Topic

Titanium Windscreen Design


Forum Posting

A Membership is required to post in the forums. Login or become a member to post in the member forums!

Home Forums Gear Forums Make Your Own Gear Titanium Windscreen Design

  • This topic is empty.
Viewing 25 posts - 1 through 25 (of 94 total)
  • Author
    Posts
  • #1298186
    Dan Yeruski
    BPL Member

    @zelph

    Locale: www.bplite.com

    Dandy Dan Durston has had an influence on me. His work with ti Windscreens and the StarLyte burners has been extensive to say the least. Thanks Dan for the inspiration and driving force.

    My windscreen desingn is a totally new concept that I conceived a couple of years ago. I could only implement it with the use of titanium to make it trail worthy. The screen is supported by 3 feet. The design alows a "Laminar Flow" of air under it toward the burner. I hope to do my final testing tomorrow. Everything seems to be in place as far as components. I have the 2 cup Foster flat bottom pot with aluminum lid.I use a stainless steel wire pot support that fits the entire diameter of the pot for the most stable support. The burner portion is the Modified StarLyte with lid.

    Total weight for the kit components so far is 67 grams or 2.3 ounces.

    What do you think, still too heavy?

    #1945148
    Bob Gross
    BPL Member

    @b-g-2-2

    Locale: Silicon Valley

    "What do you think, still too heavy?"

    Are you using 0.005" thick titanium foil?

    You are using the Fosters can to protect the titanium foil. Would there be any sense in using the titanium foil to protect the Fosters can?

    –B.G.–

    #1945153
    David Gardner
    BPL Member

    @gearmaker

    Locale: Northern California

    Very interested to read how it works, what kind of boil times & efficiency you get. The weight is awesome.

    How much clearance is there between the windscreen and the pot? Does the paperclip still work after it gets hot a few times?

    #1945217
    Dan Yeruski
    BPL Member

    @zelph

    Locale: www.bplite.com

    Hi Bob, yes I'm using 0.005 Titanium foil. I'm using the foster can for storage not protection. I used titanium because of the feet being subject to bending/breaking.

    David, I'll start off with 1/8 inch between pot and screen and then go from there.

    I can add a fuel bottle and cap to cover the pot and contents and store in a tyvek sack. That would bring it up to 3 Oz

    <center>

    </center>

    #1945260
    David Thomas
    BPL Member

    @davidinkenai

    Locale: North Woods. Far North.

    I think you're saying you've got laminar flow where it enters the bottom of the wind screen. If so (did you calc it, or do smoke traces?), fine. But just to be clear – you DON'T want laminar flow up the sides of your pot. The more turbulent that is, the better the heat transfer to the pot.

    I've had good success increasing the heat transfer with small tabs on the vertical sides of pots. Mostly through increased turbulence (read up a little on vortex generators on airplane wings) rather than the tabs or fins functioning like traditional heat-exchange tubes.

    Especially if you've got an identical Foster's can, try increasing its surface roughness with bits of foil, tiny tabs, etc. You may find a significant increase in heat transfer (if your Foster's can is mostly full of water). Ideally, the outside of the pot is rough and the inside of the windscreen is smooth. turbulence along the pot increases HX. More laminar flow along the windscreen decreases HX.

    #1945267
    Dan Yeruski
    BPL Member

    @zelph

    Locale: www.bplite.com

    David Thomas, my design is based on the findings of Tony Beasely. He has some good information on laminar flow around pots and also lots of great photos made with "shadow graph" technigue. He created a thread over at my website:

    http://www.bplite.com/viewtopic.php?f=41&t=816&p=46856#p46856

    My windscreen design is aimed at preventing air from flowing downward over the top of the windscreen. Watch this youtube video I made back in 2009:

    http://www.youtube.com/watch?v=a7mb-DU2sWY

    The design is in it's infancy. Tests are being done today. The Foster pot has ridge lines around it so I suspect there will be turbulance but the windscreen will be in close proximity with the pot.

    Thanks David for your insight on laminar/turbulant flow.

    #1945336
    Dan Yeruski
    BPL Member

    @zelph

    Locale: www.bplite.com

    Here are the results of todays test using the new windscreen, modified StarLyte burner and stainless steel pot support.

    I used 1/2 ounce of denatured alcohol throughout the test.
    Water was at approx. 68-70 degrees
    Air temp was 55 degrees in my green house.
    Small plastic medicine cup was used to measure fuel
    1/4 inch space between pot and windscreen. (Laminar flow was excellent, no radical movement of flame while burning. I am well pleased ;) )

    The first test was just to see if the 2 cups would boil with 1/2 ounce of fuel no timing was done. It boiled and continued to burn for at least 1 min. From there I started to do the stop watch routine.

    9:15 water boils, flame out at 11:00 min.

    9:14 water boils, flame out at 10:45

    8:30 water boils, flame out at 10:15

    9:40 water boils, flame out 11:30

    More testing tomorrow.

    #1945453
    Dan Yeruski
    BPL Member

    @zelph

    Locale: www.bplite.com

    David Thomas, what did you think of Toney Beaselys' shadowgraph photos?

    Here is a photobucket video that shows the flame pattern with 2 different air entry patterns on a simulated windscreen.

    http://smg.photobucket.com/albums/v228/obijiwa/Frost%20Grabber/AAA%20YEAR%202013/?action=view&current=LaminarWindsreenTechnology.mp4

    <center>

    </center>

    #1945457
    John Donewar
    BPL Member

    @newton

    Locale: Southeastern Texas

    "Especially if you've got an identical Foster's can, try increasing its surface roughness with bits of foil, tiny tabs, etc. You may find a significant increase in heat transfer (if your Foster's can is mostly full of water). Ideally, the outside of the pot is rough and the inside of the windscreen is smooth. turbulence along the pot increases HX. More laminar flow along the windscreen decreases HX."


    @Dan
    ,

    The pictures in your post and the pictures on your website look different.

    My Current Old Stock 2 cup flat bottomed Fosters pot

    Are you using the "old stock" 2 cup flat bottom cans for your tests?

    New Stock?

    The new stock 2 cup flat bottom cans appear to have more ridges than the "old stock". Three ridges on the "old stock" and 5 on the "new stock".

    Adding more ridges may make the pot stronger and increase the heat transfer as Dave suggests.

    Man I really like that see through windscreen. It may not be practical for hiking but it sure is neat for testing purposes!

    Party On,

    Newton

    #1945494
    Bob Gross
    BPL Member

    @b-g-2-2

    Locale: Silicon Valley

    "Man I really like that see through windscreen. It may not be practical for hiking but it sure is neat for testing purposes!"

    Newton, I think transparency is what happens when he gets his titanium foil so thin.

    –B.G.–

    #1945533
    Dan Yeruski
    BPL Member

    @zelph

    Locale: www.bplite.com

    "Are you using the "old stock" 2 cup flat bottom cans for your tests?"

    I'm using new atock. I have to upgrade my store photots. I had too many rejects in the original cans due to wrinkling of metal between ridges. It was cosmetic, didn't like the looks of it. 3 ridges makes the pot plenty strong. Did you notice the ridges/ruffles on the lid? The ruffles are new and will be on all lids shipped from this day forward. They fit nice and tight and allow steam to escape when it comes to full boil.http://img.photobucket.com/albums/v228/obijiwa/Frost%20Grabber/AAA%20YEAR%202013/titaniumkit005.jpg
    If I use a glove I can squeeze the top of the can(while the lid is on) to lift it up and away from the windscreen. The pot support remains on the pot because it has a little tension on it that keeps it to the raised ridge of the can bottom. Comes off easy with a flick of a finger. In my tests I used a silicone pot grabber that works nice to lift the pot up. When I do a video I'll show how it's used.

    Glad you like my transparent windscreen ;) Yesterday as the light levels diminished while I was testing I could see little waves of flames causing the hot windscreen to glow red. The glowing red actually flowed with the flame movement, it was cool.

    Tony Beasely says laminar is good and David says turbulant is good. So John, you agree with David. I'm not convinced yet. What I observed in my tests was laminar flow of heat up along side the pot/windscreen. I used a piece of tempered glass held above the pot so I could view the space between them. I could see flame moving very slowly, no turbulance. So without turbulance I was able to get great results with 1/2 ounce of fuel.

    Todays tests will give me a chance to see how keeping the windscreen 1/2" distance away from the pot has an effect on boiling.

    EDITED TO ADD: the windscreen has been heat treated to a high temperature so the "curl" of the ti when at rest is slighly larger than the diameter of the pot which makes it retain a "round" shape

    #1945575
    David Thomas
    BPL Member

    @davidinkenai

    Locale: North Woods. Far North.

    For high temperature gases, much of the heat transfer will be by radiant photons from incandescent gases – that's true in the visible range but more importantly in the infrared. In that regime, laminar or turbulent doesn't make much difference – consider view angles, reflectivity, etc to maximize radiant transfer to the pot.

    But once the gases get to lower temps, wringing out the last heat is a function of convection of air and then conduction to the pot. Turbulent flow will greatly reduce the stagnant boundary layer which insulates the pot from the hot gases.

    #1945580
    Ben C
    BPL Member

    @alexdrewreed

    Locale: Kentucky

    As usual, David is making good sense. Its consistent with my education really heat transfer and fluid dynamics. With regard to flow entering the screen, I think the low entry is good to prevent gusts from causing strong air movement inside.
    Have you ever tried a series of very small holes for air entering the windscreen? I would think small holes would dampen gusts and keep consistent airflow, which seems to be an important consideration. I would love to hear your thoughts and will test it myself too.

    #1945600
    David Gardner
    BPL Member

    @gearmaker

    Locale: Northern California

    With homage to Zelph and the old adage that imitation is the sincerest form of flattery, I whipped out a clear windscreen from a Coleman lantern glass. Brilliant!

    Tried Ben's suggestion for a lot of holes down low (104 holes @ 3/32" dia) and got good laminar flow in and up.Clear windscreen with laminar intake flow

    Like Zelph, I'm not convinced that turbulent flow of hot gases up the sides of the pot is better than laminar. With turbulence some cold fresh air is getting mixed with the hot gases. Also, with laminar flow up the sides of the pot the hot gases stay close to the pot in a boundary layer, maximizing convection and radiant heat transfer. I will try some test burns using regular Foster's cans (smooth surface) versus my brushed finished Foster's cans (rough surface) to see if I can measure a difference.Brushed finish Foster's can

    #1945608
    Dan Yeruski
    BPL Member

    @zelph

    Locale: www.bplite.com

    David, I'm beggining to see more clearly now because you said "Turbulent flow will greatly reduce the stagnant boundary layer which insulates the pot from the hot gases." In the shadow graph photo that has the least amount of turbulance I can see the boundry layer next to the pot. I can now visuallize the boundry layers being in turbulance so that maximum amount of radiant heat is transfered. I'm convinced what you say is true. Thank you.

    Ben, thanks for backing up what David said. I have tried small 1/4" holes in great quantity around the base and was not able to get enough oxygen. I had to increase the distance of the windscreen from the pot so air could come in over the top. I'll try a new approach and add 1/2" holes and keep the same 1/4" distance between screen and pot and see what happens. What I don't want to do is create a speedy updraft of hot gasses. Right now I'm getting my target fuel efficiency of 1/2 ounce of fuel per 2 cups of water.(65-70 start temp)

    I did some testing today.
    The last test I did I could see the red hot heat waves on my titanium windscreen. I did three tests and was able to boil 2 cups of 65 degree water with 1/2 ounce for all 3 tests. Sweet! Temperature in my greenhouse test area was 27 degreesF.

    Here is alink to a youtube video that will show my last test.

    YouTube video

    #1945611
    David Gardner
    BPL Member

    @gearmaker

    Locale: Northern California

    Well, rough surface definitely seems to perform better than smooth surface. Did four test boils with each pot. Air, 17 ml fuel and 500 ml water all at 58* F.

    Average time for regular Foster's can = 4:56 min.

    Average time for brushed Foster's can = 4:25 min.

    #1945619
    Dan Yeruski
    BPL Member

    @zelph

    Locale: www.bplite.com

    Just after I did the three tests I also played with the glass screen and attached the 1/2" hole add-on strip. I was pleased with what I saw. I had the foster pot on the pot support with the modified starlyte under it. Very little flame extending over the edge of the pot.

    Here is a video of it:

    http://www.youtube.com/watch?v=aLkHnbFotp4

    David Gardner, nice to have clear windscreens :-)))

    How do you support your foster pots and do you have a photo or video of the flames going up the side of the pot using the glass windscreen?

    If you put the pot directly on top of the beer bottle center how laminar are the flames going up the side of the Fosters'?

    #1945625
    David Gardner
    BPL Member

    @gearmaker

    Locale: Northern California

    Here is a picture of the flames going up the side of the pot. Flow shows better on the right where the flame is in shadow. Looks very laminar, but the roughness of the brushed surface seems to make a significant difference in heat transfer.

    The pot is supported by the center pedestal made from an aluminum air freshener bottle (the base is a 5.5 oz aluminum cat food can). The configuration of this stove creates one large flame all the way around, which flows in towards the base of the pot then out and up the sides.laminar flow

    PS: Do you prefer to be addressed as Zelph or Dan?

    #1945628
    David Thomas
    BPL Member

    @davidinkenai

    Locale: North Woods. Far North.

    >I can now visuallize the boundry layers being in turbulance so that maximum amount of radiant heat is transferred.

    Great. But a clarification: radiant heat transfer (by photons like visible and IR light), happens through and regardless of boundary layers. It is convective/conductive heat transfer that is effected so greatly by boundary layers.

    Sometimes "dead air" or boundary layers are our friends and sometimes our enemies.

    Let me give the reverse example – helpful boundary layers decreasing heat transfer:

    When we think of "wind chill" we instinctive know that high speed wind makes for more heat transfer (cold winds cool us, convection ovens cook faster). Consider the layer of air nearest your skin. Define it as the air that moving between 0% (right at your skin) and 95% of the bulk air flow (the wind). That layer is the "boundary layer". Within the layer, there is laminar flow (each infinitesimally thin sub layer sliding, unmixed, past the adjacent sublayer). As such, heat transfer is slow, just like in the "dead air space" in your sleeping pad or down jacket. i.e. very little heat transfer. As the wind speed increases, the thickness of that boundary layer decreases significantly.

    When everything is laminar, that layer is huge. At very high wind speeds, the boundary layer gets very thin and there is much more heat transfer (HX).

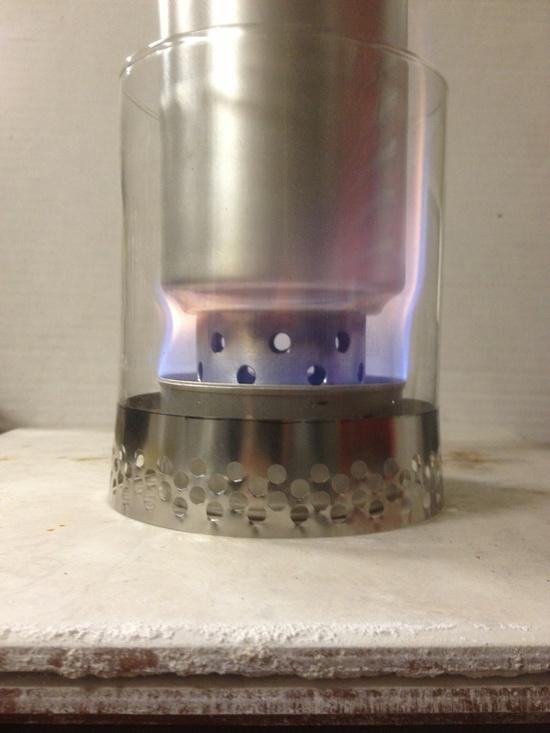
    For HX to a pot, you can't generate high speeds (unless you do a very tall chimney). But vortex generators on airplane wings "energize" or stir the boundary layer without much drag. This can be as simple as little tabs, placed 20-30 degrees to the air flow. I've done that with the very sticky aluminum tape (the REAL duct tape – that one would use on a high-temperature duct) and it significantly increase efficient for very little weight.

    Here's a video that's older than I am, but which I watched in my fluid dynamics class. Around 4:30, they give a good definition of boundary layer. There are great demonstrations of actual boundary layers under different conditions. It gets kinds of mathy, but crack a beer, and take another sip for every differential or integral sign they use. Try to follow the qualitative aspects of it and try to develop a better sense of the following concepts:

    The "no-slip" condition at the walls.

    Boundary layer thickness as a function of bulk velocity.

    How the boundary layer varies over the length of a surface.

    http://www.youtube.com/watch?v=wMxK2GtFFq0

    Flame on,
    David

    #1945639
    Ben C
    BPL Member

    @alexdrewreed

    Locale: Kentucky

    David,you are a good teacher. I assume you do it for a living. If not,you should. You gave very nice descriptions of heat transfer.
    And Dan and David, you guys are fast at the new experiments. My thoughts on the small holes was to dampen winds in the field where larger holes would let larger airflow in winds. You guys gave a good baseline on size that ought to show us what can work in windy or calm.conditions

    #1945653
    Daryl and Daryl
    BPL Member

    @lyrad1

    Locale: Pacific Northwest, USA, Earth

    David,

    I don't want to hijack this thread but after carefully reading your latest post I can't help but conclude that you are smarter, a lot smarter, than me. It reminds me of why I didn't major in any of the hard sciences in college.

    Daryl

    #1945811
    Nathan Hays
    Member

    @oroambulant

    Locale: San Francisco

    I think the heat transfer difference between smooth and rough cans could be attributed to reflectivity more than by turbulence. In all this discussion, no mention has been made of preparing the surfaces to maximize infrared heat transfer to the can. This includes the windscreen component.

    To optimize, I would want a very IR reflective windscreen and absorptive pot. Flat black anodized pot.

    I wonder if Ti performs worse than Al because of its poorer reflectivity (which it may not be at IR). And clearly (p.i.) the coleman screens don't reflect as well as Al.

    I think these points completely dominate over turbulence/laminar concerns.

    #1945824
    Ben C
    BPL Member

    @alexdrewreed

    Locale: Kentucky

    Nathan, you are no doubt correct that a flat black pot bottom can help efficiency. There was a prior thread that I know David was involved in that theorized and then tested that very premise. It was about a year ago. I painted the bottom of my Heine pot black with high temperature paint after that thread.

    I continue to believe there is a significant amount of convective heat transfer as well. That's why jetboil has the fins. I know I read another thread that David was involved in too that showed some increase heat transfer when thin metal fins were added.

    #1945831
    David Gardner
    BPL Member

    @gearmaker

    Locale: Northern California

    Nathan,

    Interesting thoughts.

    If I understand you correctly, you think the main factor in the difference in boil times between a regular Foster's can and a brushed Foster's can is because the brushed can is more IR absorbing, rather than the surface roughness. Not sure how to verify empirically. I could buff and polish the can pot so it is shiny and reflective, but that would also make it smooth.

    I have spoken to an anodizing company and they can't do a can that has not been emptied. They also cautioned that the anodizing process uses some fairly nasty chemicals that must not be consumed but which would be deposited on the inside of an empty can. I have an appointment with them tomorrow morning to see if they can even do something as thin as a beer can. If they can do it I will get at least one can anodized for experimental purposes.

    Painting flat black is easy, and I tried that in early experiments….didn't seem to make any difference. However, I will try it again under more controlled conditions.

    Will also look into other processes by which bare aluminum can be blackened.

    Will try polishing the inner surface of a windscreen too, to see if increases IR reflectivity. I use stainless steel and titanium for windscreens, so I will try one of each.

    Do you know if Ti performs worse than Al as a windscreen, and are wondering about the cause, or are you wondering if Ti actually does perform more poorly than Al for that use?

    #1945846
    Nathan Hays
    Member

    @oroambulant

    Locale: San Francisco

    Check out Caswell for diy anodizing. I'm sure you could make a rig that only anodizes the exterior. Not sure if it is worth the effort. That said, paint doesn't conduct heat so well and it is heavy…

    I only just became interested in myostoves (and made 5 different types in an afternoon – love it!) I'm moving on to the windscreen/support, so no knowledge as yet of the difference between Ti and Al wrt IR reflectiveness.

    I'm keen on building an accurate test setup that measures heat transfer in degrees/minute, not just boil times. It needs to have a consistent heat source so I'll use a cannister stove and let everything stabilize before I track the temp rise.

    I think it goes like this: Set it all up with cold water, then let the temp rise to 100 F and track time to 200 F. Needs to be stirred while rising to prevent convective hot spots, etc..

Viewing 25 posts - 1 through 25 (of 94 total)
  • You must be logged in to reply to this topic.
Forum Posting

A Membership is required to post in the forums. Login or become a member to post in the member forums!

Get the Newsletter

Get our free Handbook and Receive our weekly newsletter to see what's new at Backpacking Light!

Gear Research & Discovery Tools


Loading...