Topic

Project: 4oz 1A USB Charger

  • This topic is empty.
Viewing 25 posts - 76 through 100 (of 140 total)
PostedOct 16, 2012 at 11:31 am

I'll definitely check that site out Jack. I think I agree that Plasti-dip is probably a good spray on candidate. It wouldn't affect the components and can be easily removed if necessary. Heating up of the whole assembly isn't a concern, but localized component overheating can cause degradation and short life (inductor), so I don't think I'll go that route personally. I think a bit of silicone based dielectric grease (like you use on spark plugs and bulbs) is all I'll use to keep corrosion down. That way I'll always have access to the components and allow heat to 'get out'.

I remember etching boards from scratch :) and then adding jumpers when your mask didn't quite hold and you got a questionable trace! This board came out better than I expected, and most of the credit is due to the quality pads and soldermask. This was really fun and useful project for me. I learned tons and have something I can take with me on all my long excursions, so thanks for all the inputs and help.

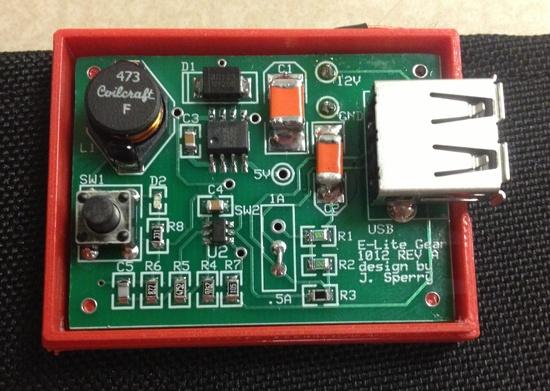
Here's the first board! Lovingly called my E-Lite Gear (pronouced EE light). Works like a charm on both .5A and 1A mode.
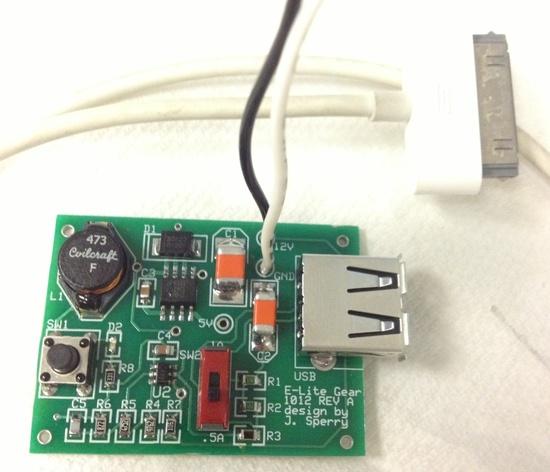
Done Board

I had a little issue with the momentary 'test switch' being a intermittent just after I cleaned the board, but it's must have just had a little cleaner or oxidation on the contacts, cause it's working great now. Actually I had a short-lived gulp when I plugged it in because I forgot that the same circuit that protects it from oscillation in low light, also delays the turn on for about 12 seconds as the cap charges up. Green is good, and this is no exception to the rule! Lighted
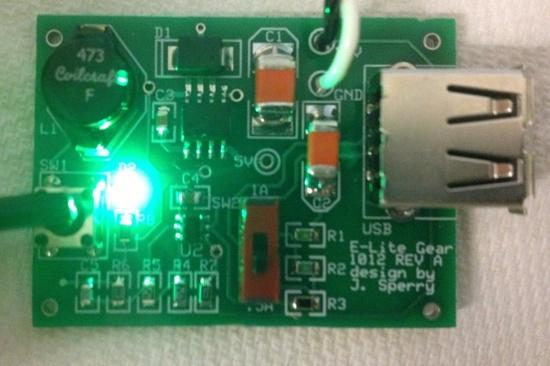
I'm going to do some more testing this week to make sure everything as expected and then I'll start putting the rest of the board together. I'll get in touch with those who've asked for one in the order they made the request as I get them done!

Next step, (forget all this talk of sprays and sealants) I'll design a snap together case for it, and have it 3D printed! A friend of mine just has something done in stereolithography and it's SWEET! so I figure all this effort should culminate in an awesome little case with the extra .2 oz I have :) Not sure I can get it done before my Nov trip, but I can try…
PostedOct 16, 2012 at 3:48 pm

The project seems to be coming along swimmingly, and looks like you'll have something to take on your GC trip. Once I get my copy of the board I'll set it with the rest of the backpacking gear for next season (gonna start snowing here and Jack don't backpack in the snow, preferring someplace warm and comfortable, like a pub, under such conditions), and in the meantime start looking for a solar panel array for something less than the $120 (or so) that the one you're using lists for.

PostedOct 18, 2012 at 6:15 am

Jack,

I'm using the 5W Powerfilm, P/N F15-300N. It's $76 bucks on Amazon shipped with a couple buy options. If memory serves (it was in an early post), it's 3.2oz stripped down. Please let me know if you find something cheaper, or more watts per oz! I used these guys in the past, so they were easy for this project. But I looked for other options and didn't come up with much that could beat it! I'm hoping someone will breakthrough with an even higher efficiently/weight panel soon and I can keep my project improving by just swapping out panels!

Jay

PostedOct 19, 2012 at 8:19 am

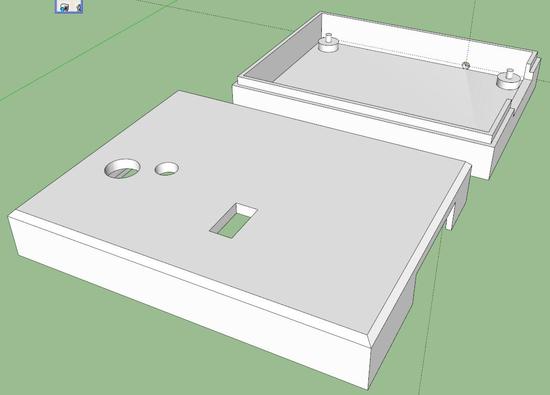
So I've got two weeks before the trip that started this project! and now that i have my board done and working. I need to finish the thought and protect it, right. You guys have thrown out lots of great ideas, but I'm old fashioned and don't like slop all over my creation, so I'm going clamshell style.

Case

This way I can, if needed, still get inside it. And although it won't be waterproof, I wasn't planning on taking it swimming.

I'm hoping to get this 3D printed quickly (times a ticking), so let me know your thoughts or suggestions! I'm looking at i.materialise.com to do the job, but I'm waiting on a quote now. And in between all this, I'm trying to get some extra boards made for all those folks who've asked for them!

PostedOct 19, 2012 at 8:42 am

That's a cool looking case. Should do the job for you. What material do you plan to make it out of?

PostedOct 22, 2012 at 9:25 am

It looks like PG-12 is NOT UV resistant. Not the best material for a Solar Panel Controller :)

I have a few options in polymide and ABS plastic that are much more durable for real-world use. Apparently, it's pretty tough to get anything on short notice, but I'm hoping to find someone who can make me a case in less than 2 weeks!

George Geist BPL Member
PostedOct 23, 2012 at 2:18 pm

> Please let me know if you find something cheaper, or more watts per oz!

Hi Jay,

I too have a 5W Powerfilm panel, and look forward to upgrading it with your board.
While looking on Amazon yesterday I stumbled on a smaller higher efficiency panel called "Strong Volt Solar: six". I have ordered one – only $29.99 on Amazon). It is 6W and about the size of the 0.6W panel you showed earlier in this thread. Manufacturer's claim is they are using 16% efficient cells. Worth checking out.

Out of the box this folding, cloth panel is 12.2 oz on my scale. I plan to put it on a diet and see how light I can get it. Will post my results and pictures when I start lightening this Strong Volt panel.

I done just a couple preliminary tests and it appears to be reaching the 1A threshold on the USB port. More tests needed to confirm.

For now your board and a striped down 5W powerfilm is the lightest watts/oz.

PostedOct 24, 2012 at 7:11 am

George, Keep us posted! Sounds interesting. I'm assuming this in NOT flexible, and the panels are susceptible to damage in a backpack? can't beat it for the price. interested to know how light you can get it stripped down too. Thanks!

George Geist BPL Member
PostedOct 24, 2012 at 8:44 pm

> Sounds interesting. I'm assuming this in NOT flexible, and the panels are susceptible to damage in a backpack?

Hi Jay,

The two 7"x7" panels on the 6W charger seem well protected. They fold facing each other and are backed by metal plates to prevent bending. I suspect that the metal plates are the majority of the 12oz and I'm considering options for replacing the metal with something nearly as stiff but a lot lighter. Unfortunately I have only been able to find carbon fiber flat plates in 4" and 6" squares, not 7" or 8".

PostedOct 25, 2012 at 4:53 am

With the high cost of carbon fiber (I love McMaster Carr though), I wonder if fiberglass would be sufficient for that purpose but save serious weight? You'd still have to probably store on the outside of your pack because I believe even a slight bend will crack the monocrystalline type solar panel. The size sounds great though. 7X7 isn't bad.

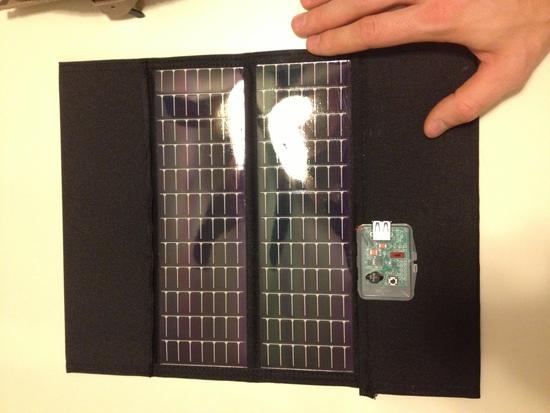
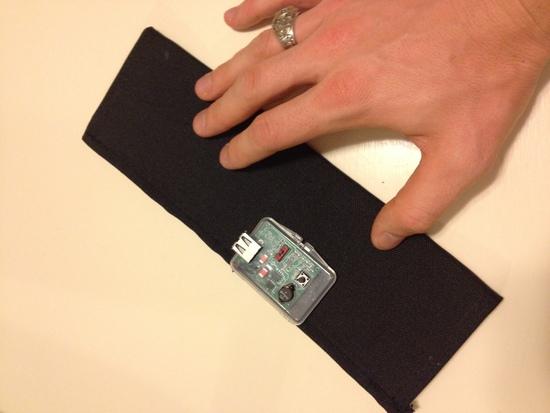
Here a pic of what I'm taking in the canyon for reference. Just waiting on a couple parts, and I can ship some board out to those who have requested them!

Found a small plastic case that tooth picks come in to give it some protection untill my 3D printed case comes in. Got it all sown up nice and use some heavy duty fabric tape to secure the case/board onto the panel.
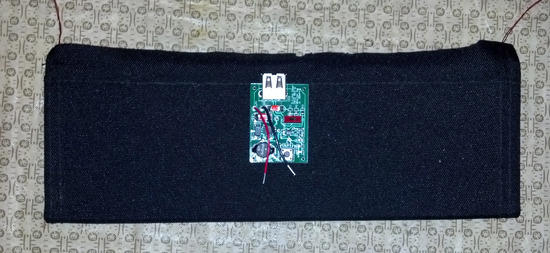
folded

There are 6 panels of course, but the end two are folded in. I wanted to show the cleaned up edges. I definitely had an easier time cleaning up the edge that I left more fabric on. Since I used the Thread Injector, it's better to leave extra and cut the excess off later that try to sew on a tiny fold. IMHO
unfolded

George Geist BPL Member
PostedOct 25, 2012 at 11:54 am

> With the high cost of carbon fiber (I love McMaster Carr though), I wonder if fiberglass would be sufficient for that purpose but save serious weight?

Fiberglass could certainly be made to work, it is just a matter of how thick it would need to be to match the rigidity of the existing 1/16" metal plates. And then determine what weight savings that thickness of fiberglass would give. Taking that thought experiment further… What do folks think about mounting the cells on two 1/2" thick 7"x7" Styrofoam sheets? With the thought of getting rigidity from thickness of the material rather than its strength. Dense, closed cell polystyrene is 1.6 lb/cu. ft. Each sheet would only be 0.3oz.

Each solar cell is small (about 2"x3") so some flex can be tolerated between cells on the 7"x7" panel and if the cells are held to the sheet by a drop of flexible silicon at their center, then they would be able to withstand much more flex without breaking, compared to mounting them flat to the sheet with glue or tape.

That said, it is hard to compete against the durability and waterproofness of the PowerFilm panels Jay is using.

I'm just thinking out loud how one might build a smaller, lightweight solar panel to hook Jay's cool board to.

George Geist BPL Member
PostedOct 27, 2012 at 5:18 pm

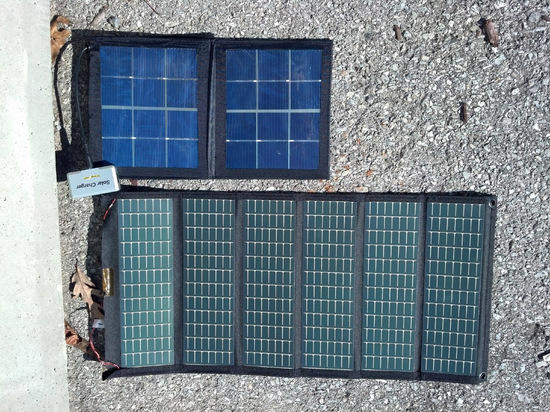
Before I began ripping the Strong Volt panel apart to lighten it, I did a head to head test against the 5W PowerFilm panel to make sure it was going to be worth my trouble. The results were surprising. I sat the panels side by side on the ground charging my Smartphone for one hour each. Side by side it is really apparent how small the Strong Volt panels are. The PowerFilm has 162 sq.in. of collector area. The Strong Volt has 52 sq.in of collector area. In the same amount of sunlight in the same amount of time the Strong Volt put in just a little over double the amount of energy as the PowerFilm panel.

OK. 1/3 the area, 2x the power, and 1/2 the cost of the PowerFilm
But several ounces heaver – seems like a worthwhile project to try to lighten the Strong Volt Solar Panel.

PostedOct 27, 2012 at 5:23 pm

Side by side picture please :)

That sounds great! So curious how far you can strip it down!

Got the last parts for my boards today. Hope to get two done tomorrow! Yours is one of them!

George Geist BPL Member
PostedOct 27, 2012 at 6:15 pm

The was some initial concern that the polycrystal solar cells in the Strong Volt panel would make it more fragile and you couldn't just stuff it down in a backpack. Now that I have tried to take it apart, let me say that the Strong Volt panel is really tough. I would go so far as to say you could drive a car over this Strong Volt Solar six panel and not break the cells.

In taking the panel apart I discovered that it is made by placing a piece of clear tape over a 0.039" thick metal plate so the cells do not short themselves by touching the plate. The 1.5"x1.5" solar cells are laid out on top of this tape in a 3 by 4 pattern. Then clear silicon is poured over the cells and metal plate, encasing the cells in a solid block of clear plastic with a metal back. There are no air gaps and the silicon flows under as well as above the cells, gluing them to the metal plate and forming protective clear window above the cells. Being soft I find the window easily gets little scratches and scuffs on it.

Starting point: I put the 6W panel on my scale and it weighed 12.3 oz.

I then proceeded to cut away all the extraneous fabric, velcro, and grommets just as Jay had done to lighten the 5W Powerfilm panel. I put the stripped down version of the Strong Volt back on the scale and it was 9.3 oz.

I felt 9.3 oz was still too heavy for my taste so I then began the process of trying to remove the metal plates and that's when I discovered that the plastic was tightly adhered to the metal under the cells. I am slowly trying to pull the two apart without damaging the solar cells. Any suggestions from anyone?

PostedNov 1, 2012 at 12:00 pm

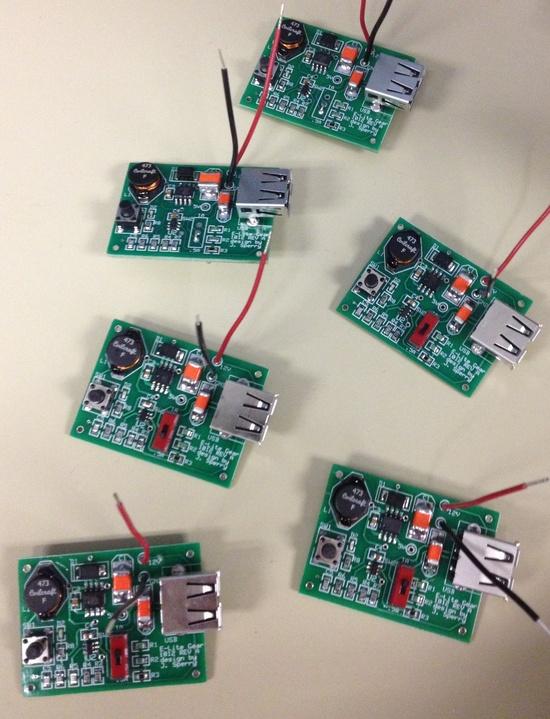
Just wanted to update on my progress. I got the last parts for the boards this week, and despite the power outage from the storm I was able to finish all of the boards!

6 boards

Unfortunately, I was short two of the SPDT switches, so until they come in, I have 2 of the 6 boards jumpered to 0.5A mode for test purposes. I'll use one for my trip since I my panel won't support the 1A mode anyway.

Board w jumper

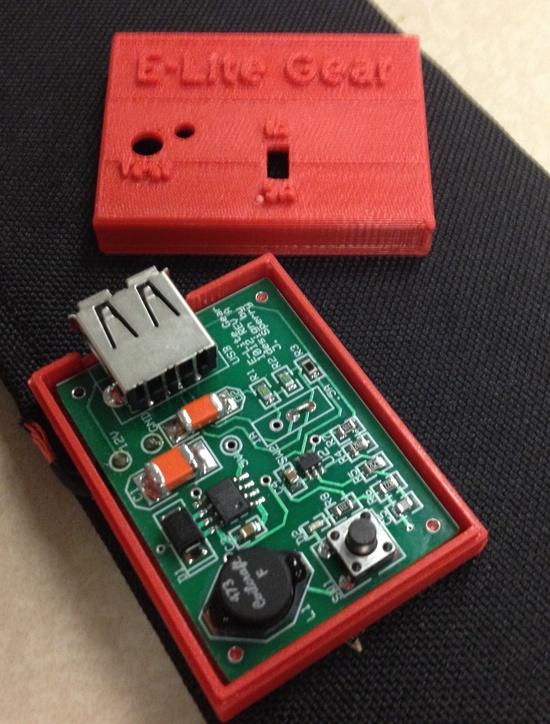
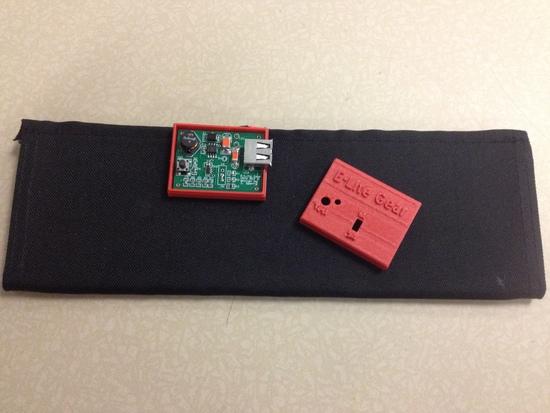
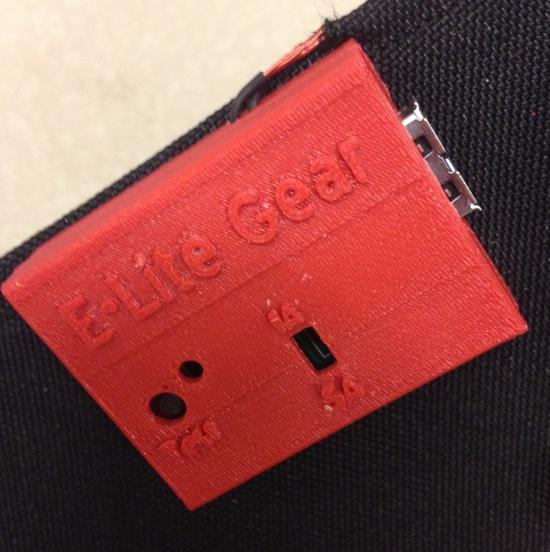
My case came in from the 3D printer too. Red ABS plastic from PartSnap.com. The resolution wasn't as good as I wanted, so the lettering didn't come up great. I'm going to have to try again with a different material because I know it can look much better, but his will be more than functional for the Grand Canyon next week!

Red Case

Everything lines up and it's super sturdy, and I have a great little 3.8oz solar panel ready to go! And I'm able to check the 10 day forecast for the Canyon and clear sunny skies are predicted for all of next week on both rims!
Full package

Everyone I've shown this too has been really excited about this, so I'll likely try to set up a website to offer it to like minded backpackers.
E-Lite Gear

Thanks to all who helped with great ideas and support! Backpackinglight is AWESOME! For those who have asked for a board, I'll get them sent out tomorrow! They've all been tested. Please let me know your feedback too, I'll be eager to hear how they treat you and what panels and cases you pair them with!

George Geist BPL Member
PostedNov 2, 2012 at 7:43 pm

> Side by side picture please :)

I got sidetracked for a few days by this pesky thing called a job.

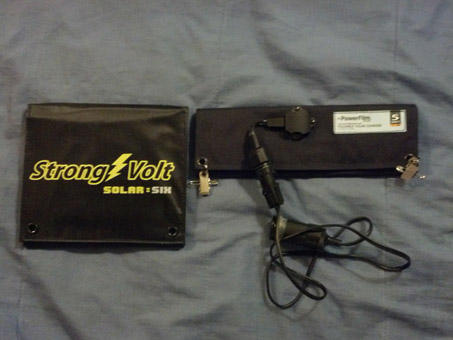
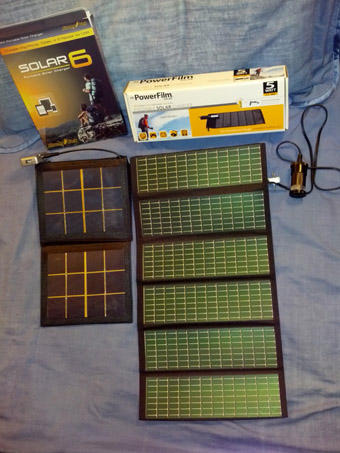
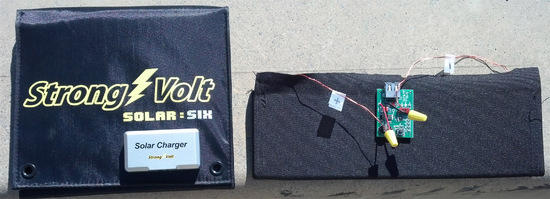
Here are the side by side pictures of the 5W Powerfilm panel verses the 6W Strong Volt panel. My earlier post gave more details of measured output and actual cell area.

Here they are folded up

Powerfilm vs Solar 6 solar panels folded

Here they are unfolded

powerfilm vs solar 6 panels unfolded

I may get some time this weekend to continue to see how light I can get the Solar 6 panels

James Marco BPL Member
PostedNov 3, 2012 at 2:52 am

"I am slowly trying to pull the two apart without damaging the solar cells. Any suggestions from anyone??"

You can try warming the cells/metal. I think this would have an overall effect on the glue. Be carefull though.

George Geist BPL Member
PostedNov 4, 2012 at 7:24 pm

Here is an update on lightening a 6W Strong Volt Panel.
Marco's suggestion turns out to be a good one.

The Solar 6 is made of two panels. Each panel has a metal plate that has a 1/16 think clear plastic poured around the solar cells and adhering to the metal plate.

The metal plate weighs 2.4 oz.
The plastic with cells embedded weighs 1.9 oz.

The first panel I tried a process of clamping the plastic face down on a flat surface and using thin shims to slowly pry the metal plate off the back of the plastic block.
The theory was to avoid flexing the plastic and cracking the solar cells. The process ALMOST worked. Two of the twelve solar cells broke. Studying what went wrong. In a couple spots the plastic that flowed under the cell stayed stuck to the metal rather than staying with the plastic block. when it pulled away from the back of the cell the cell was cracked.

I then tried Marco's suggestion on the second panel. I heated the back of the metal plate with a propane torch (slowly, carefully) testing if the plastic would release from the hot plate. Trying a little hotter each time. It released on my third try.

Hopefully this information will be helpful to other MYOG'ers

PostedNov 5, 2012 at 1:27 pm

I went out to get the mail today and had a pleasant surprise waiting for me. It was a box from the Wizard of Oz and inside was his neat little (and I emphasize little)circuit board. Very clean and detailed work. Now I just need to wire it up to the solar panels and get it in action. Thanks for the quick delivery.

George Geist BPL Member
PostedNov 6, 2012 at 9:07 am

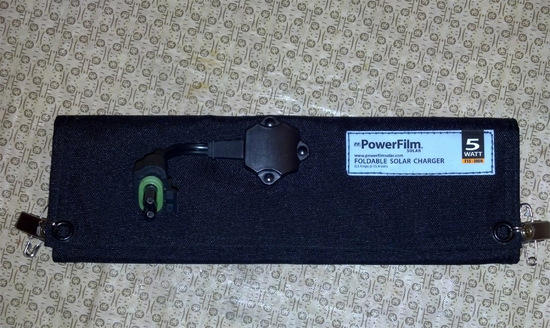
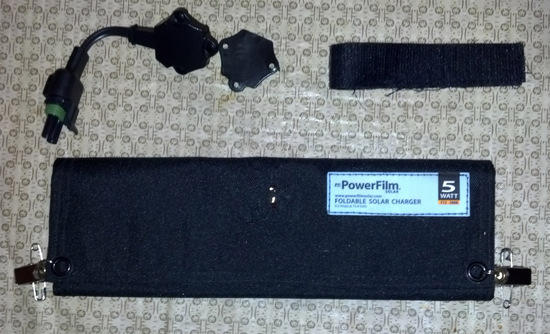
Like Rich my board from Jay came yesterday. I got so excited I started trying to build my own 4 oz USB charger from a 5W PowerFilm panel. I bought my PowerFilm several years ago and found my panel was 1.5 oz heavier than Jay's starting weight. So it looks like I'm going to end up with a 4.9 oz charger in the end.

Here the steps I took.
1. Test the panel and be sure it works before you start cutting it apart
I also weighed my untouched PowerFilm panel and it was 6.9 oz

PowerFilm panel 6.9 oz

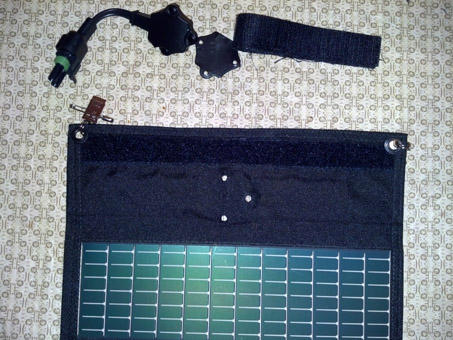
2. I used a dremel tool to remove the rivets holding the heavy plug and I removed the velcro (I found the velcro was both glued and sewn on) I put the panel back on the scale and it was 5.6 oz

PowerFilm panel 5.6 oz

3. I carefully slit the top flap to see where the wires ran, pulled them out from under their tape, and out of harms way before I prepared to cut off the top flap and grommets. I drew a line with a ruler and chalk at the bottom hole.

PowerFilm at 5.6 oz showing flap

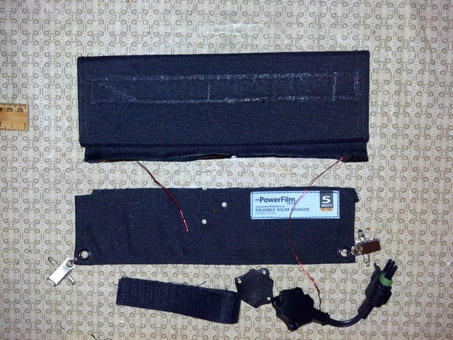
4. I cut off the top flap and put the panel back on the scale — 4.8 oz. Given I hadn't removed the bottom grommets, This is almost exactly 1.0 oz more than Jay's panel was at this same point.

PowerFilm 4.8 oz

5. I then set my new charging board about where I plan to install it and my scale reads 5.0 oz with the bottom grommets still on the panel.

PowerFilm panel 5.0 oz

My next step is to loosely wire the board in and repeat my power test head-to-head with a Solar 6 panel only this time using Jay's 90% efficient charger board. It is going to rain here the next two days. So I have to wait for the sun to come back out.

Right now I'm thinking of installing the board inside the panel (between the two layers of canvas) and build a little clear window to see the test button and light. Do folks think this will work OK?

George Geist BPL Member
PostedNov 8, 2012 at 1:57 pm

One more important tip for those following in Jay's wake and lightening the PowerFilm.
Those tiny copper wires coming out of the panel look bare, but are actually well insulated.

The sun came out today and I hooked Jay's board to my lightened PowerFilm to run some power tests and…. no green light. I hooked a volt meter across the two copper wires and got zero volts. Jay's board was fine — no power was being fed into it. What I discovered (and maybe should have guessed sooner) was that you have to scrape the copper colored insulation off the wires where you hook them to the board.

Just a heads up so the next person doesn't do the same stupid thing I did.

By the time I had the green light and was ready to test head-to-head against a Solar 6,
the sun was going down and so weak I was getting the 15 second oscillation built into Jay's board. Will try again tomorrow to do a comparison test between the PowerFilm and Strong Volt panels.

George Geist BPL Member
PostedNov 9, 2012 at 11:06 am

> Will try again tomorrow to do a comparison test between the PowerFilm and Strong Volt panels.

Jay, do you have any ideas what might be causing the board to oscillate on and off?
My 5W PowerFilm panel is feeding the board 17.3V instead of the designed for 12V. Could that cause any problem?

Here are the details from my test. Done in bright noontime sun.
The load is my Motorola Razr Maxx phone with battery about half full. Lithium batteries have a pretty flat charging curve in the middle of their range so I wanted to run my tests in this range and not have to account for non-linear effects that are sometimes seen below 20% or above 90%.

Here are the two panels folded up showing the respective charging board sitting on each.

Strong Volt and PowerFilm 5oz with charger boards shown

Here they are unfolded side-by-side in full sun to start the test.

Strong Volt and PowerFilm 5 oz unfolded

First test. My 5 oz PowerFilm: Board switch set to 0.5A. Test button shows green.
Phone plugged in at 12:00 noon with battery power level at 51%
Here is what was observed: Phone screen came on showing "charging"
Charging symbol went out after 1 second. Then 9 seconds later the charging
symbol came back on for 1 second. This cycle repeated for 5 minutes.

After 5 minutes I decided to try the 1.0A switch setting to see if this stopped or at least changed the oscillation being observed. I unplugged the phone, flipped the switch to 1.0A, pressed the test button and got a green light, then re-plugged in the phone.
The charge symbol continued to come on for 1 second, then go out for between 9-10 seconds, then come back on for 1 second. The frequency did not change for 5 minutes.

Phone unplugged at 12:10 with battery power at 48% (drain most likely caused by the screen being held on the whole time and battery charge circuits being flipped on and off in the phone.

Second test. Strong Volt Solar 6 panel
Phone plugged in at 12:12pm with batter level 48%
Screen came on showing charging, after 30 seconds screen time out blanked screen. I turned on the screen every few minutes to check that charge symbol was still on steadily. After 10 minutes I unplugged the phone.

Phone unplugged at 12:22pm with battery level 52%

Third test. My 5oz PowerFilm panel Leaving setting at 0.5A for 10 minutes.
Phone plugged in at 12:26pm with battery level at 52%
Same 1 sec charge, 9 second pause, 1 sec charge cycle observed for 10 minutes
Phone unplugged at 12:36 with battery level at 50%

So my question to Jay and the forum. Any idea what might be causing the cycling?
Any suggestions on what I might be able to do about it?

Jerry Adams BPL Member
PostedNov 11, 2012 at 4:55 pm

What is the voltage to the phone during the 1 second and 9 second periods?

What is the allowed voltage to the phone?

Viewing 25 posts - 76 through 100 (of 140 total)
Loading...