John,
Snowed in today with not much to do, so got Google to translate the page with the DYI instrunctions. Not the best, but much better than my French. Takes a minute to translate:
It's a brave new world.
Good luck!
Topic
Become a member to post in the forums.
John,
Snowed in today with not much to do, so got Google to translate the page with the DYI instrunctions. Not the best, but much better than my French. Takes a minute to translate:
It's a brave new world.
Good luck!
Sam,
I like how you spend your snow days. Thank you very much for the translation of the webpage.
Imagine that a picture with a thousand words! ;-)
Party On,
Newton
PS
I didn't see any beer commercials on the original only motorcycle commercials. Do you think that the commercial feeds are live streamed and always changing? Interestingly enough there were no commercials at all on the translated page. ;-?
John,
Didn't see any beer, just the bike, but there was a note on the bottom about Budweiser, so may have wrongly assumed it was about beer. Beer and bikes are closely related in NH culture (We have an annual "Bike Week," when civilized life is temporarily suspended, and all the yuppies become backpackers and flee into the White Mountains). There are changes for sure on the Daily Motion videos, because the first time I viewed them last year, the biker wasn't on there. Interesting about the translated page without the commercials – go figure.
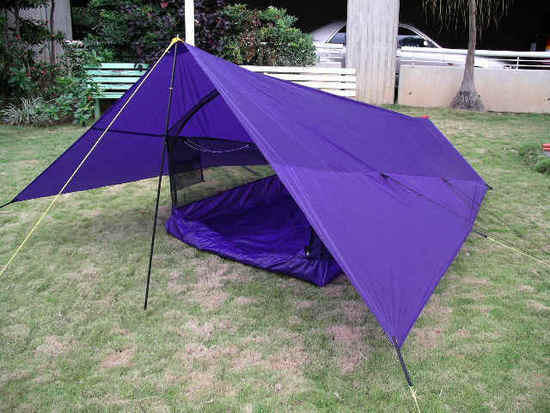
The dimensions made me wonder enough to want to do a little oregami and cut some paper to the same scale as the diagram and shape it to see what happens. Seemed like the pitched tarp would be awfully short based on the listed dimensions, expecially with a pack wedged in at the foot, as recommended. Might also cut some silnylon to the same shape to make a model with music wire and pins on one of those cheap little cork bulletin boards they sell at Staples and Walmart. Silnylon does not come wide enough to do the tarp in one piece, so there would have to be a seam somewhere, and found no clue. Maybe right over where the trekking poles fit. But will draw no conclusions without experimenting further.
In fairness, he does say right at the outset that each builder needs to alter the dimensions to fit their height and comfort. Easily adjustable length trekking poles would seem to be a must for this tarp.
This would be a great little tarp if the design works. He mentioned, if I got the translation right, that the fabrication was done by Arklight, a Canadian company that makes excellent stuff. Their X-tarp is a different design, though.
If you do make one, and it works, please post it, with some photos if possible.
A silnylon floor, attached to the sides with plastic snaps, would be nice, but would require that the tarp always be pitched to the width of the floor at any point.
Am addicted to freestanding tents, so am not a tarpologist, and only use one trekking pole; but have to admit that this tarp/tent fascinated me. If it works, the elasticity of the silnylon works in conjunction with the hoop-shaped pole to create more space inside. Prestretching the fabric might also reduce sag somewhat, together with a line-lock for tightening a front guyline. Was very impressed by the videos, and by the miniscule size of the tarp when folded and stuffed.
Bon voyage.
Hi Sam,
I’m on bit of a snow day myself right now. It’s 40 degrees with a wind chill down to 33 degrees and wet and rainy.
I’m not sure that I’ll attempt his design anytime soon. You mentioned a floor restricting the pitch to the same size every time. I don’t see that as a problem necessarily. I would think that you’d be used to it being addicted to freestanding tents. ;-)
I have actually been considering a Nightwing Tarp with a sewn in floor and noseeum mesh added as my go to shelter. The foot end could easily be closed off with a wind block of silnylon.
I now carry 12 stakes to secure my Meteor Bivy and MYOG shaped tarp. If I do the Nightwing thing I could leave the bivy and six of my stakes at home. The Nightwing would only need lines at the two ridgeline tie outs and I could use doubled over shockcord on the 4 corner staking points to allow for the stretch of the silnylon.
The above embedded link goes directly to the DIY page of Ron Moak’s Six Moon Designs website where the pattern of the Nightwing is downloadable.
Any thoughts, comments, warnings? ;-)
Party On,
Newton
John,
Well, you could leave most of the stakes behind with Oli's tent also, and it would be much easier to make. Maybe two pieces of silnylon, three max, (not counting reinforcement patches) and no catenary seam to deal with.
In the picture of the Nightwing, there is one pole at the front, right in the middle of the entrance. There is also a reference to a "tripod" design, so I'm not sure if it is intended to have an A-frame entrance or not. But if not, not so good. With the tarp wall coming right down to the ground, there will be plenty of condensation on it, and if you have to squeeze around that pole in the front, you will get many doses of it. Oli was camping on the arctic tundra, where the winds probably helped a lot with the condensation.
This brings to mind that Oli's tarp also comes all the way to the ground, with no ventilation in the rear. There was a reference in his article to a link concerning dealing with condensation. Might be worth following up. Raises the question whether any tarp that is not raised off the ground can be livable. Used to call them 'tube tents.' A friend purchased a 6MD pyramid (Oasis?) tent that she felt was a steam bath, especially in the rain, partly because her hiking pole did not extend long enough to lift the tent so that the bottom edges of the walls were suspended well off the ground, as the design allowed. So for hiking around here, I think Oli's tent would also have to have some kind of ventilation designed in the rear, as the Nightwing does. Whatever you decide, you might want to consider keeping the bottom edges of the walls off the ground, with some netting underneath between the floor wall and the canopy, as in the Oasis, many Tarptents, and the GG One.
Suggest caution purchasing silnylon if you don't have any of the oldy but goody "wet look" stuff that Roger Caffin talks about. I think the Thru-Hiker and Quest first stuff is probably OK, but is not as good as the old stuff, and some of the silnylon currently sold leaks, Rockywood's 'utrasil' and some seconds I have purchased from OWF being just two examples. Eventually we will have a very light WPB fabric that is very air permeable and water resistant, and all these concerns will be history. The Columbia treatment described in the latest BPL fabric article sounds promising; but Columbia is not exactly on the cutting edge of lightweight development.
The talk about snowloading left me cold. Any piece of fabric suspended from two points over that long a distance is going to be more limited in ability to deflect snow, or driving rain for that matter. Don't think people always realize the force created by wind driven rain – some of the shower test links on the Luxe website show what it can do to even a multi-pole dome tent. The A-frame pole setup on Oli's tent will do better shedding rain and snow in the front; and the hoop, while presenting a less peaked surface toward the rear, shortens the length of unsupported ridgeline and appears to keep the canopy really taut. Or maybe you could put one of Oli's elongated hoops under the middle of the Nightwing.
The 6MD design does have the advantage of providing a complete pattern with all the pieces laid out exactly – no guesswork or need to calculate the catenary cut or the shape of the pieces. Suppose your choice should be guided by how much experience you have with shaped tarp fabrication.
Recently purchased a pair of LL Bean alu/carbon snowshoe poles, a new product made by Komperdell, because they were under 8 oz each, better designed and a lot sturdier than my old poles of similar weight, all carbons also made by Komperdell. Know that 7-8 oz is quite heavy compared to some of the poles available, but the weight does not bother me in the least, and I like having something as sturdy as possible.
The reason I mention these poles is that they extend to a really long length, around a max of 57" if I recall correctly, and would make a great A-frame front for a tarptent with a quite large entrance. Downside is they don't telescope very short, which is not an issue for me, as I drive cross-country – no airplanes for me anymore; and only use one pole anyway, so as to keep the other hand free to hold the leashes for one or both of my shelties.
Also think a snapped in floor is good, especially if there is no netting between the floor and the tarp wall, because it can allow a little ventilation between the tarp wall and the floor between the snaps. Also makes for easy replacement when the light weight floor wears out, as they are bound to do. Used a snapped in floor once, and had no problem with bugs crawling in between the floor and the tarp wall. We used netting suspended over our beds in the service, and the mosquitos were not smart enough to crawl in under it at the bottom. Although they did just that at my home when there was a half inch gap at the top of a screen door. Fixed it.
I think you were one of those on another thread who advised against overdoing the planning and just getting projects done. Whatever you decide on, good luck with it.
Sam,
I have also considered this as a shelter project. I don't believe there would be much of a condensation problem with this shelter.
From what I've read about it so far it seems that it can button up well against wind and blown in rain. I could still leave 4 of my 12 stakes at home. ;-)
Actually I have been toying with the idea of using shockcord to "locate" my Meteor bivy under my current shaped tarp. The idea is to use the 4 tieouts on my bivy, the 4 corner tieouts on my tarp and 4 pieces of shockcord to locate the bivy under the tarp. It would be something off an X with the bivy being the center of the X.
Party On,
Newton
John,
Yes, that is the Quest Bilgy you mentioned before. But the dimension given by Quest is 121" long (ridgeline), or only one inch longer than the dimension you gave for the tarp you have. ???
Also wonder if it would really pitch as taut as in the picture without catenary cut.
Maybe you could make a bug tent like the Bilgy one and use it under your current tarp, suspended from loops, and with the 4 corners of the floor connected to the tarp stakes with the X design you mentioned for your bivy. If you have to add any ties to your tarp where there is no seam, bond silnylon reinforcement patches with SilNet first (see article recently republished on this site – clamping is good if you can do it) over the spot where you will be sewing on a loop.
If the rear of the bug tent is made in a triangle, you could have silnylon right-triangle panels that are usually rolled up and tied for ventilation, but zip or velcro shut over the rear when the rain gets heavy; thus allowing you to place the bug tent well back from the front of tarp to have plenty of front overhang for rain protection.
Then all you'd have to do is make the bug tent, and figure a way to pitch your current tarp with less stakes. Maybe an A-frame using your extended trekking poles attached at the front would help with that, provide a more stable structure, and easier entry and exit. You could still have space between the front corners and the cord attachment to the pole ends, for ventilation. You would have to carry an extra pole for the back, however. Maybe something made with some @ half inch carbon tube from Goodwinds, with smaller tube for ferrules. Someone posted a while back that he made a very light such pole with carbon from used golf clubs purchased for almost nothing.
Was out snowshoeing today, and the wonderful LL Bean pole I mentioned was slipping. Seems the Black Diamond type of external lock may be the only thing that really works, on aluminum anyway. May try somehow to give a rougher texture to the outer surface of Komperdell "duo-locks" on the Bean poles. Your biggest investment might turn out to be trekking poles that shorten enough for hiking, but extend well over the 50" that is 1/2 the front dimension of your tarp.
Party on, Newton.
Become a member to post in the forums.
advertisement

Discover deals from 90+ small outdoor brands during Garage Grown Gear’s Small Business Sales Week.
 Loading...