Topic

10.5 oz Cuben Fiber / Xpac Backpack

  • This topic is empty.
Viewing 25 posts - 1 through 25 (of 27 total)
PostedJan 19, 2011 at 7:11 pm

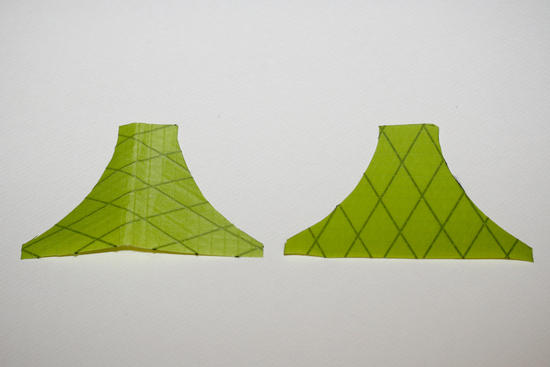
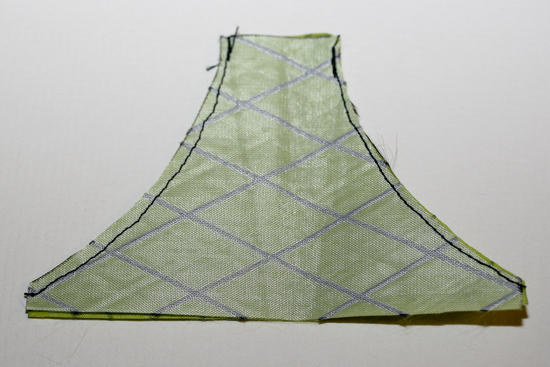
Well I got some more materials to play around with, some more Xpac and some cuben fiber to try out. This was the first time I have ever seen or played with this stuff. My wife thought I bought a big sheet of waxed paper and was like your going to make a pack out of that? Then I handed her a scrap and told her to tear it, I myself was surprised by the strength of this material. It is some really some neat stuff. The one thing that I was concerned about is the puncture marks that are left from sewing. So I wanted to make sure that I made a pack that was going to minimize the stress to the seams of the cuben fiber. So I wanted to incorporate some Xpac material to give the pack some structure and protection to the high abrasion areas. Plus I don’t know that I have seen any other cuben fiber & Xpac backpack. The pack weighs in at a little over 10.5oz and has a volume of 2500 cu in.FrontFront SidesideBack

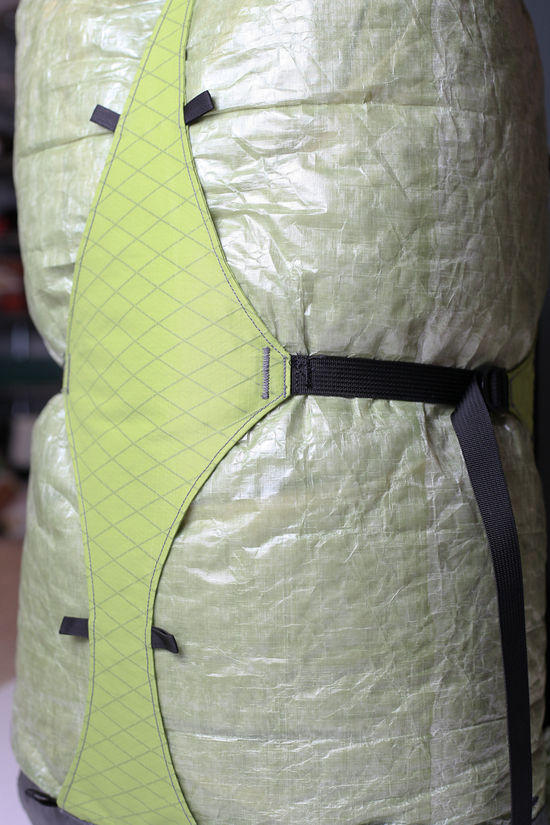
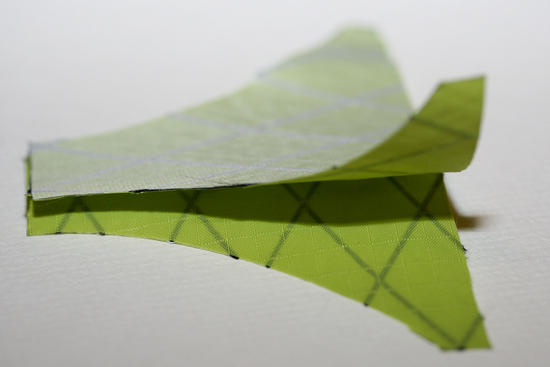
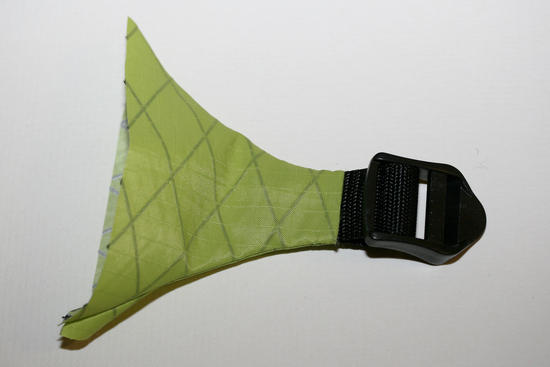
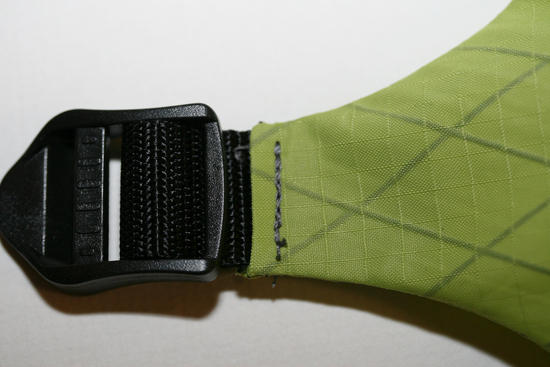
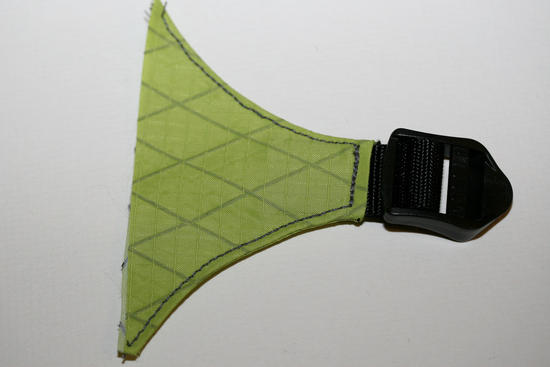
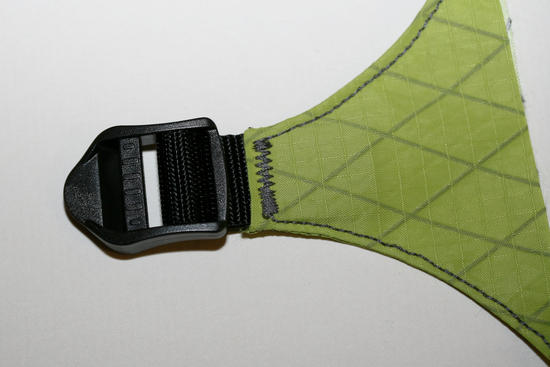
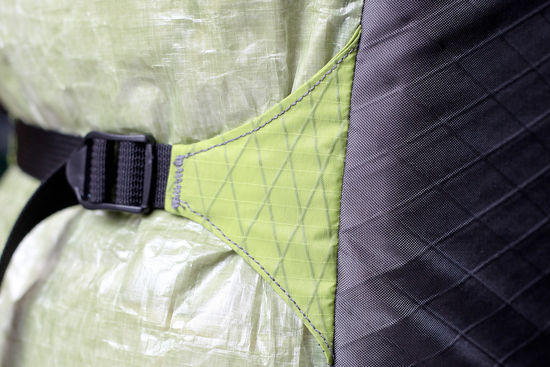
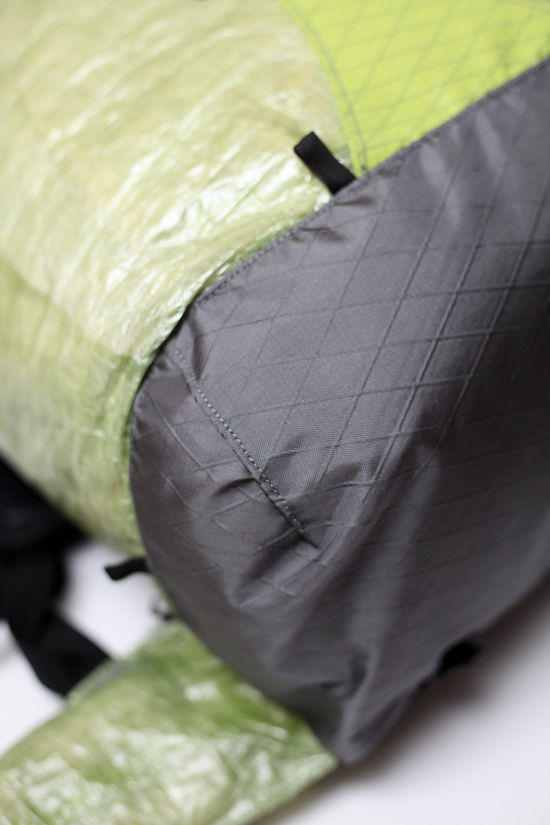
I wanted to try and keep this pack as light as possible, but also be as durable as possible. I’m not always the easiest on gear, and want to make something that will last, but hey I am using $30 yd material so let’s try and keep it on the light side. So I made the main body out of the cuben fiber. I wanted to keep the seams in the cuben fiber to a minimum to prevent any tearing or fraying, so the only seams in this pack are where it attaches to the Xpac back and body. I also wanted to reduce the stress on the seams so I made the spade looking strap connect on the front to act as compression straps as well as reduce any pulling on the cuben fiber by itself which I hope will make the pack last longer. The straps coming off the spade are connected to a triangular piece of Xpac. On my previous packs I just sewed the webbing into the seams, which can be hard to sew through and all the stress of the strap is in that one area of the seam. By making the triangle strap connection piece it should spread the stress of the strap out a little. So when everything is tightened down it is really only Xpac pulling on Xpac. Strap CloseupTri Strap

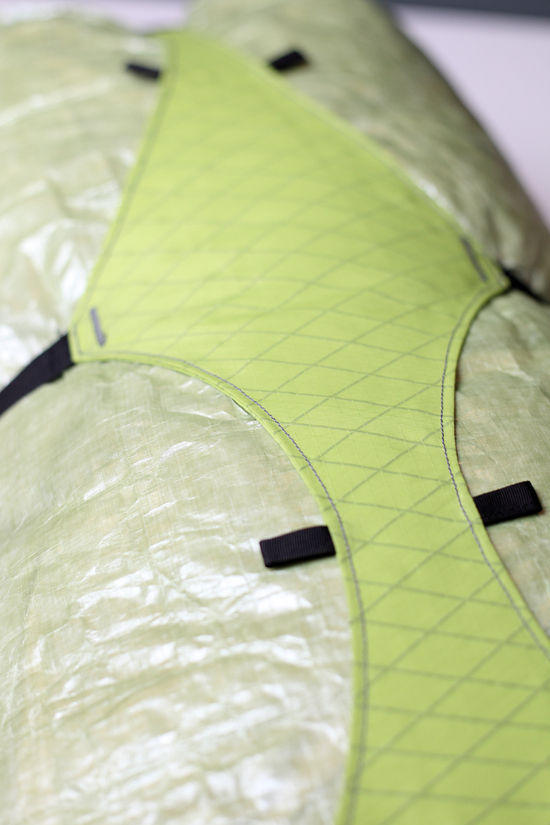
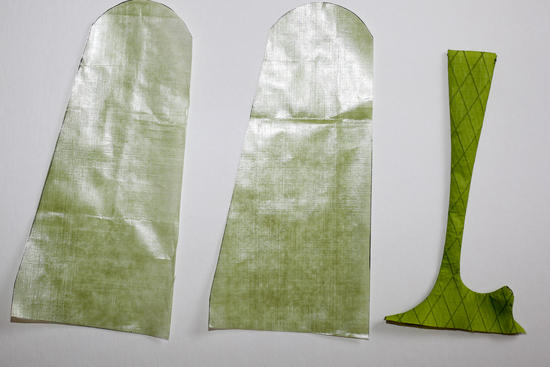
I made the bottom of the pack out of 1 piece of Xpac, there are just two short seam lines on the two front corners to create a curved bottom. My thought for this was to reduce the number of seams which would help reduce weight, but will also help keep the pack more waterproof with fewer holes. It also makes the pack look less squared off on the bottom, which I personally like the looks of. Bottom Bottom Closeup
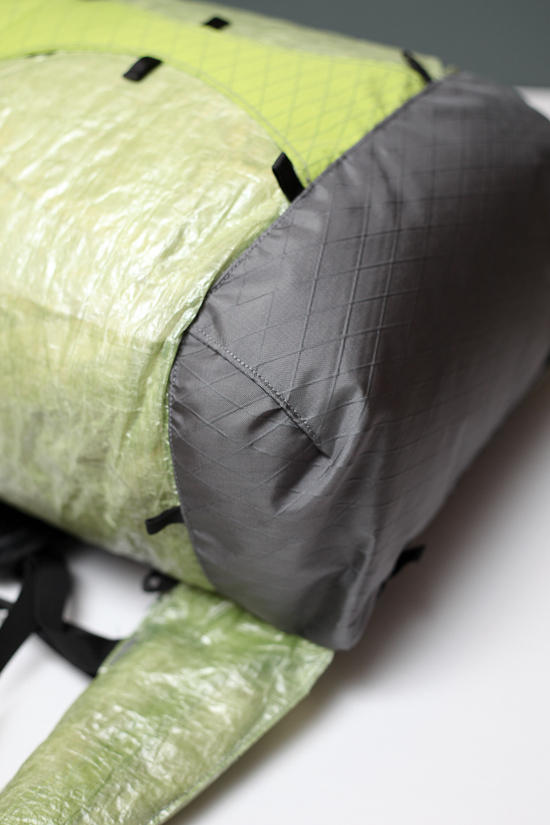
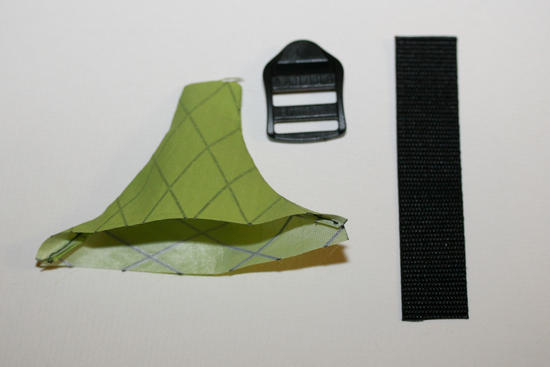
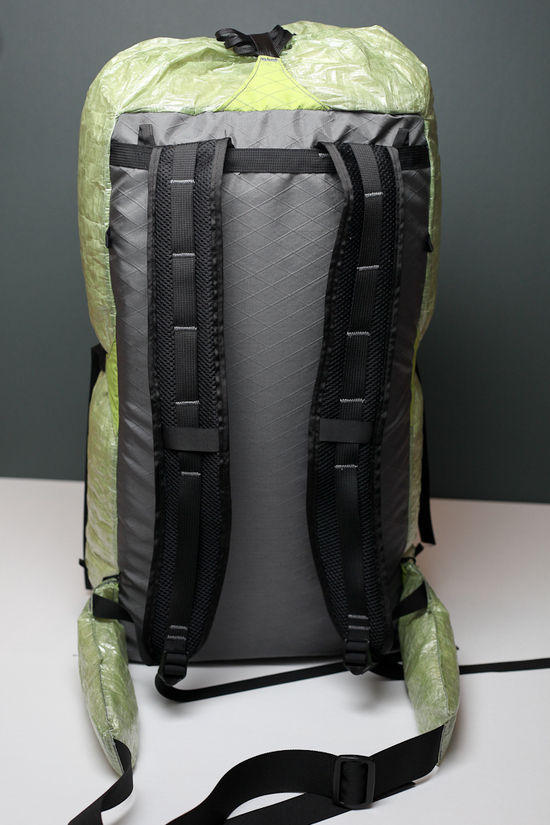
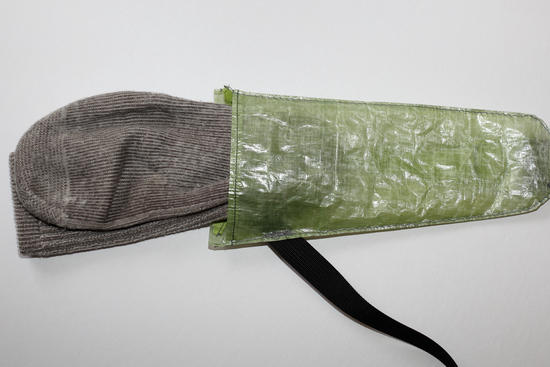
For the hip straps I came up with a different setup then what I have been using. I really just wanted to try something different and see what would happen. I used a piece of Xpac to create a 1 piece connection for the 1.5” hip belt webbing and the 3/4” shoulder webbing. I then used cuben fiber to give the hip pads some with and to create a pocket to stuff some socks in to add padding to the belt. One smartwool sock folded in half fits in the pocket nicely and adds some nice padding. I wanted to keep from having to use any Velcro or zippers so I put the pocket on the inside of the hip belt with the opening toward the back of the pack. This way the sock or towel should not be able to slip out. Hip BeltHip Belt CloseupHip Belt with sock

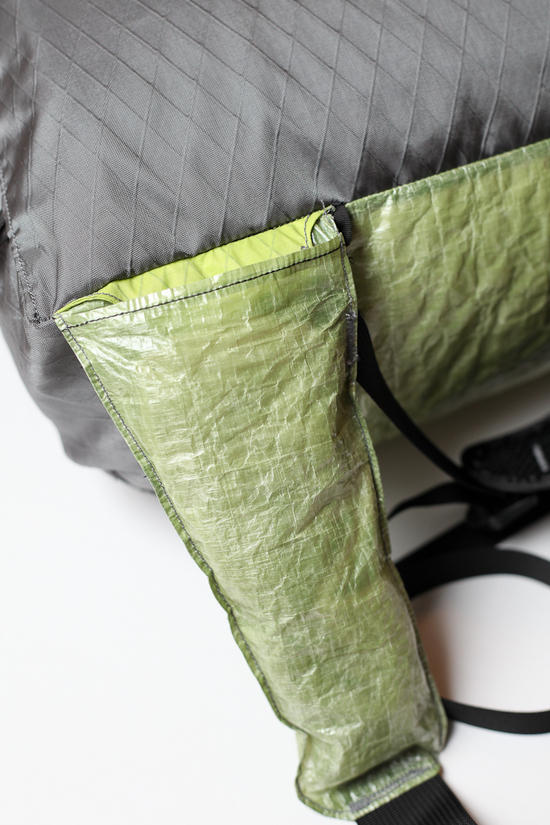
In all I am happy with the way the pack turned out. Sure I could have left some items off the pack to reduce the weight, but I feel that the items that are on there serve a purpose. Please feel free to ask any questions about the design, methods and materials used.

Chris

PostedJan 19, 2011 at 7:14 pm

Okay, I have a question. When are you going to start taking orders?

Your packs are really sweet. Congrats.

And I'm serious about the taking orders thing. ;-)

John Donewar BPL Member
PostedJan 19, 2011 at 7:29 pm

Chris,

You continue to amaze all in the MYOG community. ;-)

I am impressed by the ingenuity of the sock pocket in your hip belt design. Have you taken it out for a test run yet? How stable is the hip belt? When I tried something similar in my pack shoulder straps they tended to roll around and I had to revert to ccf padding. ;-(

I think your combination and contrast of materials is very impressive.

Great work!

Party On,

Newton

PostedJan 19, 2011 at 8:30 pm

Your packs are incredible!

What if you made this a drybag pack! That would be incredible! You're almost there, the cuben is only attached at one point! Throw some arrow shafts in there and you have a killer drybag!!!

Please make one!

EXCLAMATION POINTS!!!

Konrad . BPL Member
PostedJan 19, 2011 at 9:13 pm

Chris, I'm glad to starting working with cuben! It gets better and better. I'm really digging this one

So I unboxed my sewing machine and its been very very fun. Let's just say I have a lot of stuffsacks right now :D.

I have a quick, stupid question for you or any skilled sewer for that matter. On your spade shaped xpac piece…how do you sew curves like that? I imagine you cut the 2 exact spade shaped pieces, with room for the seam tolerance. But then what? Do you start it like a stuff sack and sew the seams from the inside and then flip it inside out so that the rightside of the fabric is facing out? My other big question is does anyone have tips for sewing curves. Such as the curve in the spade, or the end of the hipbelt. I have a hard enough time making sure I have a straight even stitch. Do you all just work slowly, and pull the fabric at an angle as it feeds underneath the foot? Are you guys using a clear foot? Thanks

PostedJan 19, 2011 at 9:25 pm

You have mastered the curves! I avoid them because I don't know if I could do them. I know I couldn't do them as well as you. Really adds to the look.

PostedJan 20, 2011 at 7:58 am

Douglas – My wife would be more then happy to see me make a pack that was not going to stay here and take up space, and I would love to have an excuse to have to make more packs, so orders will be taken at anytime ;-)

Newton – I was wearing it around last night and did not have any issue with the socks rolling around. I wanted to make the pocket for the socks big enough so that I could just fold a sock in half so it would be as flat as possible. Plus with the xpac connection piece, inside the cuben pocket, attached to the webbing and to the backpack acts like a compression strap and does a good job of keeping the sock in place.

Tyler – Your wish is my command… My original thought for this pack was to make a dry bag pack out of the cuben. I will have to revisit this idea and see what I can come up with.

Konrad – Glad to hear you got that puppy unboxed; you can never have enough stuff sacks! As for your question, yes I cut 2 of the same spade shapes out and put the right sides (the green sides) facing each other. I then sew them around the boarder like you would with a stuff sack. I then turn the piece inside out and run an iron over it to flatten out the edges. I then sew in my webbing and any buckles and then I sew another line on the out side edge of the fabric. As for sewing curves, just go slow, sometimes it is just a stitch at a time on aggressive curves. I also try and find a point on the front of my sewing machine foot and keep the edge of the fabric lined up with that. The curve on the spade was no where near as hard as the curve on the hipbelt, I got a little carried away with that idea. Curves are addictive though, once you start it is hard to stop! The foot I use is just a regular metal foot that came standard on my singer.

Daryl – Don’t avoid the curves! Squish them under your machines foot and stomp down on that pedal and show them whose boss!

Matt F BPL Member
PostedJan 20, 2011 at 9:03 am

Christopher – I'll add my compliments onto the heaps of praise you've already received. good stuff.

Also, could you describe the materials and process of making your shoulder straps? I like the design, and want to come up with a light, clean and relatively simple shoulder strap design or method for some upcoming projects. I've only made two so far, but I think packs are really a gratifying thing to make because they are so customizable and you can grind one out in a day.

thanks,

Matt

Jared Dilg BPL Member
PostedJan 20, 2011 at 9:34 am

Christopher,

You should seriously consider getting an industrial machine if you haven't already and start selling these packs! You've obviously got the knack for gear-building.

Oh, I found your photography site – excellent work! I see how your photographic eye applies to gear design as well.

PostedJan 20, 2011 at 10:58 am

I second the request for more detail on shoulder strap materials–what mesh did you use and what edging?

This is terrific work.

PostedJan 20, 2011 at 11:42 am

Sure I'll be more then happy to show you guys how I put them together. Let me get some photos together when I get home and I will post something later this evening.

PostedJan 20, 2011 at 11:55 am

This is definitely my favorite pack of yours so far. I really like the simplicity of this one, yet you have some great useful details. I love the loops for shock cord to lash things and/or compression. Its the small well thought out details like that in your project that always gets my attention.

PostedJan 20, 2011 at 4:31 pm

Seriously, these are great. I just started the MYOG journey with a fleece jacket for my dog (complete with seam on the side so it doesn't rub with his backpack) and am really anxious to start working with nylon and then even lighter fabrics. Is there any advice you would offer a brand new sewer starting their first backpack? Like the seams you were talking about with Konrad, could you explain that more fully? I was trying to picture exactly what was being discussed but couldn't. Thanks in advance and awesome products!

PostedJan 21, 2011 at 4:21 pm

Hey Chris and anyone else out there here is my step by step process for sewing the spade and triangle strap connections together.

Step 1: Cut 2 of the same pieces out.Step 1

Step 2:Put the 2 pieces with the right side facing each other.Step 2

Step 3: Run a line up each side, try and stay as true to the curve as possible.Step 3

Step 4:Turn it right side out, you can run an iron over it if it will not stay flat.Step 4

Step 5:I get my other pieces ready, such as webbing and ladderlocs. Step 5

Step 6: I thread the webbing through the ladder and make sure the ends of the webbing are even. I then insert the webbing into the small hole and run a line to hold it in place.Step 6Step 6 closeup

Step 7: I change out the thread to a heavier thread in a complimentary color and run a stitch around the outside. Try and keep this one as nice as possible because everyone is going to be able to see it. There never perfect though…Step 7

Step 8: The final step, just add a zig-zag stitch over the first line you stitched in step 6.Step 9

and that is it, I use the same steps on my bigger pieces as well. Hope this helps, and let me know if you have any questions

Chris

PostedJan 21, 2011 at 4:43 pm

Chris,

Awesome instruction, seriously, you are going to save me, (and I'm sure others) a great deal of trouble and wasted material. I was actually sitting in the fabric store today contemplating how to sew these, and now my questions are answered. Just wondering, was it difficult sewing the giant spade and then flipping it inside out? It looks like that would have been complicated. Thanks for the enlightenment though, these processes may seem simplistic to pros, but to those of us who have no experience, the are truly helpful.

Chris

PostedJan 21, 2011 at 5:06 pm

It can get tricky when you try and fit a bigger section of material through a small section. You have to make sure you don't get the fabric balled up when you are trying to work it through, I sometimes use the bottom round end of a sharpie to help push the fabric through. Just get some cheap fabric to try it out first and get some practice.

Chris

PostedJan 31, 2011 at 1:58 pm

Chris ,
Very innovative and simplistic design that's all function uses one piece of cloth for the front and sides of the pack and pocket. Less seams than traditional 4 sided pack design . I going to build one out of X pack and thru hiker grid stop. Love the pocket beaver tail closer.

One teak to the design to keep the pack water proof you could add a top flap pocket or just a round disc like a stuff sack.

Thank you very much for sharing.
Terry

Paul Johnson BPL Member
PostedFeb 8, 2012 at 1:27 pm

What weight thread did you use for the main back panel to pack body seams?

I am having difficulty with heavier threads and contemplating using standard weight 100% polyester Gutermann for a Cuben pack. Is this a mistake?

Also are you finishing these seams with grosgrain internally?

John Donewar BPL Member
PostedFeb 8, 2012 at 2:16 pm

John,

This is an older “thread”, no pun intended. ;-)

Terry’s post directly above yours is dated 1/31/2011.

You can email Chris directly here.

You can also use the PM system on BPL by clicking on Chris’s avatar and then clicking on the PM link on his bio info page.

Chris is a really good guy and readily helps out with answers to MYOG questions.

I hope this helps.

Party On,

Newton

PostedFeb 8, 2012 at 2:32 pm

Hey John,

For that pack I used Gutermann heavy duty thread or Gutermann upholstery thread. You can by all means use standard thread, but I just don't know how strong the seams would be or how long they would last. What kind of problems are you having with the thicker thread? I do use grossgrain on the inside seams, another thing I do to make the seams stronger is double my seam allowances and fold the edges of the cuben over to double up the cuben at the seam. Let me know if you have any other questions.

Paul Johnson BPL Member
PostedFeb 9, 2012 at 12:52 am

When I use the thicker thread the stitch doesn't pull up into the fabric. When I tighten the thread tension all the way to the highest tension to correct the stitch gets better, but the bobbin thread is still somewhat flat on the lower surface and I can feel where the top thread comes over the bottom thread rather than pulling the stitch back into the fabric.

I practiced making shoulder straps tonight and simply stitched the wrong sides together and then turned inside out. The stitching was very week due to small seam allowance and no grosgrain. My next plan is to stitch right side out and wrap with grosgrain.

John Donewar BPL Member
PostedFeb 9, 2012 at 3:42 am

John,

"I am having difficulty with heavier threads and contemplating using standard weight 100% polyester Gutermann for a Cuben pack".

"When I use the thicker thread the stitch doesn't pull up into the fabric. When I tighten the thread tension all the way to the highest tension to correct the stitch gets better, but the bobbin thread is still somewhat flat on the lower surface and I can feel where the top thread comes over the bottom thread rather than pulling the stitch back into the fabric".

What size sewing needle are you using in your machine?

I've experienced some difficulty with the heavier weight threads and a sewing machine needle sized too small. The heavier thread was "abrading" itself on the material because the hole being made by the needle was not large enough. At slower speeds the problem wasn't as pronounced as it was at higher speeds.

It sounds like you are adjusting the thread tension on the top side. Are you adjusting the bobbin's thread tension also?

If you have a manual for your machine it may give you the instructions for adjusting the bobbin thread tension. It is something of a balancing act getting the thread tension adjusted correctly on the top and bottom.

Sewing machine manuals are available online and some can be viewed and or downloaded for free. Just Google your sewing machine's make and model.

I hope this helps. ;-)

Party On,

Newton

CW BPL Member
PostedFeb 9, 2012 at 3:48 am

Standard home machines generally shouldn't use anything higher than a V-69 thread. Industrials, on the other hand, can generally run V-92 or even V-138.

PostedFeb 9, 2012 at 5:02 am

Yeah like Newton said try adjusting your bobbins tensions and use a bigger needle like size 16 at least. The machine I used to build that pack was a $150 Singer home machine that I got form JoAnn Fabrics so my machine was just a standard home machine. It sounds like you have a tension issue and just need to tweak around with it until you get it dialed in.

Ken Thompson BPL Member
PostedFeb 9, 2012 at 5:27 am

Did your sewing machine come with a basting stitch bobbin case? These have a black portion instead of being all chromed. The spring is set up to be looser that the standard case. This allows me to run the larger diameter thread, and have some tension adjustment.

This is a regular one

bobbin

Viewing 25 posts - 1 through 25 (of 27 total)
Loading...