I was using a web based flash version of MS Paint and the darn thing wouldn't let me use the text function so I had to draw it out. I'm glad you like it.
Topic
HMG Echo I – Initial Impressions
Become a member to post in the forums.
- This topic is empty.
I think it would be great if BPL did a comparison of these, and other double walled shelters. Of course, since a lot of these are interchangeable, you couldn't cover all of the combinations, but I would imagine that you could cover a bunch. You could also just ask various makers to recommend a few ideas and see how they compare. For example, ask Ron Bell for double walled tent ideas and see what he recommends.
One possible advantage of the Echo 1 is that the inner tent may have higher walls on the bottom. I'm not sure of this, but if so, then it would provide a little more protection from breezes. This is one of the advantages of a double walled tent (in that it doesn't need the ventilation down there). This could make it a bit more comfortable.
One thing I wonder about, is the setup of the inner tent on the Echo 1. The pictures on the HMG web site show the lower walls of the inner tent as being vertical. However, in your pictures, Dan, they seem to flair out a bit. This may, actually be an improvement (for the reasons you mentioned) but it might explain the difference in height. It doesn't explain the difference in width, though.
I know sil is "functionally" waterproof and for all intents and purposes in our world works fine as a shelter. I was only stating that Cuben is the only material in use that's 100% waterproof.
"One thing I wonder about, is the setup of the inner tent on the Echo 1. The pictures on the HMG web site show the lower walls of the inner tent as being vertical. However, in your pictures, Dan, they seem to flair out a bit. This may, actually be an improvement (for the reasons you mentioned) but it might explain the difference in height. It doesn't explain the difference in width, though."
Good observation. It does seem that there is a relationship between pulling the walls out wider and that reducing the height. If I had a bit less tension on the bungie cordage pulling the inner outwards, I may have found that missing 1" of height.
It could also be though that my sidewalls were only flared out because the pictures were taken with the door open. A lot of my observations I made after the fact when looking at the pictures. If I were to zip the door shut that may pull the walls vertical at the front of the inner. The pictures show the foot end of the inner not being flared out.
Great write-up, Dan!
I've been holding off on doing one of these until I get the pitch right — I believe that I'm experiencing a loss in tension in the tarp when I put the beak on because I don't have the geometry right.
What ends up happening is that getting a taught pitch with the tarp is a piece of cake, but in order to get the corners of the beak to reach the corners of the tarp I have to loosen the tarp's corner tieouts a little bit.
I'm planning on a 2-night outing next weekend, and hopefully get the geometry right this time :)
I'd also echo (no pun intended) Dan in suggesting that putting up a PDF with some pitching advice would be helpful. The tarp itself and the insert aren't any trouble at all, but the beak isn't as flexible as the insert, probably because it's designed to seal off the front with enough overlap to ensure that it will keep water out of the vestibule.
BTW, to keep the beak door open when the insert was in place, I just slipped it into the gap between the tarp and the insert.
Hmm…so if I understand correctly the corner snaps on your beak don't quite reach to the corner snaps of the tarp, so you need to slacken the tarp a bit to get the snaps done up.
If just one side doesn't quite reach then you could shift the whole beak to that side a smidge by repositioning the velcro. If both sides don't reach then that may be the distances are slightly off spec and there's not much you can do about it. It could also be that you are wrapping the velcro around the pole too tightly which makes the beak snaps not reach. Maybe try doing up the snaps first and then wrapping the velcro around.
I had the same thought about doing the snaps first while I was writing up my post. :)
I'll see if I can get out to a park or something this weekend and try it out. Not having a back yard of my own can be inconvenient at times.
If it turns out that the beak is off-spec, I might have to put HMG's customer service to the test, but hopefully it's just a procedural error on my part.
I measured the shock cord used with the inner at 1/8" or 3.16mm. I imagine one could switch to 3/32" shockcord (2.4mm) and it would still work with the existing LineLoc3's (supposed to work with 2.5-3.0mm) or you could switch to lighter 1/16" shockcord and snip the LineLoc3's and use nothing or Micro LineLoc's. I'm going to order some of each (Zpacks) and give it a shot.
EDIT: Here's the plan:
TARP:
– Retain LineLoc3's on the Ridgeline but use 2.5mm pure spectra cord which is probably 1/2 the weight of HMG 2.8mm line.
– Use 1.25mm line on side guyouts with Micro LineLoc's
– Not sure about the corners yet, I'll do one of the above.
BEAK:
– Try 1/16" or 3/32" shockcord on the side guyouts with no adjuster. If that doesn't work I'll use 1.25mm line with a Micro LineLoc.
– Use 2.5mm pure spectra line with existing LineLoc3 on the front guyout.
INNER:
– Use 3/32" shockcord (instead of 1/8") on the rear ridgeline attachment with existing LineLoc3
– Replace all 6 side bungies with 1/16 line and no tensioner. I'll add back a micro tensioner if I need to.
I hope to drop the 2.6oz of guylines and 1.4oz of bungie down to about 1.5oz combined plus save a bit more weight by eliminating some LineLoc3's. Potentially up to 3oz could be saved.
Dan,
Thanks for another one of your excellent posts. Don't know where you and some others find the patience to take photos of your works in progress. Really outstanding.
Sam F.
Have this shelter since a couple of weeks already, here is a video with my thoughts on it. A review will follow after my two week expedition to Russia.
Excellent video tutorial on the HMG Echo I Hendrik, this was a nice compliment to Dan's detailed writeup. It sounds like a large winged critter buzzed by your camera as you clipped on the inner at minute 8:15 in the video…nice touch. ;)
Nice work on the video. That trip to Russia should be an awesome opportunity to really test this shelter out. I'm looking forward to your review. I'm getting mine out in the wild for the first time Tues – Thur this week.
I personally prefer staking down the inner to get a bit more space inside and to prevent it from sliding around if you are camping on slightly sloped ground. I use 2g Terra Nova stakes for the inner, so it's just 0.3oz for all 4. I also like staking down the sides of the tarp, especially if you are going to attach the beak, as it will prevent the sides of the tarp from being pulled up by the beak guylines as you observe. I use 2g stakes for this as well. I haven't had any troubles using the same stake for the tarp's front ridgeline and the beak guy out.
An idea to save a bit of time is to leave the inner connected to the tarp via the shockcords if you know you're going to be using it every night. As long as things are reasonably dry, one could leave these two components attached and save quite a bit of setup time.
Kudo's to HMG for updating the weight and dimensions spec's on their website to reflect the production models more accurately. It's good to see them getting the details sorted out. The website specs now closely match my observed specs.
Hey Hendrick,
Nice job on the video and review. Keep them up..
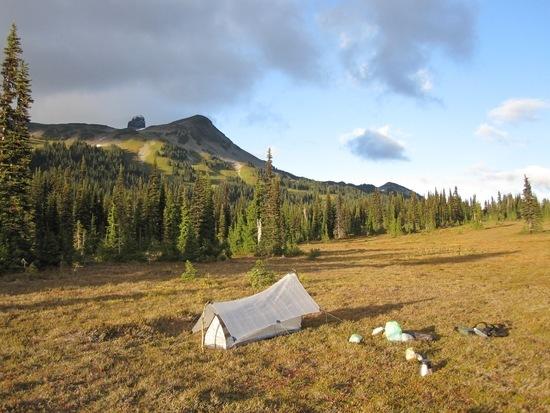
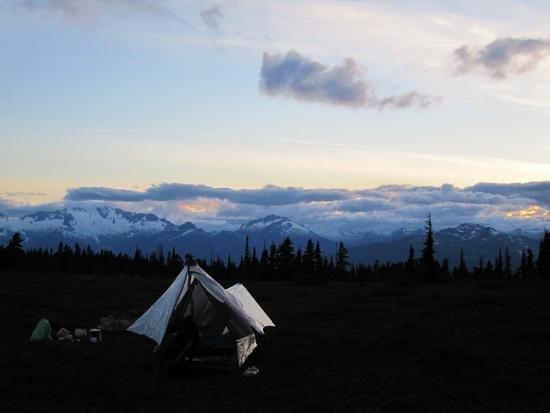
I got to use the Echo I last night for the first time in the wild. It's lot of fun to experiment with a new shelter…especially one that has so much potential for an amazing pitch if you dial in the variables.
Beginning to set it up. I forgot my hiking poles so I found two sticks:
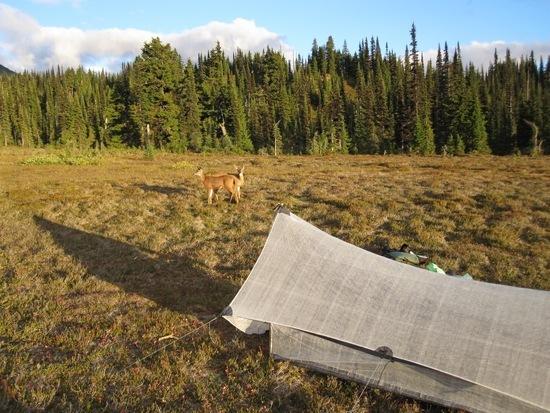
Two deer snuck up behind me to check out the Echo 1. They were maybe 10 feet behind me when one of the made a noise. I'll admit I was pretty startled.
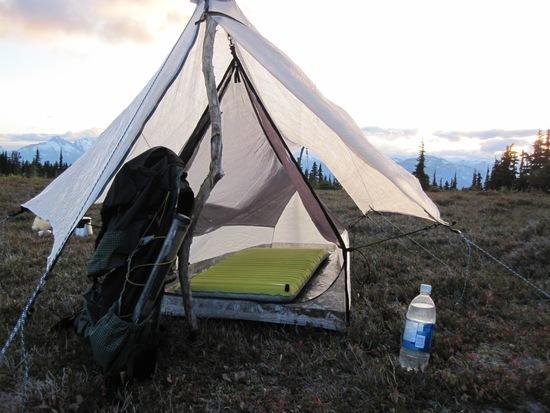
The main thing I learned during this setup is that you need the front pole to be tall enough if you want the inner to set up nicely. My stick was about 43" and that was borderline too short. Mike from HMG uses 46". The front of the inner clips directly to the underside of the tarp, so if the tarp is too low then the inner will be saggy. You can move the whole inner back away from the front to tighten it up a bit but you can only do this so much and doing so makes you more vulnerable to getting rain in the foot end (since the inner is closer to the edge of the tarp). It's better to just have the front pole taller. At the foot end of the tarp, the height doesn't matter as much because the inner attaches via an adjustable bungie cord. 34" is a good height but you can go several inches either way without ill effects it seems. As you can see in the picture below, with my 43" stick my mesh walls were a bit saggy even though I moved the tarp back a few inches to tighten it up at the attachment above the door. This would have been easy to fix with adjustable trekking poles but there wasn't a lot of nice sticks were I was camping so I just left it. This isn't a problem with the shelter, just a setup tip that I'll keep in mind in the future. I would say 46" (or even 47-48") is ideal for the front pole. Around 44-45" and you're going to have to shimmy the inner back a bit to tighten it up (which you don't want to do if a storm is rolling in). Less than this (42-43") and it's just going to be saggy. Less than 41" and it's going to be a mess.
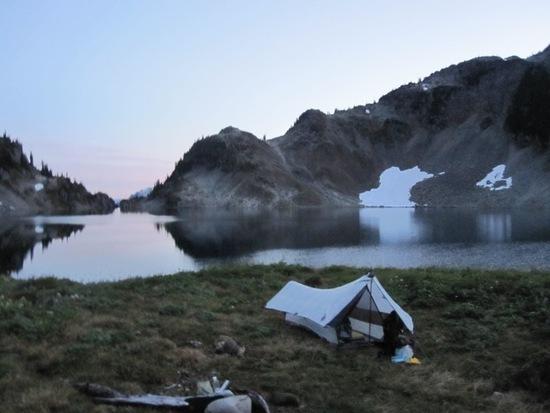
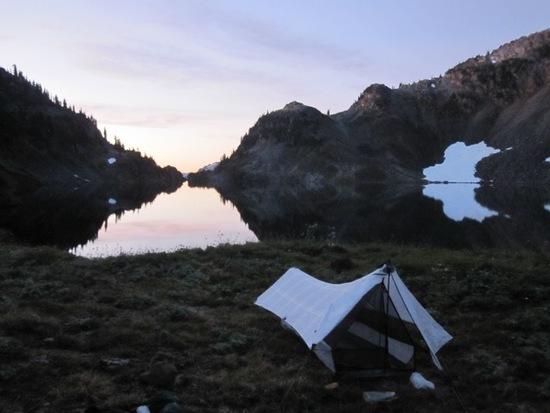
Vestibule space is great as long as you aren't getting sideways rain.
A few pictures of it setup:
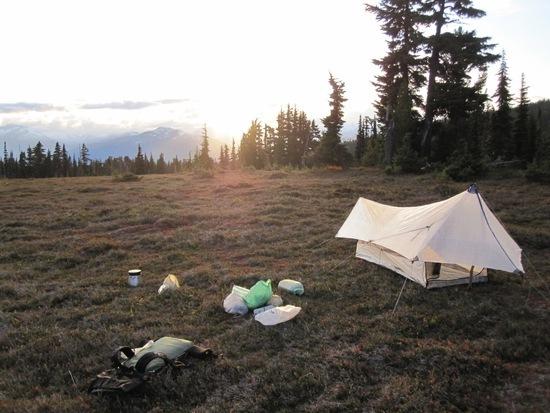
I got rain for the second half of the night. Obviously I stayed totally dry. The rain was nice enough to hold off for 45min in the morning while I cooked breakfast and packed up.
The other setup variable that I experimented with was the beak's front guyout. I was using the same stake as I was for the tarps ridgeline. If you have this stake too close to the beak then the beak zipper will be tight but the bottom edges of the beak won't be taut. If you have the stake really far out from the shelter then it pulls on the beak from a different angle and the bottom edges are taut but the zipper is loose. Somewhere in between is the sweet spot where everything is taut. For me, this has always been about where I have the tarp ridgeline staked anyways so I just clip the beak guyline to the same stake and tighten it up. If you do find that your beak needs to be staked closer or further then you can either move the tarp ridgeline stake, or use a separate stake to avoid the risk of messing up your tarp pitch. This is all minor stuff…it's just fun to figure out all the variables and eventually be able to nail down a perfect pitch quickly. Everytime I've set it up I've just clipped it to the tarp ridgeline stake and it's been pretty reasonable. I've never needed to change it. I just found last night that if it was staked out a few inches further it would have been perfect. The other variable with the beak setup is the slope of your tarp walls as previously discussed. To a certain degree, you can make up for too steep/too flat of tarp walls by moving the stake.
It's possible in Rakesh's earlier photo that the beak was staked out to far which was pulling the bottom edges taut but letting the zipper sag down. Just an idea…hard to say for sure without seeing it in person.
The only new design suggestion that arose during my trip was that it would be nice to have a small fabric loop inside the net tent to hang stuff from. I specifically like to hang my glasses (so they're safe) and watch (so I can for sure hear the alarm).
Your timing was perfect… I read your post right before I headed out yesterday. I'll see if I can get my pictures edited and upload an Echo II version tonight :)
Some of your comments helped when I was setting mine up last night, but I still haven't quite gotten the geometry for the beak nailed down. The rest is cake, but I'll put up pics and such and write at more length later.
I wrote up a post about my Echo II experiences
here
I spent some more time today shaving some weight off my Echo I and playing with the pitch. I think I'm getting the pitch pretty darn dialed in now.
Latest setup observations:
My idea today was instead of using a taller front pole (46-48") to lift up on the inner more and thus get the netting tighter, it worked even better to change where the front of the inner clips to. I routed some 3/32" shockcord through the existing LineLoc3 on the front of the inner and then I created a loop on the other end and put that over the top of the trekking pole. Having a clip would work even better as you could clip it to the guyline. This new setup pulls out more (horizontally) on the inner and it really does a good job of pulling everything tight. As a side benefit, since you don't need as tall of a pole on the front so the sides of the tarp reach closer to the ground for more coverage. 45" is fine. The rear doesn't matter that much, but I was doing about 30-32". One thing to keep in mind is that the lower you pitch the rear of the tarp, the more it will protect the foot end of the inner from any diagonal rain.
So in summary, 45" on the front and my LT4 as short as it goes on the back (about 30-32") works well when clipping the inner to the tarp guylines instead of clipping it to the underside of the tarp.
Another tip is to connect the shockcord in the middle of the inner first. This will roughly center the inner to the correct position under the tarp, so you don't wind up with it too far forward or back. As you stake down the inner, keep an eye on the middle shockcords and keep them lined up (ie. perpendicular to the inner) and you'll get the inner in the sweet spot.
For the rest of this season I plan to use the Echo I without the inner since there are no bugs left. I'll likely do a few winter trips and I'll use the inner for that for more protection and a smidge more warmth maybe.
Weight Savings
I replaced the bungie cordage on the inner with 3/32" instead of the original 1/8" shockcord. This 3/32" shockcord still works well with the LineLoc3's. IMO, this is how the Echo I should be sold in the first place. I saved 0.7oz off the inner (now 10.8oz) and that's with added shockcord to the front of the inner ridgeline.
A more radical step would be to use all 1/16" shockcord and/or use micro LineLoc's or no tensioners. I'm not sure 1/16" shockcord would give you as taut of a pitch for the inner but it would definately work. I think I'm going to stay with 3/32".
I did replace the side guyouts for the beak (that go to the bottom middle of the tarp) with 1/16" shockcord. I snipped the LineLoc3 and used a fixed length of 1/16" shockcord since this distance won't really change significantly. This dropped my beak from 4.1oz down to 3.7oz and it made setup quicker since there's nothing to tighten or loosen. I'm happy with this switch as well. The 1/16" shock cord seems strong enough to do the job.
The next step is I've got some 1.4mm cord coming from HMG. For the tarp ridgeline and corner tie outs I'm going to snip the bottom half of the 2.8mm cord off and attach this, while being careful to retain enough 2.8mm cord to use the LineLoc3's. For the middle guyouts I'm going to use only 1.4mm cord with a micro LineLoc. I might end up using all 1.4mm cord and micro LineLoc but I want to think about it a bit more before I go irreversibly snipping off the LineLoc3's.
The more I look at this shelter the more I admire the design. But I don't see the weight savings over comparable silnylon shelters which would be expected given the huge price.
The inner net tent definitely doesn't stand out as saving weight compared to the other net tents out there (ie. Alpinlite Bug Shelter, MLD Serenity). The 1.5oz cuben floor is slightly heavier than a silnylon floor and the rest of it is mostly the widely used 0.7oz nanoseeum netting. There's only a wee bit of 0.74oz cuben at the foot end. The side shockcord tie outs add weight to, but they do add a nice bit of volume inside. The Alpinlite Bug Shelter 1.25 gives a similar amount of space at a slightly lighter weight and lower price, although with lighter 3/32" shockcord the Echo I Inner can be brought to the same weight (10.6oz) so it's really a question of what the 1.5oz cuben floor means to you.
The only argument one could make for the Echo I inner saving weight vs. other net tents is if you don't use a ground sheet with the 1.5oz cuben floor (I don't) but you would with silnylon (I would sometimes in foul weather).
Silnylon floor fans could buy the Echo I tarp ($260) and beak ($80) and then combine that with the Alpinlite Bug Shelter 1.25 ($119) and get basically the same end result for $459 instead of $490. You could also substitute the GG SpinShelter for the Echo components and save $145 but then you're using Spinn and giving up some modularity so it couldn't be used as just a 6oz tarp. Then again, $314 is a lot less than $490…
The tarp (6.1oz) and beak (~3oz) are quite light as you would expect with cuben and it's just the heavy guylines that HMG uses that hide some of the weight savings. I expect to have my tarp at about 7oz and the beak at 3.5oz once I have the guylines I want on there. One could go lighter still if they wanted but with diminishing returns.
I bet it's possible to go sub 20oz for the whole system which is great for a double wall shelter.
A neat product idea for HMG (or any DIY'er) is a hybrid groundsheet that serves as both the groundsheet and as the back wall to provide a more complete enclosure when used without the inner. I'm picturing a normal 1 person groundsheet but with an extra triangle of fabric at the foot end that clips up to the tarp to become the back wall. You'd need to stake the back of the groundsheet in place.
Another neat accessory would be a clip in floor with bug netting to essentially create a single wall tent. You could have a floor with a perimeter of bug netting which then clips up to the tarp. The hard part would be avoiding gaps where the bug netting meets the tarp, since there is only 3 clips per side. You'd almost need some sort of a velcro attached, bug netting rimmed floor but then you'd need to retrofit velcro on the tarp which would add weight. Anyways, that's enough thinking out loud and typing it down for one post.
Whew! Thanks Dan.
I replaced the 2.8mm guyline on the tarp today. I used 1.4mm HMG guyline and micro LineLoc's instead of the LineLoc3's on all 8 guyouts. The tarp now weighs 6.8oz instead of 8.1oz.
The 1.4mm HMG guyline isn't the lightest stuff out there at 35g/50ft but I only needed about 35 ft (20g?). Zpacks 1.25mm guyline is 15g/50ft which would be 10g or 0.35oz lighter still. If I had bright Zpacks line instead of black stuff I'd think about using it. With that said, the HMG guyline is sharp looking stuff.
I used the Echo I again last night. I'm getting much faster at setting it up now. 46" on the front and as short as my pole goes on the rear (33") is working great with the inner ridgeline clipped to the tarp ridgeline instead of to the clips on the underside of the tarp. If you get the inner ridgeline nice and tight and don't overtighten the other shockcords (it distorts the inner and pulls the roof a bit lower) then you should have a good setup. Terra Nova 2g stakes are working well to stake down the inner at a minimal weight.
Right now it takes me ~5 min to get the tarp setup (first time tarp user) another 3-4 min to add the inner and then I slap the beak on in 30 seconds. In the future I'll likely leave the inner clipped to the tarp to save time.
Mine arrived a couple of days ago. My Katabatic Palisade arrives tomorrow, I hope. Then I'm waiting for a weather window to go for an overnighter in the Scottish mountains.
I set up the tarp fairly easily. I put the front pole at 115cm and the back at the low point of my Leki corklights (not sure what that is). Once you get the front pole up, it's pretty straightforward from there.
The workmanship is first rate.
Nice….try clipping the ridgeline of the inner to the tarp ridgeline guylines instead of the to the clips on the tarp. The pulls 'out' on the inner more instead of 'up' and in my experience gives much better results. Your tarp pitch can vary a lot more and you'll still have a good inner setup. This does require adding a bit of cord/bungie to the existing lineloc on the front of the inner.
"The workmanship is first rate."
That it most certainly is!
Become a member to post in the forums.
advertisement
Small Business Sales Week

Discover deals from 90+ small outdoor brands during Garage Grown Gear’s Small Business Sales Week.
