"CT2K.08 which has 105lbs/in break strenght the failure in my testing usually occurred around 55lbs/inch"
Thanks for sharing your results. How does the 55lb/inch igure compare with, say, the 1.7oz silnylon Golite use for shelters?
Topic
Become a member to post in the forums.
"CT2K.08 which has 105lbs/in break strenght the failure in my testing usually occurred around 55lbs/inch"
Thanks for sharing your results. How does the 55lb/inch igure compare with, say, the 1.7oz silnylon Golite use for shelters?
Good Idea Steve…I actually never did test #3… I had thought about it but I moved on to testing other adhesives before I got around to it.. Since hysol is what all the MYOG people seem to use and given that Cubic Tech use to recommend it, I will go ahead and get everything ready for a test tomorrow.. I will do all three tests again to make sure the results are consistent. I will do 5 tests of each and average the results… Anything else you want me to test while I am at it?
According to TiGoats fabrics page:
"Grab tear strength, is the measurement of force required to tear a piece of fabric into two pieces. Grab tear strength is based on the
breaking strength of the individual threads of the fabric working in conjunction with each other. In this case this is measured across a
three inch width piece of fabric. Both (1.1oz) Sil-nylon and DWR treated nylon have the same breaking strength of approximately 145+ lbs."
Does this test equate to what has been done here?
I'm trying to get a handle on what I can expect the CT2K08 I have will stand up to in terms of windspeed once I put seams in it.
Tear and Break strength are different. Cubic tech has never released tear testing data but I can tell you from experience its much higher then silnylon.. I would guess a few times stronger. I think the closest thing to a really good quality 30D SilNylon 6,6 would be the CT2K.08.. but the bonus of cuben is that its half the weight..
30D Silnylon has about 70-85lbs of break strength and about 8-16lbs of tear strength depending on the type of Nylon and how good the sil finish is… Woven materials also technically have different warp and fill strengths. Hope this helps but I am sure it doesn't..
Thanks Lawson, in fact it does help. The Ti Goat page I referred to lists strengths for both types of failure which roughly agree with your figures:
http://www.titaniumgoat.com/DWR.html
I'm wanting to get busy with my Breen CT2K.08 (same batch as Derek's), and after agoniing for months over design, I think I have my ideas coming to fruition. I'm really grateful to the contributors sharing knowledge here.
One idea I want to run past the collective is regarding the ridge seam. This is obviously under a lot of stress and since jointing seems to considerably weaken the material, I'm wondering if it would be better to avoid having a ridge seam and joint the material halfway down the sides of the tent instead. That way it would be a straight shear pull stress on the joint rather than the ridge seam getting pulled heaving fore and aft as well sideways to the ground stakes.
Make sense?
It makes sense but I don't know what the pros vs. cons would be. Another thing to think about is can you really pull apart a even a weak cuben seam? That load is distributed over so many inches or feet that your seam is actually many times stronger. I personally think tie outs are your most critical point.
Agreed. Looking at the failure on Steven's tie out corner I think a generous size reinforcement with very thinly spread glue concentrated near the reinforcement edge is the way to go – spread the load over a greater area.
I am considering giving up a bit of the weight advantage of cuben to use some strong shock cord on the main corner tie outs too. Cuben doesn't have any stretch, and the wind can be unforgiving. It is sudden 'snap' forces while the tent is being severely rattled which will cause a failure, so a bit of 'give' which still keeps a taut pitch is worth the weight I think.
Preliminary results show me that of the two, stitching is stronger than gluing for tie out reinforcement points on CT2K.08.
This is on
a 6x6x8" triangle. Stitch length 7 per inch. #49 bonded nylon
thread. Glue is Loctite u-09FL I
created both kinds of seams on the same piece
and pulled til one failed. Failure occurs at the triangle's
tip, farthest from the pull out tab.
Thanks David. Is that with two rows of stitching down the triangle edges?
Maybe a rounded corner on the triangle would work better?
No, just one.
A different shape or size of reinforcement might change things by spreading out the force more. Maybe a combination.
The forces from use may not reach such a degree that it
matters.
Oops, didn't read the part about your experience with cuben
and high wind.
On some sails they use a large semi circle and then a smaller
triangle inside that.
Bonding and sewing may also be a possible method.
The stitch holes enlarged to about 3/16 of an inch large
on the triangle's tip. So while the stitching did not fail
as early as the glue, it still was damaged to a degree. Would
have let water through easily.
Interesting info about the sails. I wonder what shape their corner reinforcements are. I'm thinking a scalloped edge on the long side of the triangle may direct the stress more towards the edge hems where the material will be doubled.
Thanks again for your input.
Hey Lawson,
Did you ever get around to finding out if the Hysol adhesive did infact weaken the material?
I'm curious as to what product/technique you ended up using on your tarps and hammocks. They look great.
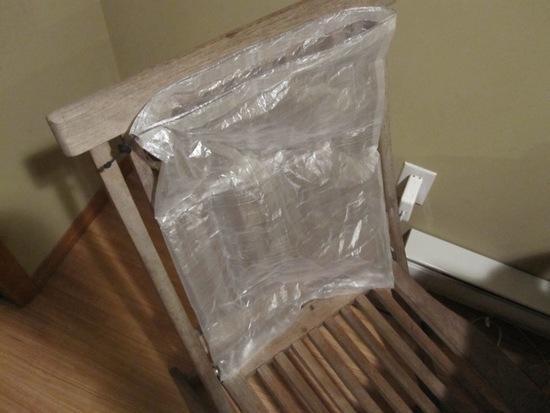
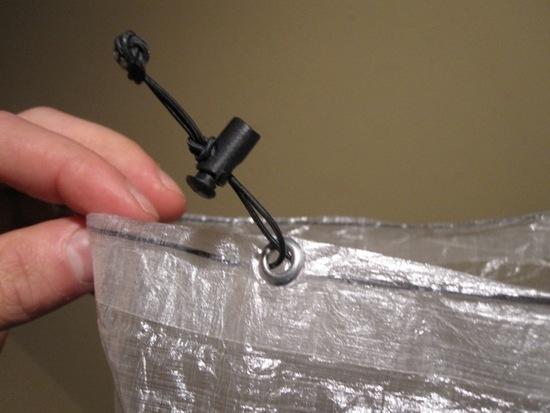
I figured I'd share a stuff sack I made today. It's mostly pretty similar to Steve's but with a few small differences. Most notably, I used tape rather than a liquid adhesive, and I used an eyelet for the cord opening instead of a folded opening.
I wanted to make quite a large stuff sack for my wife to use with her clothes since she's being using a portly 20g silnylon sack. She bring quite a lot of clothes so I opted to make a 14" x 19" stuff sack. I essentially used Steve's template, which is really just a 28"x19" piece with an extra margin on 2 sides for overlap and a bit extra at the top for folding the top hem.
Making this stuff sack was straight forward. I cut out the cuben with a razor & cutting board. Then I bonded the rectangle of fabric into it's general shape using the tape. Then I reinforced a small 0.5" x 1" area for the eyelet/grommet using a little 3M tape and a small square of cuben. Then I added the eyelet to this reinforced area and taped down the top edge of the stuff sack to create the channel for the cord to go through. Lastly I ran the Z-Line and added the cord lock. Z-line is great for running through because it's fairly stiff so you can just feed it through.
I like using the eyelet rather than the other methods of creating a cord opening because if you reinforce the area then it's quite strong and it's really simple to do.
The weights came in at:
4.8g – CT0.3K.08 (0.33oz) Cuben
2.5g – 3M tape (roughly 1.7 yds)
0.2g – Eyelet
0.7g – Cordlock
1.0g – ~30" of 1.25mm Z-line
TOTAL: 9.2g or 0.32oz….not bad for a huge stuff sack.
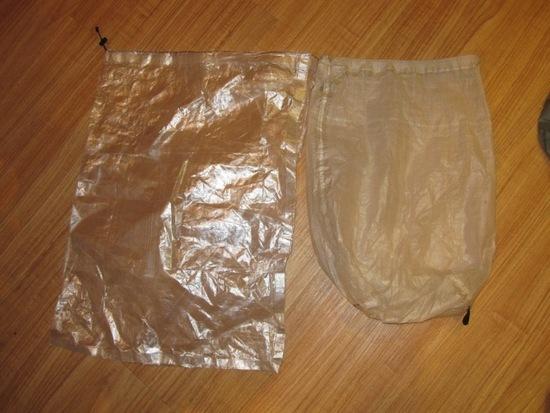
It's interesting how cuben gets less transparent over time as it's repeated folded and creased. Both of these stuff sacks are made with 0.33oz cuben. The one on the right is my clothes bag that I've been using for a year now.
Nice Job! The stuffsacks I build and sell have the eyelet and its much much stronger then anything else.
Very cool and it turned out very nice, but talk about coincidence, I made a stuffsack yesterday using 0.33 cuben, bonded with contact cement and instead of an eyelet, I glued a small rubber grommet/washer for the string to run through just like yours. I never did like the way the string used to just come out via the folded opening but it seemed fine at the time. The only reason I didn't use tape for the string channel is because I thought it wouldn't cinch closed nicely as the tape tends to be a bit thick. How is it working out for you?
It's been cinching up nicely for me…noticably better than my other stuff sacks made with heavier cuben (0.7oz) and a liquid adhesive. Maybe a heavier tape (ie. Quest Tape) would be different.
Speaking of tape weight, has anyone found anything thinner than the 3M 9485? It is 5 mils and the Venture 1163 is 6.5 mils. Anyone know how thick the Quest tape is?
I know thin coatings like Hysol are easily brushed 1-2 out mils thick and surely Steve's heated press technique takes them well under 1 mil.
Dan which 3M tape did you use & how stong?. i wasn't too impressed with the stuff Quest sent me, i could pull it apart.
About a week or so ago I started to look at thinner alternatives to the tape as I recall Ron Bell stating his was about half the weight (I can't remember the exact number he gave) of the 3M and Venture tape. I found 3M 9482 which is 2 mils thick but has about half the strength, according to their documentation, of the 9485. Probably not suitable for shelters but most likely fine for stuffsacks and simply stuff like that.
The pressure definitely thins out the tape but the weight is still there. I should measure the seams to see how thin it is, but I'm not sure I can get an accurate dimensions since the tape will compress when under pressure. I'll see what I can do.
As for the quest outfitters stuff. It' not something I would use again. I bought a bunch a while ago and it is going in the garbage. Again, I haven't measured it but it is very thick and it is a solid while so it doesn't blend well with the parent material.
Ziff, Dan can verify but I am pretty sure he used 3M 9485PC. If you look back at some of Lawson Klines posts, I think he said this was his top performing tape (not liquid adhesive) and he has quite a bit of experience.
Hey Steve,
Did you find heat pressing the tape caused complete material delamination in a T-peel test?
Ziff, I think I used 3M 9485 PC tape. I bought it from Sailrite.com which just calls it 3M Super Seam Basting tape, but I'm told it's the same stuff as 3M 9485 PC. I bought it here:
http://search.sailrite.com/?freeText=seamstick
I have not tried to tear apart seams done with this tape, so I can't really speak to how strong it is, but it seems plenty strong for a stuff sack when I was using it and I was only using 1/2" width.
Thanks Dan, will you give it a try ?
Did you find heat pressing the tape caused complete material delamination in a T-peel test?
No real testing as of yet – I don't really have a test setup to do 1" strips. I think Chris's setup would be much more accurate for that type of stuff. I was initially thinking about mimicking the way Q-Bond adheres using an ultrasonic technique, but just got too busy.
With heat and pressure, I only made 2 samples. One with the Venture Tape and one with 3M 9485PC. I pulled them to failure and one of them broke along the edge of the seam and the other about an inch away which is a good sign (I don't have them handy so can't remember which it was), but I didn't fold the edges so there may have been some of the microtears present that were discussed earlier.
I was impressed, so afterwards, I used the same technique to make my drybag for my ULA Arctic Pack but found it a serious pain in the butt to get the tape on straight over such a large length. The tooling in my press is probably about 6 inches long so it took a while to get all the seams done too. I was going to use tape to build my new winter shelter but I am holding off right now as I think it will be hard to get the tape lined up straight. Once you get off line, it can be tough to muscle it back in place. How do you guys keep it straight?
Become a member to post in the forums.
 Air-Permeable Fleece HoodieLightweight fleece hoodie weighing just 5.2 ounces.
 Loading...