


Was that the sketch I posted?
Topic
Become a member to post in the forums.
Was that the sketch I posted?

I think so- thank you if it was!

Rog,
Just saw this…my ti version is long gone. Overuse and lack of construction quality lead to it's demise. I tried a number of smaller single wall versions…even had one that worked sort of well but still to finicky for me. Honestly, esbit is just so much easier to use, for me anyway.
Of course, I have another one in the works…but I have about 30 things in the works right now so it isn't getting priority.
Nice job by the way!

Dragging this thread up from the archives…
Where can I get a pint sized paint can as discussed in these posts? I've looked at Home Depot and a couple varieties of paint stores and nobody seems to carry them.
Also for the quart version, all they have are the coated versions and I think I would like the uncoated version so I'm not burning the plastic lining off when using the stove.
Any direction on finding these would be great!
After the first burn the quart paint can will be totally clean. Pretty minor. For my inner I used a progresso soup can that pressure fits exactly into the base of the quart can and I am guessing is lighter that the pint can.
I will post pics when i can, mine works great…. until you add wet fuel ;)
"Where can I get a pint sized paint can as discussed in these posts? I've looked at Home Depot and a couple varieties of paint stores and nobody seems to carry them.
Also for the quart version, all they have are the coated versions and I think I would like the uncoated version so I'm not burning the plastic lining off when using the stove."
OSH has both the quart and the pint. Uncoated is not an option that I have seen. I haven't noticed fumes myself.
good luck,
-Michael
Beautiful! Really polished looking :)
Thanks for all the photos!
Made with Ti Goat foil, and Harbor Freight punch tool…
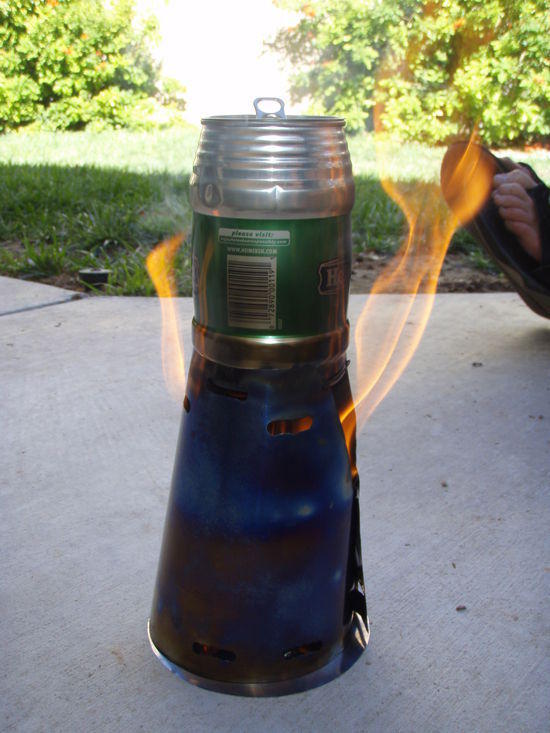
"Where can I get a pint sized paint can?"
They are sold at ACE Hardware Stores.
"(I'm going to use food storage canisters made in stainless). I was not looking forward to trying to punch holes through those containers, but that hole punch looks perfect!"
I have had good luck with a UniBit to make round holes in stainless steel.
Thanks Daniel! I'll check at ACE. We don't have OSH around here, so that one won't work…
I am actually going to play around with the pint size can to make a double-wall stove to fit inside my SP 600. I'll follow the J Falk model, but make it smaller. I don't know if it will work or not, but I thought it would be worth a try.
I have also used the uni-bit for drilling holes for the regular J Falk bushwhacker and it works very well. I did figure out that the 1/8" bit to pre-drill needs to be new and/or very sharp. It makes a big difference!
John, is yours a double-wall or is it a caldera cone knock-off? I would like to play around with some titanium and double-wall stoves, but need to get some more experience playing around with cheaper metals before I start carving up the tigoat stuff. That will come soon enough!
I have built a few of these paint can stoves and found that they work really well. My biggest hold up with taking them on trips is that I didn't like how tall they were and that they didn't nest completely into any of my pots. However, another member showed me that a flashing endcap could be used as a bottom, and this allowed me to chop the stove to the height I desired. I was worried that the shorter height would not work as well, but my tests so far show it works really well.

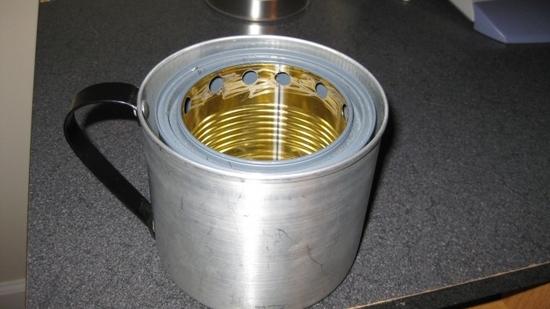
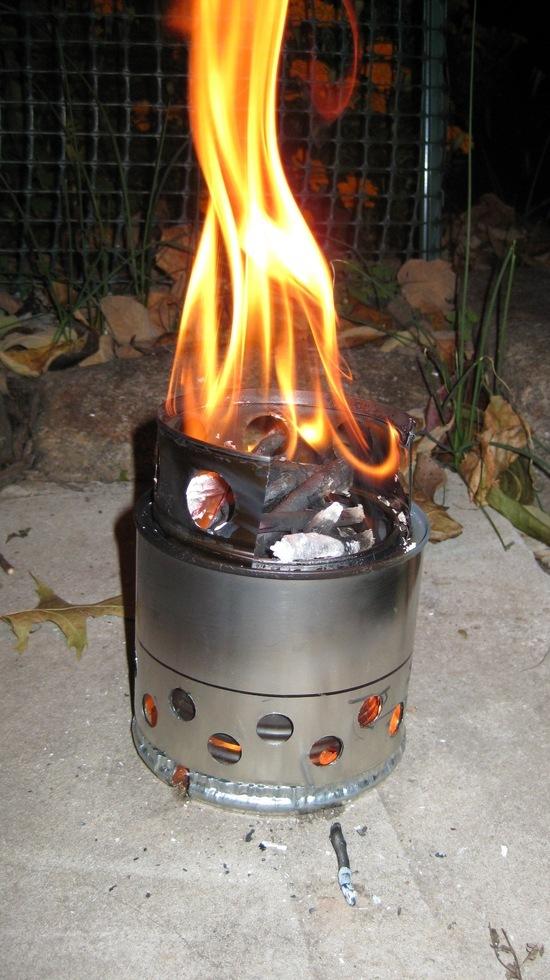
Video of the Stove Burning:

"John, is yours a double-wall or is it a caldera cone knock-off? I would like to play around with some titanium and double-wall stoves, but need to get some more experience playing around with cheaper metals before I start carving up the tigoat stuff. That will come soon enough!"
Jeremy,
Mine is a Caldera Ti-Tri Inferno knock-off, although I haven't seen one this light weight. It is a downdraft gasfier design with two cones.

Works really good, was easy to make, and only weighs 2.15oz.
Good idea to play with a less expensive aluminum design before switching to titanium. Just don't burn wood in your aluminum design :~)>
See more info at this link
Well done Johnnydune
I wish I would have discovered this thread and the Caldera Tri Tri Inferno before I spent weeks trying to design my own flat packing wood gas stove. However it did teach me a few things.
Most obviously I have found a square cone is no where near as efficient as the round caldera design. However you can still make a caldera cone in two halves if you want a bit more versatility in packing it.
Below is a little summation based on my experiences. Hopefully some will find it useful.
1) Taking from the Nimble Will Little Dandy wood stove I've found if you put notches in the top of the stove you can quickly improvise a grill with a couple stakes.
2) Canned good cans make superb burn cans. I think it's primarily the corrugation. This is cool because even if you are carrying just a regular Caldera cone you can improvise an absolutely superb burn chamber that will function as well as if not better then the Inferno chamber. All you need is an appropriate sized can good and a can opener.
3) The smaller diameter the burn chamber the more efficient the burn.
4) The taller the stove the more efficient the burn, but to tall and it becomes unstable and heavy.
5) Taller stoves are easier to load since you don't have to cut wood as short and it has little impact on the diameter wood the stove can take because even a single 3" log in a 4" wide burn chamber will burn efficiently in a wood gas stove.
6) A taller narrower stove will not only burn longer… but it'll burn steadier and more consistent then a shorter / wider stove.
The trick is finding the right width to height ratio to give you optimum stability, weight and performance. I find something a few inches taller then the Tri Tri caldera to be optimal for wood.
7) Split wood ignites faster producing less smoke and burns hotter. Split your wood. A small fixed blade knife and improvised baton works great for the small amount of wood a woodgas stove uses.
8) Any wood sticking up much if any above the secondary burn line will produce lots of good smoke. Keep your wood below the secondary burn line.
9) Due the above reasons it is better to invest in good lightweight splitting and cutting tools and keep the stove as small as possible rather than make a bigger stove and put poorly processed wood in it.
The best tools I've found thus far are simply a Coughlan's Pocket Sierra Saw (2.5oz) or the smallest Fiskars retracting pruning saw (3.4oz) for cutting in use with a small fixed blade pocket knife for splitting with an improvised baton.
You can carry a single bow saw blade (extremely light!) and with a bit of practice improvise a first class bow saw with no other tools in just a couple minutes. However the bow saw is over kill if you intend to use it just for your ultralight wood gas stove because the stove requires such small amounts of wood. Is great for campfires though!
8) A wood gas stove that can use forced air (a fan) will burn a great deal hotter, cleaner and more consistent.
A tiny 12 volt microprocessor fan from a computer will not only increase heat and decrease smoke. Most importantly newly added wood will ignite dramatically faster (usually instantaneously) therefore smoking far less while you're cooking.
It also only requires a tiny amount of air to increase the effectiveness of the stove, i.e. 6 to 9 volts is enough with a 12 volt fan is usually more then enough.
9) A single 2" x 2" hole in the caldera cone works just as well as many smaller ones and ads some versatility.
First by having one big hole can make the stove work better by pointing it into or away from the wind.
What's more having only one hole allows you to use forced air (i.e. a fan) extremely efficiently.
(Trail Deigns does make a caldera btw that has flaps instead of holes that can be opened or closed as you see fit, this may be the most flexible solution of all.)
Well, I think that's te best of what I've got at the moment.
-Mike
Hi there.
I've been having some fun looking at some of these projects. I've got a couple tweaks I would be interested in checking out. Probably I am not going to be able to avoid making another wood-gas stove.
First, though, I want to ask this question:
John Roan wrote:
"Good idea to play with a less expensive aluminum design before switching to titanium. Just don't burn wood in your aluminum design :~)>"
I know you're probably talking about the cone, but isn't the Heinie can made of aluminum? If so, are there some applications of aluminum that actually do work with these stoves, and other applications of aluminum that don't?
Thomas,
When the aluminum beer can pot is filled with water, it works just fine. If you tried putting it on the fire empty, it wouldn't fair quite as well.
Try setting a styrofoam cup filled with water on a campfire…the cup will burn down to down to the water line, and won't burn any further until the water boils and evaporates or boils over. Once there's no water of course, the cups if gone in seconds. Amazing what a little water can do!
For the DD gassifier type, as long as the inside and pot holders are made from steel, the outside portion can be aluminum. I played with this design quite extensively utilizing a Sapporo beer can as the firebox/pot holder, and a fosters/heine can as the outside and the aluminum did just fine. The issue with this stove was that the fire box was so small that you had to continuously feed it…too high maintenance for me! :~)>
I concur. The outer can or heat shield can definitely be aluminum.
Even if you could use a heavy aluminum can for the internal burn chamber (i.e. Sapporo) I would not recommend it because it cools to quickly.
After fairly extensive testing I highly recommend a standard canned good can. The material is right, the coorugation is brilliant for heat transfer and hot air convection. It basically glows red. Quite beautiful.
What's more you needn't use the whole can. The fosters can design may require it but I cut off the top and bottom at the beed and cut down one side. This is not only lighter but allows the can just enough flexibility that it can fit around or inside a great variety of pots or containers.
My heat caldera style shield is now 3-piece allowing it to flat pack so the design can be taller and doesn't stick out of the top of the pot. Essentially the stove packs down to nothing. Right now my version is about 8" tall and weighs in at about 6oz… and I expect it'll drop a few more oz before I'm ready to share it. With a titanium cone it'd be lighter still not just because titanium is lighter but because I can actually go thinner with titanium as well since it's more rigid.
p.s. A pie plate or simple piece of aluminum with dirt on it makes an excellent base if you want to use these stoves on a picnic table or avoid scorching the ground.
Surprisingly enough, the walls of a Sapporo can are thin steel, only the top and bottom at aluminum. Still very light. Just too small for my testing.
MM – I like the idea of your cone in separate pieces so it can fit into the keg/pot. Trail Designs does a customized version that does that as well. There was a forum on this site some time ago that covered it.

I put the split Caldera Cone up on the BPL wiki at:
http://wiki.backpackinglight.com/Caldera_Fissure
There you can find the links to the BPL threads on the subject as well.
Also….to a previous point…..titanium is a LOT heavier than aluminum……something like 60% heavier.
Rand
Rand,
Thanks for the link. Any possibility you might make a Heineken Caldera Ti-Tri Inferno Fissure? (Wow, that's a mouth full!) If anyone's up for the challenge, it's you guys!
:~)> John
The fisure is very interesting but it's not what I'm trying to accomplish. I split the cone into three pieces in the round so it breaks down flat and doesn't need to go in a pot (though the 3 pieces could also still be rolled). I intend to pack it flat against the inside backing of my bike pannier, but it would also allow it to be packed easier into a rolled mat
P.S. I take it people favored the single piece caldera for it's simplicty.
BTW… titanium weight… wow, what was I thinking. I get so used to people talking about lightweight titanium products I forget it's actually heavier then aluminum for the same mass. The weight savings comes in that you have to use less to get the same strength. Sorry to promote such misinformation. Really I know better… to much late night typing. I think they call it a "logical fallacy".
John:
No need to "fissure" a Heinie cone….the Keg-H cone already fits in the Heinie can! All we would have to do is make it out of titanium, cobble together an inferno, and then figure out a hole to throw wood in.
MM:
Yea….late night typing got you again…..titanium is heavier than aluminum for the same volume….weight would be the same for the same mass! :-) I do it all the time….wake up the next morning and read what I wrote and just cringe! As to making a cone out of multiple panels, we've done it. Pretty easy with our dovetail machine. We just make several panels that all dovetail together at the seams. We've done 2, 3, 4, and even 5 panel cones. Let me know if we can help you out…..you have the email address!
Rand :-)
Randy: Would love to chat with you if you have time. I should finish with my home brew prototype first though, lest I never get it finished.
My personal email is michael *at- mmeiser.com. (Hate to post my email but I couldn't find any way to contact someone privately here. Minor shortcoming of the forum?)
Right now I'm going to finish my home brew stove since it's so close to done and then hopefully post it up here for review. Who knows, maybe there will be some original aspects to it that are worth noting.
p.s. Have you given any interviews that are posted online anywhere? There was a thread on this forum about interviews with small businesses in the space. I found it tremendously interesting. One of the most insightful and inspirational interviews was one with the Brush Buddy founder on hikinginfinland.blogspot.com
Hiking in Finland guy (Hendrik M) interviewed four or five people from various businesses in this space but I don't believe I've seen one from you yet. He's got one heck of a superb blog btw. Great interviews. And to be honest it was his blog that really got me interested in the Tri Tri Inferno. Great review:
http://hikinginfinland.blogspot.com/2009/09/gear-talk-trail-designs-ti-tri-inferno.html
If you'd like, or at least not mind I could shoot him your email address. I'm sure he'd love to interview you. Else, maybe I should just "email interview" you myself though I must admit I'm new to this space, a complete babe in the woods, so to speak. I wasn't even familiar with your company or for that matter most of the companies in this space until the last month or so. Though I'm a hiker since childhood I ave come about this forum through ultralight bicycle touring.
Also, regarding my intentions with my this prototype I'm designing. I'm a designer, I dream of one day jumping into this or some other niche market with a unique product, but mostly I did it to do it. For fun, to learn, to see if I could develop a better stove, and just so I could use it. That said I'm thinking that if there is anything that you find useful in my design I'd be honored if you were to incorporate it your work. When and if I finally get around to posting it here it'll naturally be public domain by proxy anyway.
Michael:
Very familiar with Hendrik…..in fact, he did a killer review of the Ti-Tri Inferno for us….check it out here:
http://hikinginfinland.blogspot.com/2009/09/gear-talk-trail-designs-ti-tri-inferno.html
Also, as to interviews, turns out I did do one for a different blogger…..you can find that here:
http://hrxxl.wordpress.com/2009/11/02/im-gesprach-rand-lindsly-von-trail-designs/
Rand (without a “y”) :-)
> Hate to post my email but I couldn't find any way to contact someone privately
> here. Minor shortcoming of the forum?
Click on the person's name at their posting. That will take you to their personal details page. Then send them a PM (private message).
Granted, the PM system isn't great, but it works.
Cheers
Aha,
"You must specify an email address in your user profile in order to send this user a personal message (PM)."
because I hadn't bothered to put in my email address I can't see anyone elses. Lol. Will rectify immediately. :)
Thanks
Become a member to post in the forums.
 XL Stuff PackLightweight stuff pack designed to secure to the top of your backpack for carrying wet gear, extra food, rainwear, or layers.
 © Beartooth Media Group Inc.
 Loading...