Topic
MYOG Inverted Downdraft Woodgas Stove – My Attempt
Forum Posting
A Membership is required to post in the forums. Login or become a member to post in the member forums!
Home › Forums › Gear Forums › Make Your Own Gear › MYOG Inverted Downdraft Woodgas Stove – My Attempt
- This topic is empty.
-
AuthorPosts
-
Jul 9, 2008 at 7:32 pm #1230094
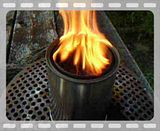
Here is my latest garage tinkering… This stuff is so much fun! It's similar to what others have posted here but I thought I'd detail the methods.
Specs:
Weight: Stove (5.4 ounces), Wire mesh pot support (0.9 ounces)Burn details: Burns clean and leaves hardly any ash. Boil times and burn duration to be determined and posted at a later date.
Nests nicely in a Snow Peak 900 Titanium pot
Wire mesh pot support can be stored in between the pint and quart paint can when assembled.
Pictures:
Not sure if I'll use the beer can pot or my Snow Peak?
Here are the parts un-assembled:
Here is the stove sitting upright in a Snow Peak 900 Ti Pot:
This is a view of the bottom of the stove with the bottom of the quart can removed. The mesh pot stand can stored between these two cans:
Materials:
1 empty quart paint can from Home Depot
1 pint can (Minwax Pre Stain Wood Conditioner) emptied and cleaned
3”x3” wire mesh
JB WeldTools:
Side cutting can opener (safety opener)
Harbor Freight deep throat metal punch ($20 item number 91510)
Wire cutter
FileProcess: (assembly time ~ 1 hour)
1) Open lids (discard).2) Using the can opener cut the bottom of both the quart and pint paint cans.
3) Using the punch (with a 7/16 inch hole size) evenly space 10 holes 1 and 1/8th inches apart (~7/8 inches from edge to edge of each hole) around the bottom of the quart sized can. The center of the punched hole should be ~ 1 and 1/2 inches from the bottom of the can.
4) Using the punch (with a 7/16 inch hole size) evenly space 15 holes 11/16 inches apart (~1/4 inch from edge to edge of each hole) near the top of the pint sized can. The center of the punched hole should be ~ 3/4 inches from the top of the can.
5) Apply a small ribbon of JB weld around the inside opening of the quart sized can. Invert the pint sized can and insert its bottom into the quart size can. The bottom of the pint size can should fit snugly into the inside opening of the quart sized can.
6) Cut wire mesh to internal diameter of the now upside down pint paint can. Affix with JB Weld to the now bottom inside of the stove.
7) Retain the bottom of the quart sized can and use while burning to protect ground from scorching.
Jul 9, 2008 at 10:30 pm #1442291Brian, this is a really nice looking stove you've put together. And not bad and the weight you've brought it in under as well. I'll be curious to hear some performance results as well. Thank you for sharing.
Jul 10, 2008 at 7:00 am #1442317Thanks Sam! I think I can get the weight down below 5 ounces for the stove by cutting the top ring of the pint size can and attaching the wire mesh directly to the side of the can rather than having it resting on the lid. On version 2 I may give that a try. I'm also not completely satisfied with wire mesh as a pot stand. I'm looking for a can that will fit between the inner and outer wall but will rest on top of the stove without much modification. I have an old Carlos V hot chocolate can that may fit the bill. Using this instead of the wire mesh will increase the weight a bit. My ultimate goal is to make this an easy project for scouts to make.
Jul 10, 2008 at 8:49 am #1442332Okay, so I feel like this is a stupid question. Apparently I'm one of two people on this site who doesn't have experience w/wood stoves! :P I've noticed that everyone uses steel. Obviously easy access, cheap. Unless one were to buy the BushBuddy, which I'll admit I've been considering–in which case it's an expensive bit of steel. Bottom line, my question is "Don't these rust out relatively soon?" It seems like I see rusted-out steel that's been involved with fire all the time–which I guess is my convoluted way of saying my charcoal chimney starter and old grills seem to get pretty rusty. Is this a valid concern or moot point? Does the rusting happen just from the effects of heat and environmental humidity? If I drop $140 on a bushbuddy, would it be rusted out in a year?
Thanks for posting!
BradJul 10, 2008 at 9:29 am #1442337Brad – This is my first experience with a steel wood stove. I assume it would rust eventually. Not sure how soon? However, it takes little time, money, and effort to make another one. As for the bushbuddy I'll wait for others to comment on its longevity as I do not have one. Though, the bushbuddy is made of stainless steel which should improve its durability.
Jul 10, 2008 at 9:37 am #1442338The stove looks great and the instructions are well written! Thanks!
Your instructions are going to help me assemble some cans that I found on the hispanic foods aisle – an ancho chile can and I think a salsa can that fit nicely together and should make for a very compact WG stove. I haven't been able to test it yet, but it may not hold enough fuel for a good burn time and it may not be tall enough to provide a good down draft, but I'm thinking that may be mitigated with the number and placement of holes.
When I finally get it done, I'll post the results.
Jul 12, 2008 at 11:15 am #1442643Brad,
I believe the BB is built of stainless steel. I've got a BB Ultra and there's no rust. Good thing too, at that price.
I built a BB knock off, using a tomato soup can and a blueberry pie filling can. My version does not come apart, or have a screen in the fire box; just punched holes for primary air.
I just weighed it at 4.16 ounces. The problem with mine is the tuna can pot stand doesn't nest. I have some 1/2" SS mesh that might work if I can squeeze it enough to fit inside the stove for storage.
The bad news is that it's too tall to nest in any of my pots.
Jul 12, 2008 at 12:01 pm #1442644Yeah, Dennis-thanks. It was a stupid question; if I'd only opened my eyes a bit more before typing…
Good news is, both of your stoves look great!
Jul 12, 2008 at 12:31 pm #1442646AnonymousInactiveDenis,
The BBU needs a nest to protect it from being crushed in the pack but your homebuilt is appears to be sturdy enough to nest a lightweight Ti cup or mug. Nice Job.
Brad,
As you can see, this BBU is rust free after 15 months of frequent use:
Jul 12, 2008 at 7:31 pm #1442678John,
That's one honkin' big picture you posted.
Re my stoves toughness: It seems pretty solid. I believe I could carry it safely in a stuff sack, exercising reasonable caution. As to nesting: The stove sticks up above to top of my Firelite SUL-1100 pot. And it requires some padding, as the stove's diameter is an inch or so smaller than the pot, and rattles about. The Bush Buddy fits the SUL-1100 very well. I made mine as a "project", and have no real intention of using it. Especially now in our sensitive fire season. Maybe next time I'm on the Lost Coast… there's lots of fuel there too.
Jul 12, 2008 at 10:33 pm #1442700AnonymousInactiveI don't know what happened. I pulled the picture because of the size. The message is fairly well established anyway-the BB is not prone to rust.
Jul 13, 2008 at 7:17 am #1442713What I really appreciate about this stove is it at least appears to retain the ashes as opposed to dropping them in a pile on scorched earth as so many backpacking wood stoves do.
I would suggest you add feet to allow air circulation under the stove to guarantee the ground doesn't get cooked. Rivet nuts work well for this. They can be had from harbor freight as can the installation tool. Place three or four of them equally spaced around the outer rim on the bottom of the stove and install machine screws in them to act as legs. Screw the legs all the way in for stowage.
Jul 13, 2008 at 6:11 pm #1442783The Bush Buddy stove may be picked up (with care) while burning. The inlet air holes at the bottom of the stove keep the metal from getting hot enough to burn my hand. My BB knock-off is not so well ventilated and gets too hot to comfortably touch. Neither stove leaves any burned area on the resting surface.
Aug 30, 2008 at 7:54 pm #1449343I had some time to tinker in the garage today and test out the burn time on my wood stove. Today was in the mid 80's (F) and was somewhat windy (gusts in the teens). Using 2 cups of cool water from the tap and a loosely fitted wind screen, I was able to reach a rolling boil in 9 minutes in my Heineken can.
From the pictures I posted earlier I made a few slight modifications. The first was removing the top of the pint sized inner can (which is upside down). Instead of the top I punched 4 holes just below where the lid was to insert the mesh screen. The second change was to shorten the wire mesh pot stand to get the Heineken can closer to the flame. The third change was to double the number of holes on the outer can to improve air flow. At present, the total weight of the stove and pot stand is right at 5.5 ounces. Here's some pics of the stove burning:
It is incredible how little smoke is put off while burning and how little ashes are remaining. This pile was from keeping the stove burning for an hour.
Aug 30, 2008 at 8:04 pm #1449346Brian,
For an hour of burn time, that isn't much ash. That implies good fuel efficiency of the stove. Good work!
ChrisSep 2, 2008 at 6:21 pm #1449686Brian, your instructions were very clear and easy to follow. O made a stove per your instructions and it was very easy to make. Thank You
I'm working on a special project to dispell what I think is an "Urban Legend" when it comes to these little wood stoves. Here is a video of the stove that I made today.
Thanks again Brian for the neat stove.
Sep 3, 2008 at 10:45 am #1449764Hi Dan. Cool video. I'm curious as to why you don't think the bush buddy design functions like an inverted downdraft gasifier?
When mine burns you can see the gasses being emitted from the wood and it's being pulled down through the wire mesh. The flames are visibly being fueled by the mixture of air and wood gas and develop a nice flame pattern from the inner holes.
It appears that your version of the stove doesn't have holes in the outer can towards the bottom. Perhaps this is an issue?
Not a big deal either way. I don't so much care how it works but rather am pleased with the smoke free and high yield burning capability of the stove.
Sep 3, 2008 at 11:51 am #1449778"I'm curious as to why you don't think the bush buddy design functions like an inverted downdraft gasifier?
When mine burns you can see the gasses being emitted from the wood and it's being pulled down through the wire mesh. The flames are visibly being fueled by the mixture of air and wood gas and develop a nice flame pattern from the inner holes.
Not a big deal either way. I don't so much care how it works but rather am pleased with the smoke free and high yield burning capability of the stove."
I agree the nomenclature is not as important as the smoke free fun of this stove. However why saddle it with "Inverted downdraft gasifier"? It is a preheated gasifier. Only up draught gasification is possible without fans. I have never seen gases pulled down on mine.
On mine the outer jacket does not reach the ground but the inner one does so there is no easy path from under the grate to the top holes. You still get the same flame pattern and no smoke because the unburnt fumes coming up from the fuel, mix with preheated air coming out of the top holes and ignite as you see in your picture, no down draught is involved and no inverted down, (unless you mean up). Your flame picture is very good and clear, you can see that all the flame is below the jets coming out of the top holes. Those people who think that ignitable gases are coming out of the top holes should expect flames all round the jets.Sep 3, 2008 at 12:22 pm #1449785Ah… that's interesting Derek. I called it a Inverted downdraft stove since that's what the technical articles I read about the stove design called it.
So your hypothesis is that the fire inside in the inner can heats the air in between the inner and outer can, causing air to be pulled from the lower outside into the upper inner holes (makes sense). When this oxygen rich air reaches the inside of the can it mixes with wood gas that is rising upwards and creates flames (seems plausible). I can see the flame pattern is only on the lower portion of the inner holes. This would support what you are stating.
Despite this I do see wood gas creeping downward off wood chunks and heading toward the low wire mesh grate supporting the coals. I don't see it during all of the burn time but it is certainly visible when I first add in a new chunk of wood.
I purposely place the holes on the outside can above the bottom of the inner can so that air would be less likely to rise up through the middle and more likely to rise up between the two cans. Perhaps this is why I'm seeing some down draft of wood gas? On the other hand it could be that I'm hallucinating from the residual pain fumes and all that darn nasty Heineken I had to drink for the cook pot!?!
Sep 3, 2008 at 2:36 pm #1449816Here is a diagram of the original stove that was named "downdraught wood Gassifier" The stove was ignited from the top and burned in a downward fashion. Air being introduced at the base of the stove and controled with a valve. Air was also introduced at another location as shown.
The second photo is a commercial stove that the guy produced according to the diagram.
The stoves that are being introduced here are not like the original that everyone gives reference to. The makers are giving their theories of how they are operating.
Oct 6, 2008 at 10:23 am #1453393Could you post a picture of the newly remodeled inside because I am trying to understand what you did. Thanks.
Oct 11, 2008 at 7:53 am #1454074I was tinkering in the basement last night putting together this stove, was wondering about something I had laying around to use as a pot support for initial tests. If any of you have an old Svea 123 (brass cylindrical), the pot support/windscreen for that fits on top perfectly. Too bad it weighs a bit over 4 ounces!
Oct 17, 2008 at 7:23 pm #1454927Unfortunately my hole punch came with two screws without heads so I can put the bits into it
Dec 9, 2008 at 4:48 pm #1463250Hey all-
Hope you don't mind me reviving this thread. Brian, your directions were indeed good. I made a couple variations and it came out all right. A few questions about this stove and woodstoves in general:1) I've seen mixed recommendations for standard fire building and top-lit fire building for these stoves. What's the best way? Does it matter?
2) I wasn't thrilled with the performance of the stove. Had to feed it pretty much continuously or it'd die out. Brian, how often do you have to feed your stove?
3) The BB Ultra and the quart-can stove have sorta reversed dimensions–the BB is wider and w/a shorter firebox. Could it burn better, or at least a bit easier, by having that extra width? Maybe able to fit more fuel in effectively?
4) It seemed like the fire would die out even when there looked to be a decent amount of fuel in the stove (say half full anyway), which made me think the fire somehow wasn't getting enough airflow/oxygen. How does the placement of ventilation/holes on this stove compare to BB (hard to find internal pics of BB).
5) I bought the same hole punch. Think I'm inept at metal working at its absolute most basic. Not a single one of my holes punched cleanly through. They all had a tag piece keeping staying attached. The tag was uniform, meaning all at the nine o'clock position. Visual inspection of the punch showed no wear, missing chunks, or weird build up. Was it me?
Thanks for the feedback, gang-cheers.
Brad
Dec 9, 2008 at 5:28 pm #1463263"Not a single one of my holes punched cleanly through."
I find that the punch seems to work best if you use a brisk motion once the punch touches the metal. If I operated the lever gently I sometimes got "hanging chads".
Experiment on scrap material.
-
AuthorPosts
- You must be logged in to reply to this topic.
Forum Posting
A Membership is required to post in the forums. Login or become a member to post in the member forums!
Our Community Posts are Moderated
Backpacking Light community posts are moderated and here to foster helpful and positive discussions about lightweight backpacking. Please be mindful of our values and boundaries and review our Community Guidelines prior to posting.
Get the Newsletter
Gear Research & Discovery Tools
- Browse our curated Gear Shop
- See the latest Gear Deals and Sales
- Our Recommendations
- Search for Gear on Sale with the Gear Finder
- Used Gear Swap
- Member Gear Reviews and BPL Gear Review Articles
- Browse by Gear Type or Brand.