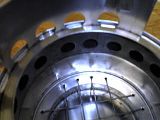
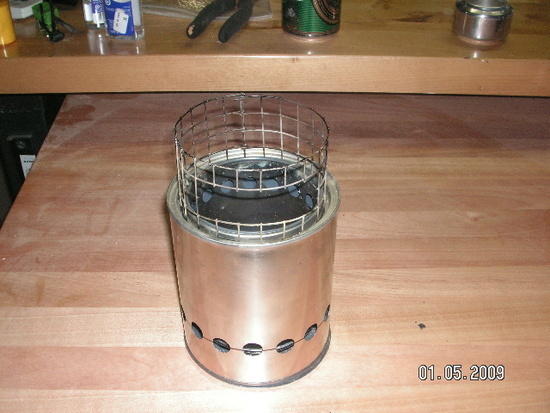
Brad – Here's the photo you requested. Sorry it took so long to get to you. I loaned the stove out and just got it back.

Topic
Become a member to post in the forums.
Brad – Here's the photo you requested. Sorry it took so long to get to you. I loaned the stove out and just got it back.
Brad – I lit my stove both ways, that is, starting at the bottom and adding fuel or adding fuel and lighting it on top. It works better slowly adding fuel (every minute or so) to an existing fire and not overloading the fuel box. Thus, I agree with you that the design suffers from poor air flow. I’ve considered making an external wall with the holes closer to the bottom (ground) since its been established that these are really not downdraft gassifiers. Perhaps this would get more air into the bottom of the fuel box. Oh, and my punch from harbor freight does the same thing… the company is not known for the best quality tools but it gets the job done…
It looks like this stove uses galvanized hardware cloth for a grate. In my experience, it will burn out pretty quick, like a couple of weeks. I recommend you get some nichrome or stainless steel wire. I've started using stainless steel safety wire for this reason. see http://www.backpackinglight.com/cgi-bin/backpackinglight/forums/thread_display.html?forum_thread_id=15999
In going from a 3 inch fire box to a 4 inch box, re-fuel time went from 2 min. to 10 min. I guess size is important.
Nice! Reminds me of the stove I was just playing around with this Sunday: The Bushwhacker stove from Jim Falk. Here's a video of it:
http://jasonklass.blogspot.com/2008/12/bushwhacker-stove.html
Thanks for the thoughtful responses, guys–glad to know I'm not crazy!
I had made one of these a year and a half ago with the double paint can set up. The one I made was successful with just a cutting slits with a Mora knife for air flow through the base of the inner can ( inverted), and cut slits with the same knife for the inner gas holes. I made triangular holes with a sharp can opener on the base of the outer can. I held the two cans together with three sheet metal screws through the upper edges of both under the top opening. For a pot stand I screwed three sheet metal screws, about 1 and 1/4" long through two stacked oversized nuts down through the top of the unit. I backpacked with it all this past season.
I improved it immensely today. and made a new one.
Today I discovered that a Progresso soup can also fits tightly inside the inner lip of the quart paint can. I drilled out a mess of 1/4 # holes on the bottom of the Progresso inner can. I drilled 1/2 " holes along the base of the outer can, and the 1 row pattern of 1/2 " holes on the upper side of the inner soup can. I was not able to get the original version to burn down from the top, but this new one is something else. I tested it this afternoon, and stuffed filled the inner can with dried wood chips from around the wood pile. I kindled a small fire on top of the pile of wood and this time it burned all the way down through the pile, eventually igniting the inner holes with the secondary burn feature. This thing rocks. The larger holes on the cans was what i needed. I never had to add any wood with this unit. I will film the process and time the boil time for a pint of water and post it here.
This is my final answer
: The following is the text from that post. For photos and a Youtube video of the stove in action go to the website entry –> http://tjamrog.wordpress.com/2008/12/22/the-evolving-backpacking-wood-stove/
The Evolving Backpacking Wood Stove
I think I have finally come close to my version of the perfect backpacking wood stove.
In 2007, I started my thru-hike of the Appalachian Trail with a wood stove. For that trip, I disassembled an older version of the Sierra Zip Stove , replacing the inner chamber with a modified titanium Sierra cup from REI , and ditching the old heavy base plate in favor of a Lexan replacement, with the addition of three Coleman folding legs. It weighed in around 9 ounces. The stove worked fine, but the Lexan base did not hold up ( cracked). I replaced it in Hot Springs, N.C. where I bought a simple Etowah alcohol stove that held up well for the remainder of the 2,175 mile walk.
But my preference for using a wood backpacking stove led me to sign up for a stove building workshop at Snow Walkers’ Rendezvous in November of 2007. The workshop was put on by Don Kivelus, of Four Dog Stoves. You can view all of Don’s products here: Catalogue. Don sells a titanium wood backpacking stove, the Bushcooker. I viewed the stove at his vendor table and when I inquired about purchasing one ( for $120) , he told me that I could buy his used demonstration model for $60, but then Don encouraged me to take his Sunday morning workshop for $10 and make my own low cost version. I had a blast with the workshop.
We each made our stoves out of one 1-quart paint can, one 1-pint paint can, 6 sheet metal screws and and six 1/4” bolts. No special tools were needed. We used only a can opener, knife, and screwdrivers. I have a video of that stove in use on YouTube , that has over 12,000 hits to date.
I used the stove throughout the 2008 backpacking season, and felt it could be improved.
For the last week I have been making and testing stoves.
The finished stove, including windscreen, weighs a mere 5.7 ounces. I filled the inner can with 2.9 ounces of air dried wood, scraps really, from around my wood pile. On 12/21/08, the air temp was a crisp 17 degrees. I was able to rolling boil a pint of cold tap water in 8 minutes and 45 seconds from touching off the birch bark tinder with a match. I removed the boiled water, made a pot of tea and then checked the stove at the 20 minute mark and could still see a small bed of coals glowing inside. NOTE: I did not add any additional wood after the stove was tindered. There were occasional gusts of wind as well. I plan to take along a sheet of aluminum foil to use as an emergency windbreak.
The most interesting finding about this new version is that it did not have to be tended. The first stove required me to frequently remove the cook pot in order to add additional wood. This one has been redesigned to allow adding wood without removing the cook pot, for example if you wanted to simmer for 10 minutes or so. But I never needed to add any additional wood.
I also revisited an older fire building technique. This stove burns from the top down. I packed the stove with 2.9 ounces of wood, lit it from the top, and forgot about it. Flames exit the top inner holes in this stove after the burn is halfway done.
At our summer camp, we have a older commercial wood stove that operates under the same procedure, brand name Tempwood . It was marketed in the 1970’s as a downdraft model. You load it with wood and kindle the top, just like this little stove. The Tempwood works just as advertised. There are disbelievers out there that are adamant that any backpacking wood stove can’t be a true downdraft unit, but doubters can check out the data/diagrams on the Tempwood, play around with this stove and decide for themselves.
Construction Details:
Outer Can- 1 quart paint can, bottom removed and 1/2 “ holes drilled along base. I bought my can for $1.70 at Lowe’s. You can use old paint cans as well, just clean them out, or throw them in a fire. I didn’t drill all the way around, but left untouched a 4” side of the can. You could do just half the can, in case you wanted to block wind, and add more holes later if you wanted to. A #1 Irwin Unibit cuts through these cans quickly , but a regular drill bit is also OK. It is easier to drill out the side holes on the paint can if you remove the bottom after you drill out the holes.
Inner can – best choice is a Progresso soup can, 1/4” holes drilled through bottom. Any 20 oz. can works as well, such as DelMonte or Dole crushed pineapple. Drill out a ring of 1/2” holes on the top of this can, about 1” apart and centered about 1” below the top of the can.
Friction fit the inner can into the paint can. Keep pushing, and you will feel it lock. I suspect you could use high temperature JB Weld to cement it in, but functions with the press fit. For long term use, I secured the fitment by screwing through the top sides of both with three 1/2 sheet metal screws. No drilling required.
The pot stand I made was constructed from a large can of canned chicken with 3/8” holes drilled and the use of tin snips. I fit it into the groove of the paint can for stability.
I found the directions and suggestions in this thread very helpful, so I gave it a shot. My attempt weighs 5.05oz with the potstand, and it took 8 minutes to bring 16oz of tap water to a roiling boil (after the stove was warmed up).
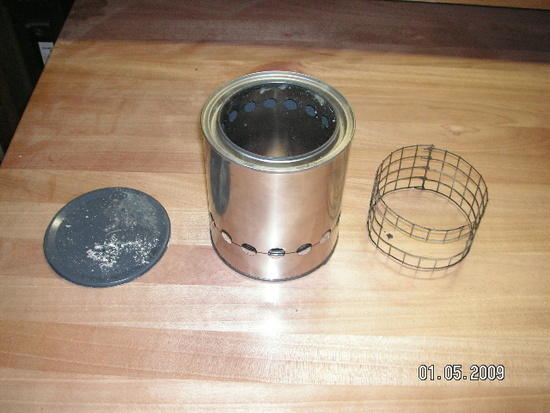
I used the quart/pint cans like suggested above. I cut the bottom of the quart can off, and both the top and bottom of the pint can off (I saved the bottom of the quart can to protect the ground from burning).
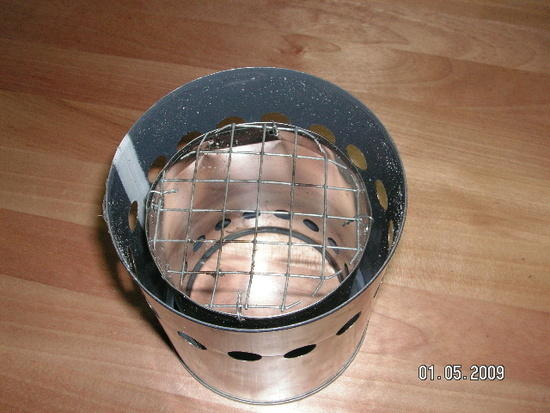
Then I drilled (16) 1/2" holes in the bottom of the quart can, and (16) 3/8" holes in the top of the pint can (a "stepbit" or "unibit" works great for this). The holes in the bottom of the quart can need to be just above the height of the bottom of the inside can. I also drilled (4) 1/8" holes in the bottom of the pint can to attach the hardware cloth. I used JB Weld to attach the pint can top to the inside rim of the quart can. I took another piece of hardware cloth and fashioned a pot support that fits in the upper rim of the quart can.
It's not the easiest stove to work with, but once you get it going, you just have to add a small piece of wood every 30 seconds or so.
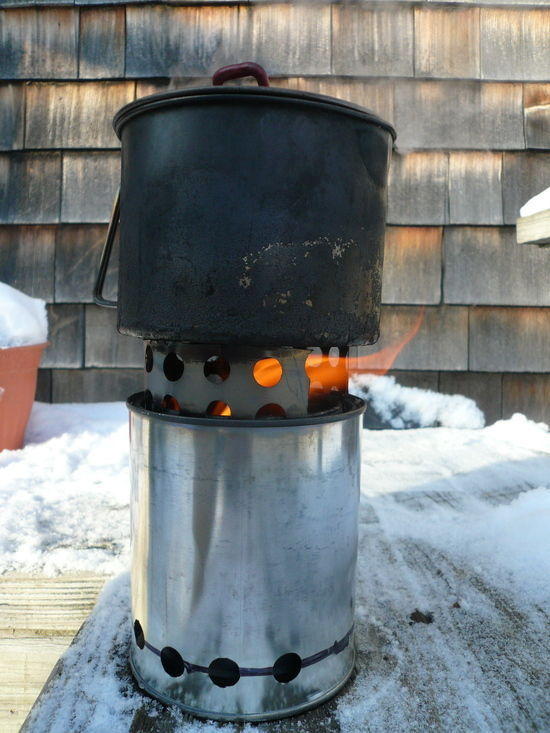
Here's the stove…

Here's a photo of the bottom (the pot stand fits in between the two cans)…
Here are the parts…
And here's the stove with the pot stand…
Dennis,
You say,
"It's not the easiest stove to work with, but once you get it going, you just have to add a small piece of wood every 30 seconds or so."
Have you tried packing your stove with small pieces of dry wood and then kindling a fire on TOP of the pile? This is how mine works. I find it VERY easy to work with, and I do not have to add any wood to get it to boil a pint of water.
New improvement: The most sturdy way to mate the two cans together is to use three 3/16 x 1/2 " pop rivets, along the top of the cans, instead of sheet metal screws.
I have made 6 of these stoves in the past few days. It is really fun. I am eating Progresso soup for lunch a lot, though.
Yes, I've tried packing the stove with little sticks (about 1-3" long, pencil diameter) then piling tinder on top, but I can't get it to light the pile underneath. I've been trying this for two days, and for the life of me I can't seem to light a fire this way (from the top down). I'm not an idiot, but I sure feel like one trying to light a fire this way. How in the world do you do this?
I'm trying a new design (single can with holes on the bottom and top) – maybe this will lend itself better to a down-burning fire.
hi there, I've just come across this forum and this thread and would really like to have a go at making one of these. But, can somebody give me the measurements of these tins and cans that you use? We don't have these quart and pint measurements on our tins over here in the UK.
Hi Stuart,
Here's one I made from a Tate and Lyle syrup tin and an ordinary size bean can. It's the same weight and size as a BushBuddy.
.
That looks deadly. I only want to heat up a bit of water!
Rog is 6'8", so he cooks with a cauldron. :)
nice work though…same weight as the BB? cool.
Looks good, but the cast iron grate looks kinda heavy! (o:
Heh, first try, I put a couple of sugarlump sized bits of firelighter in with the nice dry twigs, and it worked a but better than I thought it would. :o)
Steven, do you still use your Ti version? I have some 0.005" foil now to play with.
> I have some 0.005″ foil now to play with.
The Titanium Goat stuff? What’s it like to work with (cutting, folding, punching, etc)?
Been considering some of that for the SqueezeBox and Caldera Clones, and also thought it would be easier to use to make a wood stove than mucking about with cans.
A discussion on OM lead me to some simple maths that reminded me that the optimal burner area for a given burner sidewall area is achieved by an infinite number of sidewall plates, also known as a circle… Then it dawned on me that this could be achieved by rolling up a flat piece of Ti into a cylinder (d’oh!), locked together with tabs like my Caldera Clone.
> Here's one I made from a Tate and Lyle syrup tin and an ordinary size bean can.
I think the only appropriate response for that is the US vernacular:
Sweet!
Hi Kevin,
No, it's not the CP2 grade TiGoat sell, I went for something with a bit more rigidity. It's 15-3-3-3 which has a large Vanadium content. It cuts and folds ok with a small bend radius, but is more brittle than CP2. Less deformation when punching and burred edges than CP2 though.
I'm currently experimenting with making a DC spot welder to use with it.
Hi Rog
Where did you get he 15-3-3-3 from?
I have been working 6Al4V – hot. It cracks when cold, and I can't punch it anyhow.
I made up an AC spot welder out of a big transformer rewound on the secondary – works OK but is tricky to adjust for the different metal thicknesses.
Cheers
Hi Roger, a 6' long 6" wide piece turned up on US ebay, and I bagged it. I'll check see if the seller has any more if you like.
Been coming in to work smelling like a hippy for the past two days because of this!
Made two prototypes, still needs a bit of tinkering, but so far I'm impressed.
The first one was with a 840ml can of beans on the outside and a can of catfood on the inside which turned out to be too narrow. Now I found a can in between those two sizes, works better, more space for wood..
Once I figured out that lighting the stove from the TOP is imperative I got much better results. Right now with a very much imperfectly sealed stove I got a good-burn time of ~15 min. It took me a bit to cop on but the idea is simply to build a fire on top of your already filled stove. I've been putting the sticks in vertically to get as many inside as possible and still have air-flow. And I *think* they burn slower this way.
It uses very little wood considering the ammount of burn time you get, meaning you can use it just about anywhere. And no smoke means it's stealthy.
One of my objections is that it's bulky unless you're carrying a pot that you can fit it in to. This is also why I refuse to make it any taller than the can I'm using now.
Another objection is that once the fire burns down, you have to add sticks, creating smoke, and the fire is burning from the bottom again, unless you start all over again. So it's good for a stealthy cup of coffee but not a proper meal, unless I manage to get it going for 45+ mins, but with this size can I can't see it happening. May post pictures soon for all you backwards hicks still using the imperial system to give you an idea of the size. ;)
.. whether to put the bottom of the inner can above the holes of the outer can or a bit lower down? Haven't got enough cans to test this at the moment and me and the dog both are sick of eating beans and catfood.
Mike a drawing I have has the bottom about midway thru the hole on the bottom of the outer can (the drawing is of a actual Bushbuddy- as best the guy could tell)
Become a member to post in the forums.
 New Ultralight GearSee the latest releases in ultralight cottage-brand gear from small makers.
 Loading...