Topic

DIY Walking Axe

  • This topic is empty.
Viewing 25 posts - 76 through 100 (of 160 total)
Roger Caffin BPL Member
PostedDec 30, 2007 at 12:57 am

Hi Steven

> so I'll probably end up making a few more mods (Rev 3 if req'd)
Can I suggest that you look carefully at the length of the ferrule or sleeve on both the head and the point. By my rough engineering rule of thumb, both could do with another 5 mm or so of length. But stress test one first to see. The Ti is unlikely to break, but the CF tube might.

One other thing. Get professional advice about what glue to use. There are many superglues which will NOT work. Ti Goat was using the wrong one at one stage, and ALL the aluminium rings fell off my CF trekking poles. Epoxy on the other hand is good. You could ask Loctite about this.

Cheers
Roger

Rog Tallbloke BPL Member
PostedDec 30, 2007 at 6:48 am

Would a tensioned piece connecting the adze head ferrule and the base spike be worth considering? Maybe a solid 1/8" or 3/16" Ti rod threaded at the ends?

It would provide a failsafe fixing in the event of glue failure, reduce the chance of the glue failing in the first place, and would add to the shear stiffness of the axe shaft too. I realise it would add not inconsiderable weight, but you might be able to reduce the carbon wall thickness on the next revision and save a bit there.

If you did go for this idea, it would be worth getting the threads rolled rather than die cut, if that's feasible on Ti. Maybe ask at a specialist cycle shop how they thread titanium wheel spokes. I have a quantity of 31" long 1/8" centreless ground medical quality Ti-6AL-4V rods if you need some.

On a seperate issue, thinking about what Roger Caffin said about weight and step cutting: How about strapping a suitably reshaped alloy drink bottle full of water (or something tastier that won't freeze) to the the pick side of the shaft when more oomph is needed for ice chipping with the adze?

My Cassin 60cm axe weighs 17oz plus wrist strap so well done on a stunning job!

Steven Evans BPL Member
PostedDec 31, 2007 at 4:56 am

You've got a good eye Roger. The ferrule is too short. Recomended length is about twice the diameter… so I'm about 1/2 inch short for the head and about 3/4 inch for the spike. Definitely a fix for the next one.
As for the glue, Kevin (the gentlemen who provided the shaft) sent me a document specifying the procedure to bond CF with Ti. I am currently trying to source a local supplier of the epoxy.
It needs a few tweaks and I'll get a better feel when I go and use it a bit. I'm trying to keep it as light as possible, but it has to work aswell!
Thanks for the input!

Steven Evans BPL Member
PostedDec 31, 2007 at 5:02 am

Rog,
Good thoughts about the shaft. I had considered putting either a rod/cable down the center and fastening it to the head and spike – and maybe I will go that route if this doesn't work out. That would fix the problem of snow filling the shaft aswell – this version isn't capped off.
Now what's this talk about a carbon/ti shovel? ;)

Rog Tallbloke BPL Member
PostedDec 31, 2007 at 7:20 am

The Ruskies made a load of Ti shovel blades to get around export restrictions. They flogged 'em to the Germans as agricultural implements, and the Germans melted them down for aerospace parts. Some survived though. There is one on a well known auction site as I write. Maybe the Ruskies made different grades of them, because mine is nowhere near the 2lb quoted on that auction, more like 9oz, but I suspectthe auction owner just got it wrong or is bulling it up to be a bigger chunk of Ti than it really is. item 360008518545

It's not an ideal shape for a snow shovel, but has turned over top edges for stomping on and makes a secure king peg for camping on deep snow in the wind too.

I made the shaft out of a section of carbon fishing pole and used a cheap plastic handle off a garden fork glued onto one end. To join the shaft to the shovel, I made a temporary turned piece of ash wood drilled through it's length (for lightness ho ho) to fit the taper in the shovel head, and plan to use it to make a mould for an alloy piece when I get a round tuit. :o)

Aaron Sorensen BPL Member
PostedDec 31, 2007 at 11:30 am

Hey,
Maybe with the screw in tip you can have the option of a shovel head, and maybe even a trowel.
All you would need to do is have a cover for the spike tip which would work great as a handle any ways…

Roger Caffin BPL Member
PostedJan 1, 2008 at 11:43 am

> Would a tensioned piece connecting the adze head ferrule and the base spike be worth considering? Maybe a solid 1/8" or 3/16" Ti rod threaded at the ends?
That would put the CF into compression. Neither the CF fibers themselves (in that form) nor the matrix material are all that strong in compression. Personally, I would strongly favour the longer ferrule and the right epoxy.

> how they thread titanium wheel spokes
With some difficulty…
Actually, you can work Ti with the right tools, and the 6Al4V ELI wire is easier to work than the standard 6Al4V metal as it has been tempered (I think) to make it softer. Heat to glowing red once or twice (best in inert atmosphere) and it gets harder, like the sheet.

Rog Tallbloke BPL Member
PostedJan 1, 2008 at 5:17 pm

I agree that the longer ferrule is necessary anyway, and with the epoxy forms the primary fixing. The rod suggestion was just offered as a 'belt and braces' backup to ensure you still had all the bits to try a different glue with if it failed. Very cold conditions make glue more brittle.

There wouldn't be a need to tension the rod very tightly. Any bending load on the shaft is going to put half of it under compression anyway, whether or not there is a rod down the centre. Maybe a lateral wrap along the full length would be good rather than just around the ends If I understood Kevin's description correctly, though he's da man who knows.

I guess that having been trained as a 'nuts and bolts' shop floor engineer, I'd just feel happier dangling off an axe which had a mechanical connection helping to hold it together.

Alpha-beta alloys that are lean in β, such as Ti-6Al-4V, can be air cooled from the annealing temperature without impairing their stability.

Steven Evans BPL Member
PostedJan 2, 2008 at 5:23 am

Rog wrote "I'd just feel happier dangling off an axe which had a mechanical connection helping to hold it together"

Haha, this is the same thing my buddy told me a few weeks back when he looked at it. It's nice to physically see the connection, but in this application, I don't think you have a lot of options – maybe Kevin could give some thought to this? The epoxy and instructions on bonding given to me from Kevin "should" be extremely strong. The lap shear strength of the spec'd epoxy is about 4500psi…and in the current design, there will be a bonded area (head to shaft) of 1.72in^2 giving a theoretical max load of 7700lbs in shear (ie. 7700lbs to "pull" the head off).
And with a longer ferrule, the chance of the Ti breaking through the shaft would be less likely, however I have no idea (and not enough CF property values in input into my FEA program) how to calculate that…;)
Going to break edges and anodize tonight, pick up the epoxy and bond tommorrow, then we wait for the field report.
Steve

Steven Evans BPL Member
PostedJan 10, 2008 at 4:57 am

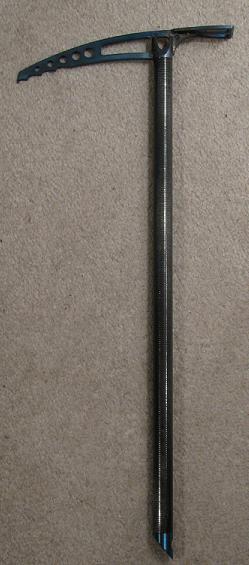
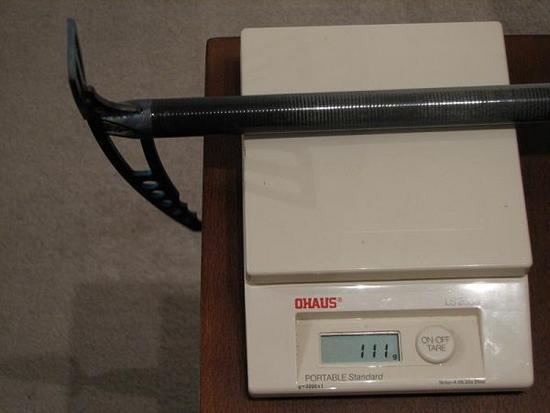
Fellow BPL'ers, the project is complete. Attached are my final pics. Total weight is 111g or just shy of 4 oz. I anodized it blue (~36V) in my kitchen, so it came out pretty blotchy…and bonded the head and spike to the shaft using 3M DP420 – as spec'd by Kevin's company. Just playing around with it, although the overall weight is low, the head is much heavier then the rest of the axe. I had a trip planned this weekend, but we have had a heat wave here and all the friggin' snow melted! We might still go but I'm not sure how much use the axe will get.
Hope you like it!

Here is the complete Axe
Complete axe

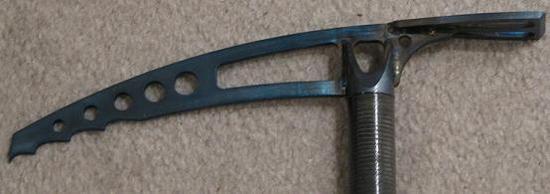
Close up of the head, you can see the uneven anodizing.
Axe Head

Here is a shot of it on the scale. I had to hang it off the edge of the table to get it stay on the scale. Total is 111 grams.
scale shot

Sam Haraldson BPL Member
PostedJan 10, 2008 at 8:58 am

Let me be the first to congratulate you, Steve. I do have one question however. How afraid to arrest with it are you? Your craftsmanship combined with the great advice of others here on BPL has been wonderful to watch unfold.

PostedJan 10, 2008 at 11:55 am

I have been watching this thread without contributing. I must say first that it is very impressive workmanship. Well done is not enough of a compliment.
I was taken by Tallbloke's suggestion of adding weight, when needed, by fixing a water bottle to the head. Now you have the finished product you can see how good it is at cutting. I guess from other reviews that more head weight would be very useful at times. Some technical climbing axes have a triangulated fixing between the head and the shaft. The shaft divides and fixes to the head at 2 places. I wonder if something like that would provide a protected place for a weight tank.
Getting a sweet blow from such a tool is about getting the pick point and adze blade on the radius of gyration, as I remember all to do with second moments although I forget the formula. I sort of feel that an extra weight tank there would be the right place to get such an effect. Looking at the picture I doubt you would get a perfect blow from both the pick point and the adze blade in a test as seen, as they are not on the same swing radius. I dont have experience but the point looks better placed than the adze, to me.

Steven Evans BPL Member
PostedJan 11, 2008 at 6:29 am

Glad you guys like it. I should add that it is 54cm long

Sam: Am I afraid? A little :). It feels really light in my hands and gives the impression that it is fragile. I really won't have a good feeling until I beat it up a bit. My concerns lie mainly in the carbon fiber shaft. I'm not concerend with any of the titanium as they are dead strong, but I am afraid that the ferrule of the head will break through the wall of the shaft when loaded appropriatly. I used plenty of epoxy and the test piece I left out to dry is like steel, so I don't believe the head will pull off, unless it tears part of the shaft along with it.
Theoretically, I should be able to hang off the end of this thing, but I am hesitant to try it until I least use it a bit in the field. I would hate to break it before it even left my house! I'm leaving tonight for a 3 day trip but most of the snow has melted up here – they have even put a warning out on the frozen lakes!

Steven Evans BPL Member
PostedJan 11, 2008 at 6:33 am

"I doubt you would get a perfect blow from both the pick point and the adze blade in a test as seen, as they are not on the same swing radius"

Doh! Now you tell me! :)

PostedJan 11, 2008 at 11:49 am

ahem.. "__Walking__ Axe"

if you have large pines around, try it out on a tree

Roger Caffin BPL Member
PostedJan 11, 2008 at 12:32 pm

Hi Steve

Congratulations. I reckon it will do what you want. You aren't going climbing waterfalls with it – that was never the purpose. I found the Helix quite strong for general bashing around, and your titanium version should be even stronger.

One question if I may:
> I anodized it blue (~36V) in my kitchen,
Details? References?

Cheers

Steven Evans BPL Member
PostedJan 14, 2008 at 4:26 am

Roger,
I used about 36 volts to anodize my axe. 36 gives a nice blue finish. I only posted the info in case someone wanted to do the same to their titanium stuff. Here's some info I pulled off the web.
http://www.valhallaarms.com/wyvern/titanium/anodizing.htm
I used four '9 volt' batteries wired in series, some tinfoil, tissue, and a can of diet pepsi…voila!

Paul,
That made me laugh…

As for the axe…I used it in the field this weekend, and I am very impressed with it's strength. I didn't push it's limits at all, but I abused it a bit on some steep ups and downs. Having not held the helix before (so I have nothing to compare my axe to), I can't believe how light and strong this thing is. The tip and spike have held up well to rocks and ice. Lots of the snow has melted because of the temperature so there are planty of bare spots. I took some pics, but I have to get them developed as my digi broke a few weeks back.
Steve

Roger Caffin BPL Member
PostedJan 14, 2008 at 1:39 pm

Hi Steve

KINKY!
Thanks ever so much for this. Yes, I am working with titanium too, and this gives me ideas …

I note the web site says 150 V at 10-15 AMPS – somehow I think they have got this wildly wrong. :-) Milliamps maybe. Especially if you used small PP3 9 V batteries.

Yes, the Titanium will hold up much better than the anodised aluminium in the Helix. Jealous!

PostedJan 14, 2008 at 2:05 pm

Steve:
Thanks for sharing this information with us. I looked at the link you posted, this is terrific. Regarding your use of tinfoil. Did you mean aluminum foil? Could you go into a little more detail regarding your setup. How long do you let it "cook", etc. I really like the color effect you achieved.

Steven Evans BPL Member
PostedJan 14, 2008 at 8:22 pm

The link I posted above was just my first hit on google. The link below explains the technique I used much better.

http://www.popsci.com/popsci/how20/3f178ca927d05010vgnvcm1000004eecbccdrcrd.html

Roger, I believe the 150V @ 15amps is overkill, but I get much, much better results with a DC power supply – never paid much attention to the amps, maybe 2 :). If you have one, use it…if not, you can get by with batteries.

Denis,
I used the same technique for my axe as in the link. It is easy and requires only a couple of bucks. Just watch out for the batteries overheating, they get hot. As for "cook time", you see when it changes. The color your titanium changes will depend on the voltage you apply to it. Take a look at this guys logo

http://mrtitanium.com/index.html

The logo gives the achievable colors versus voltage. I believe it starts at 0V and goes until 110V…I think. S you apply more volts, the color will just repeat themselves. I used 36V which gives a blue-ish finish.

Remember that it is voltage that changes the Ti color, not the amps (although I believe the amps make it change faster and let you do a larger part). A common mistake after I tell people this is to use a 12V car battery…it won't change color. Also, anodizing aluminum is a slightly different procedure which requires a little more stuff.

Hope that helps.

Steven Evans BPL Member
PostedJan 14, 2008 at 8:31 pm

"Could you go into a little more detail regarding your setup"

For my set-up:

Four 9 volt batteries
Wires with aligator clips
small piece of aluminum foil (tinfoil)
paper towel
1 can of diet pepsi

Procedure.

Wire the batteries in series (not parallel).
Wrap a ball of aluminum foil in a piece of paper towel.
Attach the negative wire to the titanium part.
Attach the positive wire to the aluminum foil/paper ball.
Dip the ball into the pepsi.
Touch the titanium part with the aluminum/paper ball.
It will change color immediately, but will require you to hold it there for several seconds in order to reach the final color.
If you are not getting results, make sure you have a closed circuit. I usually pour a little pepsi all over the part and clips to ensure a good connection.
Keep an eye on the batteries, they get dang hot. I don't want someone telling me they blew up on them.

Disclaimer: Following this procedure may lead to death. Blunt enough?

Steven Evans BPL Member
PostedJan 18, 2008 at 10:18 am

I took the Pterosaur (my buddy kept calling it that) out this weekend for some fun in the sun. The area had a fresh dump of snow, but due to the higher temperatures in the past weeks, there was a healthy mix of exposed rock. It wasn’t used much on the way up, mainly for the downclimb, and no self arrest test yet but it held up well with my weight on it. The titanium was tough, with no noticable abrasions – not even on the super sharp end of the pick. The spike has some burrs on the fine edge from the rocks but that was expected. It was super comfy to hold and uber light when on my back.
One minor issue I have is the angle at which the end of the pick is at. I need to point it forward more as it is difficult to penetrate steep angles faces. Although this isn’t really designed for that, I sometimes encounter very steep, brief, sections. Oh, and the shaft definitely fills with snow similar to the helix. A couple of design changes before the next rev. For those interested, I am planning on making a few of these as I have 14 local guys that want them. Let me know.

My only action pic as I still don’t have a new camera.
axe pics

Steven Evans BPL Member
PostedJan 20, 2008 at 5:21 pm

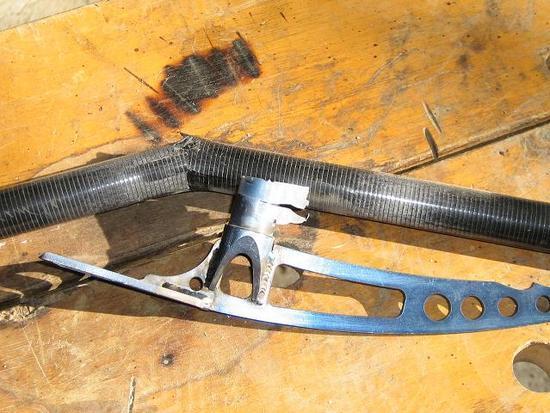
Today I decided to test my axe as per the UIAA requirements for the 'B' rating. The results were as suspected (failed only one of my tests, however, some tests require loads which I could not create ie. 600lbs), and I believe my only change will be to lengthen the ferrule from the head to the shaft as that was the point of failure. After the failed test, I tested the shaft alone to try to get an idea of it's strength. I had to load it to almost 200 lbs before it snapped. Very impressive. Knowing the load and the length at which it broke, I can calculate it's strength and design around it.

RIP my friend…
broken axe

Aaron Sorensen BPL Member
PostedJan 20, 2008 at 5:57 pm

Steve,
At least it works as expected and broke down the middle of the shaft.
Is there any way a built up 1/4" or so line could be done going down the length of the shaft at the location where the break started to occur?
It may gain 1/4 oz but my also be twice as strong when it comes to breaking strength.

I still want one though.

Viewing 25 posts - 76 through 100 (of 160 total)
Loading...