
Introduction
In this article, I present a DIY hydrostatic pressure testing device (and test results for 30 fabrics) that allows me to measure the hydrostatic head of “waterproof’ fabrics at home.
The device is made from readily-available and inexpensive parts. I also present my protocol for running the device and a discussion of some of the fabrics I tested.
Context
A major problem when buying fabric is that it can sometimes be hard to get a sample to examine in your hand to see whether it might be suitable for your project. It can be even harder to find out whether it will be sufficiently waterproof to serve as the fly for your next tent. There is the usual marketing spin, but I don’t place any faith in those guys.
My solution is to test a sample of the fabric myself to see, among other things, just how waterproof it is. This is usually done commercially with a thing called a Suter Tester, but even the simplest manual ones are expensive to buy.
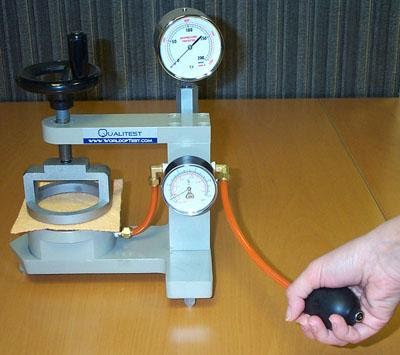
The concept here is to clamp an area of the fabric to a solid base plate and then to inject water under pressure through a small hole in the middle of the base into the space between the two, to see at what pressure the fabric starts to leak. The standard threshold for a leak is at least three drops of water visible coming through the fabric – usually slowly at first. The pressure at which this occurs is usually known as the hydrostatic head (HH).
Making Your Own Hydrostatic Head Measurement Device
So, I have made my own version of the Suter Tester (several of them in fact).
The first one relied on a hose going up in the air to measure the water pressure, but that one was limited by how high up in the air I could take the tube (a maximum of 3000 mm). Climbing a high ladder to make a measurement was not wise as the height of the water column could change while I was getting up the ladder.
The second version used a commercial round analogue pressure gauge instead of the tube going up in the air, but the resolution on the ones I had was very coarse. Mind you, if you can find a large pressure gauge with the right range, it might be good enough. The waterproofness of any fabric is not usually uniform across the surface area of the fabric, so high resolution may be pointless.
My third version used an industrial strain-gauge pressure sensor. While sensitive and able to provide more resolution than what I needed or could justify, it required lots of electronics and power. That was possible, but it was bulky.
The fourth version uses a commercial battery-powered digital air-pressure sensor with a built-in digital readout. I found it on eBay and it was quite cheap. Just how accurate it is I do not know (a few percent?), but it is good enough for this task. The rest of the device uses cheap pneumatic fittings, pneumatic hose and a slab of solid plastic, all mounted on a board covered with some heavy blue waterproof material (I don’t want the base board always wet).
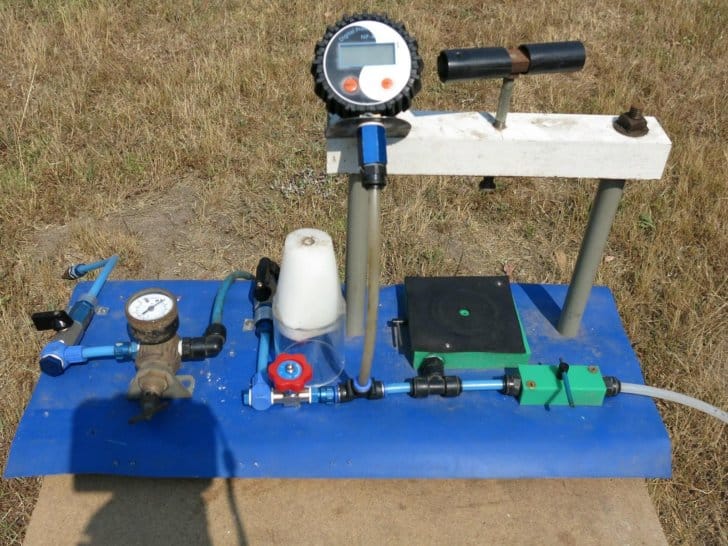
The fabric to be tested is placed on the black rubber square (1), on top of a slab of green plastic (2). It has a hole in the middle (3). The bit of clear plastic tube (4) with the white lump on top (behind the red knob) is the clamp that fits over that fabric and presses down on the solid base underneath to make the test region. If you look carefully you can see the ring-mark on the rubber. This is the core of the instrument.
Member Exclusive
A Premium or Unlimited Membership* is required to view the rest of this article.
* A Basic Membership is required to view Member Q&A events

Discussion
Become a member to post in the forums.
Companion forum thread to: Measuring Waterproofness in Outdoor Performance Fabrics with a DIY Hydrostatic Pressure Test Device at Home
In this article, I present a DIY testing device (and test results for 30 fabrics) that allows me to measure the hydrostatic head of “waterproof’ fabrics at home.
Nice DIY engineering and interesting test results. With fabrics and coatings and suppliers appearing and disappearing rapidly, seems like independent testing could be a full time job.
Any estimate on total cost of parts?
Any thoughts on how a version 5 setup might stop the silicone-coated fabric creep? Seems like the top clamp could be a plate with a large hole and a LOT of downward force, or maybe with edge clamps like an electric sheet sander. So says my armchair from halfway around the world :-)
How much does HH degrade with age and/or use? How much “buffer” do you recommend?
Yet it seems as though all the recent fabrics you tested are more than good enough, and we can obsess over other parameters like weight, condensation, slipperiness, water absorption, noisiness, stretch, and UV resistance instead. Your thoughts?
Factory sealing silnylon/silpoly with diluted silicone caulk adds about a week and some cost to an order – if it’s offered. Would siloxane tape be much better or worse? Is DIY sealing with siloxane tape reasonable?
Thanks.
— Rex
Roger,
Great article… thanks!
Obviously if a virgin fabric doesn’t test >1,500mm HH initially, it should probably be discarded from consideration. Unfortunately, this only tells someone one-half of the information needed before they burn a lot of labor on a DIY project. They also need to know how its HH will degrade from use as compared to other fabrics with similar initial weight characteristics. Every fabric I have Cubex tested for HH aging, yields a unique degradation curve; an example is shown above.
I suggest that your next companion article addresses you building a Cubex HH aging tester. In the interim, people could use a very crude washer/dryer test. It is of marginal use because most fabrics, of interest to UL backpacker, fail between the first and second cycles of the crude washer/dryer test; as a result, it offers little differentiation. A fine-grained curve is required to select the best fabric in the weight range of interest.
Toatl cost of parts?
Well, maybe $20 – $30 from China/ebay, but a lot of the materials (tubing, plastic etc) came from ‘stock’. BUT regardless, it was NOT expensive. The little pressure gauge was remarkably cheap compared to industrial units.
How to stop the creep?
Well, ‘use the force Luke’. In other words, more force from the screw on top. But before one gets carried away here, does it matter all that much if there is some slip when the HH gets over 10,000 mm? It was interesting to see that there were NO marks on the fabrics afterwards.
Obsess over other parameters?
Yep.
I would pay some attention to tear strength with the really UL fabrics. I would also avoid where-ever possible any ‘rip-stop’ fabrics, as they leak much faster and the ripstop does NOT add strength. Well, not in my testing, anyhow.
Sealing seams?
Do NOT use silicone caulk as found in those cartridges. It is the wrong stuff! Use instead the little tubes of silicone adhesive now widely available. The Permatex Flowable Windscreen Sealant was (sort of) the original stuff, but there are lots of very similar brands now. They are all quite ‘flowable’ and don’t need diluting.
Note as well that while the caulk goes off in a couple of months in its cartridge no matter how you seal it up, the adhesives in little tubes can last for years if the cap is put back on properly. A different chemistry.
Cubex?
I could, but I note that a lot of companies use banks of Maytag washing machines instead. Anyhow, I doubt I want to go that far myself.
UL Fabrics
Yes, these need careful design and sewing. You can’t just rip off the sort of seam you would use for a shirt, but they CAN be sewn to be very strong.
Cheers
Become a member to post in the forums.