Topic
UL folding saw
Forum Posting
A Membership is required to post in the forums. Login or become a member to post in the member forums!
Home › Forums › Gear Forums › Make Your Own Gear › UL folding saw
- This topic has 100 replies, 30 voices, and was last updated 7 months, 3 weeks ago by
 Mike M.
-
AuthorPosts
-
Oct 27, 2020 at 5:08 pm #3681339
All the blades I have seen have these large teeth with sharp edges. The Hortex I showed is similar to the Bahco one I actually use at home. It is great against soft wood and green wood.
However, against hard wood (eg dead Australian wattle) the sharp edges are a bit fragile, and they wear fast. Has anyone found a good way of resharpening these blades?
To recut the teeth is difficult without a narrow shaped stone such as the mfr obviously used. I don’t have one. One could surface-grind the sides a few times, but then the blade gets thin.
I found a cheap Chinese wood saw somewhere a little while ago. Not very well sharpened, or maybe just blunt, but the steel on the edge seemed OK. Almost no set on the teeth though. So I reset the teeth somewhat wider than as-delivered (you need a special tool for that) and then resharpened each tooth. It works wonderfully now, ‘cheap Chinese’ though it might be. Can I do the same for my little saw?
Cheers
Oct 28, 2020 at 1:18 pm #3681425You can buy feather edge files designed for sharpening the teeth on Japanese (pull-cut) saws. However most saw blades now have the teeth induction hardened so not really intended for re-sharpening as it’s only the surface that is fully hardened I believe. I don’t think pull saws, at least the Silkys are designed to have much in the way of set either.
Oct 28, 2020 at 3:00 pm #3681434No set on my Bahco folding saw either.
Induction hardening – hum, yeah, likely.
Cheers
Nov 8, 2020 at 2:43 pm #3682970Using the measurements and a photo posted by John, I modeled a shorter handle for the pocketboy 130 blade (it was easy to change a few variables in the parametric model). The 3d printing software reports the weight of the material used, so I can calculate the total weight of the saw quite precisely. It would be 62 g / 2.2 oz, compared to 76 g / 2.7 oz for the larger one I made, not a big difference. I think the longer blade is worth the extra weight, that’s why I opted for it from the very beginning. What may be nice about the smaller version is that it would be more compact, truly pocketable.
Nov 8, 2020 at 4:51 pm #3682986I don’t know how long it would last on hardened steel, but I’ve used diamond-dusted nail files on stainless steel that was resisting my usual metal file. And those nail file are very thin and easy to handle (light weight, too!). Some of them are as little as $9 for 6.
Nov 8, 2020 at 6:14 pm #3682998Hi David
What sort of grit do these files have? I ask because the ebay set of little diamond files I bought has a rather coarse smattering of diamond chips on them, not at all condusive to detailed work.
I looked on ebay but the files there started at about $8 each. Where do you get 6 for $9?
Cheers
Nov 8, 2020 at 6:39 pm #3683000@David Gardner, what is that name of that saw with the 11″ blade and weights only 2.6 oz?
Nov 8, 2020 at 7:00 pm #3683002@longlw: Good question. It’s one I sell under my G.O.L.D. Gear brand, but I’ve never given it a name. Obviously I’m not great at marketing. Open to suggestions.
The Elevenator?
Jack (The Ripper)?
Fang?
T—Rips?
Al Dente?
Nov 8, 2020 at 7:37 pm #3683005OK, how do I purchase one?
Nov 8, 2020 at 7:38 pm #3683006PM me. And thanks.
Nov 8, 2020 at 8:06 pm #3683009PM sent
Nov 22, 2020 at 1:11 pm #3685219I found this thread almost by accident when looking into gear for a snowshoeing trip as I’d finally like to extend my backpacking seasons to ‘year-round’.
What a find!
Although I was late to the party Jan was very accommodating and my saw handle arrived yesterday. The difference in weight to the Pocket Boy is amazing. Jan’s design is seemingly so simple and yet so efficient.
Comparing the Pocket Boy’s locking mechanism to Jan’s yellow lock is a great lesson for me how things can be simplified by thinking out of the box. Jan’s use of a tiny carbon fiber rod as a spring is a good example – to me a spring looks just like the metal spring in the Pocket Boy and Jan’s design showed me that I need to think beyond that. Now I’m intrigued to find out what else can be improved (lightened) by 3-D printing and intelligent design choices.
Nov 24, 2020 at 12:11 pm #3685534The 3D printing is amazing, but i think that its applications to UL backpacking are rather limited. Not because of the technology itself, but because you may not want to carry too many plastic gadgets anyway. I’ve made a couple more useful items – I have to start a separate thread on that.
Then, there are some technology limitations – the printed parts are not as strong as molded or machined ones. It would bee cool to print custom buckles and other similar stuff, but they would be significantly weaker. (I tried to make a tarp tensioner that would be really usefull, but it broke too easily. I may still try another version, but it would have to be much more robust and heavier.)
To overcome this, I’ve briefly tried printing nylon (which is way more resilient than the other materials used in 3D printing), but it’s difficult and the results were poor. It deforms a lot when it cools down. There probably are ways to overcome that, but it becomes much more involved.
On the other hand, I tried printing few things out of elastic material (TPU) and it’s pretty tough. There may be interesting uses of that, I already have some ideas to explore.
Nov 24, 2020 at 6:25 pm #3685596The only 3D printed object I carry in my pack is a TPU cap for my irrigation syringe to keep it from poking a hole in my FAK. Yes, I could use some tape or tubing but when you have the printer sitting right there, why not? Weight is a fraction of a gram.
Nov 24, 2020 at 6:31 pm #3685597FAK = first aid kit?
Nov 27, 2020 at 1:33 pm #3686057I Got my 3-D printed handle for the Silky Pocket Boy blade the other day. Wow, I am impressed the the product. I can’t wait to give it a real field test.
This is just what I have been looking for to round out my ultralight backpacking kit. Especially when I am carrying my hammock. It seems like the best tree pairs always have some annoying brush in between them. I am not even sure it would be violating the leave no trace rule to clear out some thick understory. Especially when they are always doing controlled burns to reduce fire hazard in some of the areas where I hike.
Nov 30, 2020 at 1:48 pm #3686519Design looks good! I think maybe some grams could be shaved by skeletonising the butt of the handle. Otherwise you could have a defined grip area at the front of the handle and relegate the rear as simply a lightweight blade guard for the folded position. Let me know what you think of this idea. Also, when is the next batch of saws?
Dec 1, 2020 at 11:45 am #3686695I’ve considered both. However, major part of the handle is mostly hollow, it’s just a thin shell filled with a 3D honeycomb structure that’s 85% void. I guess that for a given weight, it is the stronger option as the continuous shell transfers the load better than a complex outer surface of a skeletonized version. Only the area around the pivot and the neck that connects it to the part of the handle reinforced by the blade cover is solid. In fact, some version of such a partial infill is the default, most printed objects are strong enough and don’t have to be solid all the way through, and it saves time and material. Here’s a picture when the handle is being printed.
I was also thinking about making the handle shorter, with a light cover for the rest of the blade. And if it was made lightweight, it would be likely prone to breaking or, if it was a separate part, to getting lost. A neat option would be if the cover folded into the handle when the saw is used. However, any such option won’t save much weight, the rear part of the handle is already very light, as shown above.
The best way to save some weight would be removing some material from the blade.
Dec 1, 2020 at 12:14 pm #3686703And finally, I started the thread on my other 3D-printed stuff.
Dec 24, 2020 at 8:19 pm #3690772We took Jan’s 3D printed handle with the Pocketboy blade on our 5-day snowshoeing trip in Emigrant Wilderness and used it all the time to make wood for our fires. You can see the handle sticking out of the snow in this photo next to the wood.
As a result we had nice warming fires like this during our snowshoeing trek.
Thanks Jan for sharing your work with the community! It helped us to keep our overall pack weight down.
Dec 24, 2020 at 8:41 pm #3690774Got to use mine as well on a recent snowshoeing trip; temps dropped below 0 so a fire was pretty much mandatory. It worked great and is really light!
 Dec 28, 2020 at 10:36 am #3691091
Thanks for your reports and positive feedback. It’s great to hear that it worked well at such low temps.
Manfred tactfully omitted that the spring in the lock of his saw broke on that trip. I don’t know yet if it’s a problem specific to that handle, or if it’s more widespread issue.
For this spring, I’ve used a carbon fiber rod I had at hand. Its springy and has the right stiffness, but at the maximum flex used here, it is not far from its breaking point. I tried to prevent the failure by restricting the range of motion of the lock to only the necessary minimum, but it seems it may not be reliable enough.
Here’s my plan how to fix it. I’ve already found a spring steel wire of the right stiffness to replace the CF rod, and I’m going to send a new steel spring to Manfred. If it happens to anybody else, let me know and I’ll send you one too. In the meantime, you can use the spare CF spring you got among the spare parts.
I’ve already added the steel spring as a spare to the last handles I sent away, and it will be the default from now on.
Dec 28, 2020 at 11:35 am #3691102@gearmaker I would just call it, “Gardner SUL Fixed Blade Saw” That differentiates it from the Rezac SUL Folding Saw.
…It’s one I sell under my G.O.L.D. Gear brand, but I’ve never given it a name. Obviously I’m not great at marketing. Open to suggestions.
The Elevenator? – ummm, no. :-|
Jack (The Ripper)? – nada. :-)
Fang? – seriously? ;-)
T—Rips? – uh-uh. :-)
Al Dente? – half-cooked noodle? Nope. LOL
But hey, thanks for trying. :-)
Jan 7, 2021 at 1:06 pm #3692564TLDR: There’s a potential problem with my saw caused by the geometry of the locking notches of the blade. Here is a small modification that fixes it.
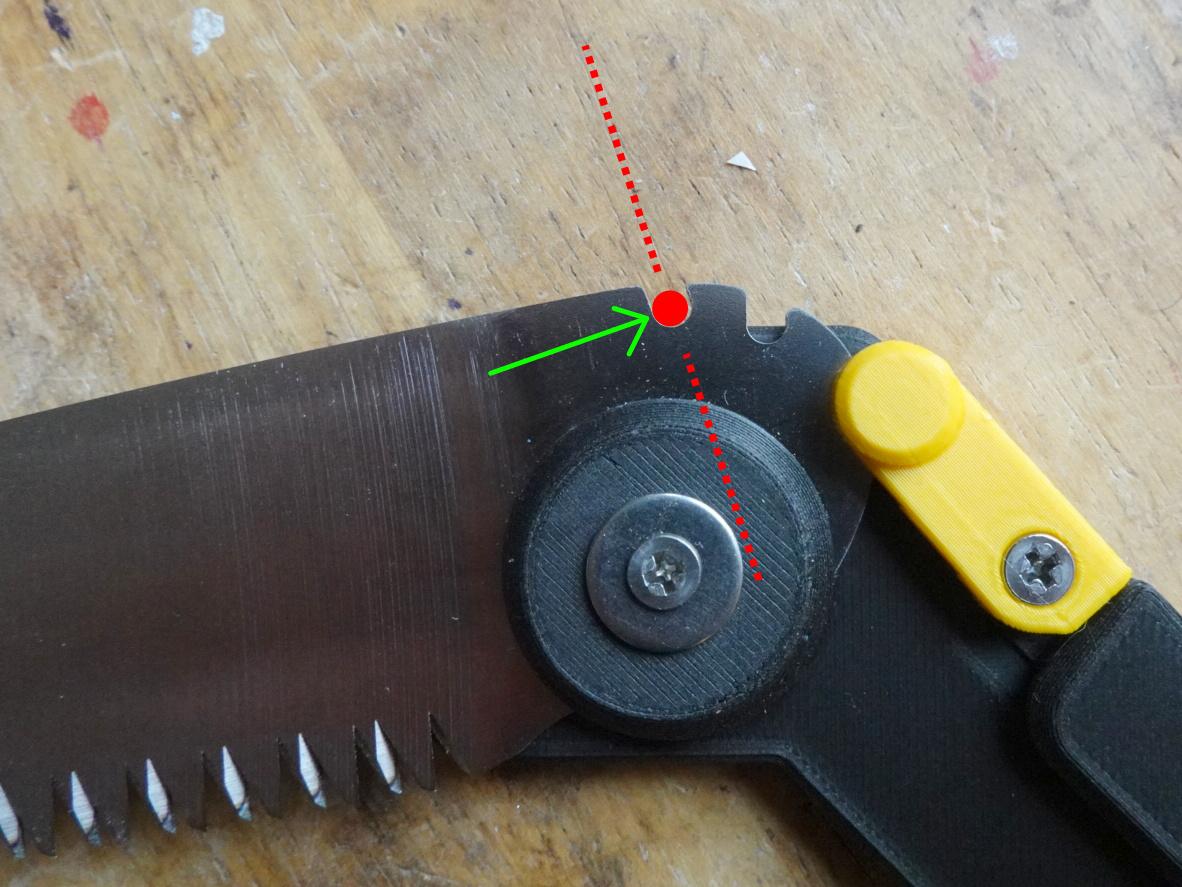
The blade is locked by a pin pressed into a notch in the blade by a spring. Unfortunately, the notch is not perpendicular to the movement of the blade (emphasized by a dotted line in the first photo), and applying a lot of pressure against the blade pushes the pin out of the notch. There’s a spring that opposes that, and it does its job well under normal circumstances. However, at a rare occasion, such as when the saw suddenly jams in the cut while a lot of pressure was applied, the lock may open. The range of motion of the lock is restricted, but even with that, the original CF spring could snap. The newer handles use a steel spring that should in the worst case only deform (and can be straightened again). I’m aware of one failure of this kind.

It could be fixed by preventing the lock pin from slipping. I have filed a tiny, barely noticeable groove at the place where the locking pin (red circle in the photo) presses against the blade. This spot is indicated by the green arrow. The blade is hard, I used a thin diamond-coated file. An edge of some diamond-coated sharpener would work too. A careful touch with a metal-cutting disc in a dremel would also do the job. There does not have to be a single groove, just roughening the surface is probably enough. With this mod, the pin is not pushed out even if the spring was removed (for testing only).
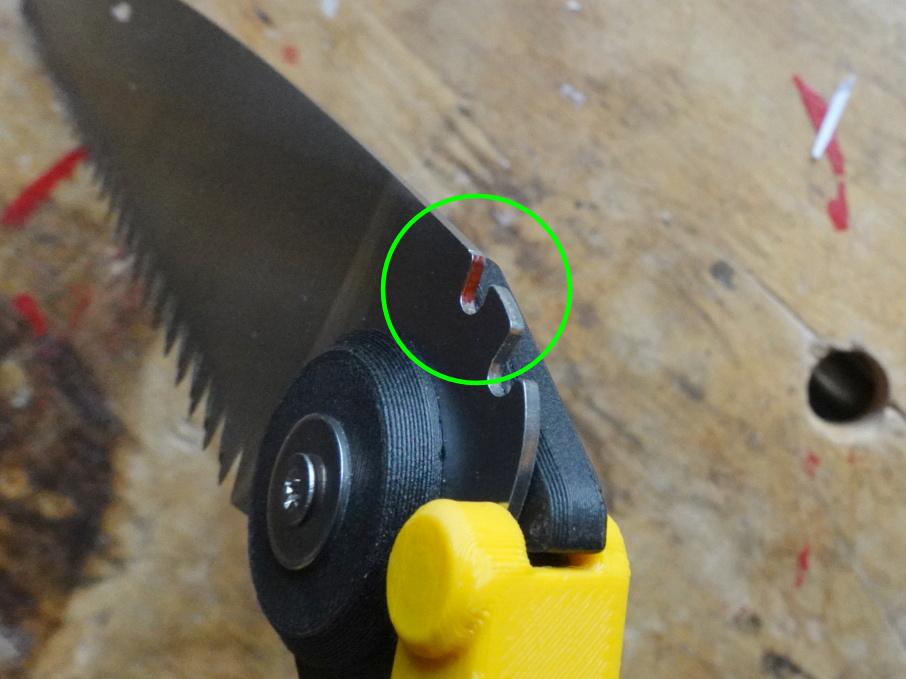
And here’s a tip how to identify the exact spot for that groove: paint the edge with a permanent marker (that’s the red color in the second photo) and open and close the lock a few times. The paint will wear out, and you want to make the groove just at the border of the area that remained painted.
 Jan 30, 2021 at 1:54 pm #3696363
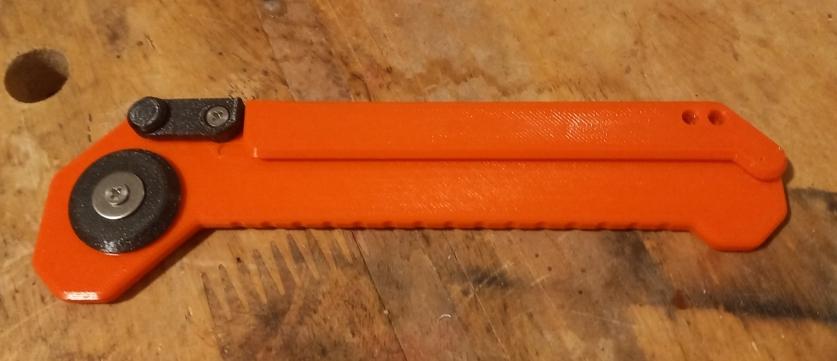
Here’s a version of the handle for the smaller Pocketboy 130 saw blade. As the numbers suggest, its’ almost 40 mm shorter, truly pocketable. The total length of the closed saw is 17 cm / 6.7 inches. With the blade, it weights 57 g / 2.0 oz. The prototype was a custom print for Mike who wanted it in orange:

I still prefer the original material which yields nice matte surface finish, is more rigid and a little bit stronger, but this one would be much harder to lose. To make up for the glossy surface, I added a gentle texture to the grip.
If there’s a demand, I can print a batch of these as well. PM me if you’re interested. Also, I have a couple of the larger ones left over from the last batch I printed and I can ship them immediately. There was a small increase in the shipping costs, and it takes more of my time to send them one by one, so I’m now asking $35 (including shipping).
-
AuthorPosts
- You must be logged in to reply to this topic.
Forum Posting
A Membership is required to post in the forums. Login or become a member to post in the member forums!
LAST CALL (Sale Ends Feb 24) - Hyperlite Mountain Gear's Biggest Sale of the Year.
All DCF shelters, packs, premium quilts, and accessories are on sale.
Our Community Posts are Moderated
Backpacking Light community posts are moderated and here to foster helpful and positive discussions about lightweight backpacking. Please be mindful of our values and boundaries and review our Community Guidelines prior to posting.
Get the Newsletter
Gear Research & Discovery Tools
- Browse our curated Gear Shop
- See the latest Gear Deals and Sales
- Our Recommendations
- Search for Gear on Sale with the Gear Finder
- Used Gear Swap
- Member Gear Reviews and BPL Gear Review Articles
- Browse by Gear Type or Brand.


