or LRMYOG, Let a Robot Make Your Own Gear. (More below…)
advertisementYour privacy is protected: We do not transmit your user data to third-party ad platforms or advertisers, and we do not host third-party tracking pixels. Backpacking Light serves ads on its own custom, native, and internal platform.
Anniversary SaleMay 15 to 25 - REI's biggest sale of the year.Topic
More 3D-printed gear
Become a member to post in the forums.
- This topic has 44 replies, 13 voices, and was last updated 5 years, 3 months ago by
 .
.
First, there’s the UL saw handle project which has its own thread. Here are some other things I’ve designed and printed.
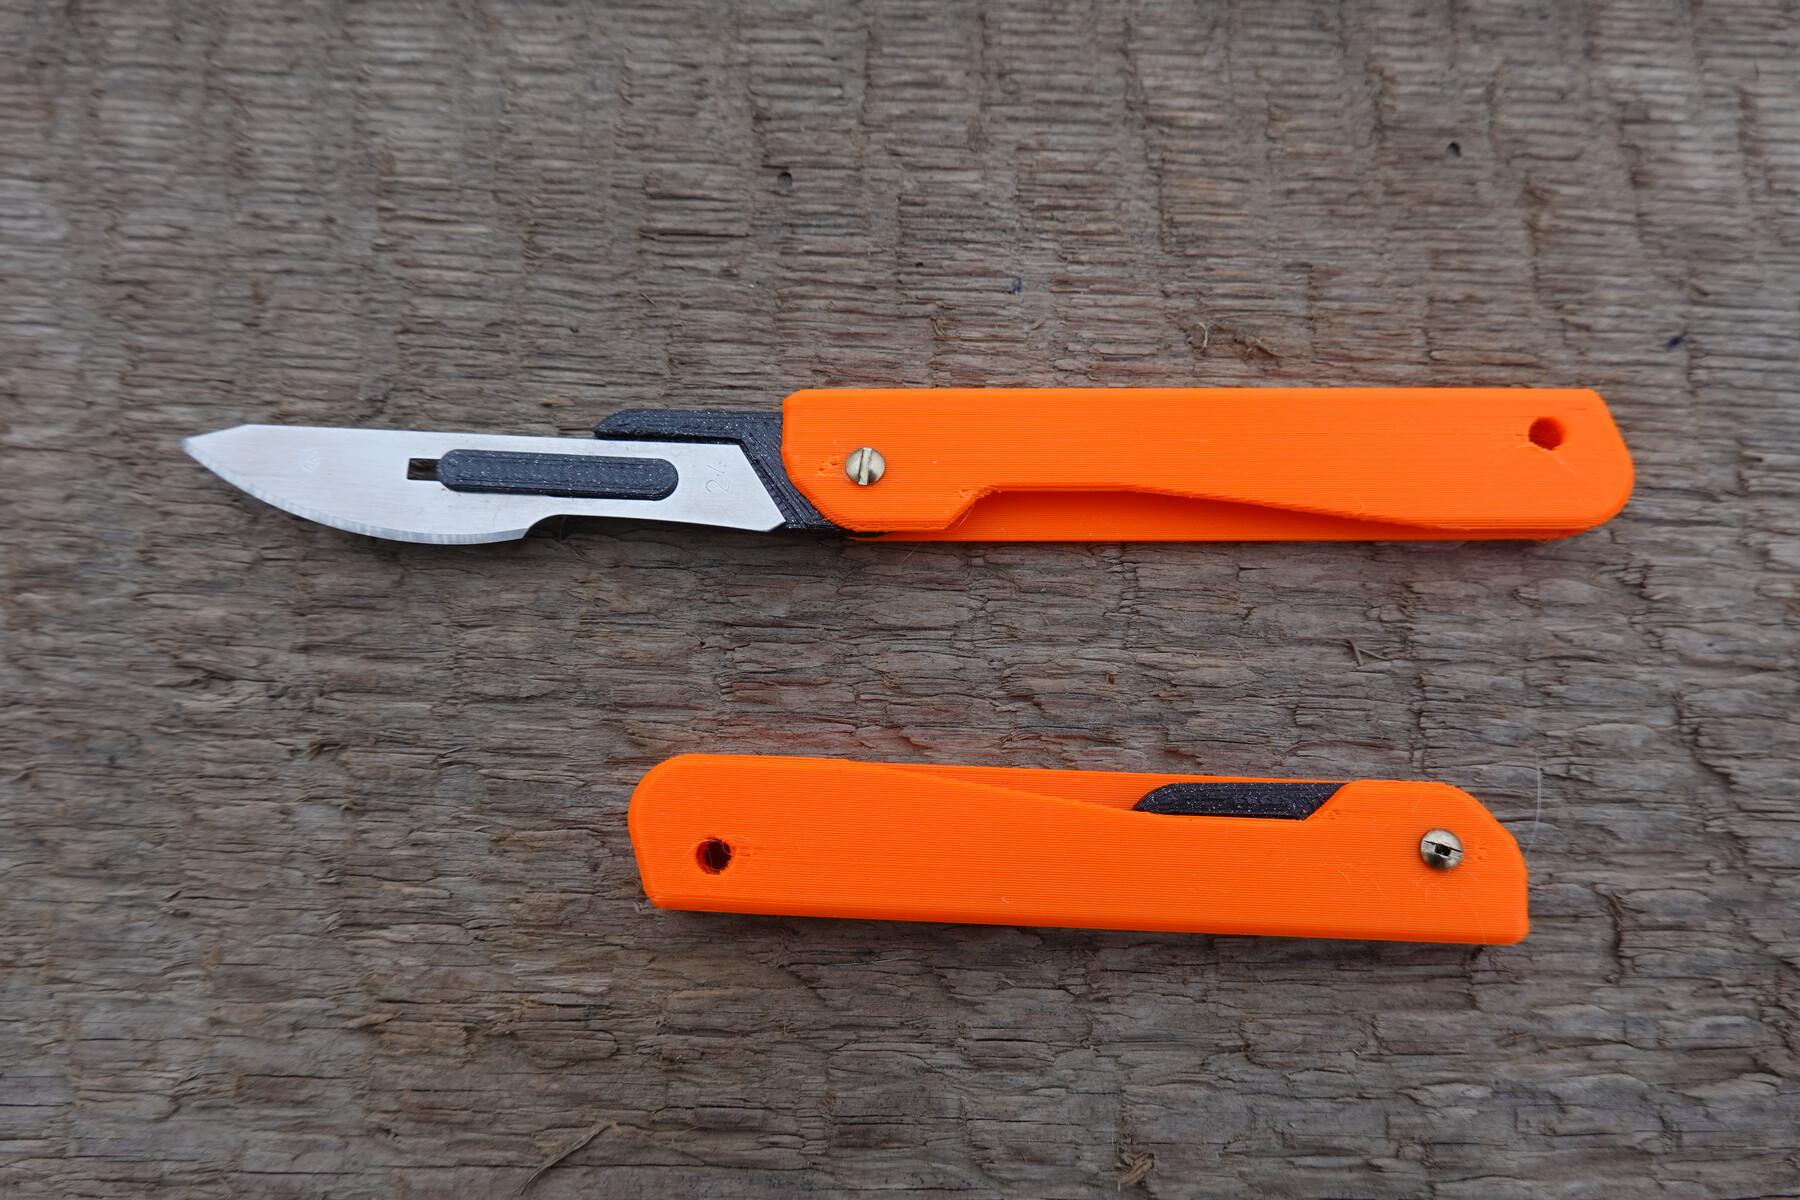
A similar but lighter thing is a tiny folding knife using replaceable scalpel blade (very sharp and cheap). The complete thing weights 5.5 grams / 0.19 oz.
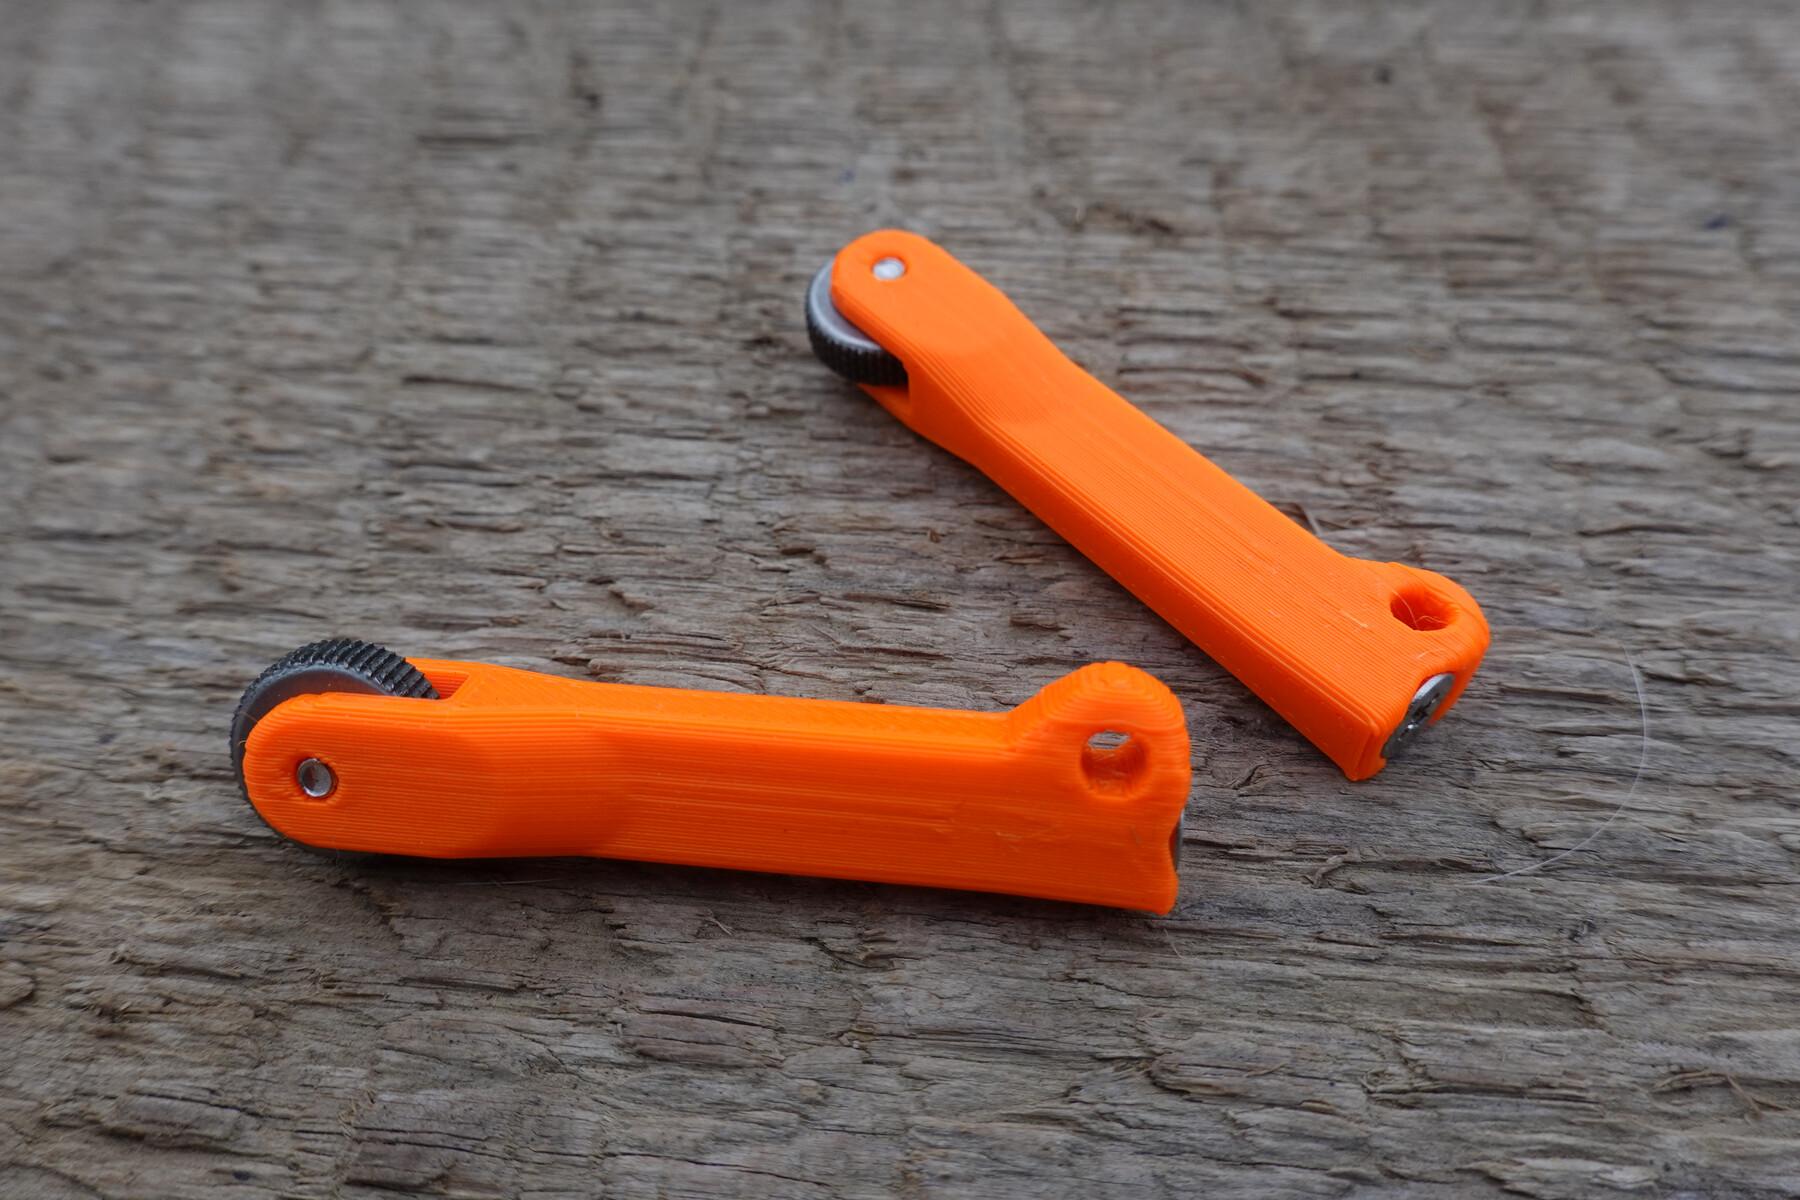
Next, a sparker for lighting stoves. Unlike the store-bought equivalent, it has a laynard hole (this was a main reason to make my own) and the flint can be replaced. 5 grams / 0.18 oz.
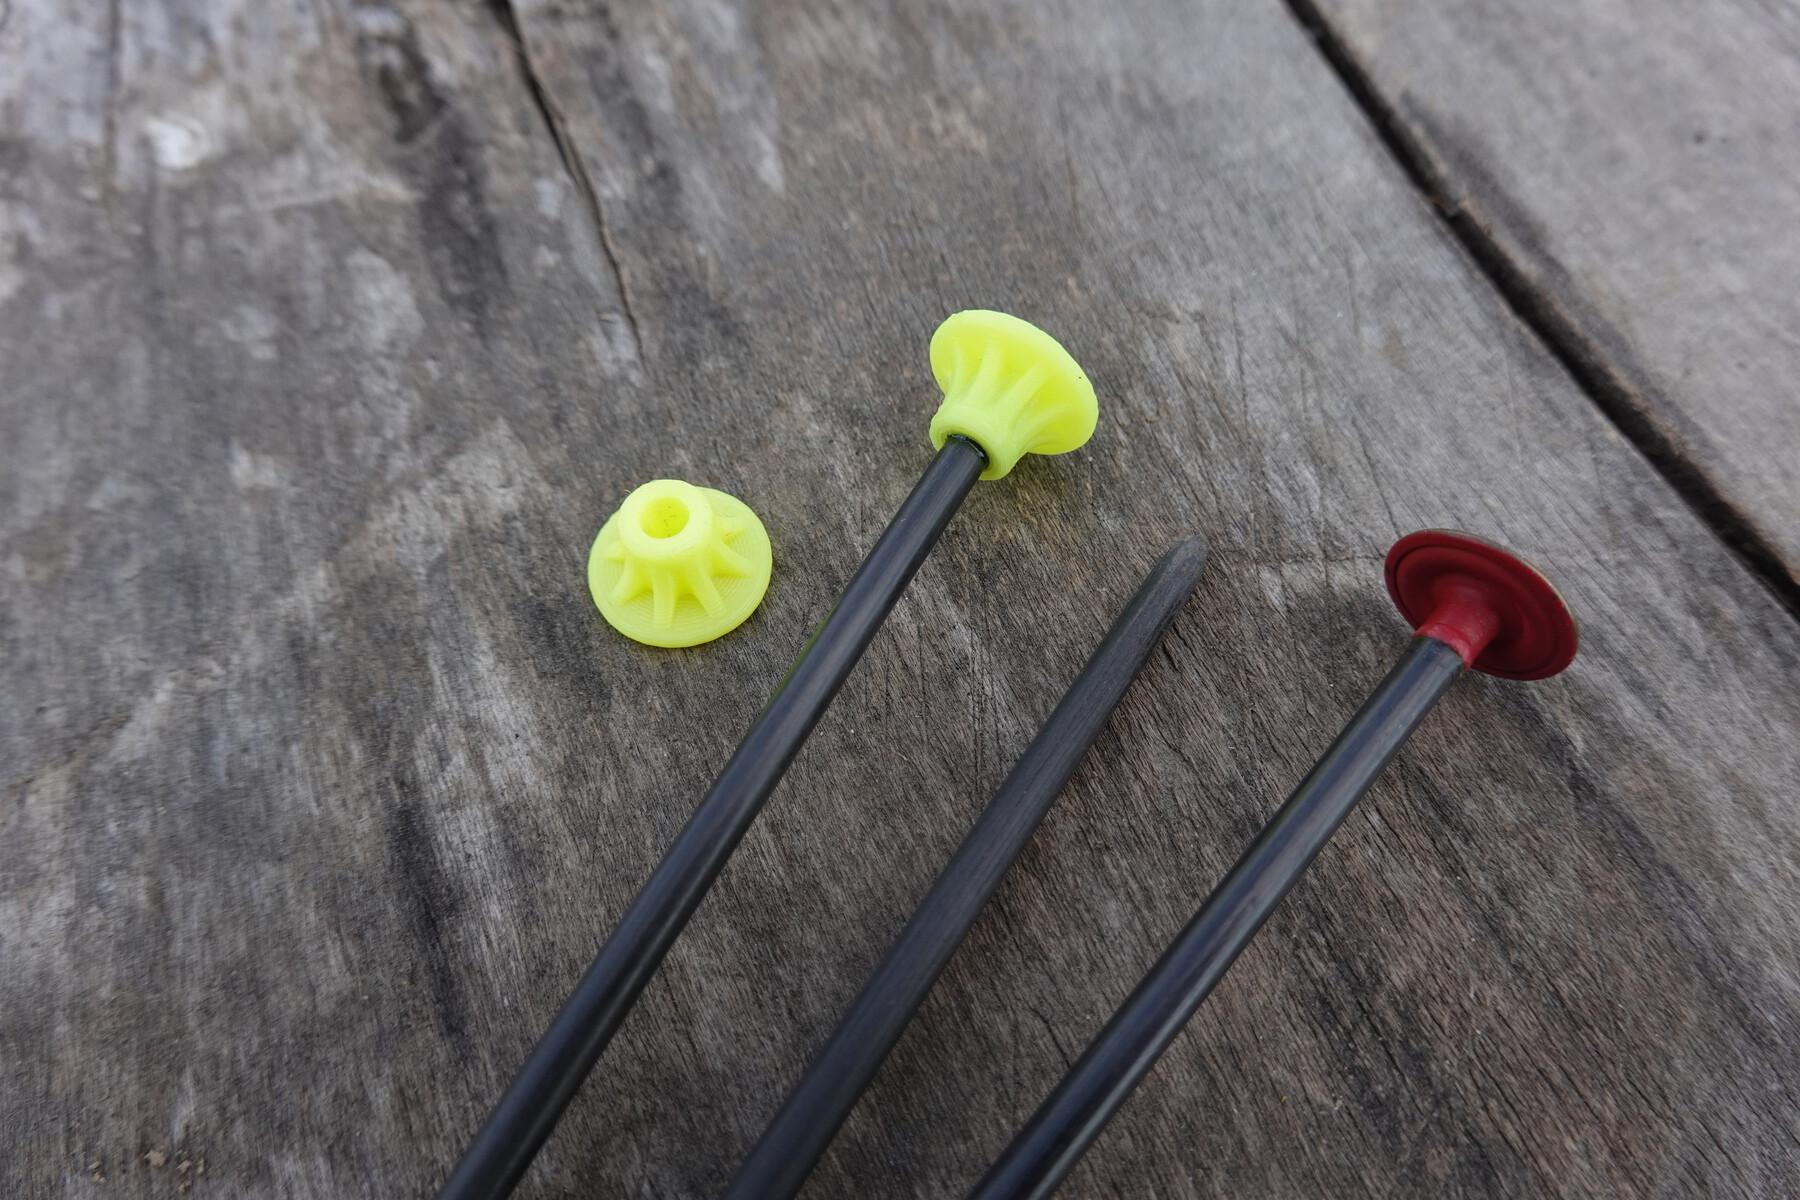
A more practical things are the heads for my CF stakes. For a long time, I’m using MYOG stakes made out of 4mm CF rod. They have more holding power (because of larger diameter) and are stiffer than titanium skewers of comparable weight. The tips wears out, but surprisingly slow. I’m still using the first set I made many years ago. Originally, I made the heads from large snap buttons (there’s one of the old stakes in the photo). Now I replaced the heads with 3D-printed ones which are a tiny bit lighter, stronger, and high-vis. 4.3 grams / 0.15 oz per piece.
Love the stake caps!
Sweet! Each of them. Does the striker work for a canister stove? That would solve my non-preference for mini Bics.
Are you selling any of these? Didn’t see them on Gear Deals…
If not now, possibly later?
I don’t plan making these for sale, but I’m going to provide the files for download. I just need to find the right platform for that. I’ll announce it here.
The striker works great with both alcohol and canister stoves, and it can even light some fine tinder.
How about combining the knife and sparker into one tool.
So many cool things. Which filament material are you using? There are so many options.
Nice! I look forward to trying your print for the knife!
Not a widely sought item but a dual pole connection fitting for a mid type tarp/tent would be a nice item. Somebody was printing those for awhile but stopped. I guess the variation in hiking pole tip diameters must be an issue.
@obxcola: joined, as in an inverted “V”? Or end-to-end to make one very long pole? I’m guessing inverted V because end-to-ends are usually joined at the grips and you mentioned tip diameters. But then, why two poles instead of one in the middle? Forgive my ignorance – I’ve never used a mid.
David the inverted A frame gets the poles out of the usable floor space. There are some older threads here (BPL) about it.
Glad you asked; that thread has the no-longer working link to the printing instructions for the device I was trying to describe above. It was called a “party hat” Here’s a photo from BPL Geez I feel guilt copying that image from one thread and dropping it into another. Now BPL has to store the image twice. Is there a way to just use the same image twice?
Another thread on the subject. Good stuff from Bob Moulder!
Sure, that makes sense. Nice to have the center pole out of the way.
When I thought about it more I remembered we did something similar when I skied the Winter Sierra High Route with guides from Alpine Skills Institute years ago. 4 people per large 4-sided bottomless pyramid tent, erected over a 2-3′ deep square pit. The snow excavated from the pit is formed into a low wall about a foot outside the perimeter of where the edges of the tent will go. Everyone brought avalanche probe ski poles that could be joined grip-to-grip, so two people would join their poles end-to-end, then join tips in a large inverted V diagonally from corner to corner, over which the single wall tent was draped. If I recall correctly we just used paracord to lash the tips (minus baskets) together at the peak, which was a total PITA in the morning when frozen solid. A device like you mentioned would have been nice.
It was 4 people shoulder to shoulder so we couldn’t get all fancy with benches and counters and all that cool stuff David Thomas does.
I just found out about the Alpine Skills Institute recently. Looks like a great idea. How was your experience? Thread drift for sure ;)
I can only rave about Alpine Skills International. It was founded in 1979 by Bela [“bay-lah”] Vadasz & Mimi Maki-Vadasz after they studied undergraduate and postgraduate Recreation and Outdoor Education at San Francisco State University. In 2008 Bela was presented with the Lifetime Achievement Award of the American Mountain Guides Association.
I did a bunch of courses and tours with ASI including Introduction to Telemark Skiing, Advanced Backcountry Skiing, Avalanche Risk Assessment and Rescue, Backcountry Ski Touring, Introduction to Rockclimbing, Climbers’ Self-Rescue, tour Sugar Bowl to the resort formerly known as Squaw Valley, tour Winter Sierra High Route, more.
The best investments I ever made in skills and training, and worth every penny. (no affiliation or compensation)
As an example, I had been alpine skiing for many years and had been trying to teach myself telemark skiing at downhill resorts for a few years so I could do some backcountry snow camping, but I still totally sucked at it. As in barely getting down beginner slopes, and falling multiple times in the process. Then I took ASI’s two-day Introduction to Telemark Skiing course. After one day of instruction and practice on Saturday, on Sunday morning the instructor took us to the top of an ungroomed, double black diamond slope of crusty, chopped, frozen crud. Exactly the kind of slope that would have destroyed me before, but I blasted down it with no problem. On 215 mm touring XC skis with barely any sidecut. It was an epiphany. Zero to warp speed after just one day. Like getting decades worth of training and experience in a couple of days. I took all of their classes that I could afford after that. And I’m sure their courses saved my life more than once.
You can’t go wrong with ASI.
I bought one of those 3D printed Party Hats when he was selling them, it’s amazing what what people can make.
Question: exactly how much printer does it take to make items along these lines? I’ve thought about getting a printer just to play around with, but I’m entirely unfamiliar with the hard/software that’s involved. What’s actually needed?
I have been extremely impressed with my Monoprice Mini Select V2 printers. They both have 500+ hours of printing on them and got for $179 on sale. Good support from Monoprice. They only print PLA which is an excellent material but not as strong as PETg (or ABS, but ABS is not fun to print with). Build volume is around 4” cubed
My Lulzbot Mini 2 has a larger build volume (7” cube?) and handles a much wider range of materials including flexible TPU. It’s a reliable workhorse except very occasionally when it gets weird. $1500
I’m forced to buy from particular vendors. If I wasn’t limited, I’d likely purchase from Prusa. Their Mini looks like a great place to start at under $400. Extremely open source nice features and a great reputation. I may buy myself one of these at some point.
The question on printing time is spot on – it’s one of the limitations many people are not aware of. This printing method is a slow process and there’s no way around that. To give you some examples from the top of my head, the sparker shown here is a tiny item, but it still takes something like 15 minutes. The saw handle (just the main body) takes about 3.5 hours (besides the size, that material requires lower speed).
Once you have a final design, it’s not a big issue. The printing needs some attention at the beginning, but once the first layers print well, it will very likely finish without any issues. I let the large prints (or printing more small items at once) run overnight.
In the prototyping stage, it may get frustrating when a tiny change in the design that takes seconds in the computer requires ten minutes of printing to verify (in the best case when it’s a tiny part or you’re printing only a part of a larger thing). The dimensions of the printed object are not truly exact, so e.g. achieving just the right tight fit between two parts requires going through a few rounds of adjustments.
I should never have gone down this rabbit hole! I thought looking at tents was fun; this is an entirely new level of absorption!!
Jan, what application do you design in? I used OnShape for a while but I have been using Fusion360 more lately.
@Matthew
I’m using OpenSCAD where one writes a code defining the object instead of drawing it. It may look weird but I found it easier to learn just another (very simple) programming language than learning how to handle a complex CAD software. This of course applies to projects focused on function, without extra decorations.
In addition to coding, this approach also requires good spatial imagination, so it’s not for everybody. The Fusion360 seems to be the standard when it comes to functional parts.
Regarding my printer, I have Prusa mini (now mini+) and I’m happy with that choice. There were cheaper options, but this printer has all the features that make it work out of the box and deliver consistent results. I want to be printing rather than tinkering with the printer (what seemed to be the major part of this hobby in the past).
Waaay back in 1999 I worked programming a very large CNC router in a furniture factory for about six months. They were skeptical of the value of CAD/CAM software so I programmed everything directly in G Code.
Hehehehe… I work with CAD/CAM that runs a CNC; the company I work for still doesn’t always appreciate the value and power of the software, even though they’re now 100% reliant on it. If the program or the CNC or the operator is somehow not functional, the entire plant grinds to a halt in about three hours.
“Sure, that makes sense. Nice to have the center pole out of the way.
When I thought about it more I remembered we did something similar when I skied the Winter Sierra High Route with guides from Alpine Skills Institute years ago. 4 people per large 4-sided bottomless pyramid tent, erected over a 2-3′ deep square pit. The snow excavated from the pit is formed into a low wall about a foot outside the perimeter of where the edges of the tent will go. Everyone brought avalanche probe ski poles that could be joined grip-to-grip, so two people would join their poles end-to-end, then join tips in a large inverted V diagonally from corner to corner, over which the single wall tent was draped. If I recall correctly we just used paracord to lash the tips (minus baskets) together at the peak, which was a total PITA in the morning when frozen solid. A device like you mentioned would have been nice.
It was 4 people shoulder to shoulder so we couldn’t get all fancy with benches and counters and all that cool stuff David Thomas does.”
I made those tents for Bela, he was a demanding SOB, but really knew his stuff.
Those tents and his experiences on the High Route showed me how little vents in a Mid did to reduce condensation.
Poles crossed on the outside are even roomier and give more flexibility in tensioning.
Become a member to post in the forums.
advertisementYour privacy is protected: We do not transmit your user data to third-party ad platforms or advertisers, and we do not host third-party tracking pixels. Backpacking Light serves ads on its own custom, native, and internal platform.
 Pro-Grade Water RepellencyPolypropylene face fabrics: see the future of raingear.