Topic

Tunnels and Domes


Forum Posting

A Membership is required to post in the forums. Login or become a member to post in the member forums!

Home Forums Gear Forums Make Your Own Gear Tunnels and Domes

Viewing 25 posts - 1 through 25 (of 26 total)
  • Author
    Posts
  • #3537395
    Sam Farrington
    BPL Member

    @scfhome

    Locale: Chocorua NH, USA

    After posting about tent design on some recent forums, I looked again at Roger Caffin’s FAQ section on bushwalkingnsw.org: https://bushwalkingnsw.org.au/clubsites/FAQ/FAQ_Shelter.htm#Tents
    There have been a number of updates, and comments about different tent designs, particularly tunnel and dome designs.

    Roger states: “The poles should go into sleeves attached to the fly for the best stability.” Thinking about reasons for this, two came to mind:

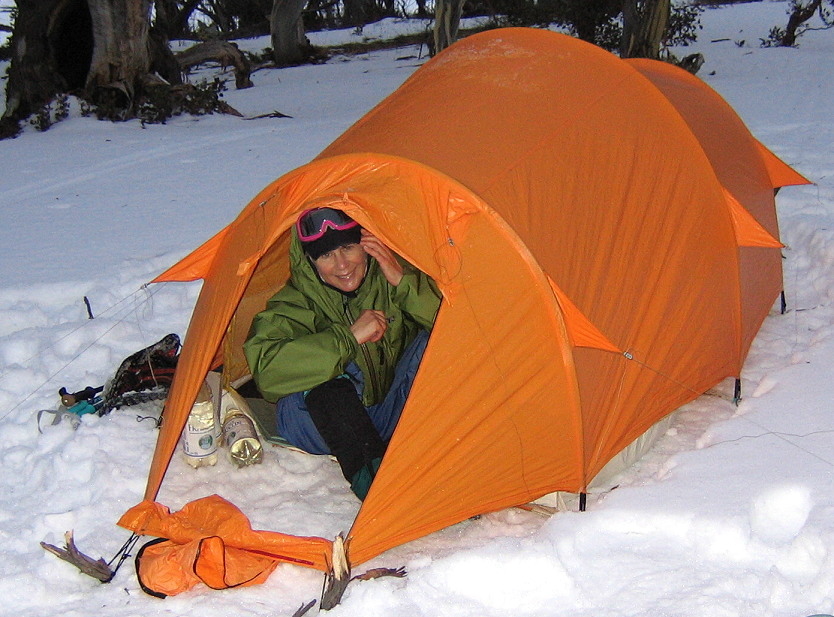
    First, when Roger’s tunnel tents are staked taut, the poles and the fly, or outer wall, mutually reinforce each other; in that the fly and sleeves hold the poles in position, and the poles in turn maintain the shape of the tent. There is less chance of the poles distorting and thus destabilizing the tent.

    Second, when the outer wall or fly is attached to the poles, the chance of the fly separating from the tent, and exposing the inner to wind and rain is virtually eliminated.

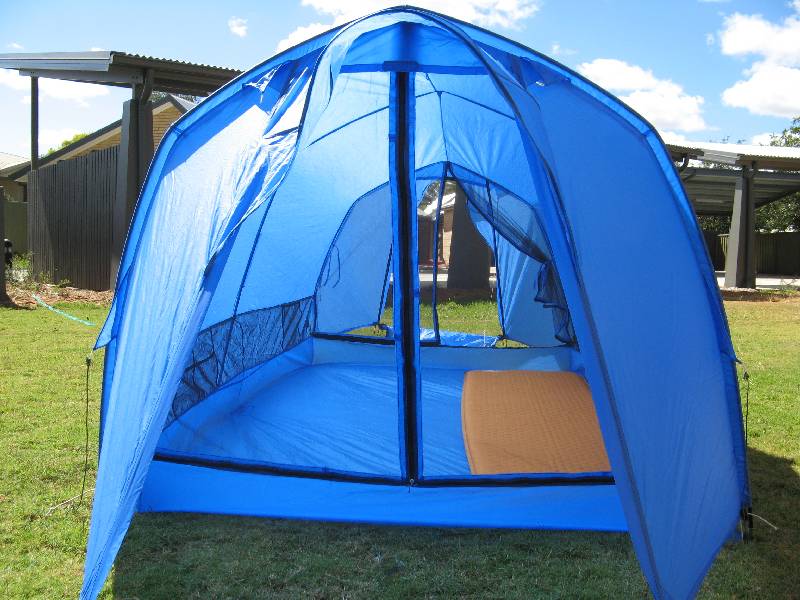
    However, if the poles are attached not to the fly, but to an inner tent, they should provide a similar degree of stability. The concern then should be over how securely the outer fly is attached to the inner structure. Roger states: “Fast-pitch designs which have the poles free-standing, with the inner tent hooked onto them and the fly thrown over the top are just not very stable.”

    Nevertheless, there are reasons for a separating fly; such as the ability to remove the fly to shake it out when wet; and if the fly is made of very light material to save weight, the ability to replace it more easily if it proves insufficiently durable.

    Therefore, if the fly is attached at multiple points to a stable inner structure, this should provide adequate security without the need for additional staking. Such attachments can include Velcro tabs, as well as buckles above the receptors at the base of the pole that tension the fly in position. Also, attaching vestibules to the inner structure will allow for a smaller fly that is easier to attach in place in storms, and a good DWR (durable water repellent) treatment on the inner should keep water out of the inner during the pitch.

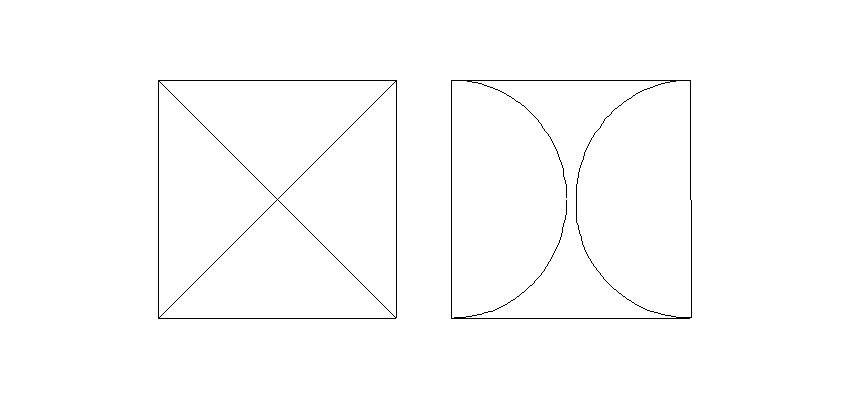
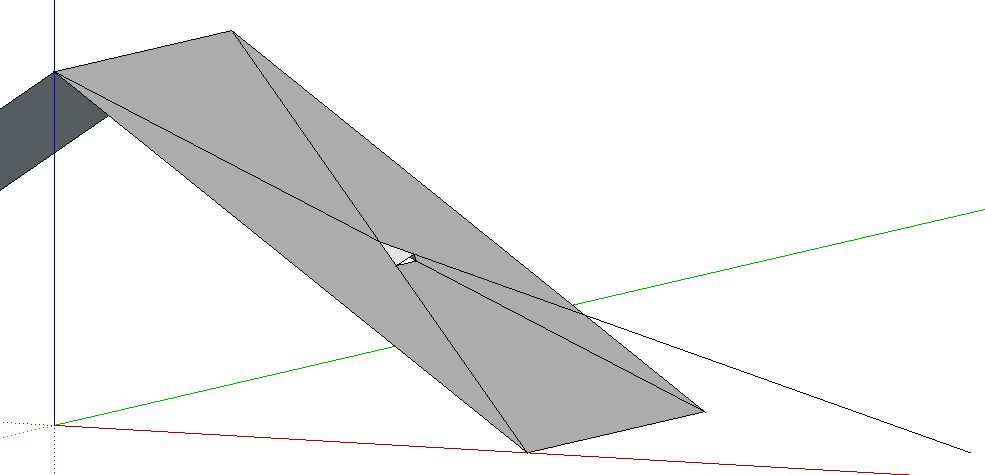
    Roger’s attachment of poles to sleeves on the outer fly on a tunnel tent, or Warmlite’s placement of the poles in internal sleeves connecting the inner and outer tents, has one major advantage: The tent can be erected in one motion, a major advantage in storms; but this may prove difficult to achieve in a design where poles cross one or more times. Until this is achieved, the added structural stability provided by poles with at least 2 crossing points will have to be weighed against the benefits of a one-motion pitch in stormy weather. For me, secure shelter during a lengthy storm outweighs occasional greater hassle with a pitch for a few stormy minutes; but I can see how opinions may vary, depending on climate, locale, choice of sites and other considerations.

    Please note that this post is deliberately abstract in the attempt to address issues and concepts in a general way without getting bogged down quite yet in details, wherein the devil resides. Any comments are welcome, including critical ones, as they may avoid wasted time on misconceived projects, something that has occurred more than once.

    #3537514
    James Marco
    BPL Member

    @jamesdmarco

    Locale: Finger Lakes

    Actually, for most current “crossed pole” designs, a crossed pole is not really necessary. Like this:

    Note that this requires a bit more skill with the lay out, but essentially doesn’t change the overall structure. They are just designed poorly and simply. The poles don’t really need to cross, it is just easier to figure that way.

    So, using this along with sleeves makes these structures slightly stronger, of slightly smaller internal volume. A fair trade off, I believe.

    #3537533
    Matt Dirksen
    BPL Member

    @namelessway

    Locale: Mid Atlantic

    Hi Sam,

    I’m just curious what your overall intention is? Are you interested in designing a specific type of tent which combines the storm worthiness of a geodesic with the fast pitch of a fly-sleeved tent?

    Hilleberg obviously tries to accomplish this by using clips on the upper half of their geodesics. While I personally haven’t had any experience with these, I understand they generally work well in the field.

    Of course, when the poles are sleeved to the tent body, they can be a little shorter – usually allowing for a stiffer shape. And some of these tent-body sleeved designs are also continuous, so they set up quickly. But if they don’t have guy lines which somehow properly connect to the actual pole (or the interior sleeves), then the guy lines will only help keep the fly in place, and not so much the tent structure.

    Regardless, there are pro’s and con’s of all the different designs out there, as well as how the designs are actually implemented. A poor implementation of a good design can result in minor discomfort to catastrophic failure.

    Best,

    Matt

    #3537744
    Sam Farrington
    BPL Member

    @scfhome

    Locale: Chocorua NH, USA

    James,
    I think you might have some issues with your uncrossed pole dome that would show up in a 3D sketch.

    Matt,
    Perhaps the abstract approach in my original post was too coy. There are many assumptions made on BPL about tent design, and before going any further with the next tent, I wanted to lay out some of these assumptions, and try to find out if there is any consensus about them.

    For example, the clips you mention (that I did not know are used by Hilleberg), are often viewed as inferior to pole sleeves from a stability standpoint. However, there is a video of a KUIU Mountain Star tent that suggests that a clip-supported tent can do quite well in the wind: https://www.youtube.com/watch?v=8hEX5R761Xc

    Yes, I am interested in designing and building a very light solo tent based on this prototype, less vestibules, that was first posted in 2011 and again quite recently:

    The original post discussed the intention and methods in detail at:  https://backpackinglight.com/forums/topic/45631/

    At that time, Roger noted in a post that, “Off the top of my head, I can see that you will have to come up with some neat way to pitch the tent – how to get the poles in place.”

    In order to simplify installation of the poles, and the overall pitch as you mention, I’m thinking about attaching the poles with clips to the outside of the inner, shaped as above; and attaching the vestibules to the inner tent so that the flyless inner tent can be pitched quickly.  Attachment of the fly would then be completed with Velcro tabs over the main section of the tent (the section shown in the photo).  To prevent unwieldy installation of the fly in the wind, and to protect ridge vents during pitching, the fly would always remain partially attached to the inner at the ridge points, unless removed for shaking out, cleaning or replacement.

    I think this would greatly simplify the pitch, always a plus if pitching in wind or rain, and also create a strong and stable structure due to crossing the poles twice, plus using elbows to create a more aerodynamic structure with surfaces that are less vertical than seen on most domes.

    However, the attachment of the poles to the inner rather than the outer, while common on domes, has been questioned in tunnels, as noted in my original post above.  So I’m hoping for some feedback about this and some of the other issues mentioned in the OP.

    Hope that provides some better clarification – Sam

    #3537752
    James Marco
    BPL Member

    @jamesdmarco

    Locale: Finger Lakes

    Sam, yes. The peak would need some reinforcement to bind the two poles together.

    #3537825
    Matt Dirksen
    BPL Member

    @namelessway

    Locale: Mid Atlantic

    Given the prototype you’ve already created, why not keep the poles the way they are, and sleeve them starting from the peaks? After pining the corners down, you would just lift the peaks up and insert the poles in. Then join the poles together with your angled insert. Perhaps the insert could be deisgned to lock in place. Regardless, a guyout point form the peak could help keep the piece intact.

    And if you use a continuous sleeve design, I can’t imagine that approach being too difficult. Like the tent illustrates below, there are many ways to make the sleeves work quickly, weather they are above or below the fly. (I have an older version of the tent shown below, and I can set up my tent – with the fly connected, in about two minutes since I can sleeve both poles simultaneously.)

    #3538222
    Sam Farrington
    BPL Member

    @scfhome

    Locale: Chocorua NH, USA

    James,

    There would be two elbows, one at each peak, to connect the poles at the peaks, as shown in the above pic. As described in the 2011 post, the elbows are made from Ti tent peg rods, carefully bent to avoid stress lines and preserve strength. But now, am considering making elbows from three-armed US Plastics polypropylene hubs with one arm removed. The remaining two arms would fit over the poles, and would flex slightly to deter pole breakage.

    The poles would also be separately clipped to the inner just above the crossing points in order to have a solid connection. There would be several clips added at other points to make the inner convex in shape and provide more space inside.

    #3538248
    Sam Farrington
    BPL Member

    @scfhome

    Locale: Chocorua NH, USA

    Matt,
    That reminds me of a Moss Starlet that I used to own and got lost somewhere along the line. It was an extremely stable design, but a bit cramped. But there is a reason why the inner and outer portions of the main canopy cannot be tailored and sewn to the tent shape as pictured in the OP.

    One of the features of the design is to use single long rectangular nylon panes as shown in the picture to make construction simpler for MYOG. When the fly is tightened over the pole frame, it expands on the bias to create a convex shape. The inner would be clipped to the poles to also create a convex shape, albeit the curves would not be as continuous as occurs when sleeves are used. An added benefit of having no seams on the body of the outer fly, probably Rockywoods 7D, is that it would be stronger and less subject to leakage. However there would be one patch near each crossing point so that guy lines could be connected to the inner between the clips, so that force would fall mostly on the pole crossings, not on the outer fly. Roger has cautioned about connecting guylines just to an outer fly that is free to pull away from the poles under it and I’ve found that to be true.

    The tent could be designed like the Moss Tent, or like the Terra Nova Nova Solar 2, with a number of triangular shaped panels meticulously shaped and sewn together to achieve a dome shape, in which case pole sleeves could be added to the inner as you mention; but the intent was to make the inner and outer walls of the main canopy much simpler and lighter.

    Because there is a limit to how much convex shape can be derived from the bias stretch on the nylon, it is not possible to achieve the near vertical shape of the area under the pole crossing points on the Moss or Terra Nova tents. However, the goal was also to avoid near vertical surfaces. There is enough convexity below the pole crossings on the prototype to allow one to sit up from a lying position, although most of the added internal space is closer to under the ridge line, where one would want it to be for sitting. I felt that space over the head and feet while sleeping did not need to be that great, and that weight would be saved by that.

    I think you are right about adding guyout points at the peaks, so that it is not just the vestibules that take all the force of winds. To minimize peg weight, the guys could go to the same pegs that keep the vestibules extended.

    #3538361
    Matt Dirksen
    BPL Member

    @namelessway

    Locale: Mid Atlantic

    “To minimize peg weight, the guys could go to the same pegs that keep the vestibules extended.”

    More than that, you could have the vestibules attach to the guy lines, similar to how some of the older Tarptent models function. That way, the guy lines actually act as the “ridge” for the vestibule.

    (Yup – that’s a Moss Starlet alright. Too bad you don’t still have it – they are selling for 350-500 bucks on Ebay these days.)

    Regarding the fabric, I think I understand what you are talking about. Either way, when I look at your prototype, I wouln’t want to do too much with it (other than guy it at the peaks and at the intersections – as you already know.) One thing I was thinking about was would you might want to introduce a small “triangular vent” right at the pole intersection (with a small triangular canopy), so the guy line could literally be attached directly to the pole intersection, then the canopy fabric could attach to the line?

    Like this?

    #3538826
    Sam Farrington
    BPL Member

    @scfhome

    Locale: Chocorua NH, USA

    Matt,
    While I want to use the bias stretch of woven nylon to achieve a partial dome shape, there is one significant drawback: If the outer wall is to be done with one piece of fabric, and not several shaped pieces sewn together, sewing pole sleeves to the outer will prevent the fabric from stretching fully on the bias (diagonal to the weave). Thought about sewing the sleeves on with a zig-zag stitch that works with sewing elastic waist bands into shorts, and even about using very stretchy nylon thread; but those were really non-starters. Besides, don’t wants to put a lot of stitch holes in the outer wall, as they would increase the likelihood of leakage. So the poles have to go under the outer wall, connected to it only at the corners. Maybe that is not clearly visible in the photo I posted, but it should be clear in the other photos and discussion in the link to the 20ll post that was included.

    Those and other considerations are what brought about the approach of using clips to attach the poles to the outside of the inner tent. All those clip attachments should stabilize the poles much more than just connections at the peaks and bottom corners. Hence the link earlier to the KUIU wind test, to show that poles clipped to the outside of a canopy (outer wall in that case) can add a lot of stability. With the poles held firmly in place by the inner, the outer could be attached with only one break in the fabric wall, and that is something like what you have suggested in your diagram.
    Rather than sewing on a vent, a small reinforcement patch would be bonded just above each of the 2 pole crossing points, and a shingle-shaped cover added over a slit in the patch so that a small JS Burley Ti connector on the guy could be inserted and hooked over a small D-ring sewn between the 2 clips that secure the poles just above the crossing point.
    The thought is that connecting the guy to a ring between the pole clips, while not as secure as wrapping the guy around the poles at the crossing point, would still engage the guy to the poles at that point. One way or another, in order to achieve stability the side guylines need to be connected to the pole crossings, as you suggest.

    All of the above goes against the idea of using sleeves rather than clips, and the idea of hanging the poles from sleeves attached to the outer. This may stand best practice on its head, but if it is as stable as I think it will be, worth doing. I like your idea with the vent connections, and will ponder it more. Am a bit more shaky about the shape of the vestibules. Wanted to use vestibules with one ridge, peak to ground, and only one peg. But am rethinking the two peg vestibules of the type used on Roger’s tents and Warmlites. While they are not as essential on a self-supporting tent, they still add a lot of stability at the cost of only one extra peg per vestibule. Thanks for sharing your thoughts about some of this. Was trying to approach this thread without getting down into the details, but that did not last very long.

    #3538894
    Matt Dirksen
    BPL Member

    @namelessway

    Locale: Mid Atlantic

    You’re welcome & best of luck with the project!

    Given the amount of fabric stretch, it reminds me of my Bibler Eldorado – or any Bibler for that matter. If you seat the poles nicely at the bottoms, and then create a way to get the right amount of tension at the peaks, you probably won’t need to many attachment points under the fly whatsoever. Then your inner can be simply “clipped” in.

    Please let us know how it progresses.

    Cheers,

    Matt


    #3538951
    R
    Spectator

    @autox

    Hi Sam,

    Could you tell us why you’re exploring the flexed pole route for a form well established by trekking pole designs?

    You’re using 9 ounces of poles with 4 stakes. The alternative is no poles with 8 stakes (4 at the corners, two for the beaks plus two more to guy out the center of the main panels). Or, if you don’t use trekking poles, the equivalent poles from Zpacks weigh 5 ounces.

    The only difference in the final form is that your side panels are held out by a point in the center rather than crossed, flexed poles. The difference in interior volume seems negligible.

    Also, as no one has mentioned it yet, Zpacks offers a pole kit upgrade to the Solplex that is very similar to what you’re working on.

    http://www.zpacks.com/shelter/solplex-flex.shtml


    #3539213
    Sam Farrington
    BPL Member

    @scfhome

    Locale: Chocorua NH, USA

    Hi Rene,
    Re Use of flexed CF poles – Several reasons:
    – More room to move in, out and about – no T-pole obstruction(s)
    – Self-supporting structure has more stability:
    – Less dependence on stakes for support (anchoring still essential)
    – Framework reduces unsupported fabric spans – less vulnerable to wind blasts
    – Fabric and frame reinforce each other
    – T-pole designs are supported entirely by stakes and guylines – inherently unstable

    Re weight: Not intended to compete with a sub one pound plexamid, for example.
    – Use only 1 trekking pole and some use none
    – May switch to even lighter filament wound CF poles – 8.9 gpi (grains per inch)
    – Pole Framework lends self to double wall – greater condensation protection
    (note: RockyW 7d outer & ExtText inner each are just over 0.7 oz/sq/yd)
    – ~ 8 oz added weight is acceptable trade-off for stability and comfort so long as the
    tent is kept to 2 lbs or less.

    Re volume: The convex side walls greatly increase interior space over what are essentially pup tent designs with limited interior room to move about. A comparison of cross-sections with the Tarptent Moment, for example, shows greater space above all of the occupied area except over head and feet, where there is still room to sit up from a sleeping position without brushing the inner wall.

    Re Zpacks flexible poles:
    – The Zpacks flex cross poles came out after this design was previewed here in early
    20ll. The Zpacks design has some added interior space; however the synergy between
    the poles and the canopy is mostly lost when the poles are tacked on to the outside
    with connections only at the crossing points, compared to poles that are an integral
    part of the structure and support the outer canopy along their entire length.
    – The 8.9 gpi poles are made from the most durable multi-layered CF shaft made by Gold
    Tip. Pultruded, wrapped and filament wound CF shafts were break tested for several
    years, and none equaled the Gold Tip, and none even remotely compared with it
    except the Victory 300 V-Force V6, which was used for the 2011 prototype and is
    slightly stiffer and heavier but not quite as strong. The break tests, which I’ve
    posted about often, were lengthy and expensive, so had to be brought to a conclusion
    at some point. The test apparatus is no longer in working shape (nor am I), so am no
    longer able to test the ones from Zpacks. The Gold Tips break at around the same
    point as the Easton .344 alloy poles that have been offered on some TarpTents, so am
    OK with them.

    Re stakes: As with most of TarpTent’s designs, I’m interested in a tent that goes up quickly, especially in foul weather; and not so much with tents that require a lot of futzing around with multiple guylines and stakes.

    If you’ve read this far, you can probably tell that I have strong opinions on this subject. Admittedly, I think that most of the very light weight shelter that is touted on BPL is not fit for its intended purpose. Exceptions: Roger Caffin’s tunnels, and some of the double wall designs that TarpTent has offered more recently. I’ve not used single wall puptents with multiple guylines since basic training before Vietnam; which might explain a natural bias against such tents. But it has been a helpful bias that has kept me warm, dry and comfortable while backpacking.

    #3540632
    Sam Farrington
    BPL Member

    @scfhome

    Locale: Chocorua NH, USA

    A BIG thank you to those who responded to the initial post. You got me thinking about a raft of issues that needed to be addressed. Progress is being made with matters that were not foreseen, and would have created major problems if gone undetected until the construction stage. And thank you to BPL for having this forum.

    #3540643
    Roger Caffin
    BPL Member

    @rcaffin

    Locale: Wollemi & Kosciusko NPs, Europe

    Yeah, I think the Victory V-Force 2D CF wrap poles should be pretty good.

    My rules of thumb:
    The shorter the poles, the stronger the tent.
    The shorter the fabric spans, the stronger the tent.
    Guy ropes weigh next to nothing.
    A 2 am in a howling storm, saving 100 g does not seem quite as important.

    Cheers

    #3540661
    Matt Dirksen
    BPL Member

    @namelessway

    Locale: Mid Atlantic

    “Guy ropes weigh next to nothing.”

    Roger you forgot to add:

    Guy ropes weigh next to nothing, but DO next to nothing, if they’re not connected to the frame itself.

    ;>D

    #3540663
    Roger Caffin
    BPL Member

    @rcaffin

    Locale: Wollemi & Kosciusko NPs, Europe

    Hi Matt
    I was going for brevity. :)

    OK, I will add:
    Tent poles which are not threaded into the fly are fairly useless.
    Guy ropes need to be attached to the pole sleeves.

    (But as everyone knows, I am biased.)

    Cheers

    #3541099
    Sam Farrington
    BPL Member

    @scfhome

    Locale: Chocorua NH, USA

    Matt,
    I think that Roger’s photo illustrates that the guylines do not have to be attached directly to the poles themselves, when there are pole sleeves sewn to the outside of the fly, and the attachment is by a pullout sewn to the base of the pole sleeve.

    Roger,
    Had not seen that tent before. Is it one of yours? Looks something like the MacPac Olympus, but perhaps lighter. Is there a reason for having the door unzip down rather than up to and under the awning over the door? And is there something besides the lady’s head holding the awning up, and if so, can you tell us what was used for the awning support? Fiberglass is too stiff for that bend.

    I’ve been trying to design that type of vestibule and door and have been having a devil of a time with scale models and 7D nylon fabric. Will muddle on, but am looking for info on the details. Thanks.

    #3541102
    Roger Caffin
    BPL Member

    @rcaffin

    Locale: Wollemi & Kosciusko NPs, Europe

    Roger’s photo illustrates that the guylines do not have to be attached directly to the poles themselves, when there are pole sleeves sewn to the outside of the fly, and the attachment is by a pullout sewn to the base of the pole sleeve.

    In fact is is very hard to attach the guys directly to the poles. I have tried but I found no good way of doing it. Using a distributed attachment (see photo) sewn into the seam with the pole sleeve does work very well. Adjust guy rope tension to match pole seam.

    Had not seen that tent before. Is it one of yours? Looks something like the MacPac Olympus,

    Yes, it is my first double-skin winter tent, made before the current red one. Yes, it is modeled after the Olympus – my first serious winter tent.

    It uses Dim Poly Titan fabric: nylon coated with a serious layer of PU, and originally designed for NASA use for high altitude balloons. With bonded seams it is air-tight, let alone waterproof. Called ‘Titan’ because the orange coating contained titanium oxide to block the UV – long-duration high-altitude flights after all.

    However, the nylon fabric does not have a DWR (why should it?), and it could absorb condensation on the inside and then freeze solid! Packing the tent when frozen was tricky as I did not want to crack the coating or the fabric. A great fabric (and tested by several vendors), but not for winter tents.

    Is there a reason for having the door unzip down rather than up to and under the awning over the door?

    Oh yes, for sure! Several reasons.

    Field use showed me that a U-shaped zip as used on some tents to get a side-opening door had a fatal flaw. Zips do not really like going around in a curve, and FROZEN zips really do not like it. This tent survived, but I could see a damaged zip that way for sure. In the end I did not run the zip around the curve in the field.

    One could of course run two straight zips up the sides of the door so the door opens upwards, but that turned out to be a total pain. How do you hold the door up and out of the way?
    Plus, how do you incorporate a top window for essential ventilation with that design? A real mess there.
    Finally, consider the poor zip at the bottom corners. There would be considerable stress on the last few teeth in the zip down there at any time, and far more when trying to run the zip down to the bottom. These stresses would be made worse by any dirt in the teeth down there – you are not always pitched on clean snow.

    So I looked at the current design, opening downwards. Top window? Dead easy. Straight Zips? Of course. No load on the zip bottom ends: of course. Door rolled up on the ground? That turns out to be a trivial detail in use: you just step over it. I was told that you could never sell such a design commercially because newbies would be for ever tripping over it and trashing the tent. Well, tough. We find it perfectly convenient.

    And is there something besides the lady’s head holding the awning up,

    That’s my wife Sue – my walking and ski-touring partner since Uni days. It was Sue who got us ski-touring in fact.
    Just Sue’s head holding up the awning. She was fitting out the interior of the tent when I asked her to stick her head out. That said, the awnings (at both ends) are held up by heavy whipper-snipper (string trimmer?) plastic cord in a narrow sleeve around the edge of the curve. I have also used narrow strips of 1.5 mm PE sheet.

    Awning design: fitted to the pole seam and with a simple curve at the outer edge. Fitting to the pole seam is tricky: it took some maths. That was OK as the whole tent has a maths-based design anyhow. I dare say you could just leave the awning till last and ‘fit’ the fabric to the otherwise finished and erected tent. A bit of silicone sealant …


    Hum … there may also have been a guy rope to the peak of the awning. This photo seems to say so. We had hail or corn snow hammering on the tent at high speed all night, but we slept well. It’s a secure design.
    (A note for novices: either tuck your skis right under the tent fly or ram them in upright. Don’t leave them just lying on the snow where they can get covered in the night. We hang our ski poles off the skis as well so they don’t get lost.)

    A detail to check at the front end of the vestibule in the 1st photo: dead sticks instead of metal stakes. Also used for the guy ropes at the sides. They worked very well for holding, and in the morning I just unhooked and left them in place in the (frozen) snow. Works fine in wooded areas, but we are often in treeless areas so I can’t rely on that.

    #3541821
    Sam Farrington
    BPL Member

    @scfhome

    Locale: Chocorua NH, USA

    Thank you, Roger, for all the info.
    I’ve had problems with D-P materials before because not enough homework was done before purchase with respect to their characteristics; although for a tent, it would be lighter brands of materials in question.

    See now why you joined the door to the sidewall extensions at the bottom. Among other things, agree that unobstructed venting at the top vents is critical. And see why you did not curve the zippers. That could also apply with sandy areas, as well as with icing; and even interior zips, such as those on a bug netting door, could wear out more quickly if exposed to dirt and sand. The next design will have only straight vertical zippers. Will experiment with one vertical zipper on a vestibule to see if opening the flap or flaps will provide enough room for easy entry. The peak of such a door might have to be higher, though; but the door flap(s) could be held out of the way by Velcro tabs, or a tab at the end of a short length of light shock cord. The door ties we see, especially the ones with barrel fasteners, are a big pain.

    Have seen tents that use velcro tabs to reinforce the zips where they join. Sleeping bags also. The tabs fold and stick out of the way when not in use, and only the felt, not the hook surfaces, remain exposed. Quality hook and loop can withstand a lot of stress if it is not directed toward peeling. The tabs would only be used when buttoning up in a storm. Inconvenient and not needed in milder weather.

    String trimmer cord? Will have to check out what is available. As for waiting till last to fit vestibules and awnings, that has become the standard operating procedure, with construction broken down into defined steps as much as possible.

    That first winter tent is a beauty. Thanks again for your suggestions.

    #3541851
    Roger Caffin
    BPL Member

    @rcaffin

    Locale: Wollemi & Kosciusko NPs, Europe

    This is a copy of my summer tent someone else made. They went for the straight zips.

    For the inner tent on later models I have managed straight zips up the sides with Velcro right across the top. No gaps at the ends of the velcro!

    Cheers

    #3542651
    Sam Farrington
    BPL Member

    @scfhome

    Locale: Chocorua NH, USA

    Roger, I’m also a fig fan of inverted T zips for inside netting doors. Have used them for a long time, with #3 coil zips, with never a problem. Thanks also for the suggestions about trimmer wire to support the awnings. Pierre D. mentioned the heavy duty whipper wire in his newest thread. For a smaller tent, am wondering about using plastic knitting needles, which are very flexible, but would need some long ones. Must go looking.
    Also think the awning support rods could easily be installed when the tent is pitched. No additional hardware, just pockets of light webbing (grosgrain or twill tape) that the rod ends could slip into. It might make the tent more easy to pack up if the rods were not permanently installed.

    #3542663
    Roger Caffin
    BPL Member

    @rcaffin

    Locale: Wollemi & Kosciusko NPs, Europe

    Never seen knitting needles that long. :)

    I have seen lengths of 1/8″ plastic welding rod though. The PVC stuff is quite bendy. There may also be other plastics available. Could be worth considering. The advantage of the whipper snipper cord is that you can’t damage it. The larger stuff is usually a copolymer, blended for extreme toughness.

    Removable stiffening – um. Yeah, possible I guess. I would be a bit concerned about losing them in a storm, although I don’t lose the tent poles. The stiffening could easily go in the tent pole bag. You would need to ‘retain’ both ends.

    I don’t have any problems rolling the w-s cord up in the tent: it does not get damaged. But I do know it is there when I am rolling the tent up.

    Cheers

    #3542774
    Sam Farrington
    BPL Member

    @scfhome

    Locale: Chocorua NH, USA

    “I have seen lengths of 1/8″ plastic welding rod though.”
    Another good suggestion to add to the shopping list.
    Thanks.

    #3545748
    Sam Farrington
    BPL Member

    @scfhome

    Locale: Chocorua NH, USA

    Roger, & all –
    Problem solved. The kite supply companies sell solid fiberglass rods, and there is actually a thread about the flexibility of different diameter rods:
    http://www.kitebuilder.com/forums/viewtopic.php?t=11335
    Kitebuilder no longer sells this stuff, but the lowest shipping charge was found at:
    https://www.flymarketkites.com/fiberglass-tubes/

    I think the 1/8″ (.125″) diameter rod (3.175 mm) should have just about the right flex to slide into a small sleeve and support arced awnings over triangular shaped vents such as the one shown in Roger’s photo of his wife, Sue, in a tunnel tent..  As he noted, the rods can be stored  unflexed with the tent poles in their stuff sack.  One or two of these FG rods will be very light and should do a good job of stabilizing the vent covers.  The awning can come down a few inches below the bottom edge of the vent, dispensing with the need to also build in a vent closure.  When I get one built on a tent, will post a photo.  The trick is to have the ends of the rod a little higher than the leading edge of the awning so it cannot flip backward – shown in this photo of a One Planet Goondie:


Viewing 25 posts - 1 through 25 (of 26 total)
  • You must be logged in to reply to this topic.
Forum Posting

A Membership is required to post in the forums. Login or become a member to post in the member forums!

Get the Newsletter

Get our free Handbook and Receive our weekly newsletter to see what's new at Backpacking Light!

Gear Research & Discovery Tools


Loading...