Topic

Silpoly solo tarp w/15 bonded tieouts for max versatility and durability


Forum Posting

A Membership is required to post in the forums. Login or become a member to post in the member forums!

Home Forums Gear Forums Make Your Own Gear Silpoly solo tarp w/15 bonded tieouts for max versatility and durability

Viewing 8 posts - 1 through 8 (of 8 total)
  • Author
    Posts
  • #3745223
    Monte Masterson
    BPL Member

    @septimius

    Locale: Southern Indiana

    Tarp is made from a 70″ X 110″ piece of Dutchwaregear Xenon Sil Wide 20D silpoly. Finished dimensions are 5′ 8″ X 9′. Weighs 7.5 oz. Has stood up to a lot of Winter testing which included at least 30 mph winds and heavy rains.

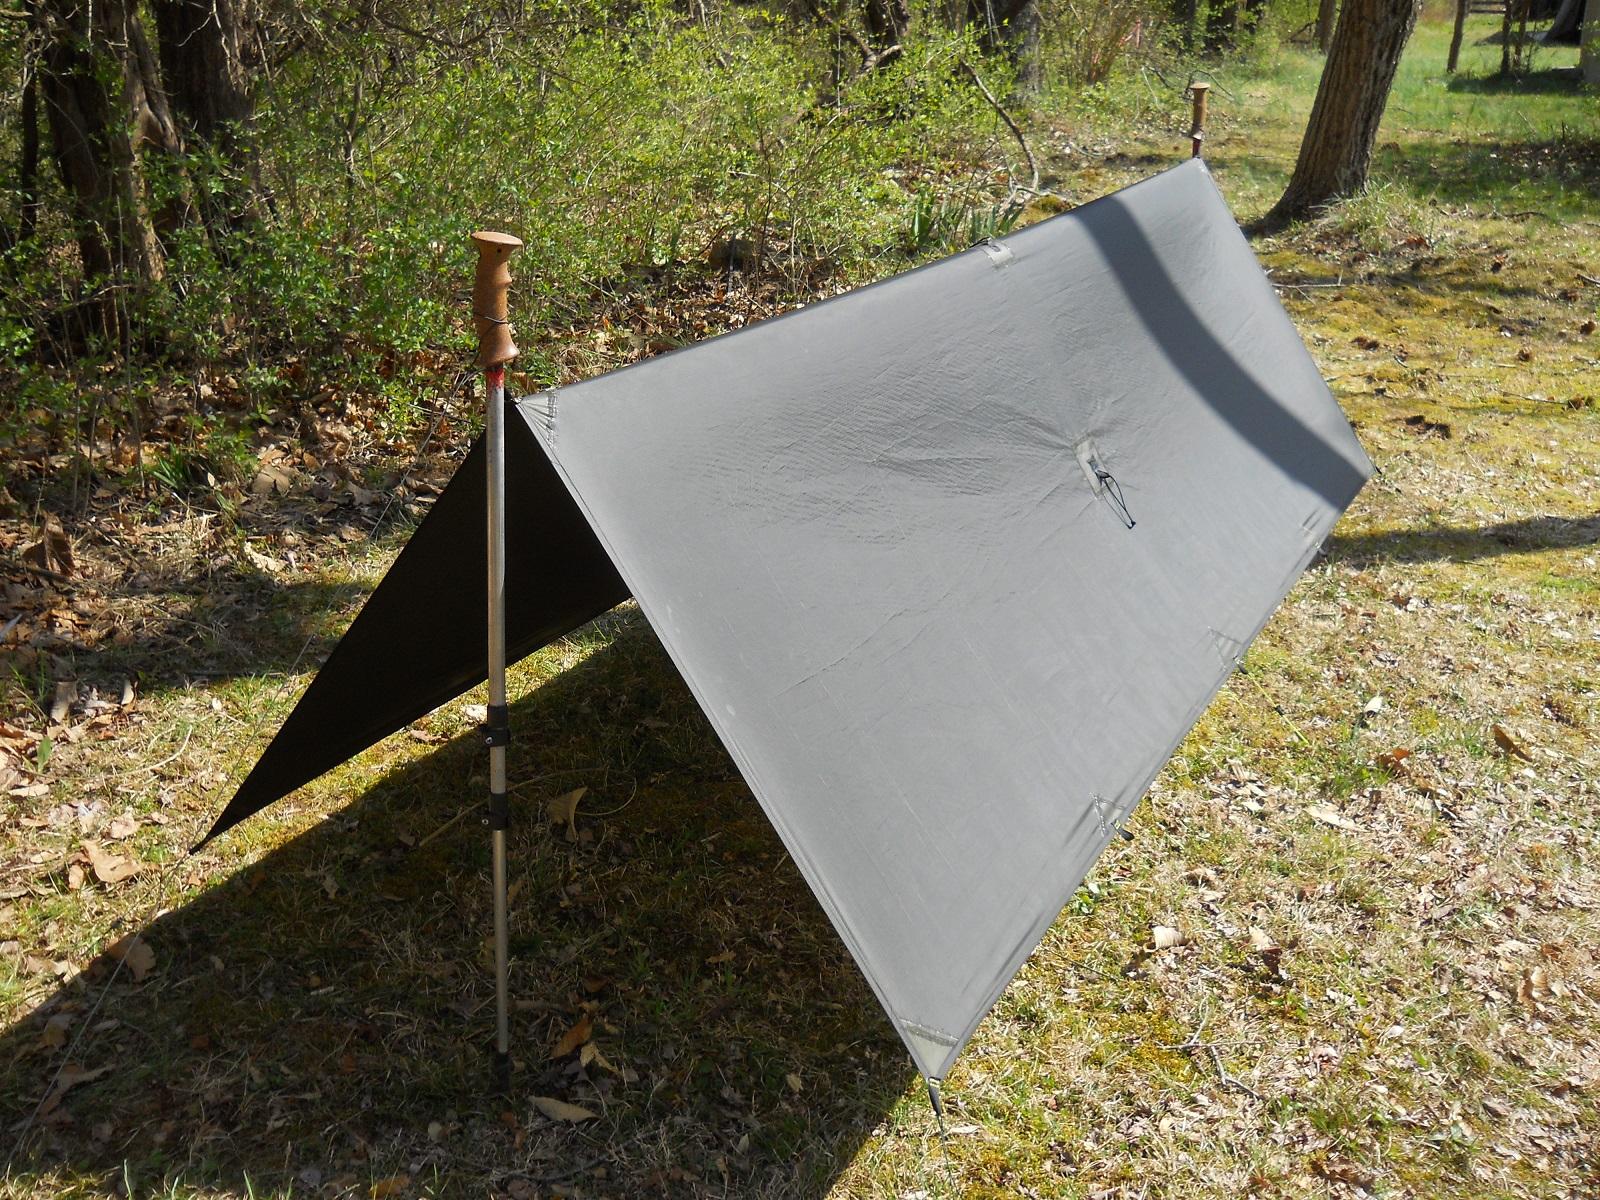
    One of my favorite pitches is the double pole holden, but of course you can’t do it with just the 8 basic tieouts that you see on many flat tarps. This one has 12 perimeter tieouts and 3 panel. That includes 2 extra on each long side halfway between corner and middle tieouts. Sun is at my back so the space is much deeper under the tarp than it appears. Mid panel tieout is deployed from backside.

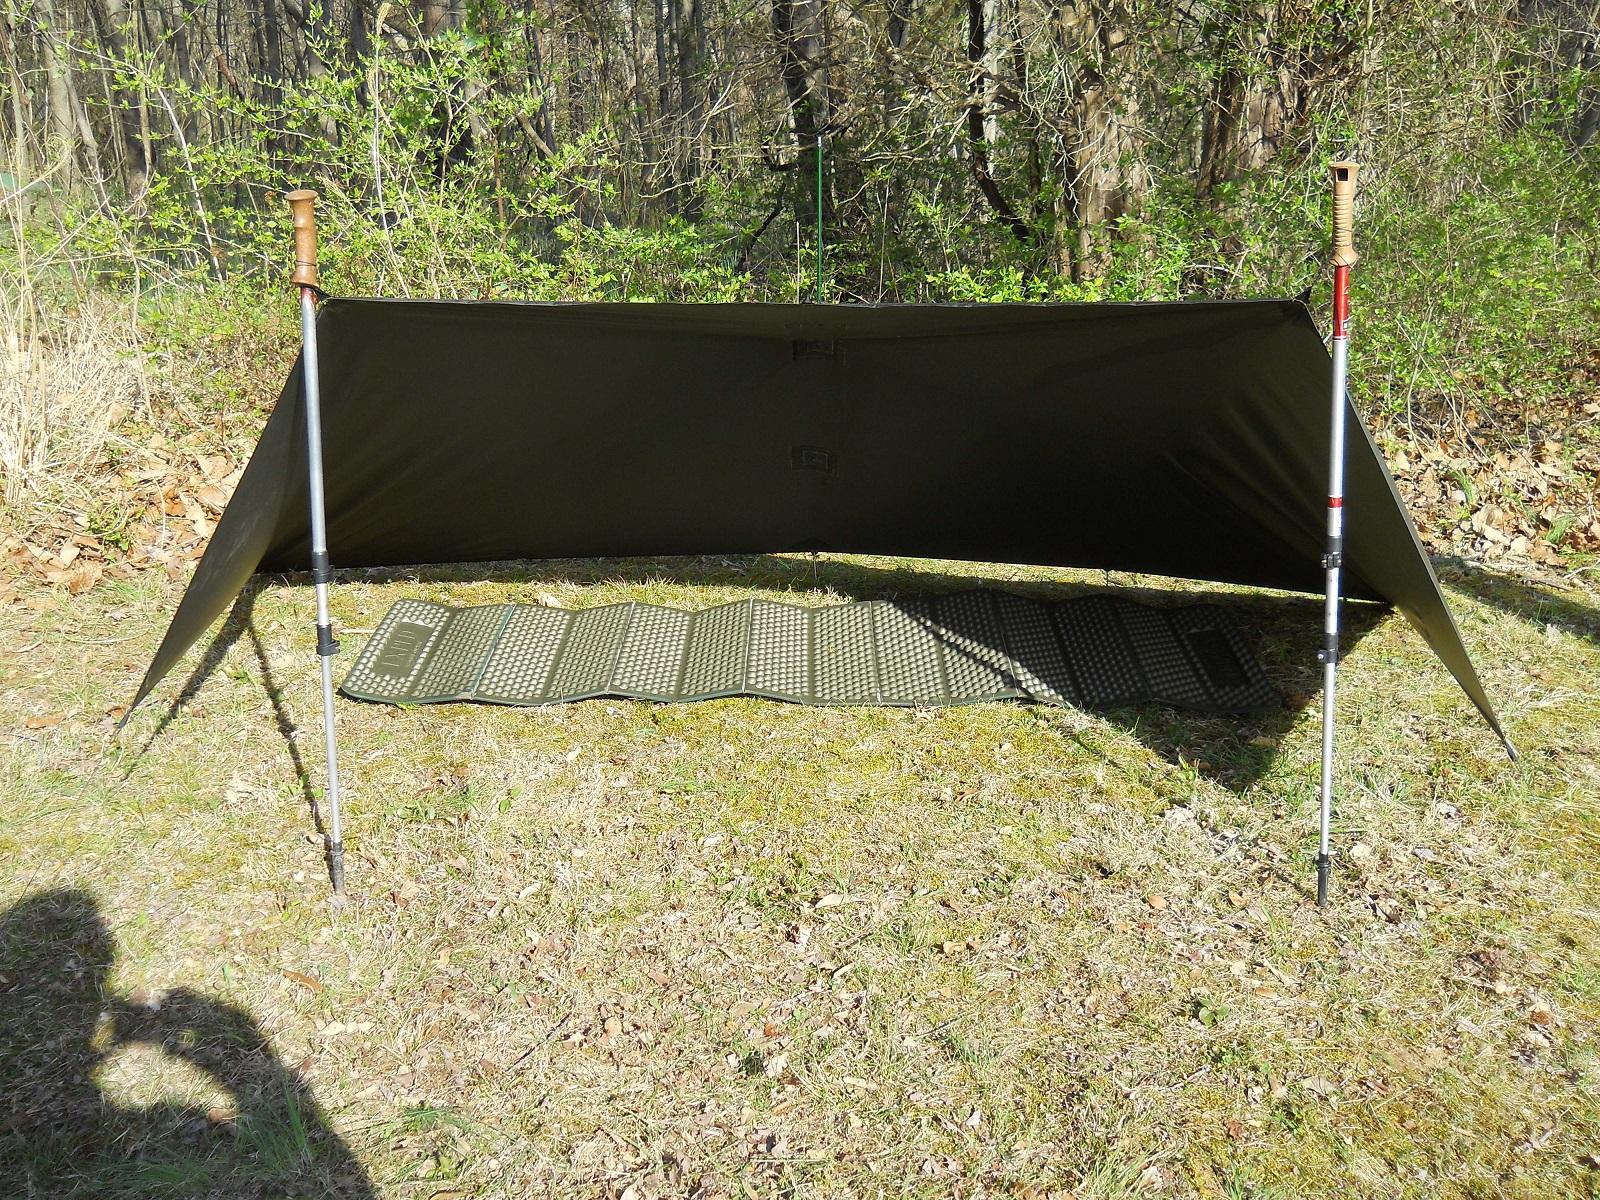
    I pulled out all the stops for the reinforcements. The triangles on the perimeter are the same 20D silpoly material and are bonded with Permatex Flowable silicone in a methodical 5 step process which assures solid adhesion. With a double perimeter hem that gives me 6 layers in which to sew on my 3/8″ grosgrain. I wouldn’t dream of making a tarp without bonded reinforcements for ALL tieouts. For the 3 panel tieouts , 1 middle and 2 at 1/4 width (mainly for A frame pitch), I used 4″ silpoly squares on both sides and on the underside I bonded on 2″ X-Pac squares (center of 4″ squares) in which to sew the grosgrain. With 3/32″ shockcord loops on the panel tieouts everything is pretty strong and much less likely to rip out. Lean to pitch below (back view). The pitch becomes almost unworkable on a tarp this wide without mid-panel tieouts (same with double pole holden pitch above). Otherwise rain, condensation and/or wind will make the tarp will droop down on you. Nor will the tarp be as solid without the mid panel, regardless of how taught you try to pitch it.

    Lean to front view.

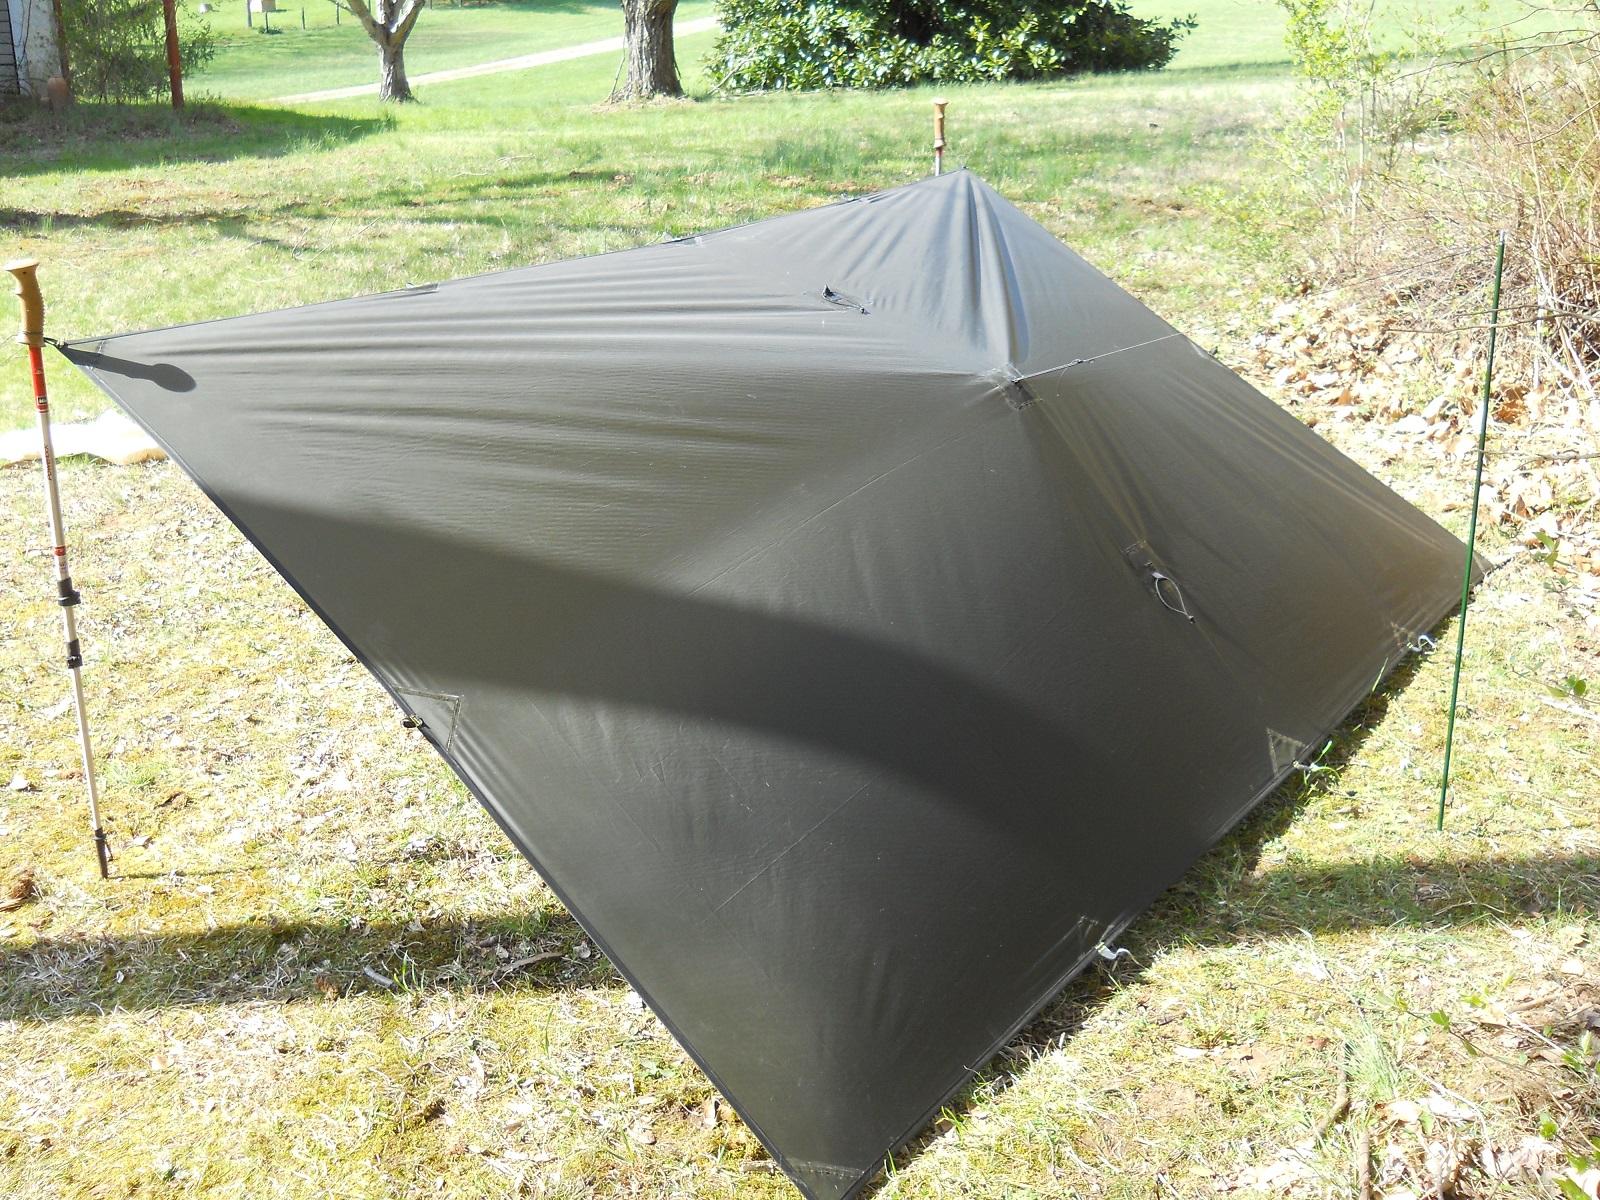
    Closer view of lean to pitch to show underside of bonded panel tieouts and how much utilizing the middle one can open up space underneath.

    A frame with 4.5 oz all net top zip bug bivy  https://backpackinglight.com/forums/topic/4-5-oz-all-net-extra-large-bug-bivy-full-length-top-zip-entry/ underneath.


    #3745254
    Mike B
    BPL Member

    @highwarlok

    Locale: Colorado

    Looks great. Nice taught pitches.

    #3745260
    Monte Masterson
    BPL Member

    @septimius

    Locale: Southern Indiana

    Another pic of the double pole holden pitch, but with a lighter camera exposure. This pitch provides a lot more livable space than a half-pyramid. It’s fine for fair weather to protect against condensation, frost or to utilize as a windbreak. Also works with light rains and low winds, or in moderate rains if the backside is properly angled toward the prevailing breeze.

    But of course if substantial rains are expected, I’m going with the trusty ole A frame. And deploying the side-panel tieouts is a must IMO. Even the MLD Monk Tarp at 5′ wide has side panel tieouts (Monk Tarp also has 12 perimeter tieouts). Actually a 5′ X 9″ size (Monk) is better for the half-pyramid, holden and lean to pitches because it has less width to span and therefore sags less. It’s more solid and taut. However, the extra 8″ width of this silpoly tarp provides far more coverage in the A frame configuration.


    #3745262
    dirtbag
    BPL Member

    @dirtbaghiker

    Usual sweetness. I love it!

    #3745588
    todd
    BPL Member

    @funnymo

    Locale: SE USA

    Ahhhh….seamless perfection!!!

    #3745746
    Sam Farrington
    BPL Member

    @scfhome

    Locale: Chocorua NH, USA

    Hi Monte,

    Would luv to know more about your five step process for applying Permatex.

    Also, could not tell for sure if the ‘panel’ pullouts were located on a seam, or are secured with just a reinforcement patch attached on the large fabric panel surface.

    Thanks.

    #3745757
    Monte Masterson
    BPL Member

    @septimius

    Locale: Southern Indiana

    There’s no seams on the tarp Sam, it’s made from one 70″ X 110″ section of the Dutchware Xenon Sil Wide. https://dutchwaregear.com/product/xenon-sil-wide/ For each panel tieout I bonded on two 4″ 20D silpoly squares (one on each side) which gives me 3 layers. Then I sewed around the perimeter of the squares about 1/4″ from the edge with a longer stitch length and a slightly lower tension. Next I bonded on 2″ X-Pac squares to the center of the silpoy squares (underside), but without sewing around the perimeter. I like to use same material as tarp on all reinforcements (except X-Pac) because the stretch stays the same and therefore doesn’t invite failure like it would with heavier reinforcements (when sewing around edges).

    The bonding of reinforcements goes like this: I clean the tarp on the area I’m going to bond to and the reinforcement with oderless mineral spirits and let dry. Next I lay a piece of wax paper underneath tarp in area I’m working on. Now I take a 1″ wide disposable foam brush and apply silicone to BOTH the tarp and the reinforcement. After that I scrape off all excess silicone (important). Then I place the reinforcement on the tarp and purge any major bubbles with my finger. Next I place a piece of wax paper over reinforcement and go over it over it with a roller to get all of the bubbles out. I procced by removing wax paper and laying a fresh clean piece over everything and then placing a hard bound book on top. After that I put a 1 gallon jug full of water on book and leave for at least 18 hours. After removing book I let dry for at least 3 days. Sewing a line on the edge of perimeter tieout is optional. Properly bonded you don’t need the sewing really (on perimeter tieouts, not panel) I’ve done it both ways and I get it when people say that sewing a line on reinforcements can create a perforation which invites tearing. Some manufacturers such as Trekkertent don’t sew on their reinforcements and rely on adhesives.

    #3745811
    Sam Farrington
    BPL Member

    @scfhome

    Locale: Chocorua NH, USA

    Thanks, Monte. With respect to curing time and weighting, that is very similar to what Roger Caffin suggested to me for Permatex, and it provided strong bonds with sil coated fabrics. But have not tested the bonds in nasty weather yet.  It is important to me for reinforcement patches at corners and stress points. because if the bonds release after a while, I don’t think they will be effective enough in distributing forces away from stress points.  This was clear at all stress points on a prototype canopy, where the quarter moon shaped patches did not adhere after some time to the areas on the panels that were away from the seams.  But I was using GE sil glue, as recommended in an old BPL thread on sil bonding.  Am hoping Permatex will do much better.  If not will have to try triangular shaped patches, hem their edges, and sew one side of the triangular patches right over the single layer of fabric on one side of the triangle (The other two sides of the triangle will be integrated with, and sewn into the seams).  Don’t see any other way to use patches to disperse force on single layer areas on fabric with sil coated fabric.

    Am also experimenting with PU coated, densely woven paraglider fabric which might be more amenable to bonding with adhesives.  But one step at a time.  Did find some hard plastic 5 ”  diameter disc shaped wall shields at Walmart to assist with clamping round reinforcement patches over single layer areas on a canopy.  This will be my first tent built from scratch, and am taking it slow in the hopes of making a product that will last.

    Thanks much for the info.  It is very helpful.  If one side of a patch must be joined with a single layer on the canopy fabric, will use a thin needle and adjust for a longer distance between stitch holes.  Have had good luck with Metrosene thread designed for outdoor products.

Viewing 8 posts - 1 through 8 (of 8 total)
  • You must be logged in to reply to this topic.
Forum Posting

A Membership is required to post in the forums. Login or become a member to post in the member forums!

Get the Newsletter

Get our free Handbook and Receive our weekly newsletter to see what's new at Backpacking Light!

Gear Research & Discovery Tools


Loading...