Topic
Improved Water Scoop: Design Phase
Forum Posting
A Membership is required to post in the forums. Login or become a member to post in the member forums!
Home › Forums › Gear Forums › Make Your Own Gear › Improved Water Scoop: Design Phase
- This topic has 78 replies, 22 voices, and was last updated 6 years, 4 months ago by
 Ben H..
-
AuthorPosts
-
Apr 24, 2018 at 9:19 pm #3532075
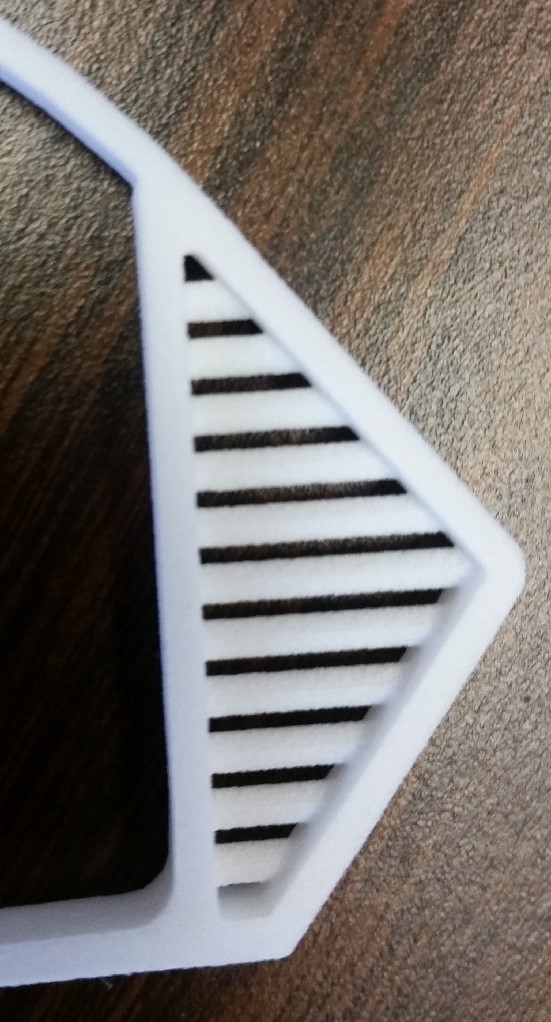
Comparing the two, the sintered nylon has a much nicer finish. Some of the finish issues from the extrusion process could be cleaned up with a little sanding. I am more concerned about the area of the sieve. The sintered nylon is beautiful:

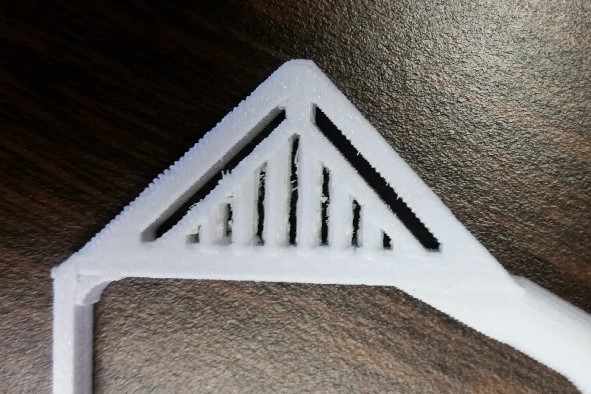
The extruded PLA piece is a disaster:

I bought some flowable rtv to coat the pieces so they don’t become bacteria laden. I am not sure if it will be thin enough to not clog up the PLA sieve.
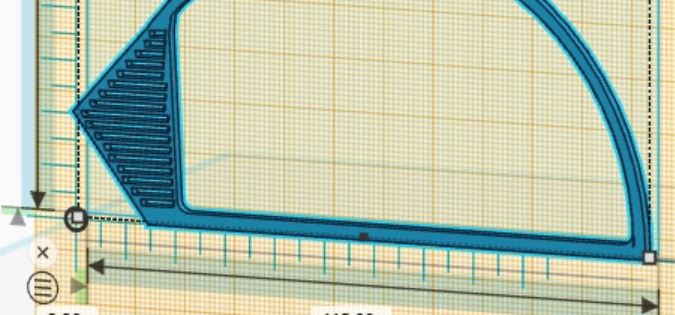
Apr 24, 2018 at 9:52 pm #3532078I was pretty committed to using PLA because it is food safe and the extrusion process allows for a hollow design but I am pretty unhappy with the results. I could print design b up in sintered nylon, but the more I think about it, the more I like Adam K’s idea of having the handle extend through the scoop to add strength. I know my second design is quite a bit uglier than my first design, but I have since re-drawn it so it looks better. Based on the results of the printing I am definitely going to re-design the sieve area. If anyone is interested in getting something like this 3-d printed, it cost me ~$20 to have both parts printed and shipped to me from Shapeways.com.
In terms of adding a handle to my second design, I am still having trouble working out a solution. I ordered some button spring clips, but they specified, what I consider to be, the wrong dimension, and it is too big to fit inside an arrow shaft.
Apr 24, 2018 at 10:31 pm #3532087I still don’t understand what the whole point of this is!
How is this to be used?
Pretty please, a photo of what you would do with the ‘scoop’ in real life, in a creek, would help me understand.Cheers
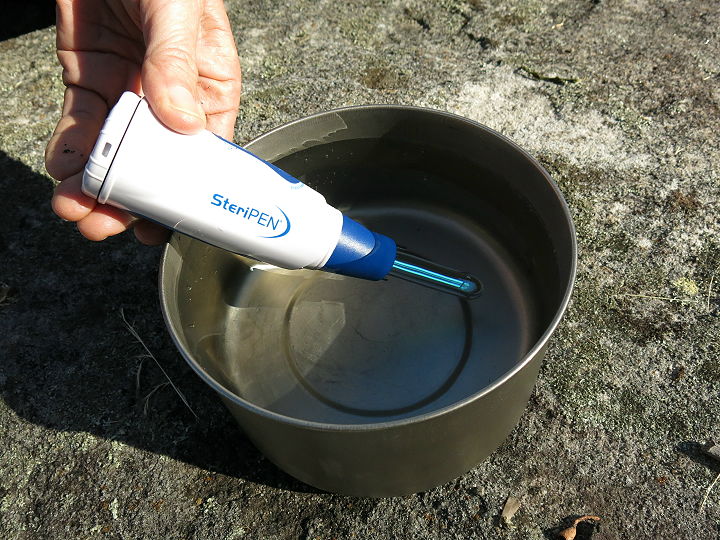
Apr 24, 2018 at 11:54 pm #3532104A bag attaches around the rim of the plastic piece shown. You hold on to the handle and scoop water up into the bag. The opening is large enough to insert a steripen and treat the water. After treatment you pour the water off through the sieve into a clean water bottle. The clean water bottle could be narrowed mouth and lightweight. The flat part allows you to scoop water up from a thin wide trickle. The handle can allow you to reach further down to access water.
Apr 25, 2018 at 12:18 am #3532109Can we see one in field test?
Cheers
Apr 25, 2018 at 12:24 am #3532110I hate to agree with Roger, but it seems time for some field trials.
Maybe filmed by a friend with some wit (for good commentary) and their choice of $2 gas station plastic products and a Swiss army knife scissors to cut it into a competing tool.
Apr 25, 2018 at 12:45 am #3532112I don’t have firsthand experience with steripens but I thought you were supposed to filter particulates before the treatment.
Apr 25, 2018 at 2:13 am #3532120Mathew, you are correct. The strainer that was available was a lot like the fine head nets a lot of people use in the ADK’s during blackfly season. I cannot say for sure, but I am guessing that any particulates that can get through this are less than what can interfere with the UV treatment. A silty mix of stuff is OK provided it is less than the “weak lemon-aid” guideline. Again, UV does next to nothing for chemical contaminants. So, it pays to know the area you will be hiking into.
In the ADK’s, I don’t really bother. If I do get some mud or leaf litter in the mix, I wait a minute or two and pour off the clear water into my second bottle, disposing of the debris. Sometimes a couple times. Then I can zap a full bottle (1/2L gatoraid bottle) for drinking. I never scoop, zap and pour off. I do not believe you will get good drinking water that way.
Any debris or particulates in the water will “shadow” the water immediately next to it. Even agitated, you will not get it all with larger debris since it can be saturated. So, it doesn’t make sense to have the opening big enough for the Steripen. You should NOT use it that way. I do not believe a cloth bag will supply a clean enough surface, unless it is totally free of wrinkles, stitches, threads. These can harbor bugs and defeat the UV because they will soak without being zapped. Anyway, that’s two reasons.
Fill your bottle full to the top. Turn the steripen on and submerge it. At this point, some water should overflow the bottle onto the threads. I gently swirl the pen causing a slight current in the water and incidentally spilling out some treated water. At the end of treatment, remove the steripen. Then take a dry piece of cloth and wipe off the threads. Of course, if you were carrying dirty water, you should also dry the cap & threads. There is nothing left that is untreated/not dry. It is safe to drink.
Apr 25, 2018 at 4:47 pm #3532185You don’t need a proper “filter” treatment before you use a Steripen, though if you have a lot of crud in your water, Steripen probably isn’t the best treatment. What I am calling a sieve is for large floaties that can sneak into your water when you scoop it up out of a relatively clean source. If you want to use a hankie to to better remove particulates, this scoop frame would be easier to use than a non-stiff container.
I find the suggestion that you can’t pour off treated water to another container a bit odd. How are you supposed to use the water? The reason I think this idea matches well with a Steripen, is that the Steripen need a wide mouth container to treat. Wide-mouth, seal-able containers are heavy. Some people have suggested treating the water in a cut-off platypus, then pour it into a light narrow bottle. I found that technique awkward and difficult. I thought to myself a lightweight plastic frame would not add much weight and make this task much easier. Whether the end goal is superior to just using a wide-mouth container is yet to be seen.
I agree it would be best to strain it before it gets in the treatment bag and that is possible by using the narrower strain to scoop up water. In my mind, I like the idea of having a wide area to scoop water up with and felt it would be too clunky to strain that entire width. Others seem to prefer a narrower scoop which could be easily accommodated if they were to make one for themselves.
To be clear I don’t ever plan on selling these. The end result is a product I think I would like to use and drawings/easy to follow instructions for others to create their own if they would like. People have mentioned preferring the handle 90 degrees off from the direction I have it. If the end result of this is a useful product I would be more than happy to put the handle wherever people want it. The second design looks a bit clunky to allow putting the handle opposite the sieve.
Those requesting video of a field test are missing the title where I state “design phase.” All I have is a plastic frame at the moment. I am still working out how to attach the bag and handle and make sure the 3-d printed plastic does not turn into a cesspool of bacteria. This project is slow moving, but it is not a super high priority for me.
Apr 25, 2018 at 6:04 pm #3532192I really don’t care about selling these either. I am more worried about it’s use.
You wrote:
“A bag attaches around the rim of the plastic piece shown. You hold on to the handle and scoop water up into the bag.”
OK, Great idea.You continued with:
“The opening is large enough to insert a steripen and treat the water. After treatment you pour the water off through the sieve into a clean water bottle.”
This is the part I do not agree with.
1) Gathering water from a small trickle or shallow stream usually involves bumping the bottom. Not always, since it could also be trickling down a rock face. This “dirty” water will carry contaminants: mud, microbiota, organic debris into the gathering system, basically contaminating it all.
2) Zapping it (treating it with UV from device, not necessarily the steripen) should sterilize everything below water level. BUT, like all radiation, it travels in a straight-line only. The sterilizing radiation will not and cannot travel around corners (folds, seams in the bag.) Nor will it sterilize anything above the water level. Surface tension see’s to that. A brief examination of a mylar bag will show there MUST be a fold or some seam in it somewhere. The sterilizing radiation will not penetrate behind this. Basically, you leave the entire batch contaminated after sterilizing it with UV, because you did not strike every surface directly.
3) Debris/floaties, other organics in the water will act to soak water and bacteria and flagellates (and other protista…including guardia, crypto, and others) that live in the water. UV is a straight line defense. If it cannot see it directly, it cannot “kill” it. Bugs in the shadows of objects cannot be killed. Bugs embedded in leaves and other debris cannot be “killed.” So, any sample that has these after a normal zap cycle will remain contaminated. UV is blocked by a single layer up to 5 layers in in humans (sunlight/sunburn.) Don’t expect magic out of a steripen.
4) This all happens BELOW WATER LEVEL. Pouring the water off AFTER treating it means you contaminated the already contaminated sample again. The upper levels of the bag and grate are already contaminated and remain so. Pouring clean water over dirty water only means it ALL is contaminated.Don’t get me wrong. I have been in occasional areas where a trickle of water was all I could get. It took me ten minutes (likely a lot less but I was THIRSTY) to fill one bottle from this trickle. I zapped the bottle and drank it looking for more. I spent over an hour filling two water bottles with my pot (which I simply bent to what I needed to gather water.) I drank two water bottles and still didn’t pee until I finished the other two, refilled and drank them later in the day. This gadget has some value.
I don’t think your solution as written has any weight. And especially when you expound on things you obviously don’t know. Newbees are reading this. While I will admit to just drinking water from high streams, there is always a risk. To stay safe, please do NOT follow Ben’s outline. Gather your water into a container, then zap it.
Apr 25, 2018 at 7:55 pm #3532204I said:
…if you have a lot of crud in your water, Steripen probably isn’t the best treatment.
I’m not sure where we have a disagreement. Did you want me to say, “definitely don’t use a Steripen!”
I guess your main issue is pouring off the water. In your example your poured the treated water into your mouth. I’m suggesting you pour it into a clean bottle and then into your mouth. I guess if you wanted to you could pour it directly in your mouth. I don’t see the difference. You seem focused on cross contamination. Is your concern that my design will end up with people scooping up inherently dirtier water than if they didn’t have it? As you gave an example, sometimes you make due with what you have. It is not clear to me how my idea is inherently unsafe. You mentioned the Steripen suggested technique of turning the treatment bottle upside down with the cap loosely screwed on to flush out any untreated water on the lip. You could certainly do a similar technique with my device. Just pour a little clean water on the ground before filling your vessel (the Angel’s share!).
Apr 25, 2018 at 8:02 pm #3532205I think the concern is pouring the water past the filter/grid that is contaminated. I’m pretty sure you could address this concern by treating the water in the bottle rather than the scoop. I’m pretty sure Steripen makes models that fit the Smartwater/Gatorade/disposable bottles carried by most BPL members.
Apr 25, 2018 at 9:36 pm #3532223It might be a very good idea to read our article on the Classic 3 Steripen.
I suggest that the better idea is to use the scoop to collect water, then pour it into your pot through a filter, and then zap it with the Steripen.

This way you get reliable performance.Cheers
Apr 25, 2018 at 11:59 pm #3532241What do y’all think of this filter set-up? Container has 4 flat sides that flex and has a lid to boot. Container is dual purpose ;-)
Apr 26, 2018 at 12:27 am #3532244Great. SIMPLE.
I would put the filter over the pot and then scoop away.
Then Steripen in the pot.Cheers
Apr 26, 2018 at 12:50 am #3532247That would be TOO SIMPLE

I shoulda made the video longer and showed the filter material folding over to the opposite side to cover up the debris and then pour from the clean side. The hurrier I go, the behinder I get
 Apr 26, 2018 at 12:51 am #3532248
:)
Apr 26, 2018 at 3:02 am #3532264Scooping with your device is not going to work more than one scoop. The 1st scoop is going to stir up sediment in your shallow water source. The filtering “mesh” is not going to allow a whole helleva lot of water through. The second scoop will clog your mesh and the louvered pour spout. Even if you were able to get some water in the bag (60ml) and treat it, pouring it out via the contaminated louvered pour spout negates the purification. As long as you have a mesh covering your device you’re not going to be able to “scoop” You will be able to place it into the water source and let water “seep” through the filtering mesh.
If your shallow water source is 1/2″ deep, you’ll get 1/2″ of water in your bag if you let it seep in. 1/2″ that’s all.
 Apr 26, 2018 at 11:51 am #3532291
Ben, yes. You should not have mentioned using the Steripen in the filter.
I typically use my bandana for filtering scummy water. In low water, I make do with what I have to fill my container, then zap it. While I have had digestive problems from contaminated water with other methods, I have never gotten sick from UV treatment.
Some say I go overboard. Yes. In most cases, I don’t need to be cautious. Like I say, sometimes I know I can just drink wild water. However, even the directions at Steripen are a bit worrisome. They say to put the cap back on and then flip the bottle over. I tried this for a while but noticed I really do the same thing to the threads by sloshing treated water over the edge while zapping it. In every case a bandana wipe around the threads removes water/bugs from the threads.
In the case where the cap is contaminated, their method contaminates the whole sample. I don’t do that. The cap is usually clean, but in those cases where I just fill a bottle for carrying it without zapping it, I dry the cap too.Then zap the water, then do the “gently squeeze continuously as I screw on the cap on” trick, forcing water out along the threads/cap as I screw it on.
I have zapped some fairly bad water out of swamps/vernier puddles/mud puddles and this has worked fine. At least I haven’t had the craps in about 15-20 years of using UV treatment.
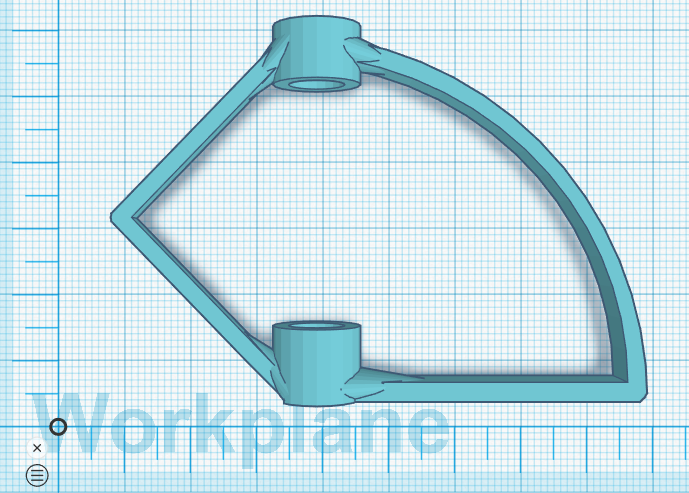
Aug 22, 2018 at 8:00 pm #3552587OK, so I took a bit of a break on this project, but I have finally made a new drawing. It has the handle go through the frame to add strength. It is a bit smaller than my previous drawings because the platypus that I bought and chopped up narrows considerably at the top where I cut off the cap. It gives me 8 inches in circumference to work with. I took off the sieve screen because (1) it is difficult to draw (for me), (2) I was having a hard time figuring out a good way to attach the bag near it, (3) I received quite a bit of push back from people and (4) I’m not convinced it would do a whole lot. Removing it simplifies the design and I can revisit it in the future if I feel like it.

I’m still having trouble figuring out the best way to attach the handle. The handle will be an 8 mm arrow shaft cut to whatever length is desired. I could just glue it in, but for packablity I would like it to be easily removable. Right now I put a little indentation inside the receiving area for the shaft. I would like it to mate the shaft and frame with a spring button clip, but I can’t find any that are small enough to fit inside an arrow shaft. If I can press a little bulge sticking out of the side wall of the arrow shaft, the plastic and aluminum might be flexible enough to make a good friction fit… those are my thoughts right now anyway. I was googling around this mourning for a bead rolling tool for small tubes. A company in Anaheim makes a WWII vintage design for $140 (definitely more than I am willing to spend). I watched a few DIY tool videos that take a grinding wheel to a cheap wire crimping tool, but I don’t have a grinding wheel and the tool didn’t look like it would fit inside an aluminum arrow shaft.
Aug 22, 2018 at 10:48 pm #3552629You can probably get just what you want if you misalign the two holes, either sideways slightly or by a small angle.
Cheers
Aug 22, 2018 at 11:54 pm #3552644If you are using an arrow shaft, they do come with threaded inserts. You can leverage their hardware to fasten the two parts together. My 2 cents.
Aug 22, 2018 at 11:56 pm #3552646Both of these ideas are excellent! Thanks for the input.
Aug 23, 2018 at 12:05 am #3552649Slide a “pencil clip” over the arrow shaft.Insert handle into hole of plastic widget and then drill appropriate hole thru both plastic and arrow shaft. Slide “pencil clip” forward so the end of clip falls into holes drilled. Make alterations as needed. You might be able to alter the clip to an internal spring button you were wanting if it’s small enough. If you go commercial with this contact me ;)
Pencil Clips
 Aug 23, 2018 at 12:11 am #3552651
Threads will get grit in them and cause frustrations.
-
AuthorPosts
- You must be logged in to reply to this topic.
Forum Posting
A Membership is required to post in the forums. Login or become a member to post in the member forums!
Our Community Posts are Moderated
Backpacking Light community posts are moderated and here to foster helpful and positive discussions about lightweight backpacking. Please be mindful of our values and boundaries and review our Community Guidelines prior to posting.
Get the Newsletter
Gear Research & Discovery Tools
- Browse our curated Gear Shop
- See the latest Gear Deals and Sales
- Our Recommendations
- Search for Gear on Sale with the Gear Finder
- Used Gear Swap
- Member Gear Reviews and BPL Gear Review Articles
- Browse by Gear Type or Brand.

