Hi Dan
Ah yes – heat treatment bags. Thought so. Could be good for campfires. Dunno how you would hold one over an alky or canister though.
Cheers
Topic
Become a member to post in the forums.
Hi Dan
Ah yes – heat treatment bags. Thought so. Could be good for campfires. Dunno how you would hold one over an alky or canister though.
Cheers
Craig and Adam, great info! This is the kind of experience I was looking for. PLA seems like a good choice but the resulting product would not be dishwasher safe. I don’t think that would be too significant of a limitation. I’m going to have to put together a CAD model. I haven’t done any drawing since college so I am a bit rusty.
Jan, how do you use your tube? Do you just use it to redirect flow or do you siphon through the tube?
Hi Ben
I am not a CAD user, no CAD training (though use various spatial, GIS, software packages, somewhat related). Tinkercad is what I use for 3D print design. Its web browser based, runs great, has good video tutorials, etc. There are fancier programs out there from CAD and others that let you do neat tricks (particularly the ability to scale items based on input metrics would be cool) but you probably don’t need it.
Best of all, Tinkercad is free :-)
PLA seems like a good choice but the resulting product would not be dishwasher safe.
This is most likely true. While very stiff, PLA has a fairly low softening point. If you left it in a car on a hot day, it would most likely soften and deform under its own weight. For an application like this however, I imagine it would just be washed by hand.
I agree with Roger; some really creative ideas on this thread!
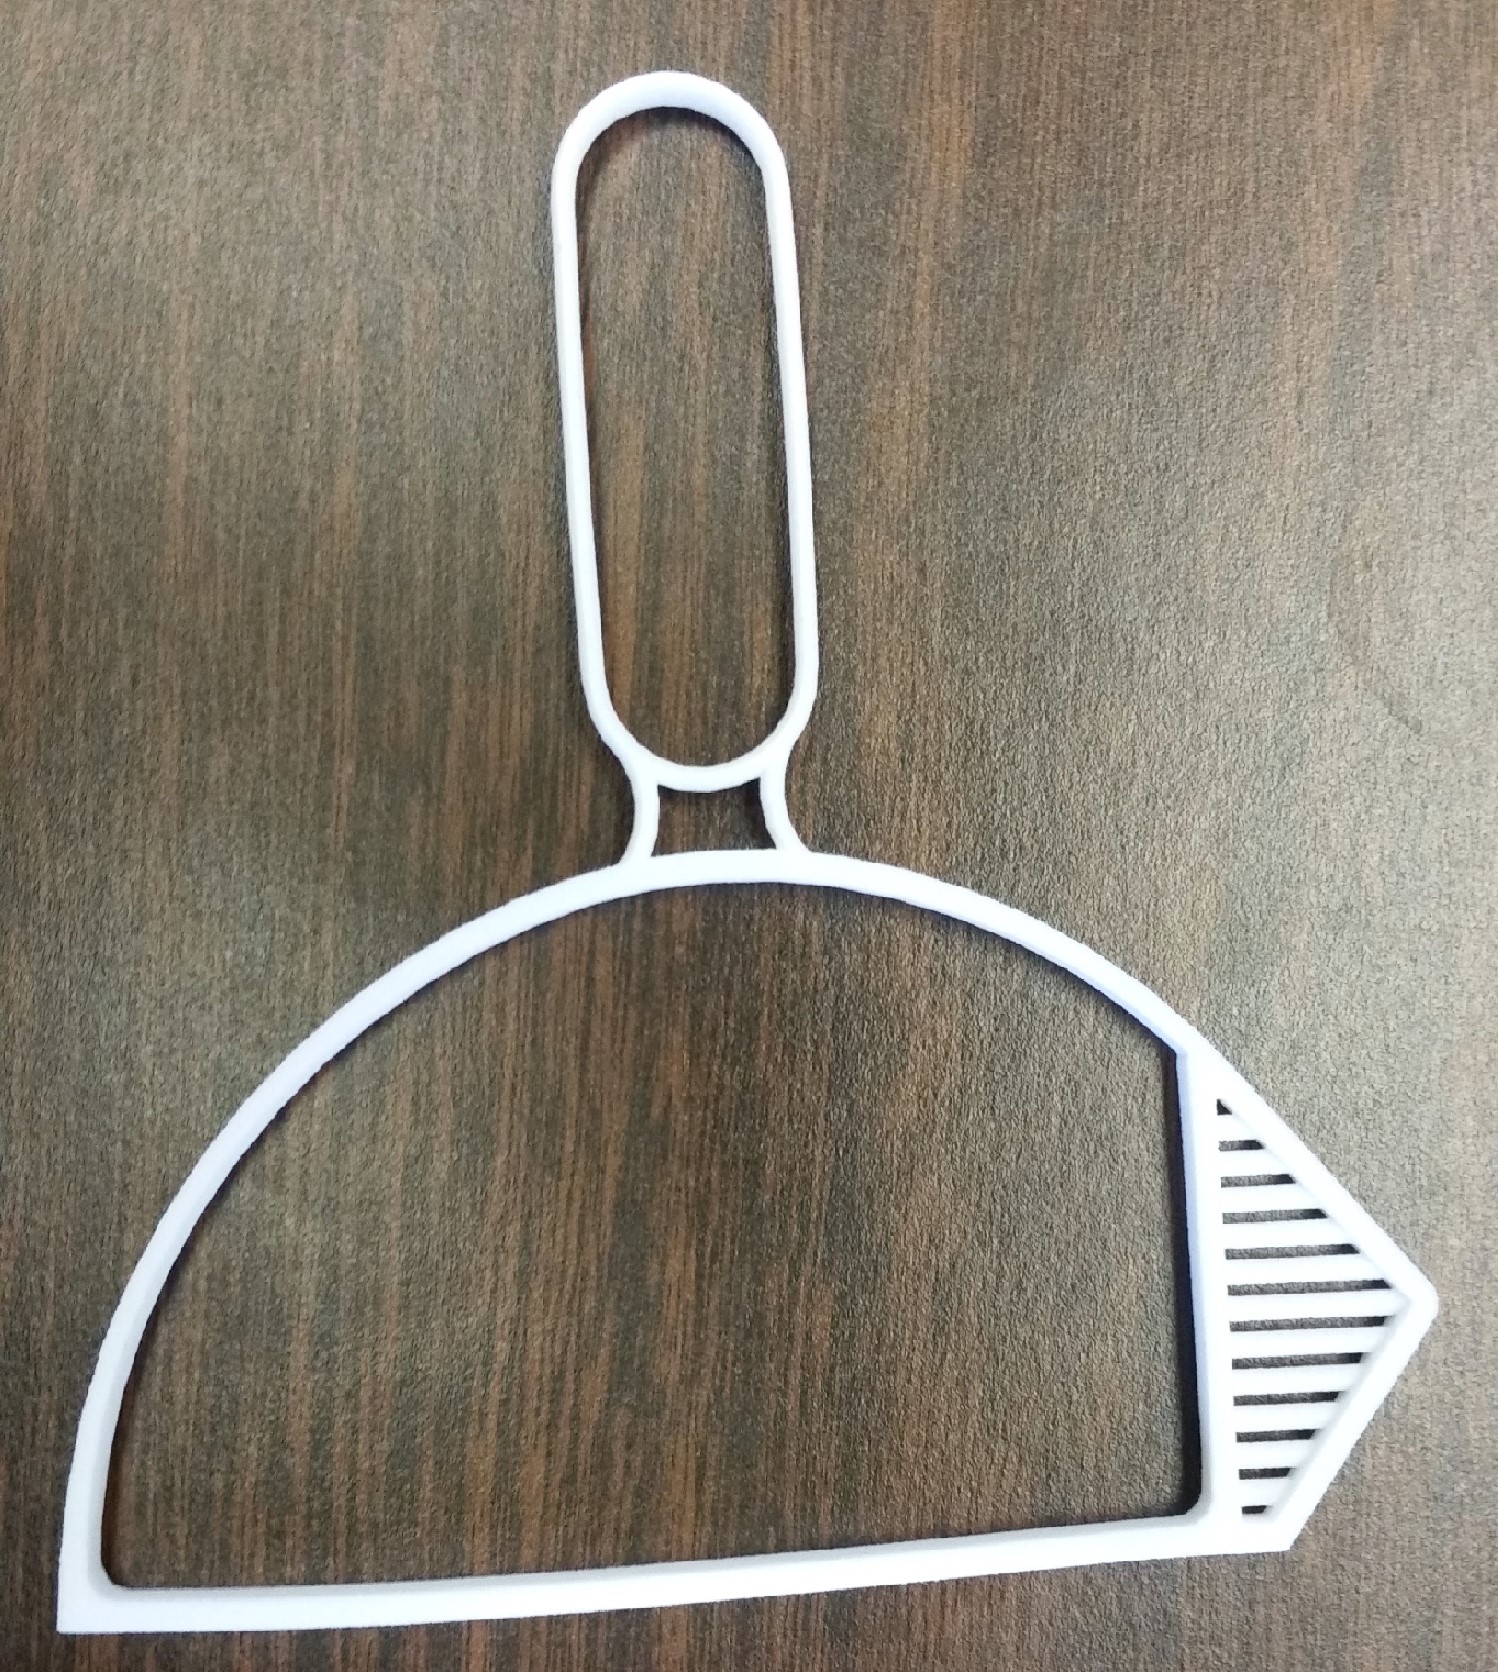
Here is a quick update with some questions. I roughed up my first attempt at drawing what I am thinking about:
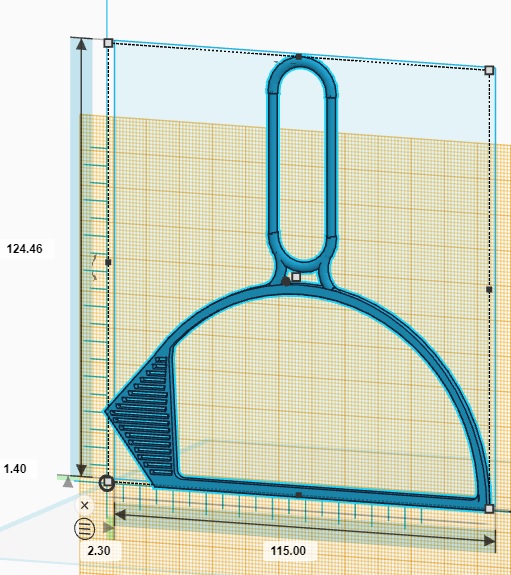
It is very two dimensional, though I am not sure if any 3-D features would be advantageous. I was thinking about shaping the pour spout more, but that would make it less compact for packing. I would really like a fold-able handle, but I think it is a bit beyond my design skills. All feedback is appreciated
The best part is I uploaded the stl files into Shapeways and discovered I could get this printed up for $4-9 (depending on type of plastic and printing technique)! I am very excited about that price point. That means to me a usable product is within reach for a reasonable price.
I tried to get the circumference of the scoop to match a 1 liter platypus but tinkerCad does not have good measuring tools
My biggest question is what is the best way of attaching the bag to the scoop? Does anyone have any recommended glues? I may try using a soldering iron to melt the two plastics together. I may add a slot along the pour spout to have a lip to curl the bag around. I would love to hear suggestions!
I can provide the stl file if anyone is interested, but I am currently cleaning up the CAD. The circular and straight sections of my handle don’t meet smoothly and the slots in the pour spout are a mess.
Sorry, but I can’t make any sense out of that at all. There must be some parts still in your head.
Cheers
Thanks for your helpful advice as always Roger
Hi Ben
Sarcasm not intended. I suspect others will be as much in the dark as me.
Cheers
I don’t think you need to make the circumference equal to a platy, and perhaps would suggest you not try to do so. If the flat edge is about as wide as a platy, you’re really limiting yourself to what kinds of places you can get water from. Something only a couple of inches wide, perhaps with a bit of a curve instead of flat (to get into spots like Franco’s pic above), might be more useful, and would be lighter.
As well, you could have the slots in the slightly rounded portion so that it acts as a rudimentary filter for water both entering and leaving.
And if the height of the whole thing, including handle, were as wide as a platy when opened, then you wouldn’t need to attach it to the platy, the platy pressing against it while open would hold it in place.
Thanks for the feed back Doug! So you think holding the bag in place with friction would be enough? I feel like that would slip out when you try pick up a bag full of water
I like using a freezer Ziplock with a cut corner. Stiff enough to scoup water with one hand. And with the water coming out the bottom you can also avoid floaty bits on the surface.

“I feel like that would slip out when you try pick up a bag full of water”
You can hold it in place to pick the bag up, I just meant it should stay in place while filling the bag with water, especially if it’s a slow running water source.
Hi Ben
I like the design so far! I agree that its much too big though. I think you’ll find that to print that up in PLA it will weigh too much (hard to say, but I’m guessing at least 30grams), and be far too flexible, unless you beef up the diameters a fair bit. I would cut it down so that the dimensions of the scoop are around 60*60mm.
With your handle, no way it will handle more than a couple of hundred grams before snapping before too long where it joins to the mouth section. You need to beef that up. A better technique is probably to do the handle in a short piece of CF tube (eg 5mm OD). Design a nice stiff section to slot that into. You can add a tiny dab of superglue to it, it will never come apart. You can drill out the hole gently to get the tube to fit if the print doesn’t come back perfect; leave plenty of meat.
You can always dremel/drill/sand away material once you have your print. You can’t add it back. If you decide you’ve grossly overbuilt a section, you can carefully take material off to save weight.
Think as well about the direction of the force on your parts. Having round or square profiles definitely won’t be the most efficient use of plastic here. You want the volume of plastic running in the same plane as the forces they experience. So thinner in one plane, thicker in the other. If that makes sense.
Another thought I had is to think outside the square a bit more with the handle. I’m guessing that the “mesh” section you’ve designed is where you dip in shallow water? You don’t want the handle perpendicular to that. I would use CF tube, and, run it down to that point. You could use a triangle scoop shape too. Triangles are strong shapes. Think like an Arrow, where, the point of the arrow is where you are collecting from (with your mesh section). The tail of the arrow is the handle. I would run the handle past the base of the triangle and to the apex where the collection point is. This will make it very strong.

You could easily do up a CF or plastic (mylar) bag to attach. You could wrap the open ends around the sides of the scoop then glue (or use tape) back to themselves. The joins would mostly be in sheer rather than peel unless your scoop parts are too fat.
Another way of doing this, is to just 3D print the joints. Then use CF tube for the straight sections. Glue in. Will be FAR stronger, lighter. You could use some pretty thin OD tube, like 2 or 3mm for sure.
These are great ideas Adam!
I definitely am concerned about the strength and flex. I am guessing my current design (2mm x 2mm) is too weak to handle the loads of 1 liter of water. I can stretch the drawing in the z-direction pretty easily, which will put more material in the primary direction of force but will add weight pretty quickly too. I’ve been thinking about redoing the drawing with a hollow cross section. That is easier to do with 3-d printing. Of course that wouldn’t work for laser sintering (the cheapest option on shapeways), but it would work for PLA which is extruded.
I am beginning to think the bag will have to wrap around the frame to get a good enough attachment to hold up to the weight of a liter of water. That will alleviate some of the food safety concerns with 3-d printed plastic too
My thought was the flat wide surface would be used to collect from a flat wide trickle of water. People seem to have more interest in a narrow profile to reach down between crags. I am thinking I should make the height narrower so that it can be used in either orientation.
I like your idea of using a tube for the handle. If I can figure out how to make it removable I could put two attachment points (one 90° clockwise from current location). That would further enable using the scoop in either orientation. A removable handle would make the thing more compact too.
I like your ideas for exotic materials (maybe not so exotic around here). My idea is that the end product would be a series of easily followed directions that anyone could recreate (1. 3-d print this, 2. buy this dimension tube and bag and these glues, 3. assemble). People could use a platy, DIY cuben, or a ziploc. The handle could by carbon fiber, aluminum, or a stick they found in the woods.
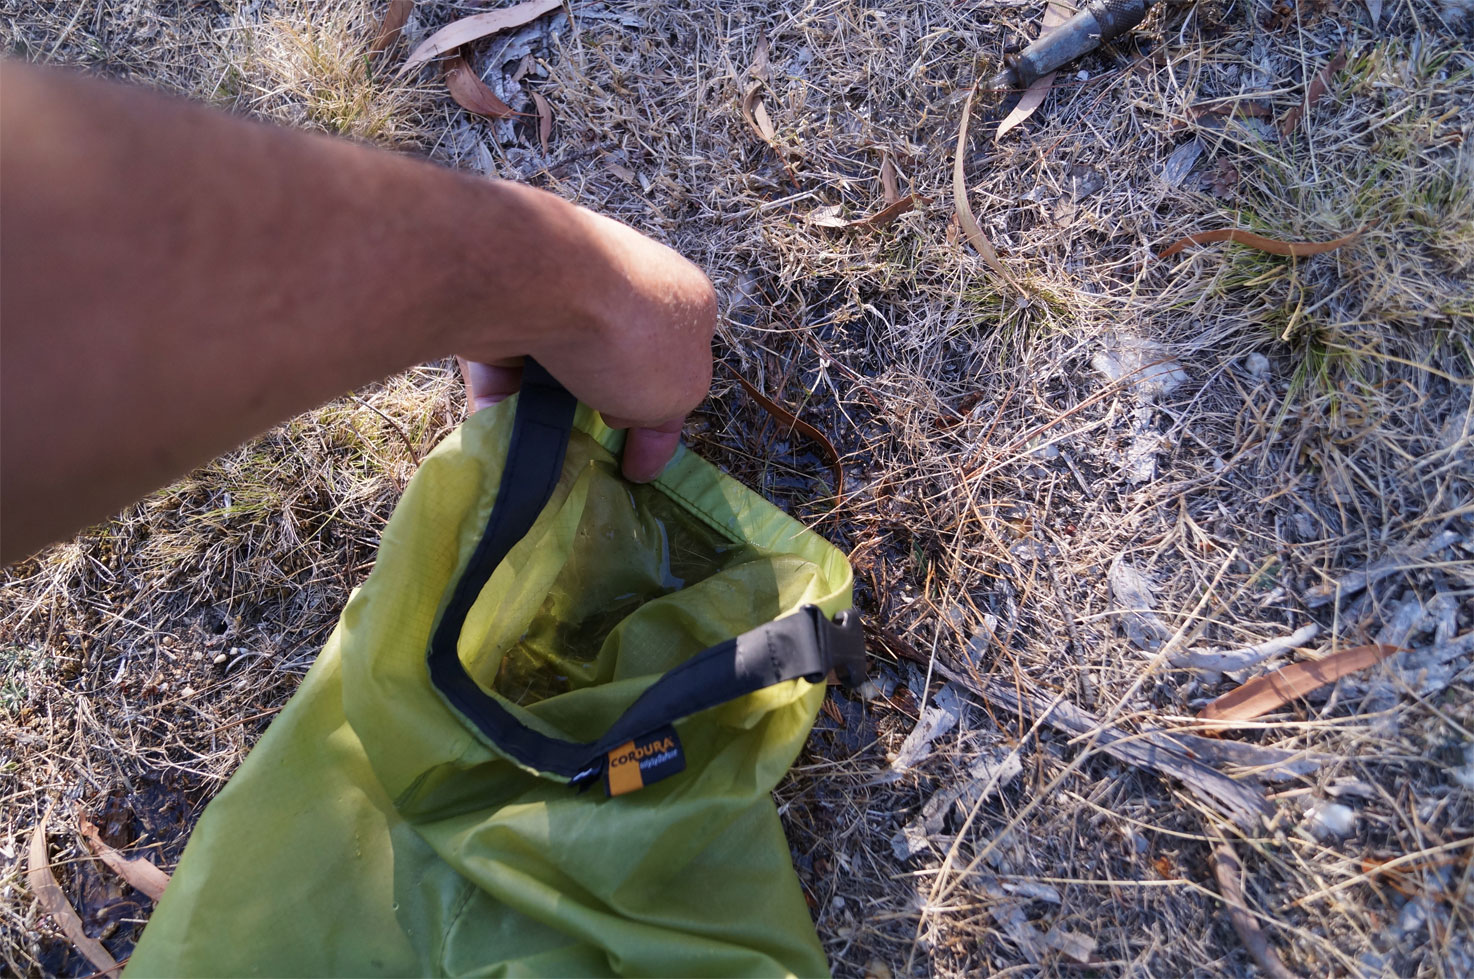
Your basic idea sounds good. Attached (hopefully) is a photo of a Plastimo Floating Poly Bailer, something I use in my kayak. It’s far from perfect, but the flat bottom works better than any round shape. Consider the small curve of a kayak. If say a 1 liter yogurt container doesn’t work very good inside a ‘yak. It’s not going to be of much good anywhere else. One thing I’ve thought of is a bag at the end of this scoop, so that you could pick up a lot more water. (you slide this scoop along and lift the lip and there’s not a lot of water in it. The only part that needs any stiffness is the lower edge, the rest of this can be anything.
For a shallow water source you’ve got major issues. Basically you need 6″ deep of water from 1″ deep of source. Pumps are good (MSR Sweetwater, but it’s all too many parts, two floppy hoses with two ends you have to juggle and the pump in the middle that takes two hands…. Sure we make it work and it’s not that big a deal, nevertheless it’s unnecessarily fiddly). The problem with a pump and a shallow source is that you’re sucking up from the bottom, which is usually sand and muck. If instead you had a surface, pressed into the bottom and the pump sucked off the surface….
I also like your idea of the side pour spout and pre-filter. Is there anywhere in our modern world a spout that doesn’t seemed designed to make a mess?
Also, do you really want a water system or do you just want to play with a 3D printer?

This might give you some ideas:
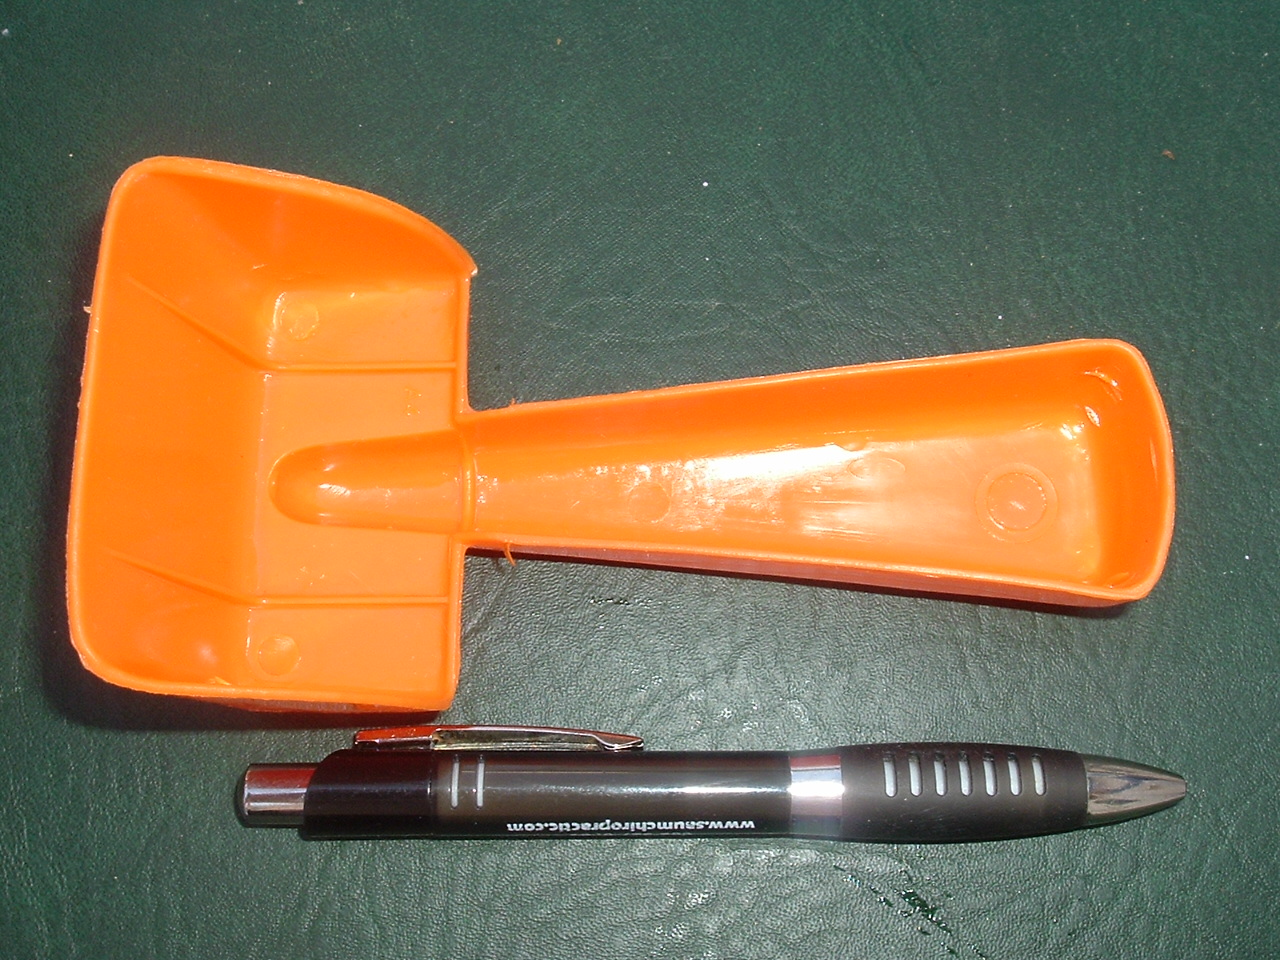
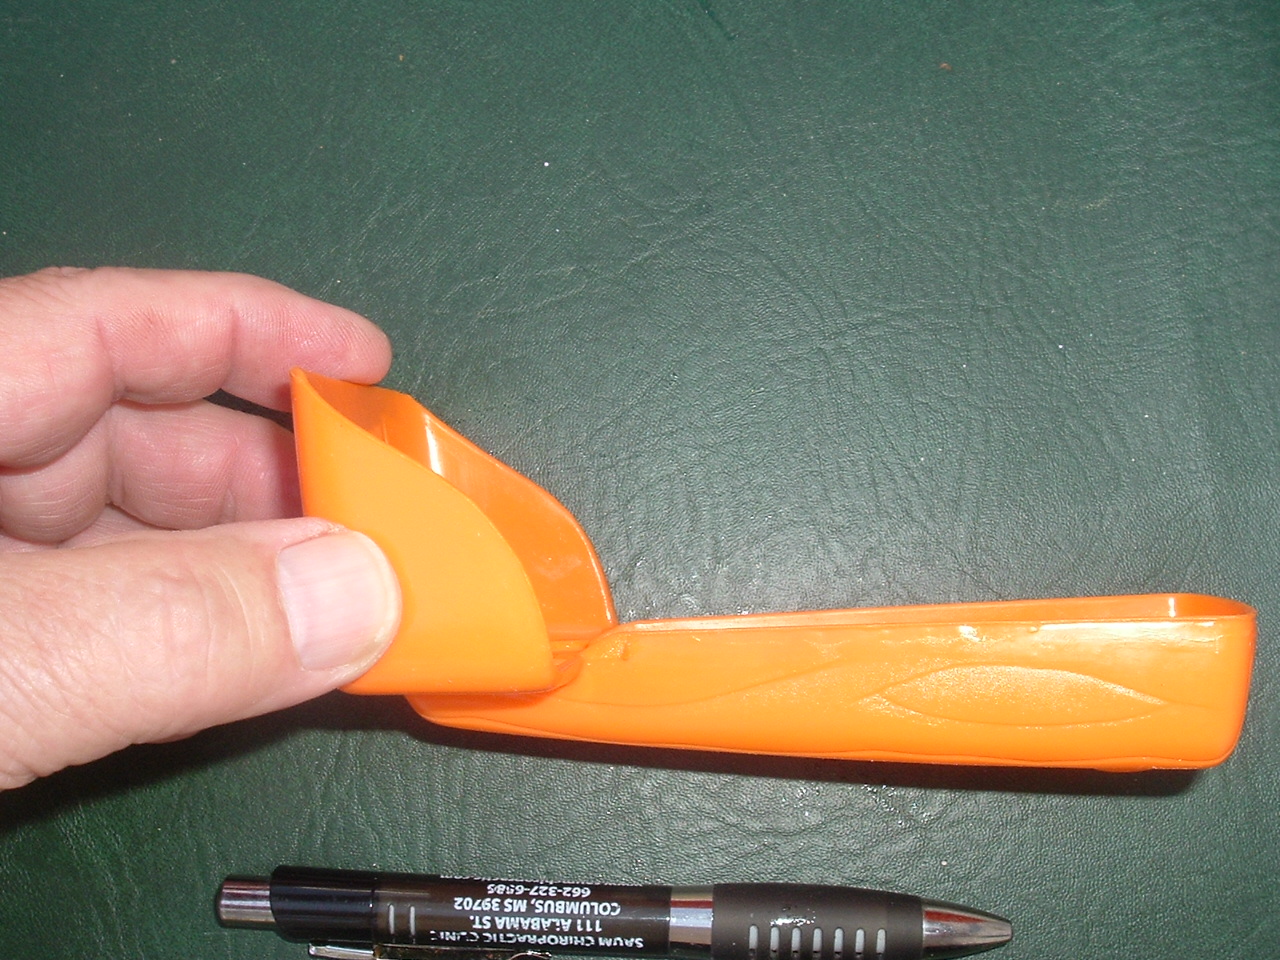
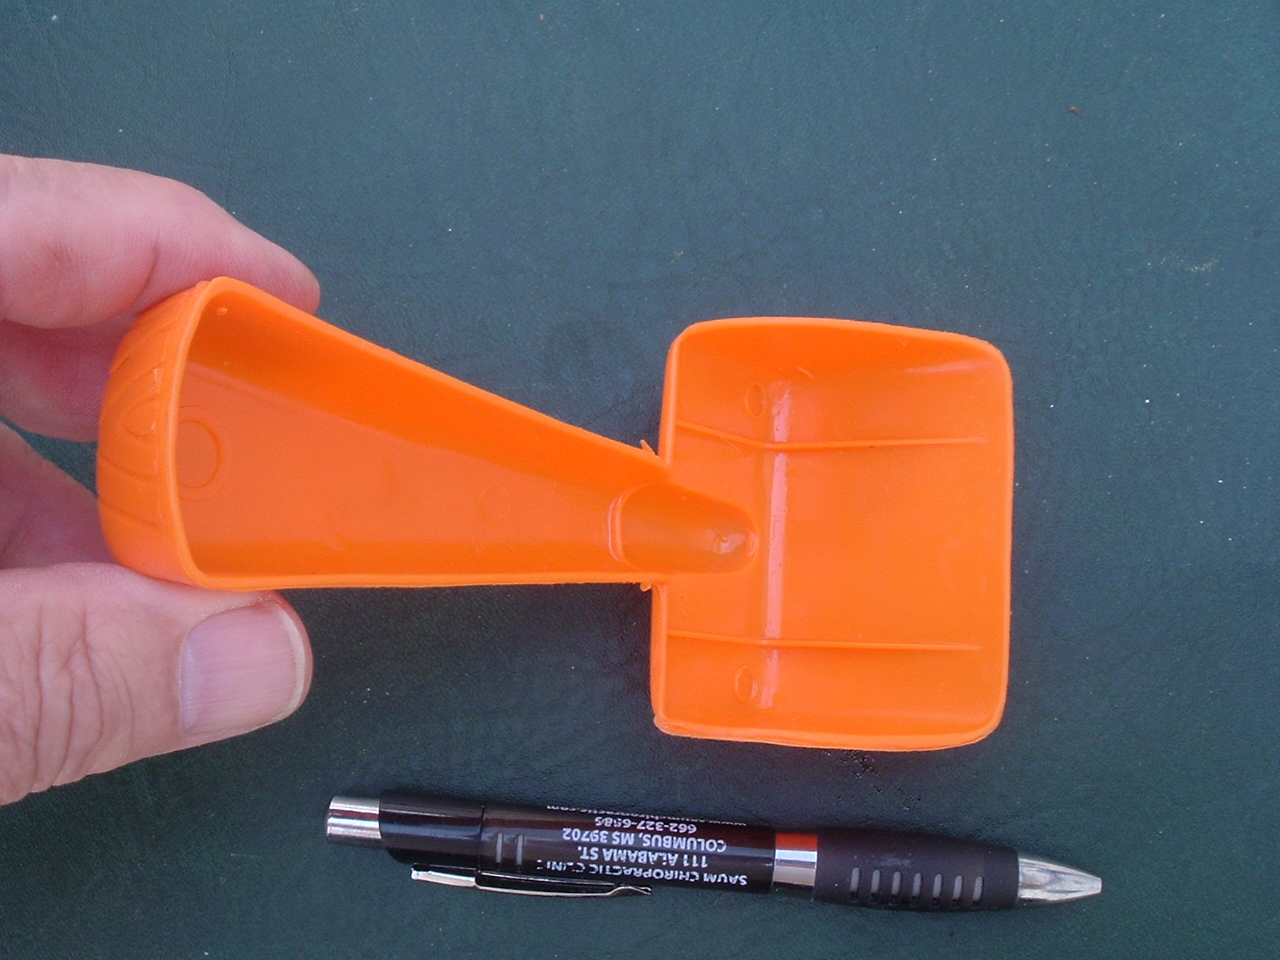
It’s bright orange … It’s a poo trowel!
Cheers
Ahhh yes, 3d print with magnesium powder. Make 2, each a different color ;) One will nest into the other for storage. Scrape off some magnesium in case an emergency fire starter is needed ;) A multipurpose tool has been created 
I am thinking of making the handle out of an arrow shaft (3/8″ or 7.9 mm) It seems like anyone could get a banged up arrow shaft pretty cheap either in Aluminum or Carbon Fiber. I am now trying to figure out how to attach it to the scoop. My first thought is a button spring, but I can’t seem to find any small enough to fit inside an arrow shaft. I could glue it, but would like a removable option. Any ideas?
<p style=”padding-left: 30px;”>https://www.rockwestcomposites.com/connector-accessories/locking-telescoping-mechanisms/button-clips/1137-ss-group</p>
This is the smallest I could find. It is down to a 0.375″ ID which might work with an Al shaft but probably not for a carbon fiber tube
I dusted off my Mechanics of Materials text book and did some simple calculations. Indeed my current drawing is doomed to failure. I calculated stresses more than four times the tensile strength. If I use a 4 mm diameter tube with 1 mm wall thickness, then I get a factor of safety of almost 20. Though I’m a bit concerned that a 1 mm wall thickness is too thin and localized buckling will occur.
My calculation also swung me in favor of PLA over laser sintered nylon. The sintered nylon is cheaper and appears to have better finish, but the tensile strength is less than half of PLA. With PLA being a food safe material (with lots of caveats) it seems like the best material. Since PLA is extruded it will also allow hollow parts (like the tube mentioned above).
I’m new to these forums but work quite a bit with composites used in hobby rocketry. We’ll oftentimes get a part 3D printed then make a mold from that part so that other parts can be cast from resin. That gets us away from the brittle parts we usually get via 3D printing.
There are lots of suppliers for these materials and here’s one that advertises food safe silicones for molds as well as resins. # NV00000320805679 I have no connection with this company and you would certainly have to figure out its suitability for your project and make sure the materials are indeed safe for your use. But the custom candy industry uses lots of molds, so there is an entire industry sector supporting food safe products.
Once you have a mold made, you could insert some thin wire or hollow tubing inside the mold prior to pouring in the resin. That would add quite a bit of extra strength.
Typically, you’d make a two part mold so that your finished piece can be tubular in profile. But I can see how a one piece mold would work despite one side of the molded piece having a small flat section. It’s much easier to create and use a one piece mold and you could sand your finish piece into a tubular profile if needed.
I’ve worked with carbon fiber too. There are some small diameter sleeve-based materials that can be pulled taught so that you can create parts with hollow interiors. It only takes the sleeve material and whatever you might choose to use for a laminating epoxy system.
This method would take some design planning in order plan ahead on how to remove whatever you might use for temporary forming support, but small diameter wire or tubing can be sprayed with a wax mold release in order to be able to pull it out of your part once it’s been made. I’ve made some really small diameter tubing using this method. A heat gun can be used to melt the mold release wax so that your interior support piece can be pulled out of your finished product.
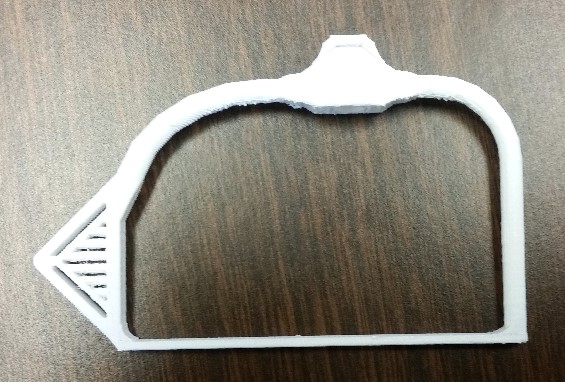
Update: I had two designs printed. Up first is my original design I printed up with Laser Sintered Nylon. The CAD drawing is a 2 mm wire. I stretched it out to 5 mm x 2 mm:
As expected the resulting piece is very flexible:

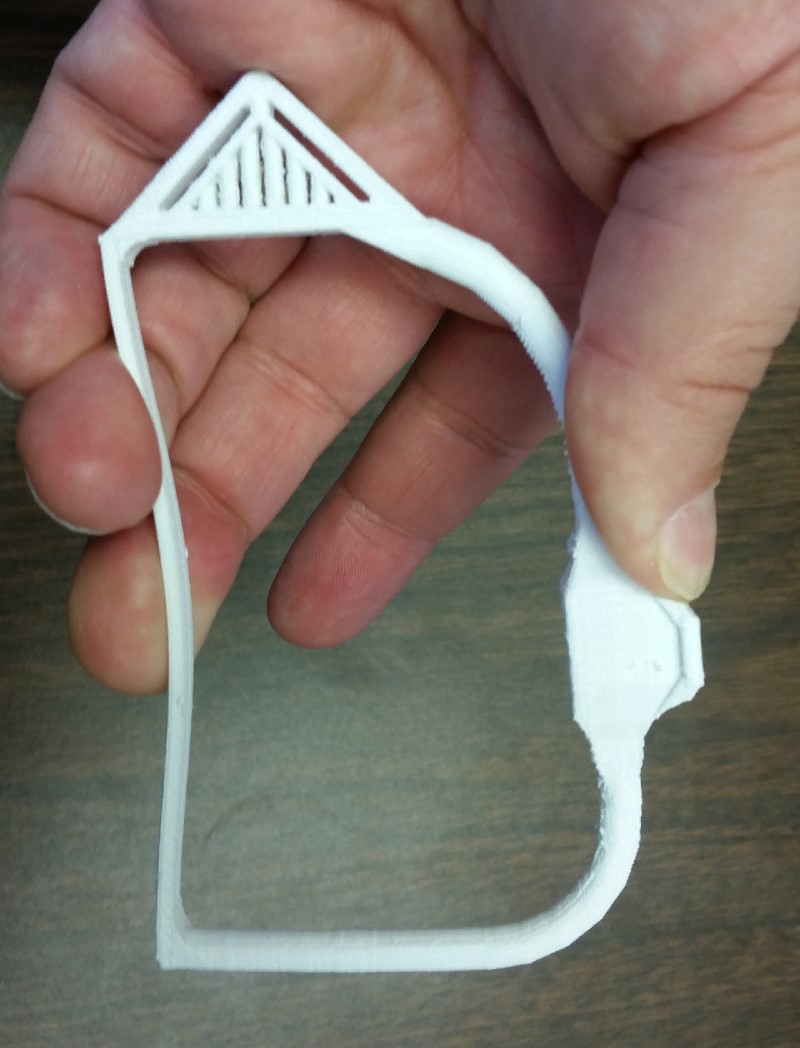
As mentioned in a previous post, my hand calculations suggest that my first design is really marginal. My first stab at a redesign I made it out of hollow 5 mm tubes and printed it up with extruded PLA:
And the result of using a stronger plastic with a better design is that it is much stiffer:
Become a member to post in the forums.
 New Ultralight GearSee the latest releases in ultralight cottage-brand gear from small makers.
 Loading...