Topic

How to (easily) build an handle for a reciprocating saw blade?


Forum Posting

A Membership is required to post in the forums. Login or become a member to post in the member forums!

Home Forums Gear Forums Make Your Own Gear How to (easily) build an handle for a reciprocating saw blade?

Viewing 13 posts - 1 through 13 (of 13 total)
  • Author
    Posts
  • #3378830
    Paiolo Montanel
    BPL Member

    @paiolo

    Hi all,

    I’d like to create an UL wood saw buying a 6″-9″ reciprocating saw blade like the first or the second of this image:

    …and then building an UL handle for it.
    I was thinking about making it from an aluminium bar (with some padding added over) or from a piece of wood, but any idea is welcome.
    It should be 45° to be confortable to use.
    As I’m not an expert on DIY, does anyone have some suggestions on the easiest way to build it?

    #3378883
    Jordo _99
    BPL Member

    @jordo_99

    Locale: Nebraska


    Being a woodworker, I’d probably go that route.

    I’d make a cutout that matches the cutout of the blade attachment and then secure it with an alu or ti bolt/nut.

    You’d probably end up with a lighter solution if you went with a titanium handle wrapped in paracord but may be difficult with play in the blade if you can’t figure out how to match the cutout of the blade.


    #3378903
    James Marco
    BPL Member

    @jamesdmarco

    Locale: Finger Lakes

    Well, you can purchase an extra blade clamp from Milwaukee, Ridgid, or the like. Generally, these are simply pressed steel, then highly tempered. The mount is the same size as on the blade and have a crew through it to secure the clamp to the shaft. It also has a pressed divot or pin that locks into the blade.

    So, with a mill, you can mill facsimile of the shaft into a handle at any angle you like. Then drill a hole and tap it for say a 3/32 screw. Screwing through the clamp will lock it down over the blade preventing up/down, left/right movement and the divot will stop it from in and out movement. It is all in the blade clamp. The shaft simply allows the clamp to do the work.  Follow?

    You can mill this at home with a good set of files. Simply, cut a couple parallel notches for clamp clearance leaving the same size as the blade mount n some 1/4″ aluminum bar stock. Then drill a hole for a screw, I believe you will need the same size as the clamp mount because it is unlikely you will want to open up the hole in the clamp. (Again, this is highly tempered so slow, lots of pressure and oil will help if you try to open the hole up.) It is just easier to pick up a longer version of a cap screw at the hardware store. Get a nut for it. You might be able to peen the threading after it is assembled to keep from loosing the nut, screw and clamp. On the sawzall, they just thread the hole in the shaft. You can do this, but I am afraid the aluminum will be a little soft and strip out after a while.


    #3378908
    David Thomas
    BPL Member

    @davidinkenai

    Locale: North Woods. Far North.

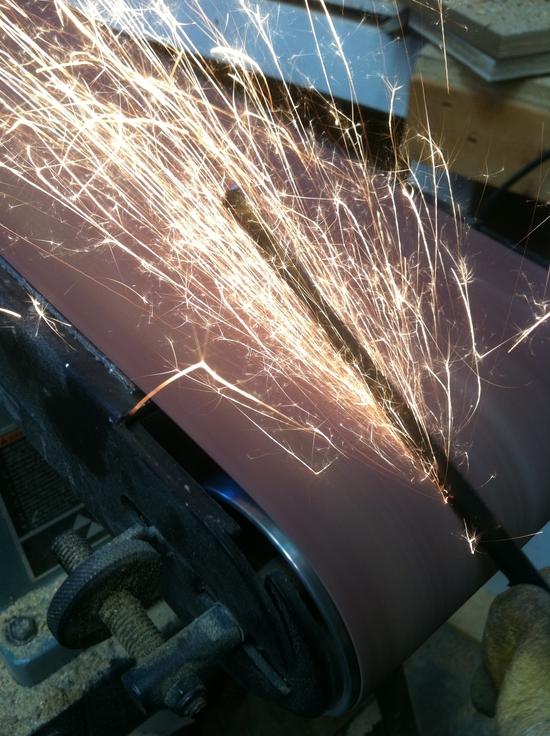
    If you want something that ends up like this:

    It’s quick and easy to – if you have a belt sander, the curvature at the end lets you do this:

    Then I use Plasti-dip to put a few coats on the hand grip for a little padding and more friction.  I posted the entire process (link below).  I’ve also done this with exactly the reciprocating saw blades you propose using – I’ve got some in the garage now.  If this is a fun project for you, have at it.  If you really just want a reciprocating-saw blade with a handle and want it to be as light as possible, PM me and I’ll pop one in the mail to you.  Probably on Monday because I’m heading on a Father-Son, Math-Fishing-Snow-Camping trip this afternoon (taking the middle-school math team across a frozen lake to a wildlife refuge cabin for 3 days).

    http://backpackinglight.com/forums/topic/58657/

    Other ideas for a handle include:

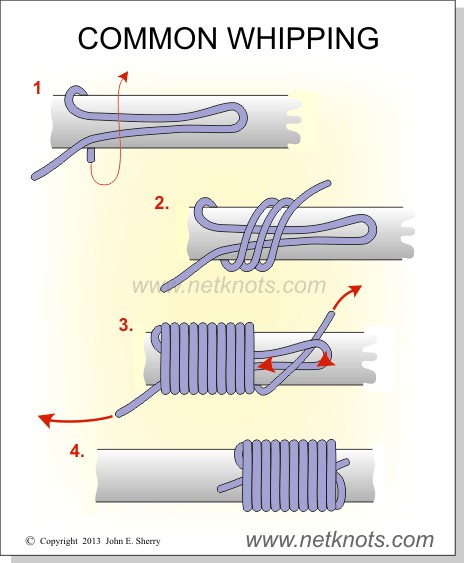
    Make the finger indents, and then wrap the handle area with 550-cord or, better yet, a little bit lighter line.  It can double as emergency cordage. I’d finish the ends by capturing them in a loop under the wraps, just like when you “whip” the ends of a laid rope with small cordage:

    Use a good two-part epoxy or gorilla glue to glue some wood on each side.  I’d suggest bamboo – I keep a case of bamboo flooring around as material for a variety of projects.  Weirdly, (until you think about it) sawing and sanding bamboo smells just like mowing the lawn).  If you found just the right length nut and bolt, you could make it really secure by bolting through holes in the wood / blade / wood.  Once the wood is attached, sand it down and sand out any finger indents you want.

    You might look at old kitchen knives at a thrift store and see if any of them have handle wood or bolts that you could reuse onto your blade.

    #3378911
    Jon Fong / Flat Cat Gear
    BPL Member

    @jonfong

    Locale: FLAT CAT GEAR

    David,


    great job on the snow, but you have to fill us in on the “Math-Fishing-Snow-Camping”  Sounds way cool.

    #3378928
    David Thomas
    BPL Member

    @davidinkenai

    Locale: North Woods. Far North.

    Jon,

    We’ve got 5 middle-schoolers from my MathCounts program and 3 dads who will pull sleds across a frozen lake this evening to a public use cabin.  It isn’t a UL trip, since there’ll be a chainsaw to cut holes for water access and ice-fishing.  I’ll bring hundreds of challenging math questions, (i.e. “How many positive integers less than 2016 have an odd number of factors?” ), plus supplies for camp-craft lessons (knot tying, fire starting, knife&axe work, etc).  One cool thing about snow camping in a cabin with a wood-burning stove is you can just bring frozen pizzas (they stay frozen) and then heat them in an aluminum-foil tent on the stove.

    #3379420
    Paiolo Montanel
    BPL Member

    @paiolo

    Thanks to all for the suggestions! :-)

    As a starting point, I will probably try a super-simple solution that was inspired by your yellow-handled saws, David.

    I want to try to insert part of the blade on TWO CORKS and to securely lock it in some way (I have some ideas to try…).

    Corks are very lightweight (8 grams each) and very confortable as a handle, unfortunately this first prototype wouldn’t have an angled handle, it will be leaved for the next prototype…

    #3379760
    DAN-Y/FANCEE FEEST
    Spectator

    @zelph2

    I used 2 part plumbers epoxy to create a handle for a limb lopper blade. Instructions with photos at this link

    http://www.bplite.com/viewtopic.php?t=245

    #3379770
    Bob Moulder
    BPL Member

    @bobmny10562

    Locale: Westchester County, NY

    Good suggestions so far!

    I’m not into the whole saw/axe/woodcraft thing, but I’ve built a fair number of radio-controlled model aircraft, so I guess I’m something of a woodworker-by-default and thus a solution with wood springs to mind. :^)

    Another easy solution that looks way cool when finished is to laminate a few thicknesses of birch ply around the saw blade, using epoxy, and clamp together and let cure. The sheets of birch ply needn’t be carefully cut because you’d then use a Dremel with a sanding drum to sculpt the handle to whatever shape you prefer. Finish with a little clear polyurethane varnish, and use a T-nut (also called a blind nut) and bolt to secure the handle, then grind those smooth.

    #3381836
    Brian
    BPL Member

    @bbbowers

    Locale: NW Iowa

    This topic is great. I like the simplicity of the plastic dip but how is the grip? I like the idea of adding a finger choil.

    The cork idea sounds interesting. Any more thought into that?

    #3381940
    Eric Blumensaadt
    BPL Member

    @danepacker

    Locale: Mojave Desert

    OR….

    You could buy a Gerber Switchblade that has a folding/lock blade setup with two blades, one for wood, one for bones – hence the name Switchblade. One blade is carried in the saw and the other in the Cordura sheath. (It’s made for hunters, not serial killers who dismember victims.  Jus’ sayin’)

    I have a Switchblade that I take deer and elk hunting. Great for sawing hefty sticks but not small logs.

    #3390555
    Daryl and Daryl
    BPL Member

    @lyrad1

    Locale: Pacific Northwest, USA, Earth

    Here’s another alternative.

    I slipped a piece of vinyl tubing (5/8″od/1/2″id) over the blade.  Seems to work fine.  Weighs about 9 grams for this 3/12″ long piece of vinyl tubing.

    Took some coaxing with hammer, pliars, etc. to get tubing slid onto blade from pointy end.  I don’t think it is going anywhere soon.


    #3390607
    Paiolo Montanel
    BPL Member

    @paiolo

    It seems a simple, nice idea: let us know how it works after some testings!

Viewing 13 posts - 1 through 13 (of 13 total)
  • You must be logged in to reply to this topic.
Forum Posting

A Membership is required to post in the forums. Login or become a member to post in the member forums!

Get the Newsletter

Get our free Handbook and Receive our weekly newsletter to see what's new at Backpacking Light!

Gear Research & Discovery Tools


Loading...