


Non-editable first post
Topic
Become a member to post in the forums.
.
Non-editable first post
It’s general knowledge that alcohol stoves are exquisitely sensitive to air movement. My early designs were optimized for “lab conditions” but did not perform well in breezy conditions. concerned me when contemplating a worst case survival scenario: I’m alone. It’s windy. I, and all my gear, are soaking wet (slipped while crossing a creek or river and my pack got away from me or similar). I’m in an exposed area and have only a limited ability to create a windbreak (I don’t have a windproof tarp or tent (tarps don’t seal well, trekking or tent poles are broken, the shelter is torn/damaged in some other way; or I don’t have a place to set up a windscreen because I’m above tree line, caught on a steep slope or ridge, or I don’t have the ability to set one up because I’m injured). I’m in danger of becoming hypothermic. I need to get hot fluids inside me ASAP in order to survive.
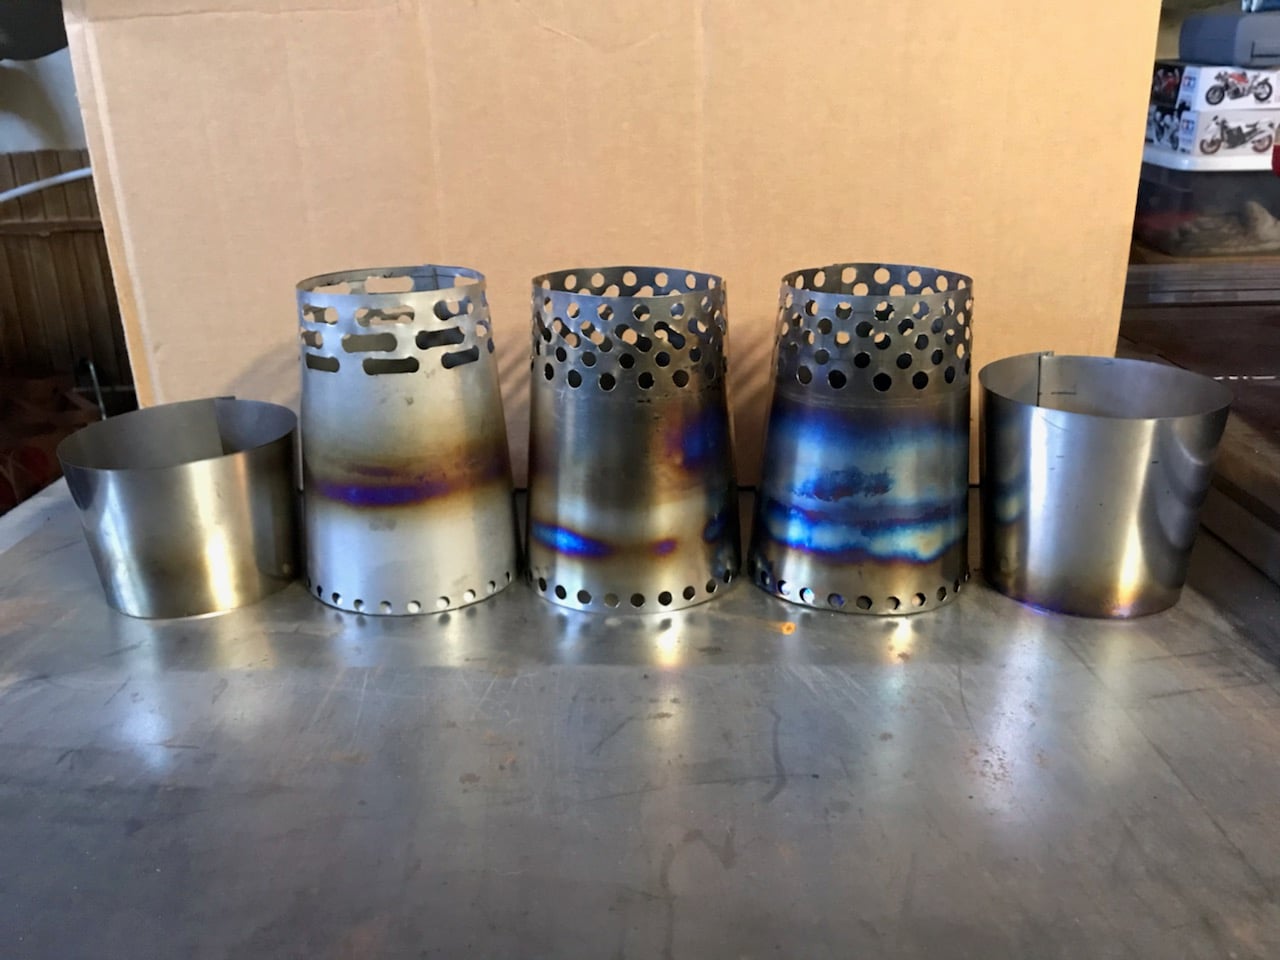
So for the last year and a half I’ve been working on developing an ultralight system that performs well in the real world. What I came up with is a windscreen with built-in internal baffles and an exterior baffle made from aluminum radiator fins at the low air intake holes, and an inverted top cone to shield the exhaust holes.
In still conditions, the system uses an average of 13.91 grams of alcohol (17.63 ml) to heat ice-cold water to a rolling boil in an average time of 7:15 minutes, averaging 66.12% efficiency. In windy conditions (steady 5.9 mps/13.2 mph) the system uses an average of 16.33 grams (20.69 ml) of alcohol to heat ice-cold water to a rolling boil in an average of 8:50 minutes, averaging 56.29% efficiency. The system (upper and lower titanium windscreens, aluminum radiator fins, pot, lid, wick burner, 8 oz fuel bottle, and reflectix-insulated container) weighs 6.10 ounces, and 6.28 ounces with a silicon lip guard.
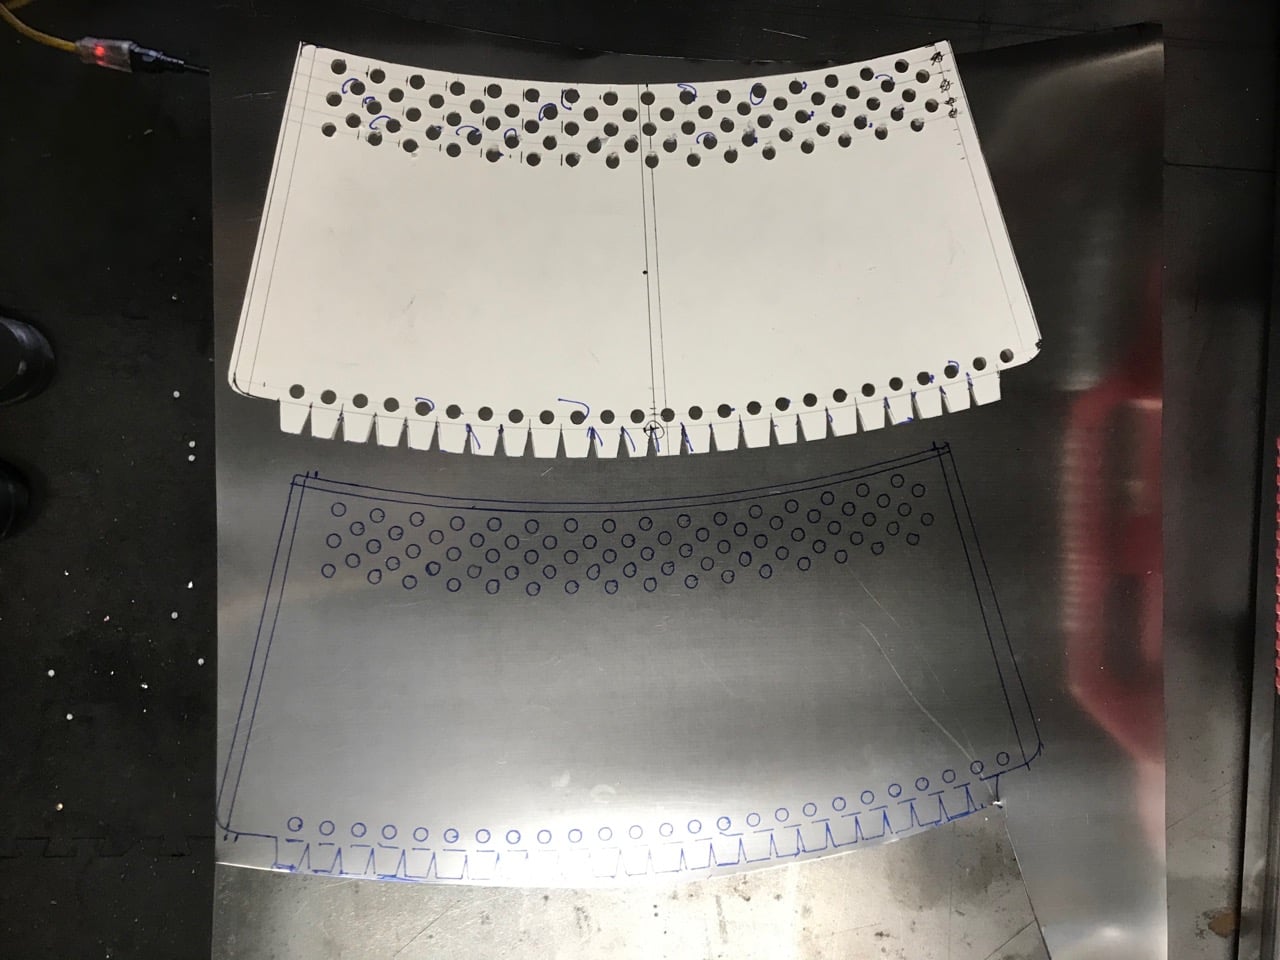
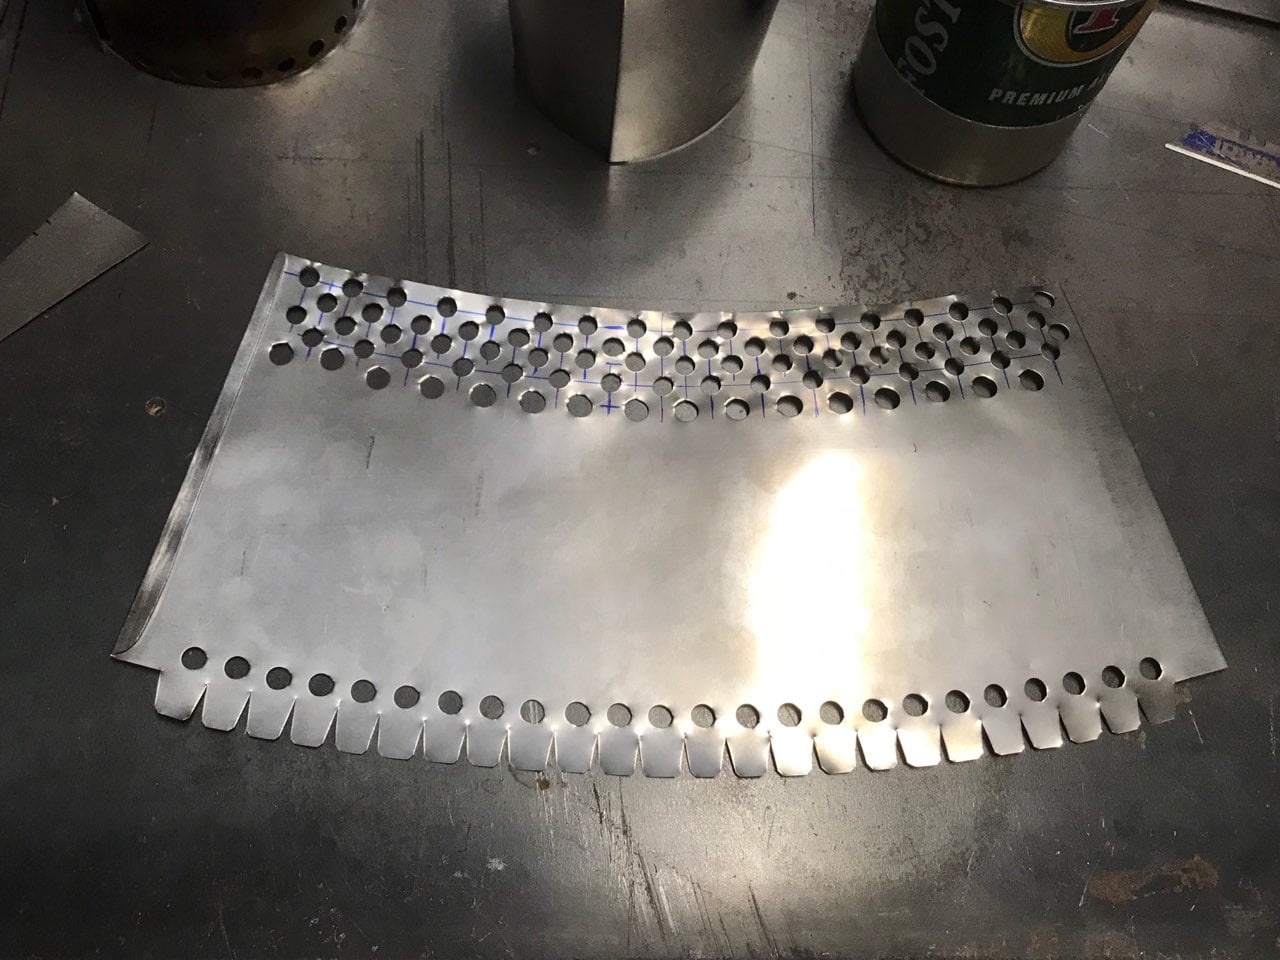
I started with the concept that I wanted the windscreen to fit into a generic ziplock-style truncated cone food storage container to protect the system when packed, can be used for a bowl/simmer cooker (with a reflectix cozy and filled with 500 ml of boiling water, the water is still 190 degrees F after 30 minutes), and allows me to cook and eat a meal while heating more water for a hot beverage. This set the height and base diameter, and I used Zen Stove’s windscreen calculator (http://zenstoves.net/PotStands-Conical.htm#ConeTemplates) to come up with the angles and dimensions. The vertical dimension of the windscreen template is a half inch taller than the final height, with the extra half inch at the base being cut into internal baffle tabs that are bent in and up to block the low air intake holes from direct airflow into the windscreen.
I bought .005″ titanium foil from Titanium Goat for the windscreens. I used a Neiko hole punch to make 1/4” holes for the low intake holes, and 1/4” and 9/32” holes for the exhaust holes. The external baffle is a ring of micro-louvered pleated aluminum radiator fin material that I ordered from a custom radiator fabricator in Alabama.
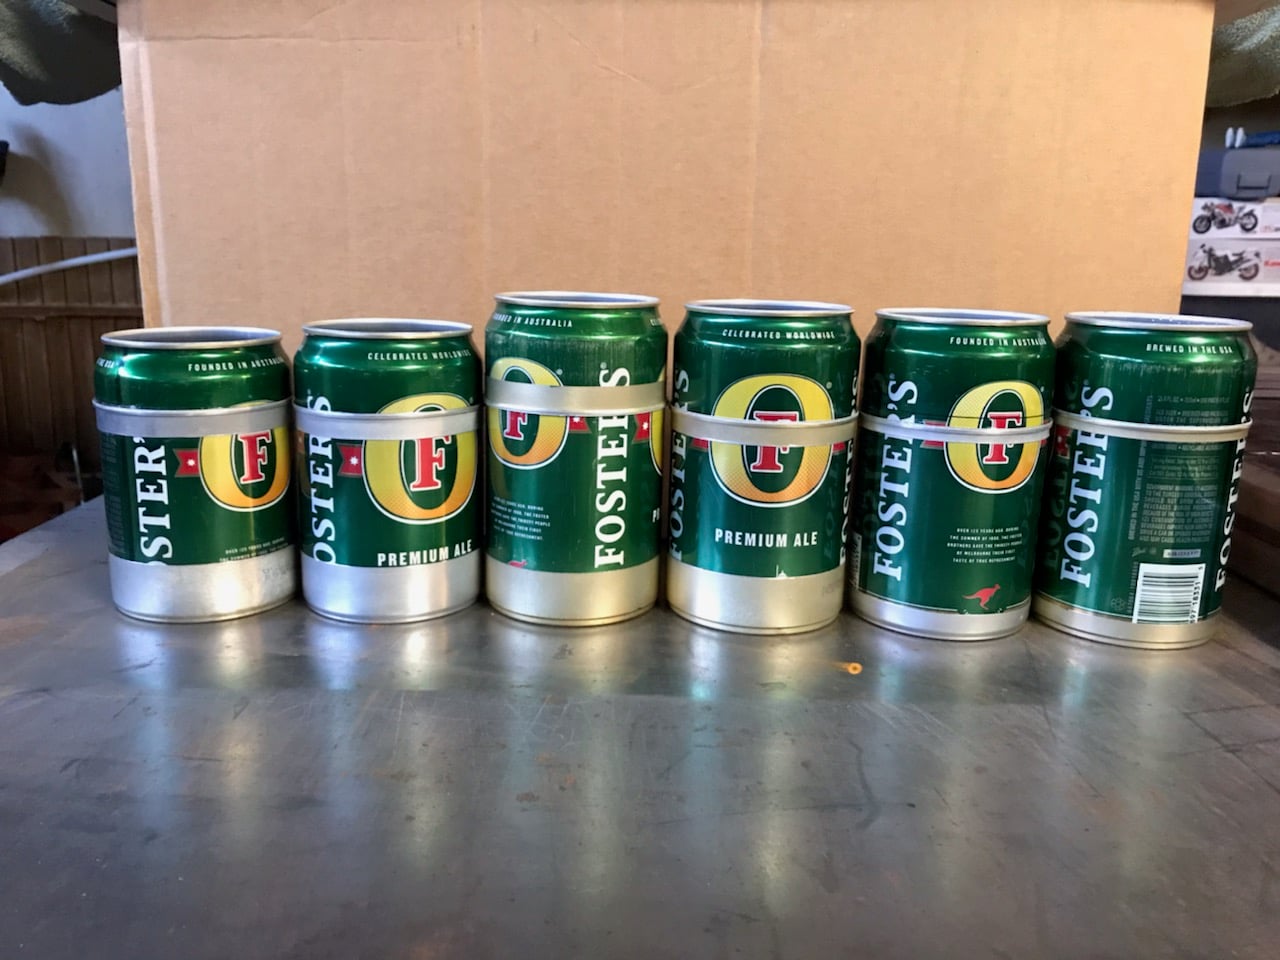
These are pictures of various windscreen and pot designs:
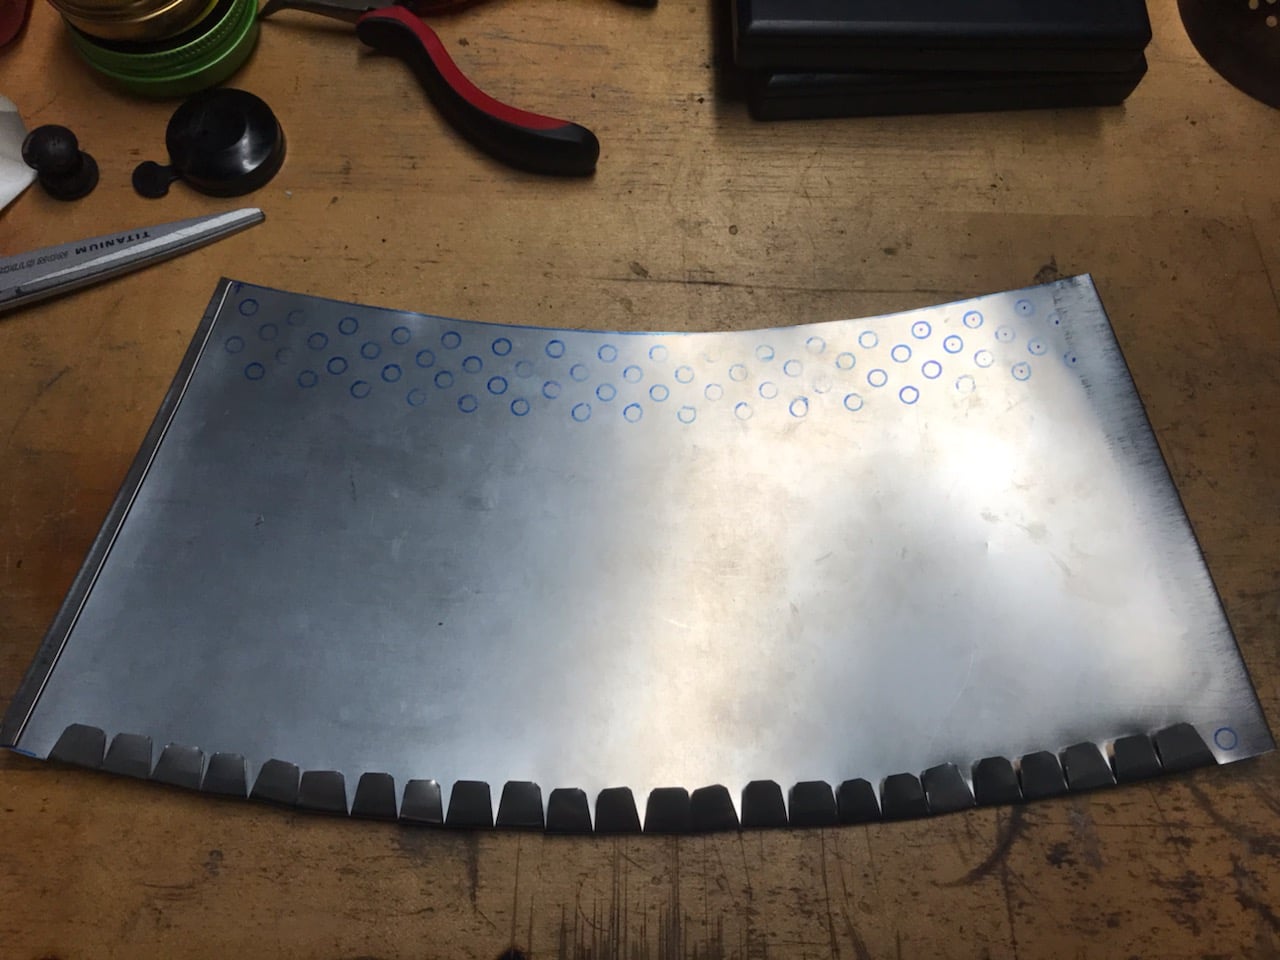
These are pictures of the final windscreen template and process of fabricating it:
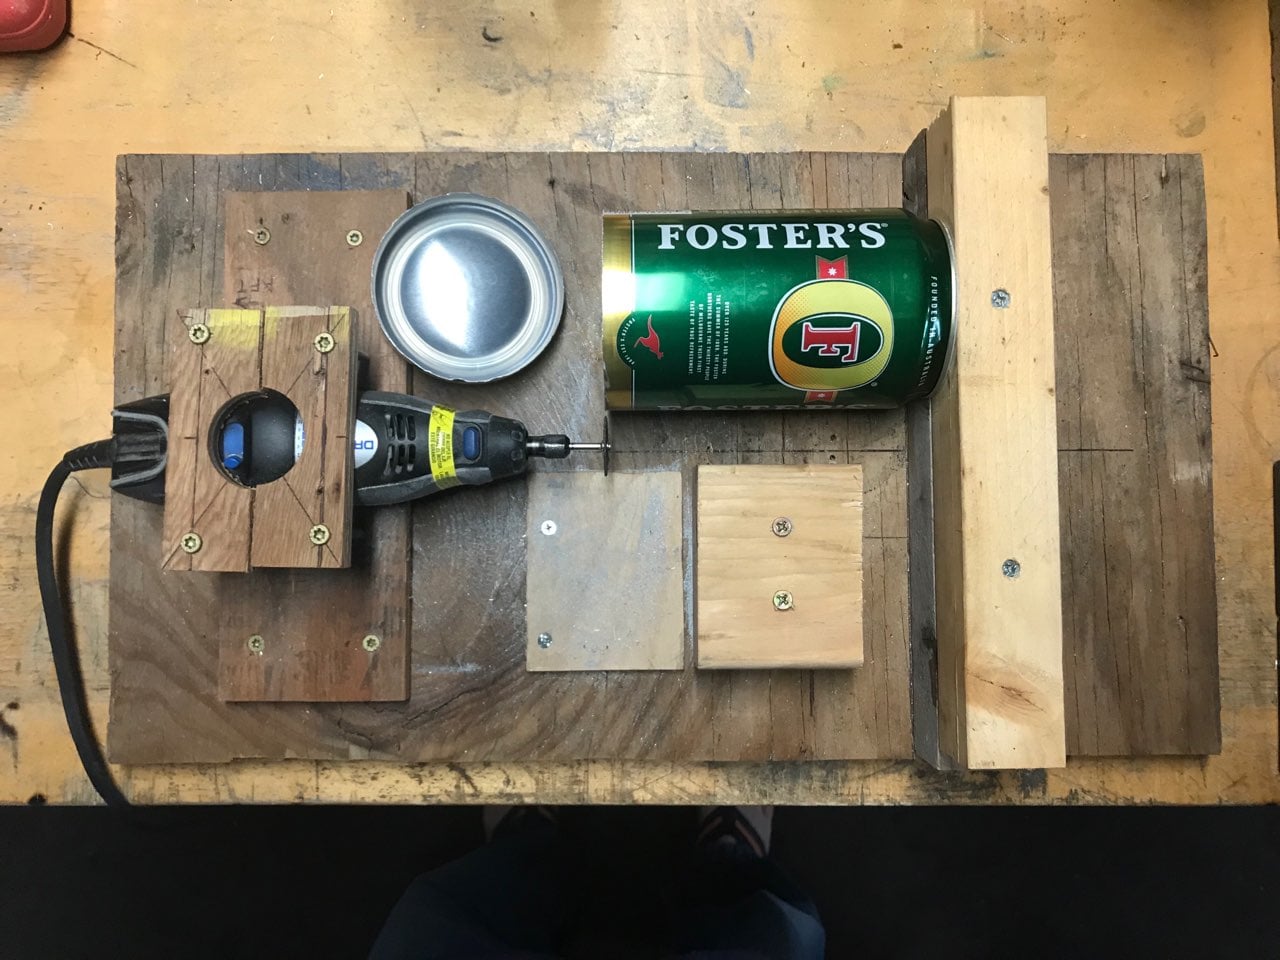
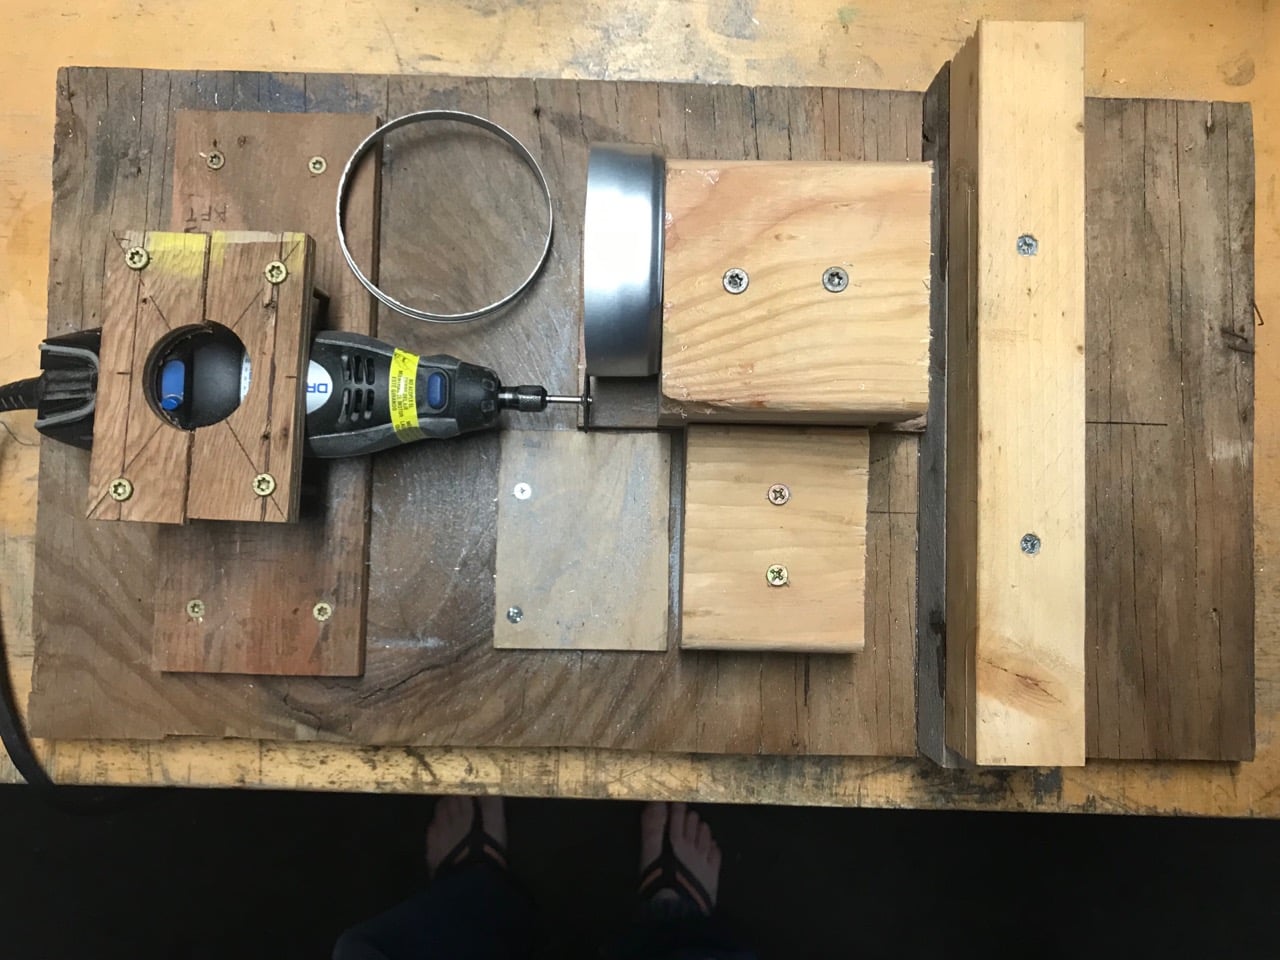
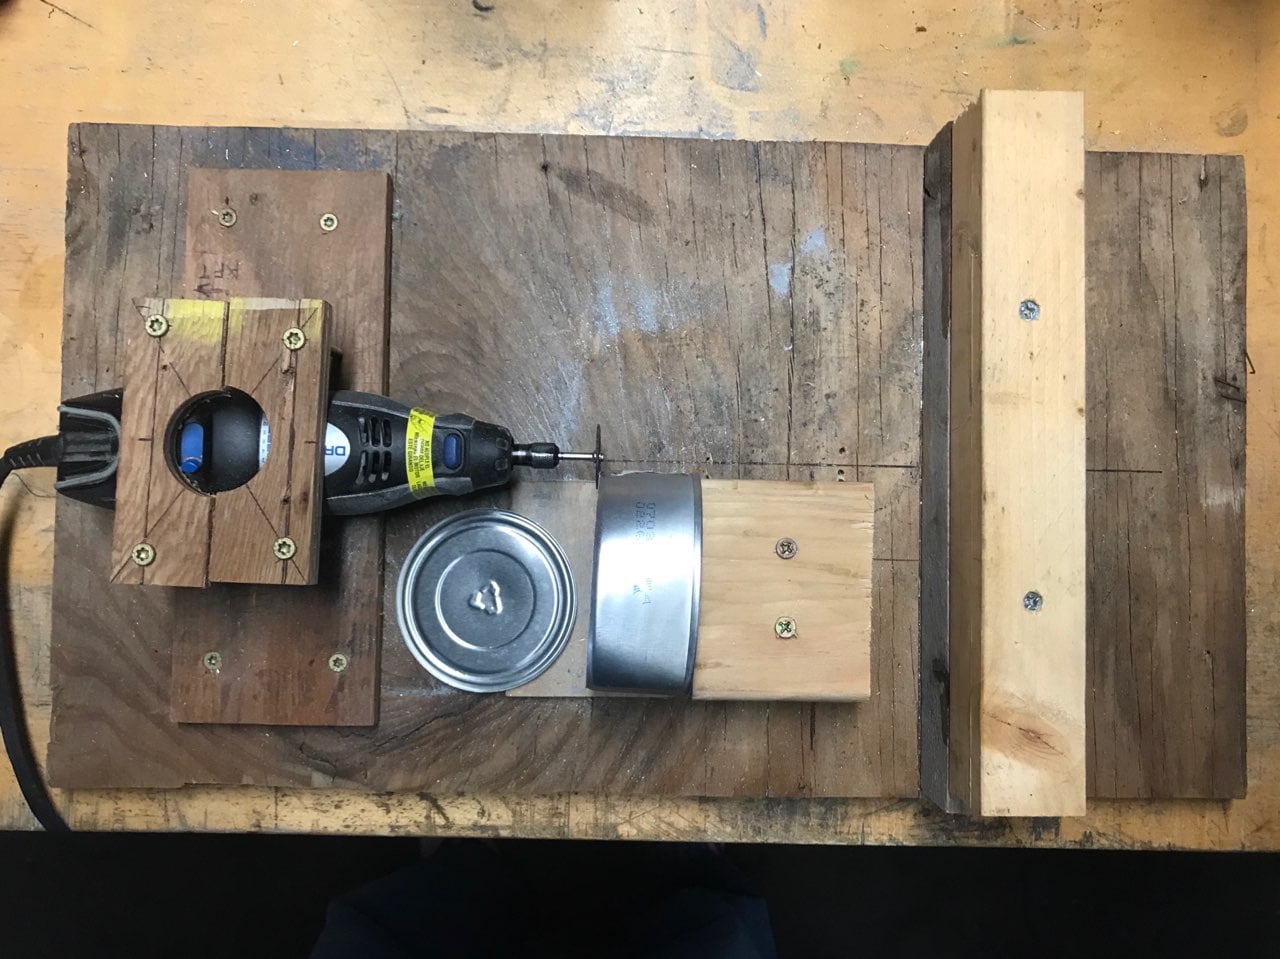
I fabricated the pot from a shortened Foster’s can and a 5.5 oz cat food can for the base and support ring. By lucky coincidence, the inside diameter of the 5.5 oz cat food can is just a hair larger than the outside diameter of the Foster’s can and they fit together very nicely. Cutting the cat food can into two pieces, I used the lower portion as the bottom of the pot because it provides a flat aluminum base and is thinner for better heat transfer and lighter than the original Foster’s can base, and the upper portion as a pot support ring set at the height of 500 ml of water. The support ring sits on the top of the windscreen and makes the system very stable in windy conditions, and setting the ring at the 500 ml level makes it easy to fill the pot precisely as well as maximizing heat transfer into the water. (As an added benefit, when the windscreen is suspended from the top of the ring it works very well with a BRS-3000T canister stove – more on that in a later post.) By another amazing coincidence, the circular ridges formed into the cat can base fit precisely on the top of a Foster’s can, so I cut just the bottom off another cat can and used it for the pot lid, which is about 4 grams lighter than the Foster’s can top. For the wick burner I used a 2″ diameter aluminum screw-top cosmetic/spice can and 2600 *F Morgan refractory ceramic fiber insulation for wicking material.
These are pictures of the shop fixture I made for cutting Foster’s cans and cat food cans:
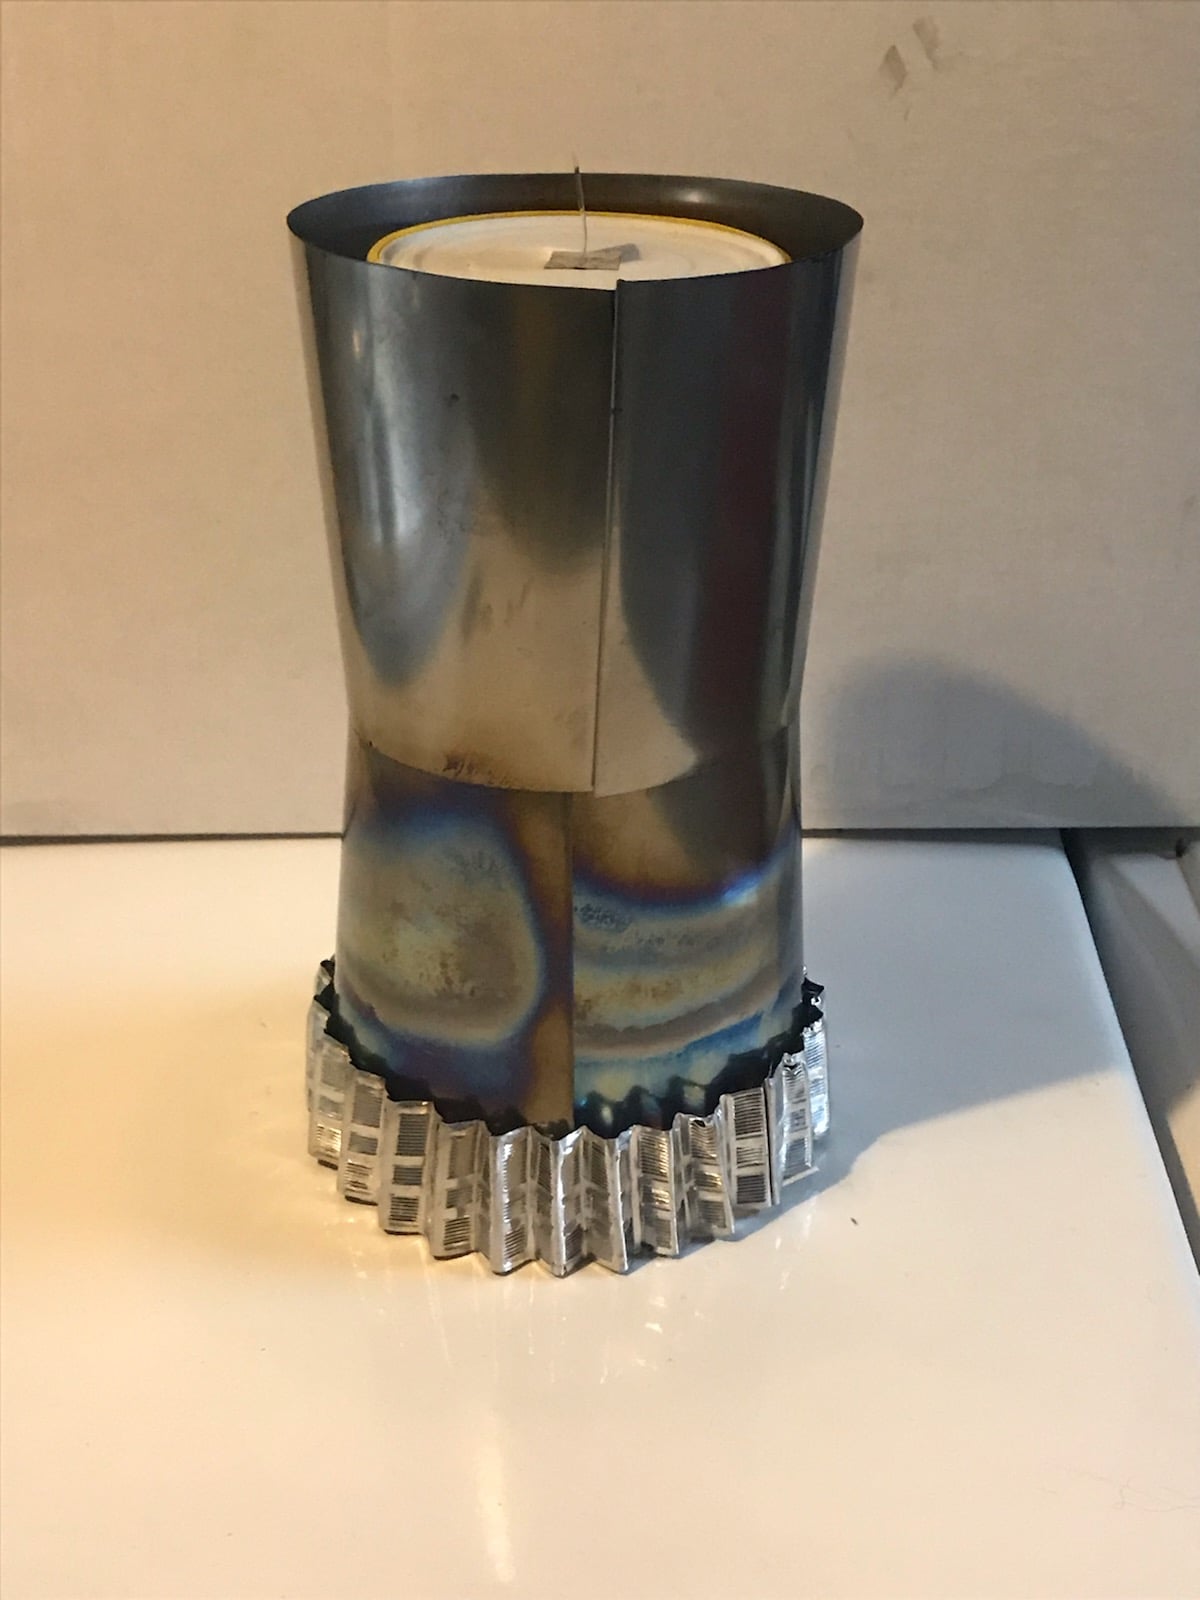
These are pictures of the final windscreen and pot with all the components of the complete system:
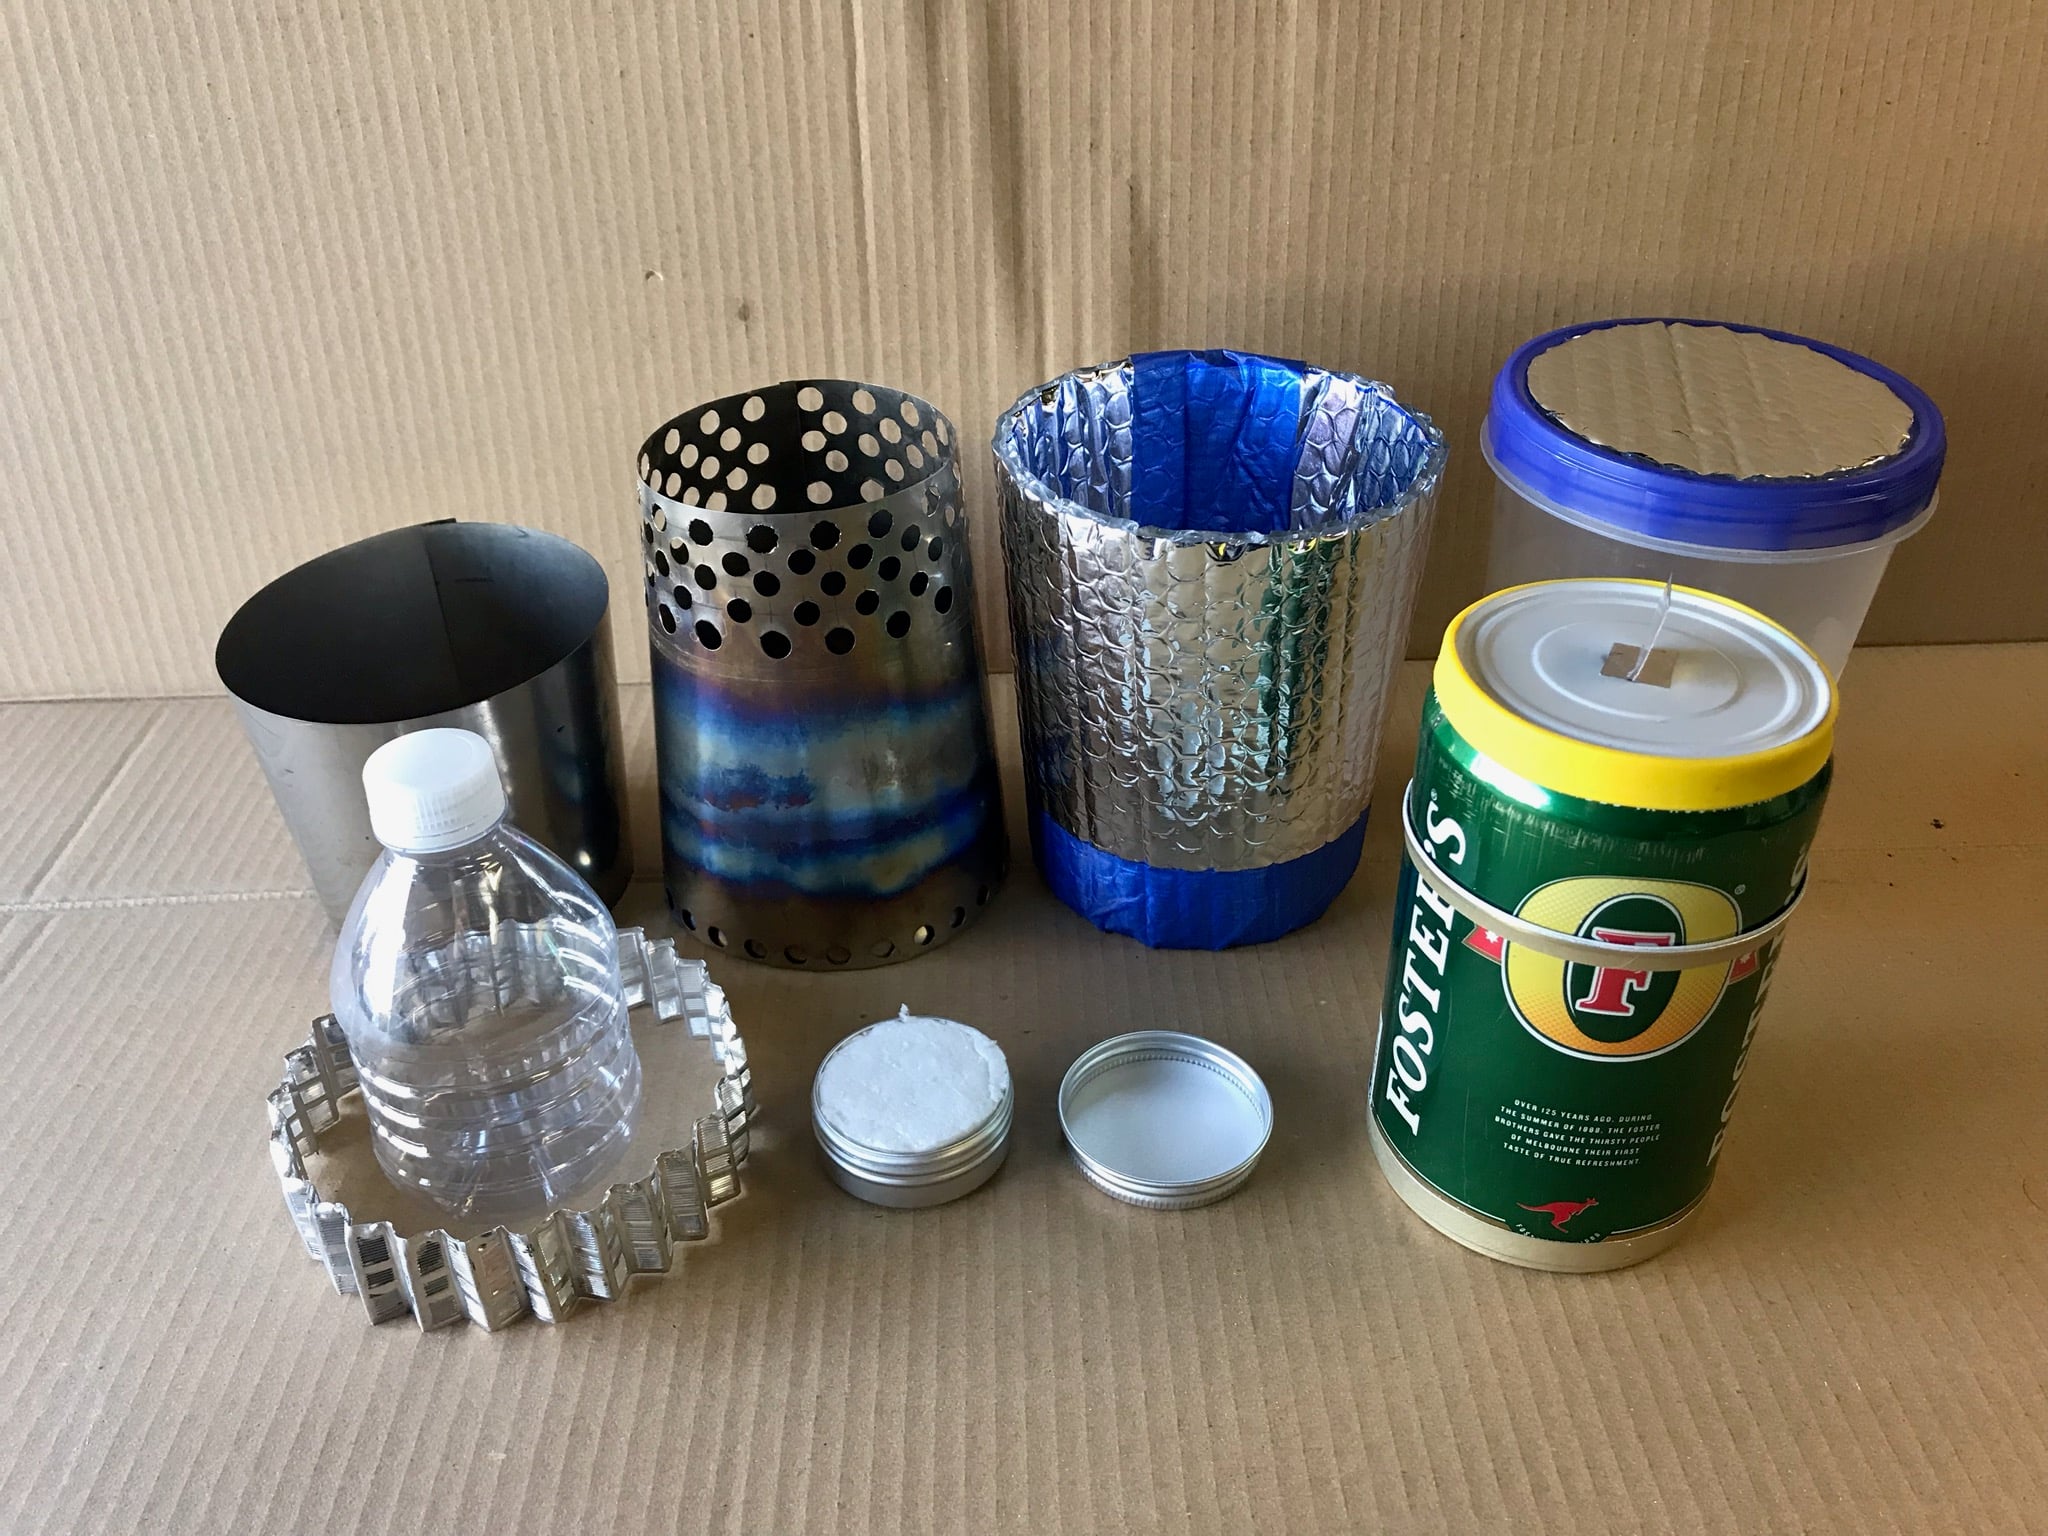
This is a picture of the windscreens and pot ready to go:
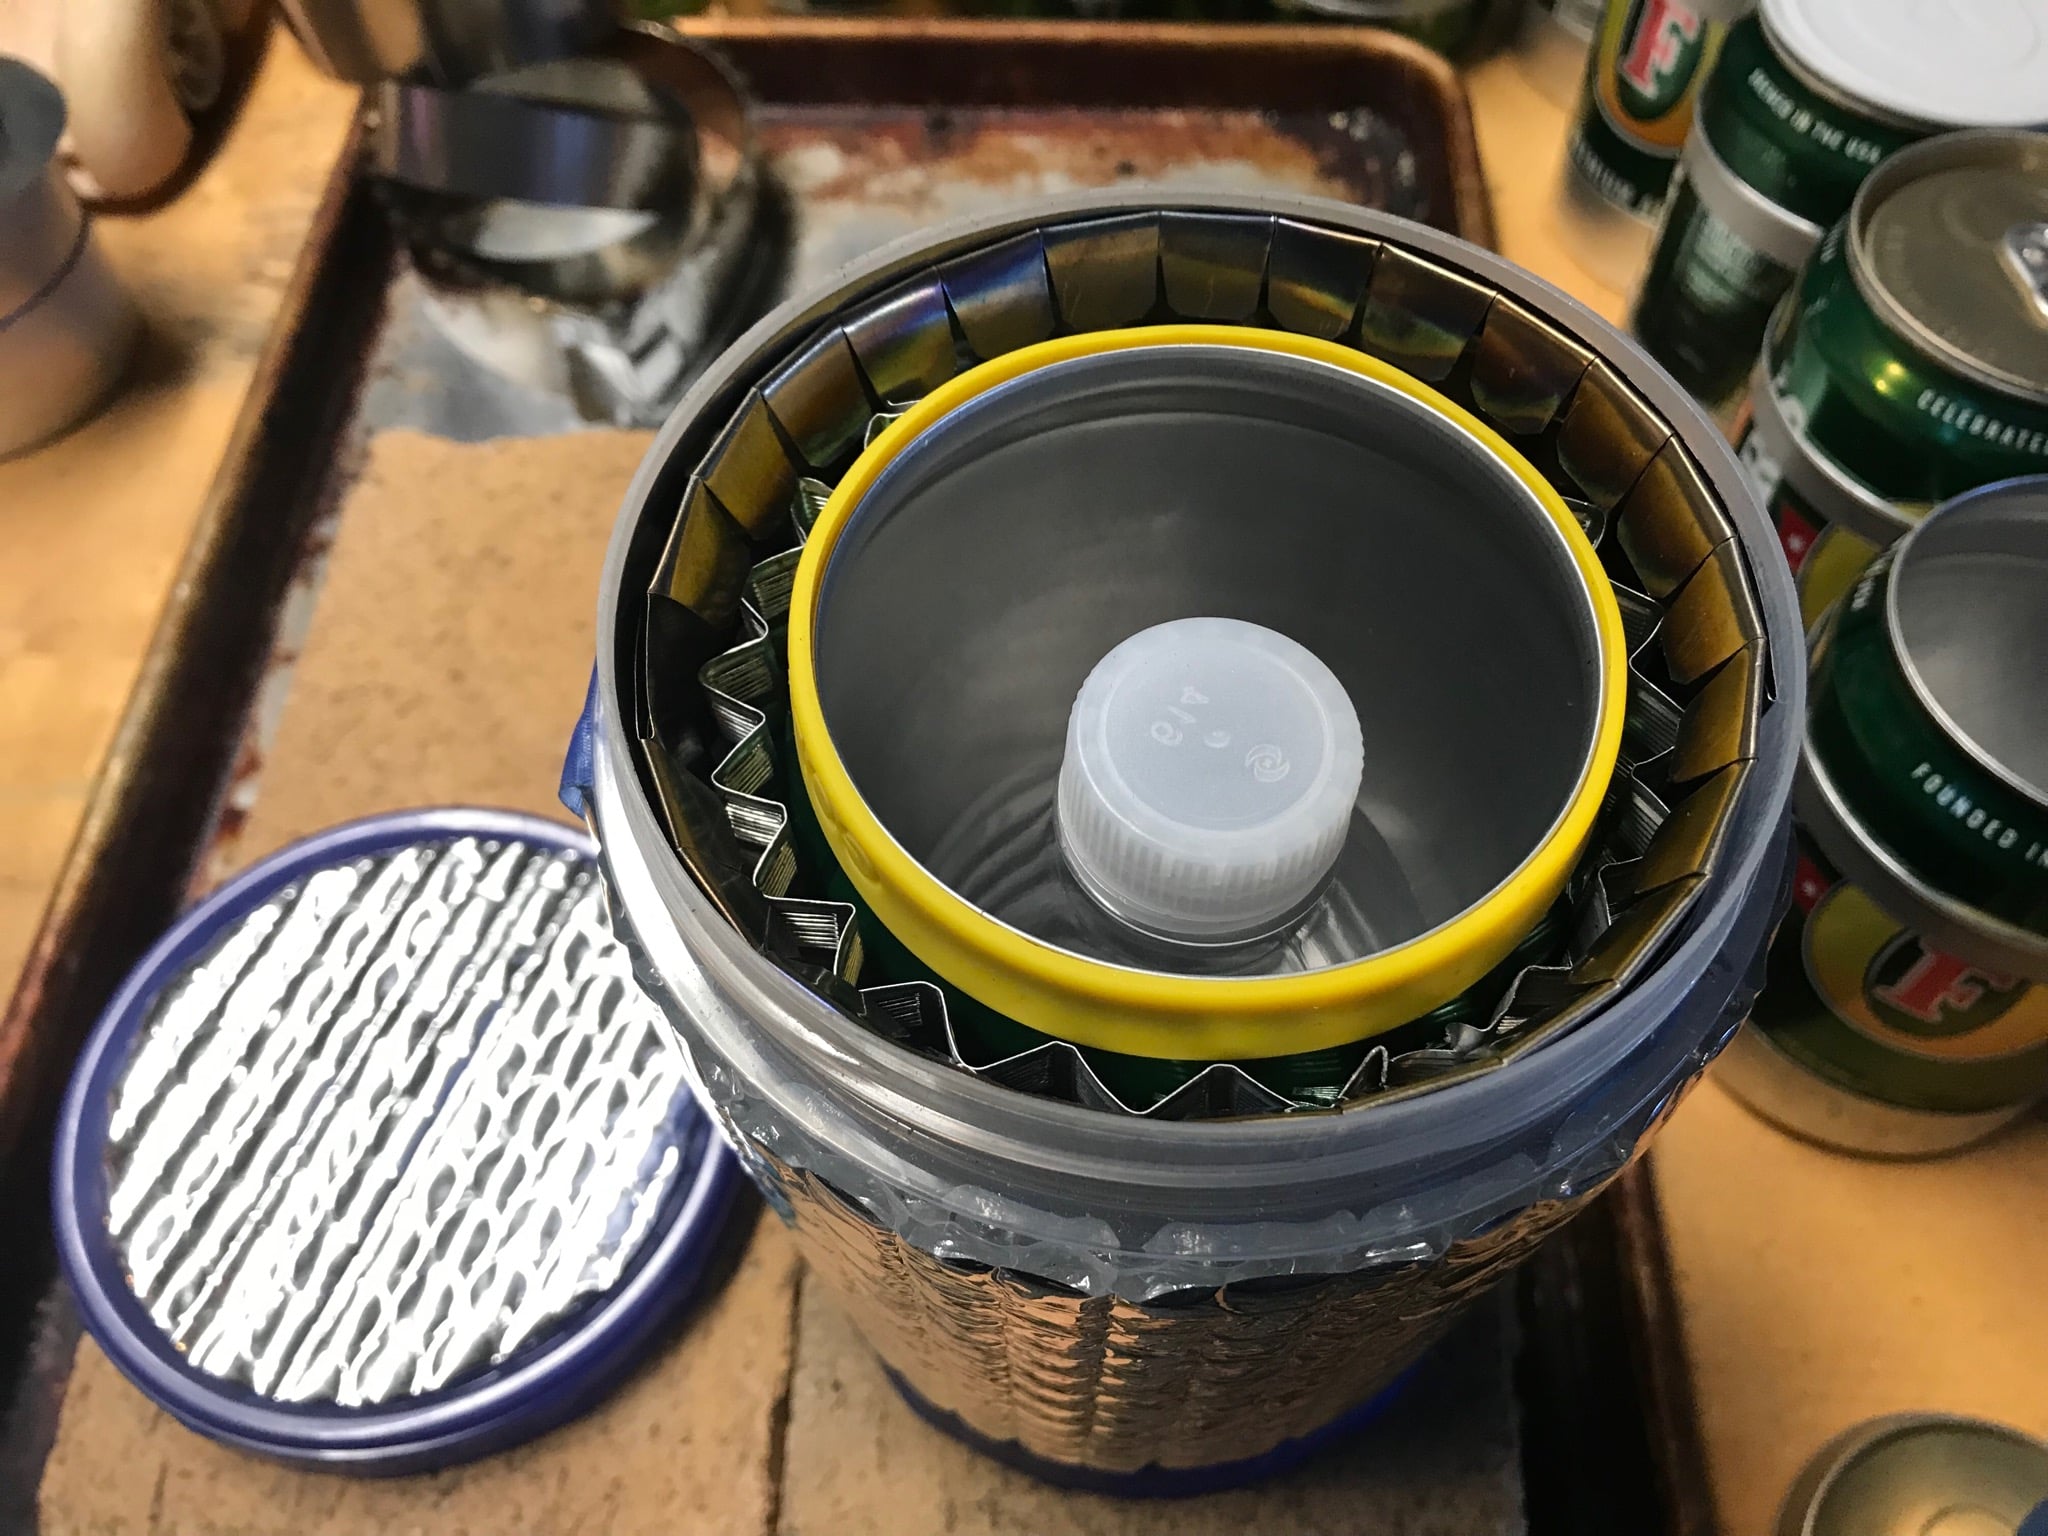
This is a picture of how all the components packed into the food storage container:
I did hundreds of test boils as I altered the number and size of air intake holes, the number of exhaust holes, dimensions and patterns, and the dimensions of the pot and cat food can base and support ring. All of the tests were conducted using 500.0 grams (= 0.5 liter) of Brita-filtered tap water. Given that my electronic thermometer gave me two sub-zero starting temperatures it appears that there are still some chemicals/minerals in the water that reduce freezing temperature.
I did scores of additional tests with a box fan. When the StoveBench protocol was announced by BPL I did dozens more. I don’t have a remote thermocouple thermometer (it’s on order) so I timed the tests from ignition to rolling boil. My elevation is 30 feet above sea level, so I presume that boiling temperature here is 100 *C.
This is a picture of a “rolling boil” that I used as the end point of my tests:
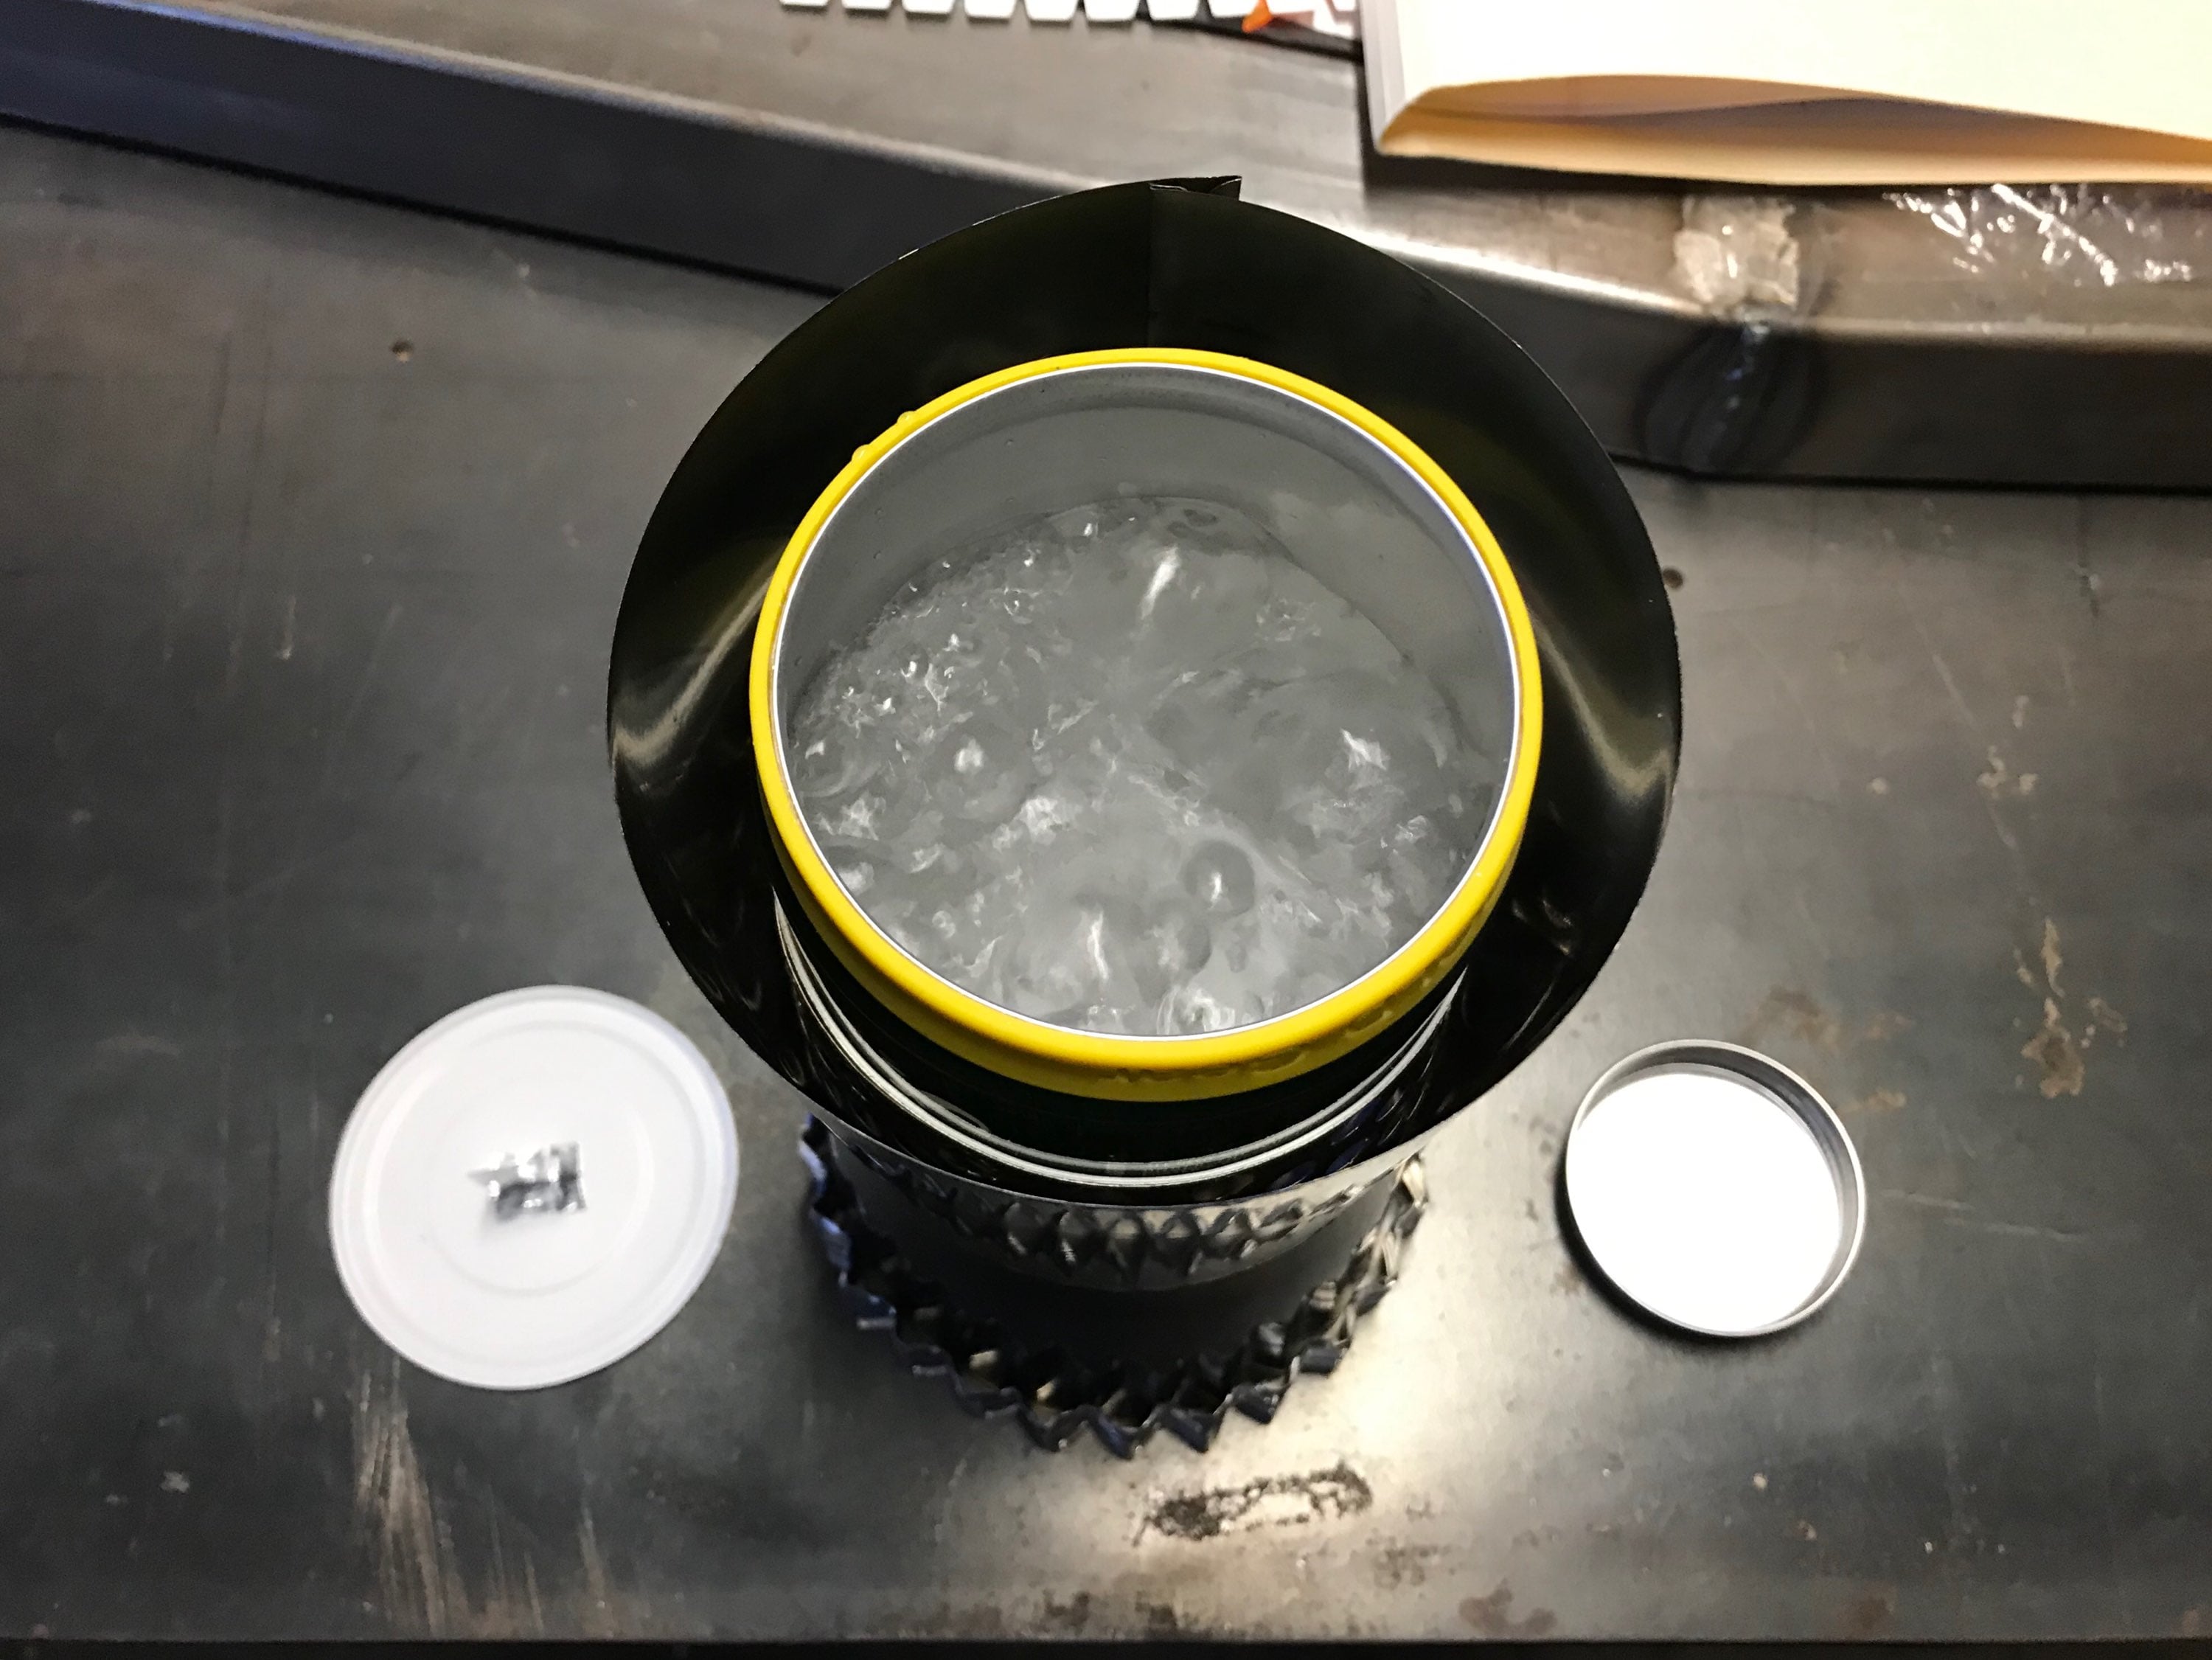
Final 10 test burns in still air:
W (*C) start Fuel (gms) Mins. Efficiency
1. -0.2 14.03 7:18 65.81%
2. 0.5 13.88 7:12 66.06%
3. -0.3 13.99 7:21 66.07%
4. 0.1 13.92 7:14 66.14%
5. 0.3 13.85 7:13 66.34%
6. 0.2 13.91 7:12 66.12%
7. 0.1 13.93 7:15 66.09%
8. 0.4 13.86 7:11 66.23%
9. 0.5 13.83 7:16 66.30%
10. 0.1 13.94 7:15 66.04%
Average starting temperature: 0.17 *C
Average fuel consumption: 13.91 grams (=17.63 ml)
Average time to boil: 7:14.7 minutes (7.245 min.)
Average delta temperature: 99.83 *C
Average efficiency: 66.12%
Average F: .4953
This are pictures of my wind-testing set up:
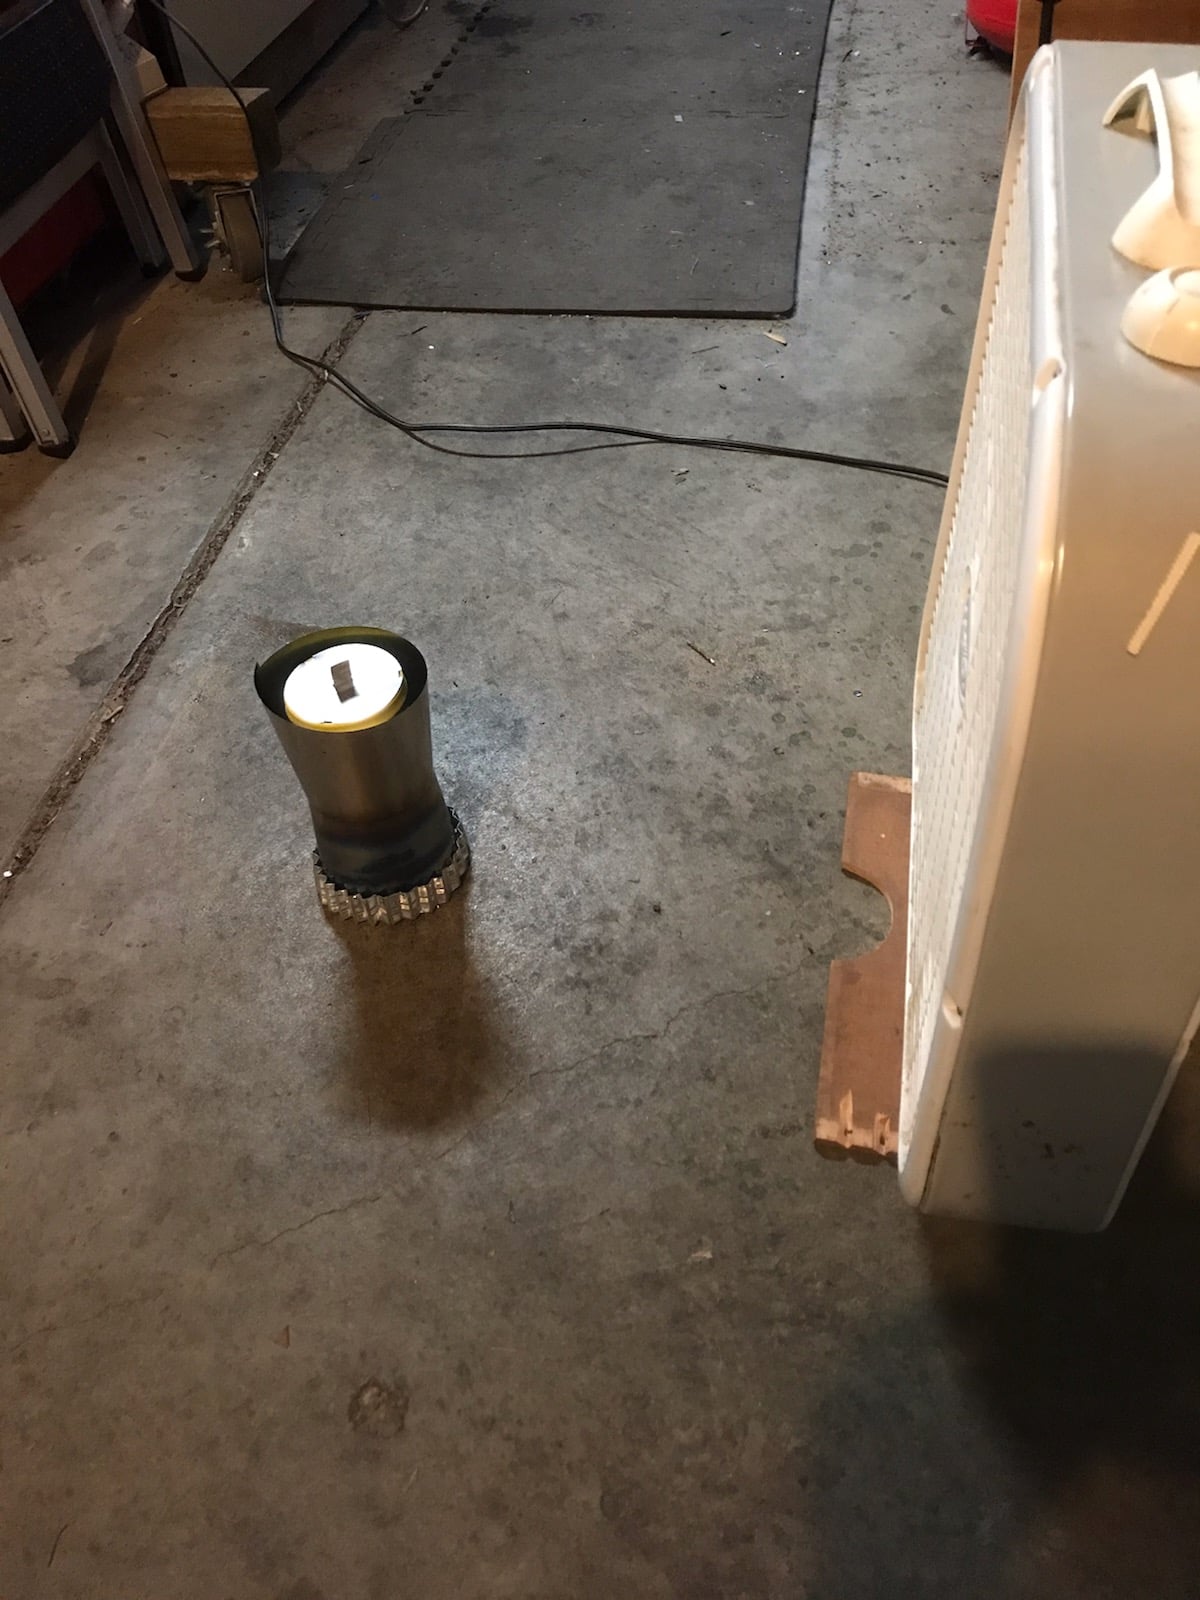
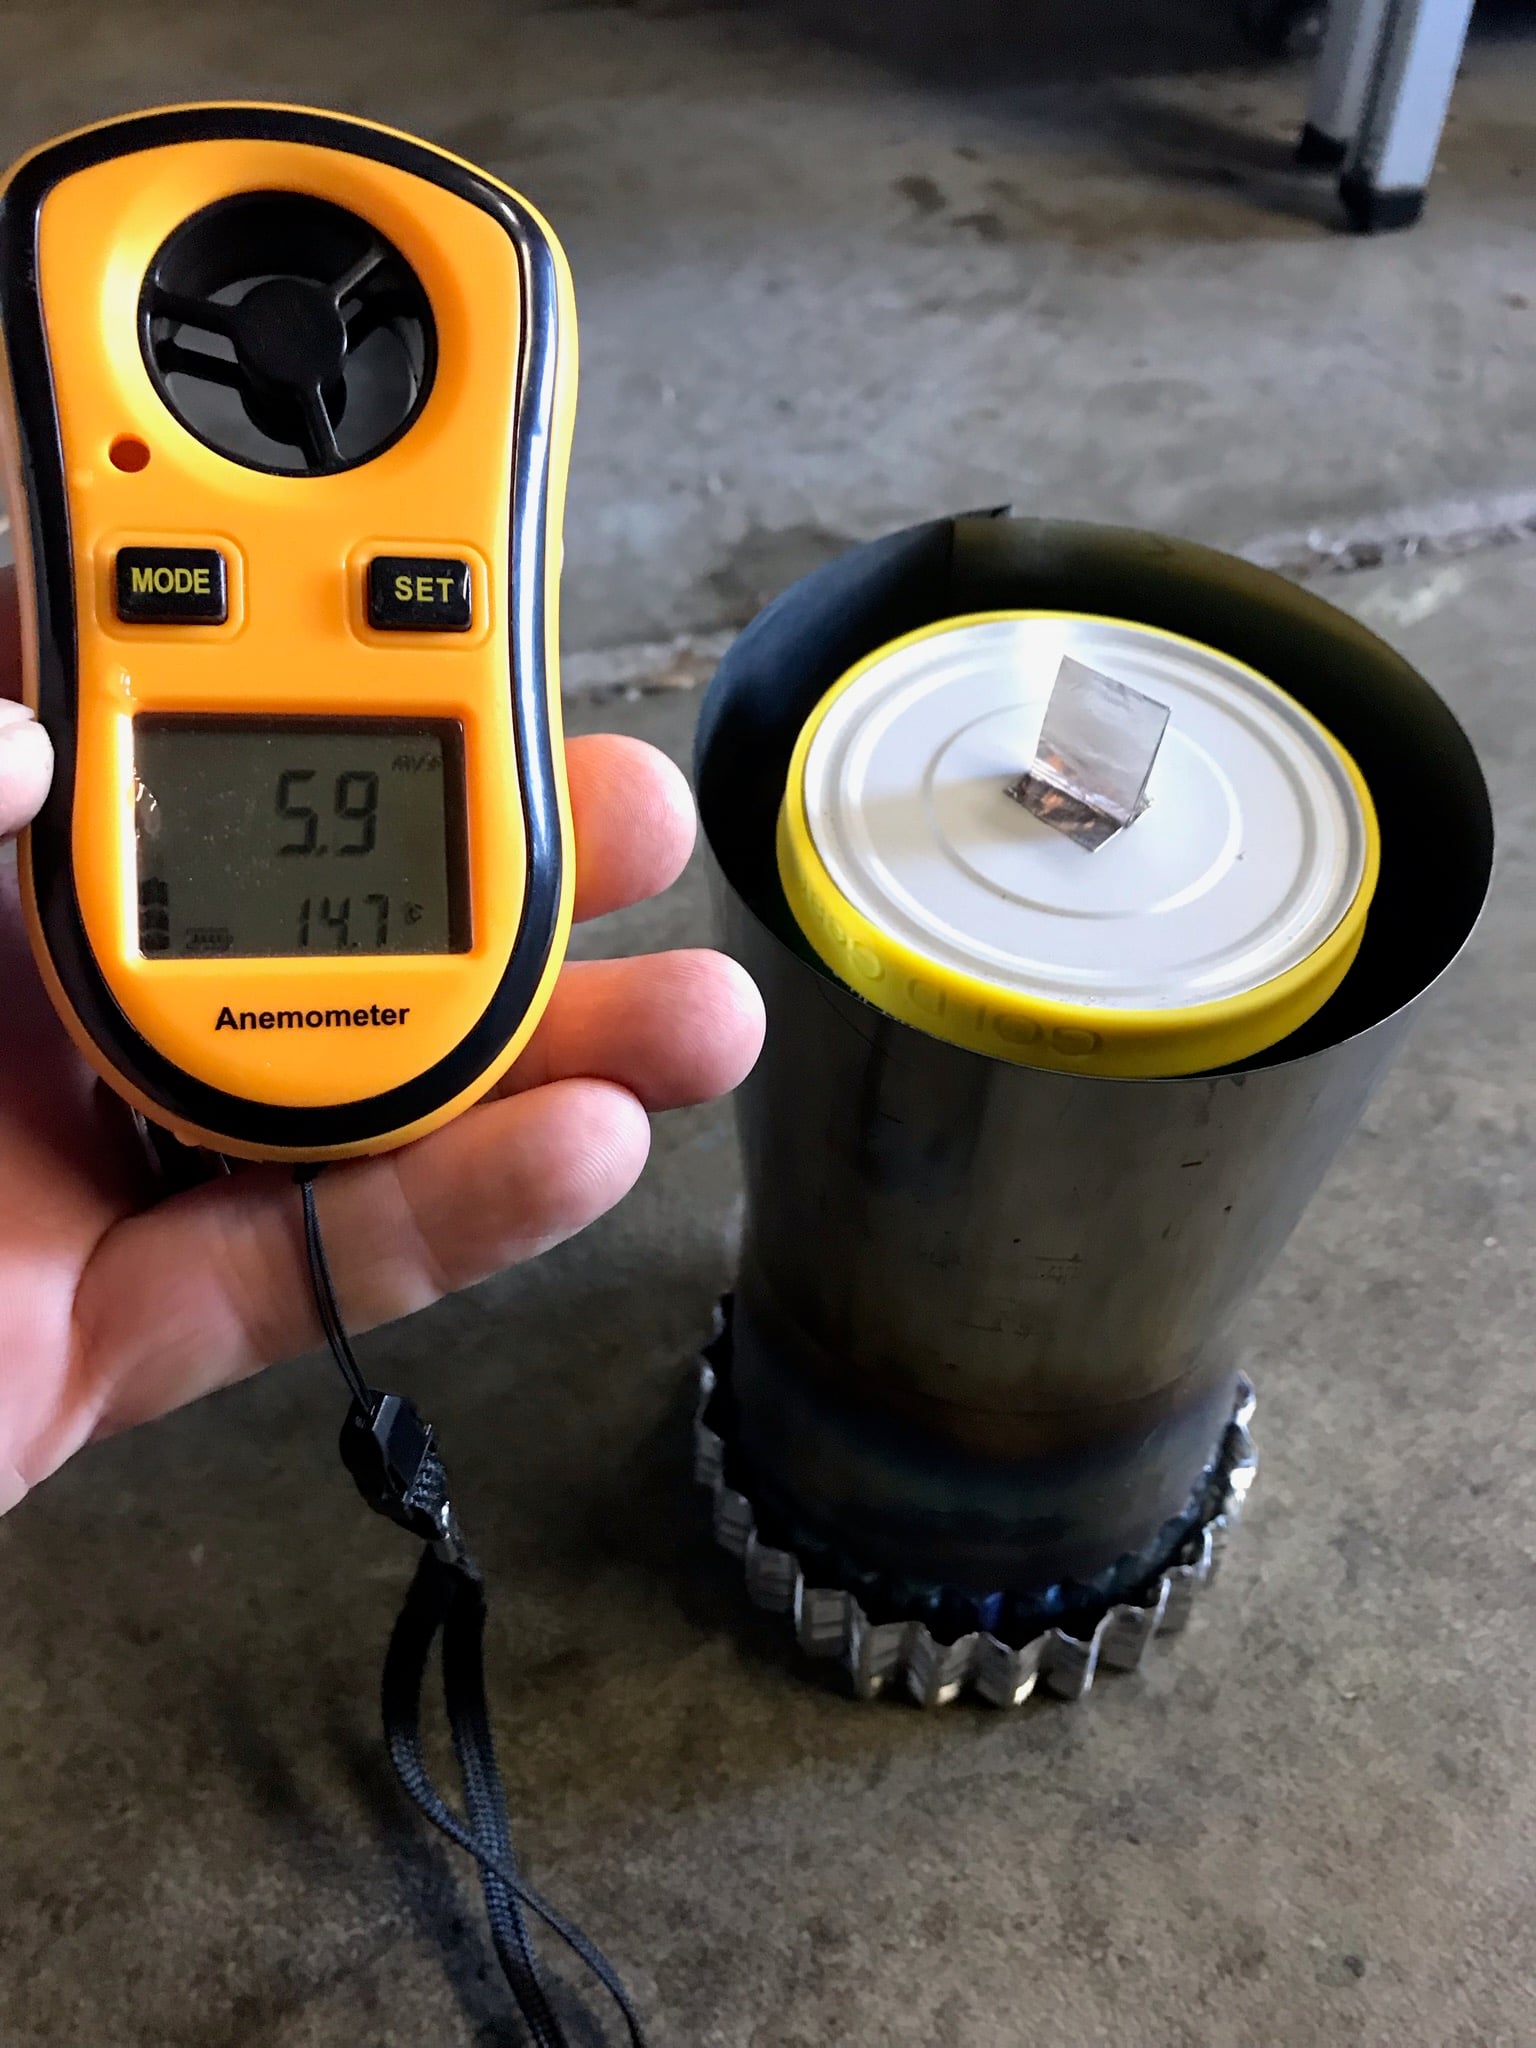
Final 10 test burns with the box fan:
W (*C) start Fuel (gms) Mins. Efficiency
1. 0.1 16.95 8:55 54.31%
2. 0.2 16.42 8:56 56.01%
3. 0.9 15.94 8:38 57.30%
4. 0.2 15.81 8:40 58.17%
5. 0.7 16.45 8:39 55.63%
6. 0.1 16.85 9:08 54.64%
7. 0.3 15.78 8:42 58.23%
8. 0.5 16.15 8:48 56.78%
9. 0.4 16.01 8:54 57.33%
10. 0.1 16.89 8:59 54.51%
Average starting temperature: 0.26 *C
Average fuel consumption: 16.33 grams (=20.69 ml)
Average time to boil: 8:49.9 minutes (8.832 min.)
Average delta temperature: 99.59 *C
Average efficiency: 56.29%
Average F: .3452
I’ll be going into production of this system soon and will post to Gear Deals, with free shipping to BPL members.

Looking forward to it – A couple of questions: How do you get the pot off the stove/holder to pour the water into your dinner? Does the “outer” windscreen get hot? I’m trying to picture how I take my nicely boiling water and pour it into my Packit Gourmet ziplock without burning my fingers. Do I need to put just enough fuel into the stove so that it burns out on its own or can I snuff it and save the fuel for the next meal as I do with my Starlyte?
I love the “All In One” nature of your setup and I believe it will save me a couple ounces over my current systems.

I lift off the upper windscreen and then lift the pot either with a hiking glove or barehanded by the silicon lip guard. The upper windscreen gets warm but not too hot to grasp barehanded. If I’m wearing a hiking glove I just grasp the pot and pour the water into my food. If I’m lifting the pot barehanded by the lip guard I use a bandana or similar while pouring. Lifting the pot at a slight angle lifts the lower windscreen with it for access to the burner, and I then cap the burner to snuff it and preserve the remaining fuel like a Starlyte. Putting in more fuel than is needed for a boil also makes the stove burn rate essentially linear.

Not to rain on the parade but it sure seems like lots of parts. In a windy difficult situation I think I would want something simpler (i.e., JetBoil or other canister system).

@david Nice work and great testing! This looks like a great contribution to the UL Community. When will the production units be available?
@Jon: Thanks. It will be a couple of weeks at least. I’m getting set up with a machine shop to make the windscreens and waiting for more aluminum radiator fin material from Alabama. I’ll post in Gear Deals as soon as I can.
@Randy: In still conditions the upper cone and outside baffles aren’t needed. Hikin’ Jim did some tests with a JetBoil and WindBurner in windy conditions, and the JetBoil never boiled the water. And JetBoils weigh 12.0-14.6 oz. (depending on model) without a canister, the WindBurner weighs 15.3 oz. without a canister, vs. 6 oz. for this system. Add 7.1 oz for a small 100 gram net weight canister from JetBoil and you get a total of 19.1-22.4 oz for a JetBoil or Windburner system. Add 7.6 oz for a bottle full of alcohol for this system, which give you 15 boils of 500 ml of ice water in still conditions, or 13 boils of 500 ml of ice water in windy conditions, for a total of 13.7 oz. for this system.
Great Work!
Does the upper cone mainly shield convective cooling off the sidewalls of your Fosters pot or does wind actually impact the flame pattern of the stove?
@Ben: Thanks! The upper cone mostly shields the exhaust holes so that heat rises all the way up the can to the water level instead of blowing away. Without the upper cone in windy conditions the flame pattern is affected somewhat, but the baffles on the intake holes do the major portion of flame pattern control.
Very interesting stove and well illustrated post. I love it when people experiment to achieve batter stove efficiency. That’s how we make progress.
For several years I have been using Trail Designs’ titanium Sidewinder cone stove and the mating Open Country 3 cup aluminum pot. But I use mine with ESBIT & a BGET tablet holder for max efficiency.
Recently I got TD’s tiny “KOJIN” alcohol stove and it works well too. I use yellow bottle HEET.
For winter I have the Inferno woodturning insert that makes the Sidwinder a “gassifier” stove that burns much hotter than a regular wood burner. That’s why the stove is made from titanium.
I love that this stove is so versatile, as yours is too.
@Eric: I’m going to get some Esbits and see how they do with this set up. I’m hoping it will take only 1/2 of an Esbit to achieve a boil. First I want to try a design idea for a burning tray made of stainless steel with TIG welded corners. Should be interesting. If that doesn’t work I’ll use one of my Ti trays. I will post my results.
Become a member to post in the forums.
 New Gear with Aluula FabricsLighter, stronger, more abrasion-resistant, and highly water-resistant - explore ultralight backpacking gear made with ALUULA Graflyte fabrics. Engineered for exceptional strength, durability, and lightweight performance, ALUULA Graflyte helps reduce pack weight without sacrificing reliability, making it ideal for demanding backcountry adventures.
 © Beartooth Media Group Inc.
 Loading...