Geoff; Once I have the right fabric, the rest is just a fun hobby with tools that have been in the workshop for a long time. So for a tarp running $150-250, that’s the cost of the project unless some doodads run out, which seldom happens. But see now what you mean if a tent maker is going to be paid for all the work.
Also, am sorry to hear about Gen’s issues with flat tarps, and that is why I already bought some for the next project. But even with a cat-cut tarp ceiling, there is plenty of usable fabric, and sometimes it is possible to harvest the tarp for a new project. Believe me, am not wealthy by any standard.
Geoff, Dave, and Moab Randy; Thank you for all the info about tent design, construction and materials. With a large ping-pong table to work with, most of a tent canopy can be built and shaped along seams held only with fine pins. Often, some of the seams will be cat-cut; such as the ceiling(s), and the vestibule(s), depending on the design and orientation of the fabric. But for me, they are not cut until after the fabric panels, with plenty of seam allowances, are pinned together to make the upper canopy shape. And adjusted to make the shape as taut as possible. Sometimes a light carbon rod is bent at the right length to mark where the seam should go to maintain a cat-cut.
Once the taut shape is accomplished, then the panels are marked with lines to show where the seams will go. Placing the marks to come out with a flat felled seam is a little tricky, because such seams are not sewn in the middle. But for me, there is no cutting and sewing until the seams are adjusted for the tautness. I’ll study your posts further for ways to approach this.
So with the right design, there is measuring, but not much other math involved, and is more like what happens in a tailor shop, but simpler because tent panel shapes are much simpler than clothing. And as I found, there are ways to simplify the construction even more:

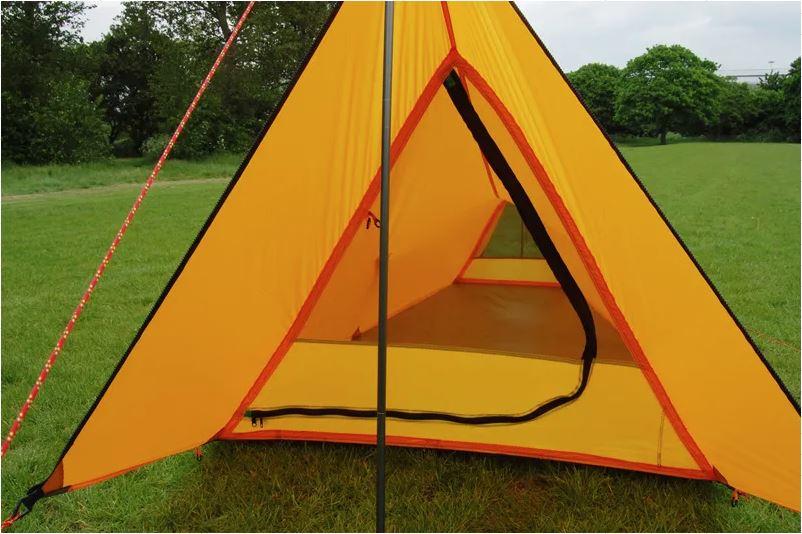
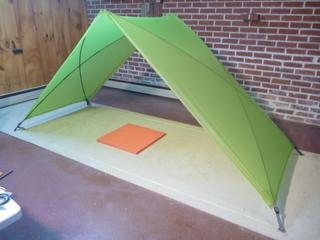
The span between the above 2 peaks is sewn with a straight seam, but adjusts by itself to a curve when the ceiling is tightened. So no cat-cut curves for that. The side panels (which make the tent more comfortable than an A-Frame) are bowed out by the four flexible carbon poles (visible in the photo inside the fabric). The equally sized front and rear vestibule panels (not shown in the above picture of the model) require 4 seams joining them to the ceiling. Since the leading edges of the ceiling are held straight and tight when the poles are installed, no cat-cuts are needed at the seams joining the ceiling and the vestibule panels.
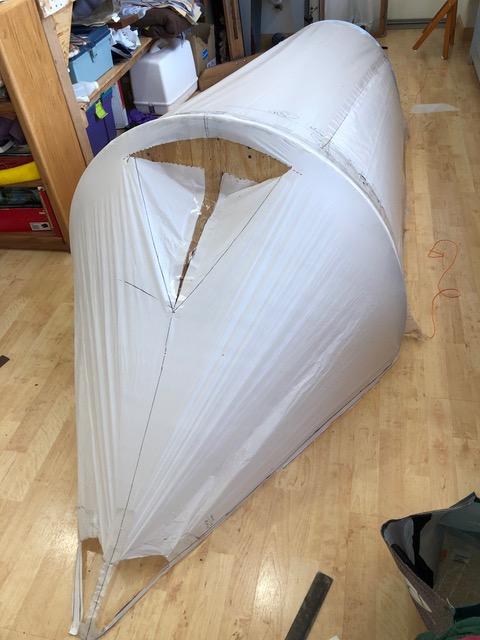
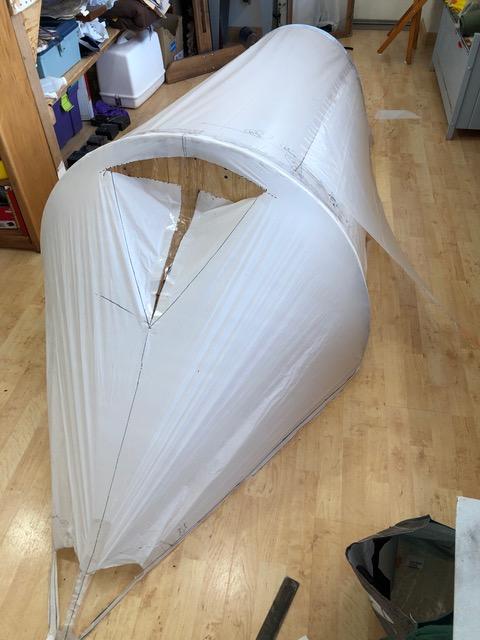
So the structure is tight and fairly easy to build. The biggest challenge, noted by Roger Caffin when he saw the design on a BPL post years ago, is how to install the poles under the canopy as shown in the above photo. This led to a major redesign. The final (hopefully) conclusion was to use some small light and strong pole clips from Dutchware, making it easier to install the poles outside the canopy, thus making the canopy an inner wall, sewing the vestibule panels to the inner wall, and as is usual, using single walls for the vestibule panels for the front and rear of the tent. Then the inner wall can be covered by a narrow fly with some overhang on top. The overhang on the fly, would also add ventilation, but like any vent, must be covered against blowing rain.. The narrow size of the fly makes it lighter than most, and easier to install.
The problem then became finding an inner wall that would breathe and maintain the shape of the wall in the picture. Pole sleeves would take more time to install, and in any case would just destroy the stretched taut shape of the woven silpoly inner.
Also, the inner wall if coated only with durable water repellent (DWR) would soak out immediately during pitching; so needed something more water resistant. The answer was to use some membrane 1.1 from RBTR, and drawing from Stephen Seeber’s findings on BPL, give it just enough time in the washer to remove some of the water repellent, yet maintain some breathability. This approach may sound bizarre; but has been used by tentmakers, including Go-Lite on its ponchos; but Go-Lite’s fabric was too dark to use as an inner tent; whereas the Membrane comes in a light green. So with a bit of washing, the membrane may provide a material that will repel water long enough to pitch without leakage, and breathable enough to add to ventilation as an inner ceiling. Yes, I know, hope springs eternal.
But the point is that the shaping, cutting and sewing are not the biggest challenges. Rather, it is the endless niggles. Like how to lighten the weight of the vestibule zippers, or limit them to the front vestibule (I use Warmlite # 3 zippers that are stronger than market #3’s, but almost as light; specifically, around 0.11 oz per running foot plus the weight of each pull). So for a solo tent, with a large side entry front door, is it really necessary to have a full zip at the rear side, a shortened zip, or no zip at all, just in the rear. And is it better to eliminate the weight of a full rear entry door, and extend the main floor into the rear vestibule for a dog or small child, or just to lay down the pack and other gear where it can dry out away from sleepware in the main tent.
The late Jack Stephenson said that tent making is “a form of insanity.” But as Jack and his family and others have found, there is nothing like being able to stay warm and dry in a tent of your own design and making, while a wind and rain storm is raging just outside. And please excuse me for not sticking to the OP’s issue. As Jack suggested, and I’ve tried to show, tent making involves numerous issues that must be considered with each other.