See next post.
Topic
Become a member to post in the forums.
See next post.
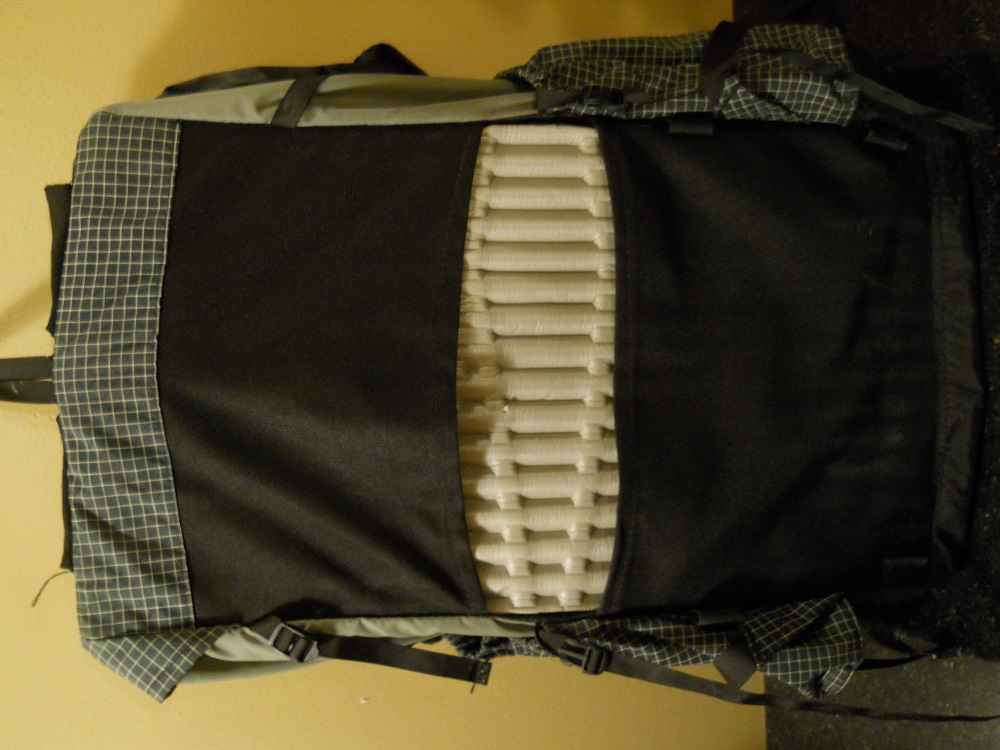
After 3 weeks of pattern making, pattern refining, sewing, seam ripping, re-sewing and adding some additional reinforcements, my first MYOG backpack is finally done. Other than lots of wavy stitching and overly complex panel shapes, I’m pleased with the look, design, fit, weight, comfort and volume.
After some good input from a BPL post last month, the pack fabric was selected as 100% 1.1 oz MTN Silnylon 6.6XL (Coyote color) from RSBTR. Pretty amazing fabric for the weight – I cannot rip this fabric with my hands and it should hold up OK with gentle on-trail use under 10 lbs total weight (thanks Aaron S. for the suggestion). But, wow, this fabric is so slippery to sew with – but practice will hopefully make perfect.
Already have a list of minor things to do differently on the next pack, including a more simple pattern for the panels and side pockets and integrated shoulder strap pockets. The next pack will shoot for 8 ounces or less and probably be made of X-pac X 21 RC and Lite Skin LS 21 (or something similar). I’m hoping these two fabrics will be easier to handle and sew with than silnylon, and also less slick on the body while wearing the pack. My hands are already sweating with anticipation.

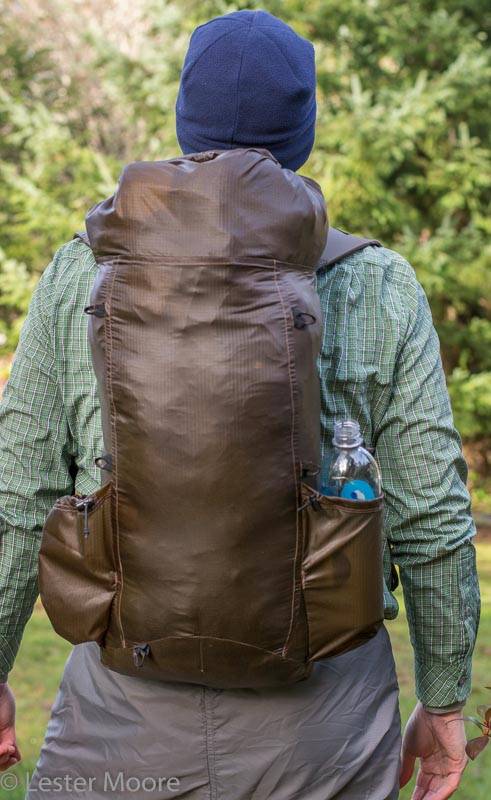
The side panels were contoured (banana shaped) to conform to the upper back and lower neck area for a more form-fitting fit than most backpacks (this feature worked well and provides an excellent fit).
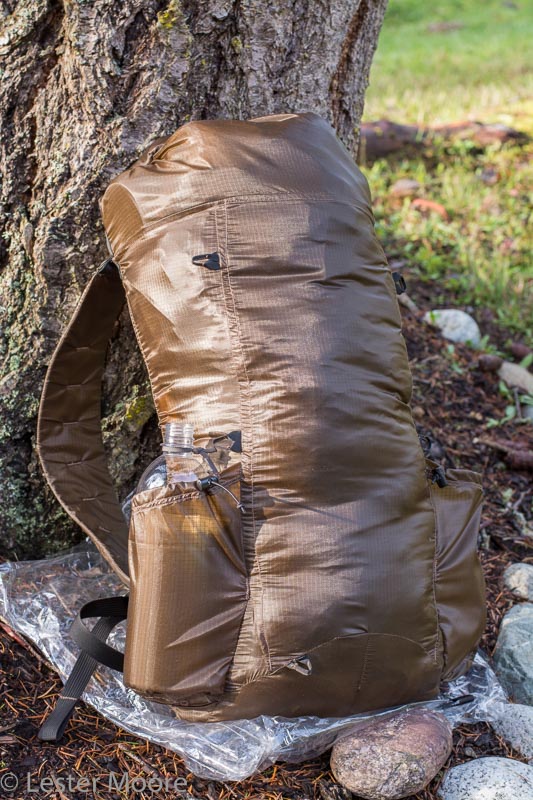
Flat-felled seams were used on almost all of the main seams, except for the rounded bottom of the front panel which would have been difficult to sew and still look good (need stitching practice).
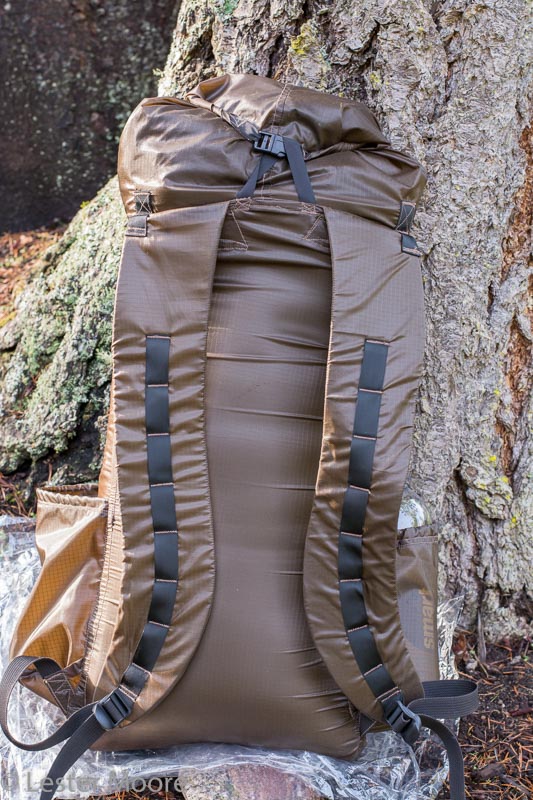
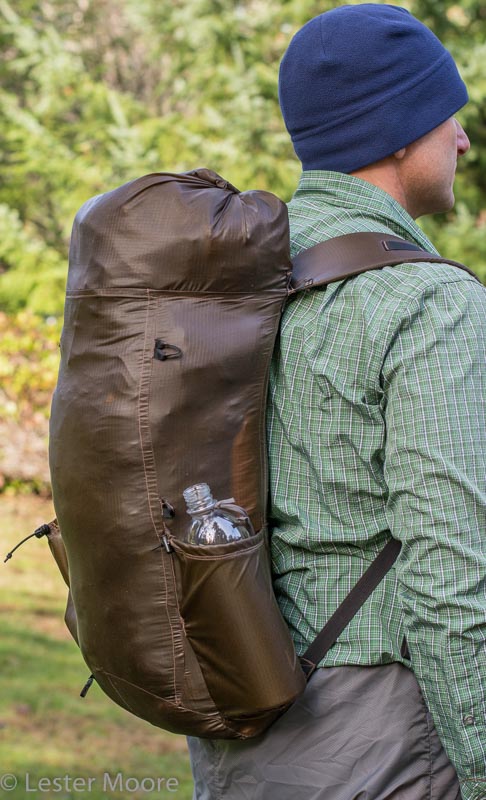
3.0″ wide shoulder straps with 3/4″ grosgrain daisy chain and 3/16″ foam inside (very comfy, but this slick pack would slide off the body easily when climbing over deadfall).
Irregularly shaped front panel tapers at the top and bottom and is concave on the bottom (a more simple panel design would work nearly as well, look fine and be much easier to sew). All the panels were cut out of heavy paper stock and put together with tape to form a 3D paper prototype before any fabric was cut.
3D shaped side pockets were difficult to attach due to half-circle flat bottom and partial non-overlap with main panel seams (the next pack will have all sides of the pocket sewn into the main panel seams all the way around).

Overly complex side panel shape and back/bottom panel with central dart and irregular shape were difficult to sew. Notice the obvious, wavy, second row of stitching on most of the flat-felled seams.
The outer edges of the shoulder straps were reinforced to the main pack body as this location was receiving a disproportionate amount of tension while wearing the loaded pack. Pack No. 2 will angle the outside edges of the shoulder pads an extra 3/8″ to distribute the force across the full width of the 3″ shoulder strap seam.
Beautiful pack. Thank you for sharing!
I like it. Looks like all your ideas worked. Fit is great!
Very impressive! I’m starting to think about learning to sew and this is very inspirational. Thanks for sharing it.
And it seems very ambitious. Interesting to hear all the ways you’d simplify the next one.
Looks good. I’ve been checking out the 6.6 MTN Silnylon for shelters.
Nice. I like the wavy seams : )
I made a pack with silnylon like that and I used it for a couple years. At some point the fabric started to rip at the top where it’s exposed to UV. And it was sort of stretchy. Maybe xpac is better? Your pacl is really low weight though.
It will be interesting to get your experience using it.
Nice work!
Looks Great!
Looks great! With something other than sil-nylon, maybe your complex shapes would go a lot easier. Never noticed a grey hair on myself till working with that stuff!
Lester,
You can tell a lot of thinking went into this pack, and a lot of learning came from it. The joys of MYOG! Really like the shoulder straps and the contouring of the side panels for better fit. Are you using any foam pad inside and if so how are you finding it doing with the contours?
Thanks everyone for the kind words – I had no idea getting into MYOG how fun it would be. The pack carried 10 lbs very comfortably on a 2 hour day hike this weekend, so no major design changes as far as fit or comfort go.
I’m already cutting patterns for the next revision though. Looking forward to sewing with some easier fabric too. Once the second pack is finished I’ll post details about how it differs from this first pack as far as improvements and simplification of the panels.
As for the shoulder strap foam, the foam is something I get locally from Redfish Kayaks. Joe (the owner) makes custom closed cell foam kayak seats and has tons of extra pieces about 20×20 inches, flat, and ranging from 1/8 to 1/2 inch thick, often with the thickness tapering from one side to the other. It’s similar foam to GG’s Nightlight pads (denser than the Thinlight). The fit is snug and precise as the foam is cut to the same size as the strap pattern fabric, with minor trimming to fine tune the fit before sewing the straps closed.
As for a CF pad inside the pack, a 6-way folded 1/8″ GG Thinlight pad fits well. However, the slipperiness of the pack material causes the foam to shift upward while hiking very easily. With this slick silnylon pack, I may add a couple corner pockets inside to hold the folded foam pad in place.
Regarding pad retention, I have a pack that has two sets of overlapping velcro straps sewn at the bottom of the pack and where the shoulder straps attach (vertically). I am actually not a fan of velcro, but this works really well to keep the foam pad in place. Since the straps overlap for several inches, it easily accommodates pads of varying thicknesses and heights.
You might also consider a pad pocket on the outside of the pack, such as this SMD Feather. It doesn’t rob you of any pack volume like a pad on the inside does. Same concept as the GG Kumo, but since you’re making the pack yourself, you could design the pocket to be deeper, like the Feather. That way you can fit two cut sections of 10″ X 19″ Ridgerest (taped together and folded) in the pocket. With the ridges vertical, the Ridgerest ccf provides INFINITELY more rigidity than the 1/8″ foam does. Unfolded, the 19″ X 21″ the ccf makes a good camp seat and can supplement sleeping pads, such as under the hips where you need it most. Of course the Ridgerest is extremely durable too (unlike foam).
 .The Scotch Heavy Duty Packaging tape is the only thing I’ve found that successfully joins Ridgerest sections together. Works amazingly well really.

Lester, as far as the shoulder straps go, I don’t believe you will have any problems there.Wide straps as you used distribute the load over a wider area on your shoulders needing less padding than you would expect. No known formula for this, but I have found that 3″ to 3-1/2″ straps only require about 1/8″ for comfort at 20 pounds and 3/16″ for 30 pounds. Your 3/16″ at 3″ will easily let you carry 10-20 pounds. Attachment points become less critical. The wider straps also allow greater seam width attached to the pack. For light packs it doesn’t need any reinforcement. However, for durability and longevity, running the daisy chain over the shoulder then down 2″ on to the back of the pack will add strength to this critical joint. This can be a bit difficult to sew sice the strapping does not like tight seams. A hot iron will usually work to get it to comply, though.
But for scrambling over deadfalls (we call them blowdowns here in the NE) you need a couple items that can be easily added. The first is a torso strap. I usually just position this high at the base of my clavicle to prevent interference with breathing. Small 1/2″ ribbon/strapping can be used but heavy duty elastic strap works as well. This will more or less lock in a light pack to your shoulders or at least keep it from sliding off. The pack can still be carried easily till you get a chance to shrug it up a little to where it usually sits if it does move. The second item is a light hip belt. 3/4″ strapping can be added at the bottom to hold the pack onto your body as you navigate trail obstacles. Not so much of a weight distribution mechanism (though, it does carry some weight,) it keeps the pack from swaying out as you use your arms to climb over any obstacle. Both add weight, but are worth it on a rough trail.
There is no reason that the pad cannot be added to the outside, against your back. Like most GG packs, this will add about 200-500ci to the internal volume. Again, this will add weight. After all the hacks you are up to about 6oz by my reckoning. But you can easily travel anywhere far heavier pack can. Again, Good Job! Will you be posting the plans anytime soon?
iago – interesting suggestion on internal pad retention with velcro – do you have a photo of this setup (hard to visualize)? Do you also have velcro on the pad?
Monte – having the CF pad on the outside works OK on my GG Gorilla, so I may try that design here. Having the CF pad on the outside makes a lot more sense for folks who sit on it during the day. Agreed on the rigidity of the RidgeRest (or two folds of TAR Z-Lite or GG SitLight) – that’s my preferred setup for day hiking, but I only carry a full length CF pad for backpacking. It’s also nice having the CF pad on the inside for pack support and to keep sweat off it. But outside pad pockets are so easy to put on the pack, I may try that with some 5 oz Lycra Mesh from Quest Outfitters.
James – a sternum strap is definitely in the works – some elastic and other fittings are in the mail right now. I’ll probably add a detachable hip belt too, but need to do some research on ways to attach it. On a groomed trail carrying under a dozen pounds or so, it’s nice to forego the sternum strap and waist belt, but both help a lot when scrambling or crawling over downed trees on unmaintained trails.
Looks Great Lester!
Did you use any reinforcement of single layer material surrounding the shoulder strap/backpanel or side webbing attachment seams?
Let us know how that Mountain silnylon holds up!!
Silnylon is a pain, yes!
Get yourself some Xpac and you’ll really love how its stiffness lends to easy creases and manuevering ofmultiple layers.
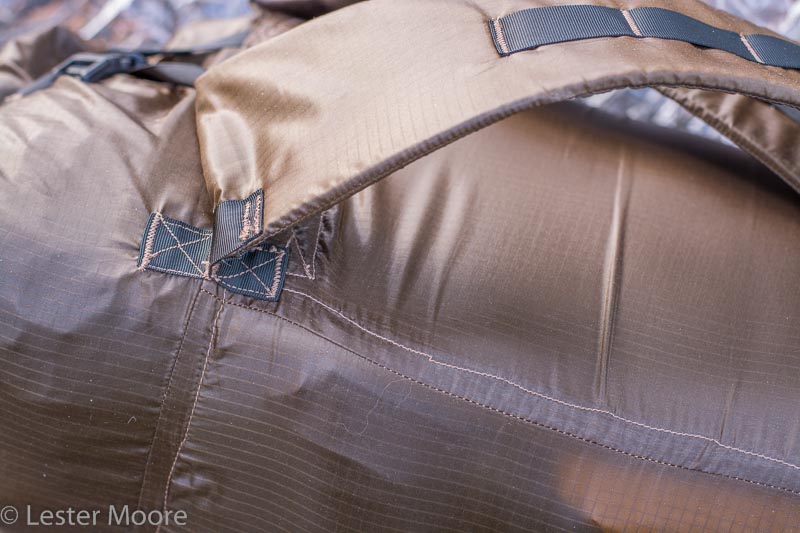
Nathan – there’s force distribution where the shoulder straps attach to the upper back panel, and where the shoulder strap adjustment webbing attached to the bottom corners of the pack. For the shoulder straps, about 1.5 inches (without foam) are enveloped inside the flat felled seam on the top of the back panel, using large X-boxes to attach each strap to the inside face of the panel, to distribute the shoulder pad force (mostly hidden under the strap, some visible in right of photo 1). There’s also stress on the top of the shoulder strap, mostly on the outside edges, so there’s grosgrain reinforcement with small X-boxes above and below on these outside edges (left of photo 1, only top reinforcement is visible). There are also small X-boxes for the pack haul loop (photo 1 below).
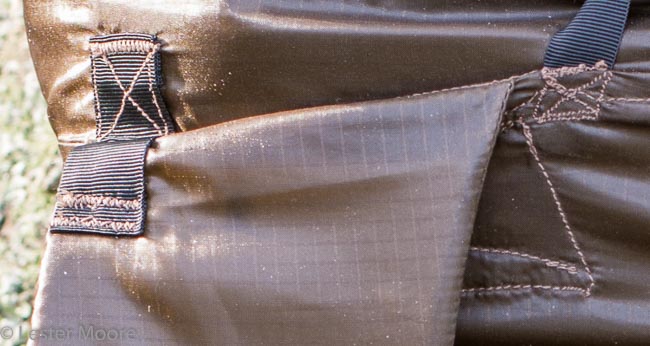
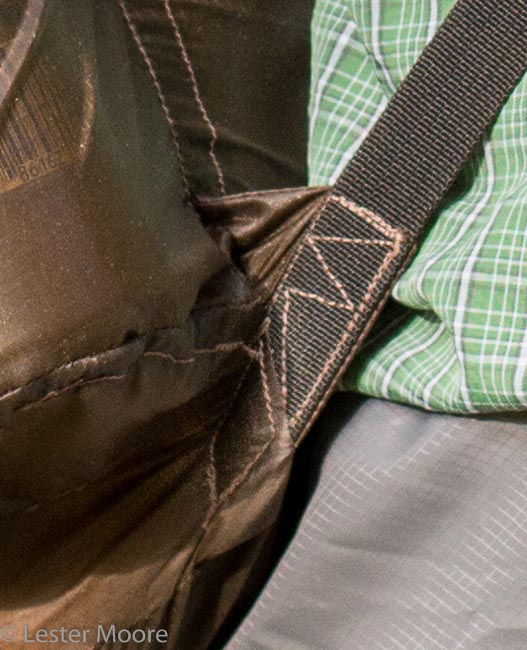
For the shoulder strap adjustment webbing where it attaches to the pack bottom, there’s a triangle of double-ply material- it’s 2.5 inches tall, thus distributing force across 2.5 inches of the panel flat felled seam. In addition, there’s an x-box (without the X) securing the actual strap to about an inch worth of the side panel to further distribute force (photo 2 below).
Very nice Lester! I am in the design phase of my first pack and am wondering if flat felled stitching or bias tape is the way to go. What helped you choose flat felled stitching?
A simple double stitch without bias tape may be fine with stronger material and if the material does not fray easily. I chose flat felled for better force distribution with such a light (30D) material. Also, I used a 2 mm seam length for most of the straight stitching, and 1 mm with a pass or two of overstitching for moderate stress areas (tie out loops on the side panels).
Dyneema X seems to work fine without hiding the raw edges somehow (the 2017 MLD Burn backpack I have does this for example). Not sure about X-pac fraying, though.
Nice work Lester! Somehow I missed the reinforcement on your original post. I am impressed by how much detail and planning you put into your first MYOG bag. I’m happy to mail you some scraps of X21, plenty enough for a new bag to keep that fire lit. PM me your addy if interested.
P.S. Xpac won’t fray, and generally I recommend a longer stitch length for lighter fabrics. (This is using a walking foot machine.)
I see your point about the material. I’m using Xpac TX07 and am still deciding how to stitch for adequate durability.
Nathan – I assume the longer stitch length for lighter fabrics is due to the risk of needle holes too close together compromising the fabric’s integrity at the seam? Some sewers advise shorter stitch lengths for added strength in key areas of a job. But that advice would only hold true if the fabric is substantial enough to support closer, denser needle holes. Would it be correct to say that every fabric has a unique optimal stitch length (for a given thread and needle size) that balances the competing factors of longer lengths punching fewer holes versus shorter lengths providing more support from the tread?
Dear Lester, I sent you a PM with the picture. I have had trouble resizing the pic, and the linking feature did not seem to work either.
Become a member to post in the forums.
 Pro-Grade Water RepellencyPolypropylene face fabrics: see the future of raingear.
 Loading...