Topic

FireMaple Quick Boil Pro modified to work with stock BRS stove


Forum Posting

A Membership is required to post in the forums. Login or become a member to post in the member forums!

Home Forums Gear Forums Make Your Own Gear FireMaple Quick Boil Pro modified to work with stock BRS stove

Viewing 20 posts - 1 through 20 (of 20 total)
  • Author
    Posts
  • #3840496
    Casey Bowden
    BPL Member

    @clbowden

    Locale: Berkeley Hills

    Following photos show how I modified a FireMaple (FM) Quick Boil Pro (QBP) pot to work with my stock BRS stove.

    01

    Unmodified FM QBP pot. Holds about 800 mL filled to brim. As shown, only works with a stove that comes with the pot. Includes heat exchanger fins and full 360 degree protection of the fins from wind. Other items to note: the handle is overkill and the stock lid is heavy.


    Left: Stock stove that comes with the FM QBP pot. Right: BRS stove.


    Deciding where to notch the bottom of the pot to fit the arms of the BRS stove.


    First I drilled out the rivets that connect the stainless steel piece that allows the stock FM QBP stove to lock into the pot.


    Here’s the ring removed from the pot.


    I decided to notch the pot where the rivet holes where. You can also see that I removed three heat exchanger fins so the stove arms bear directly on the base of the pot.


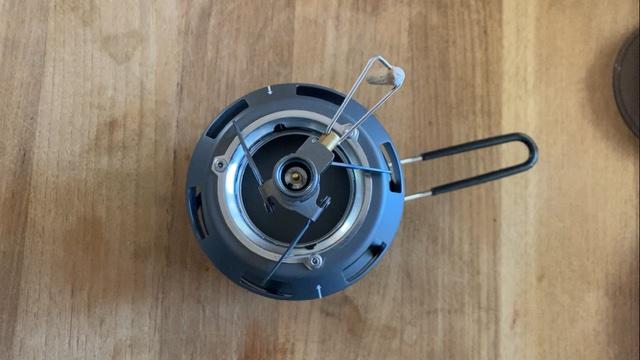
    Unmodified BRS stove now fits the FM QBP pot.


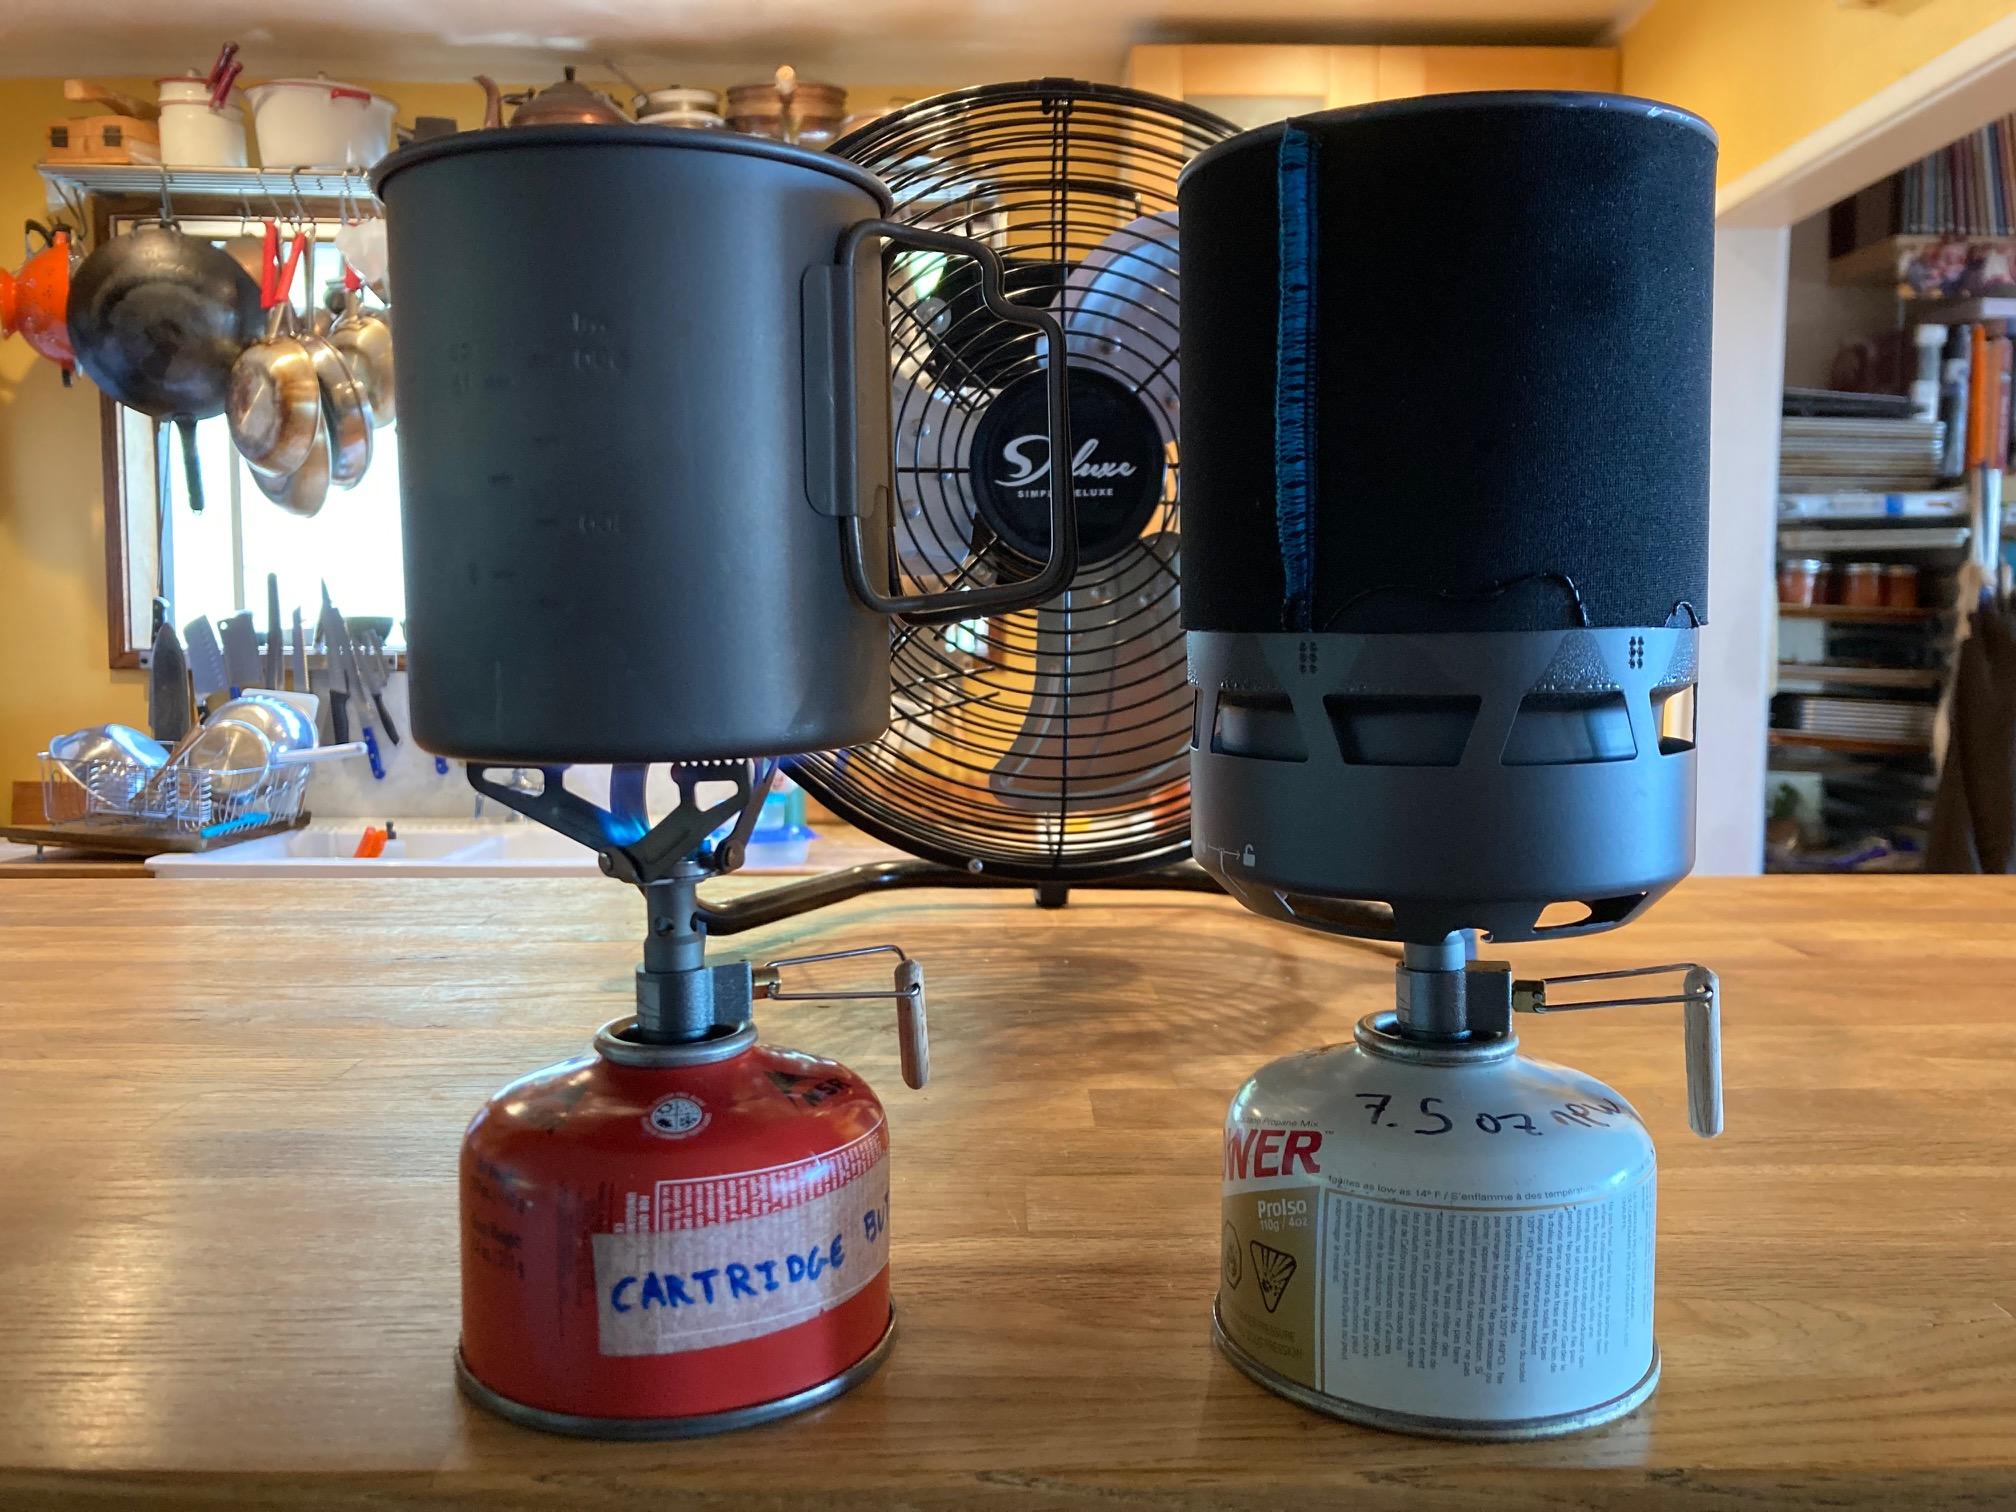
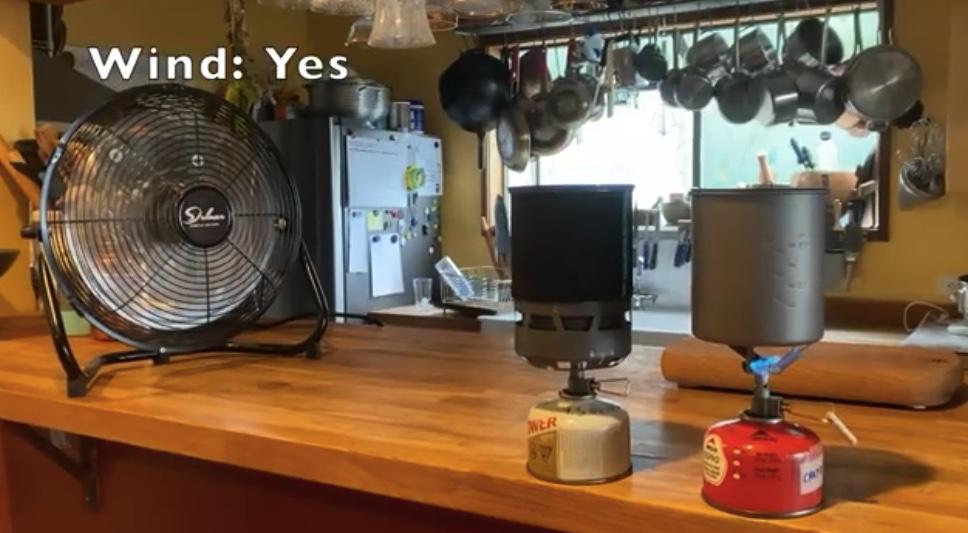
    Toaks 750 mL titanium pot on left and FM QBP on right. Both heating water with BRS stoves. Fan is not on.


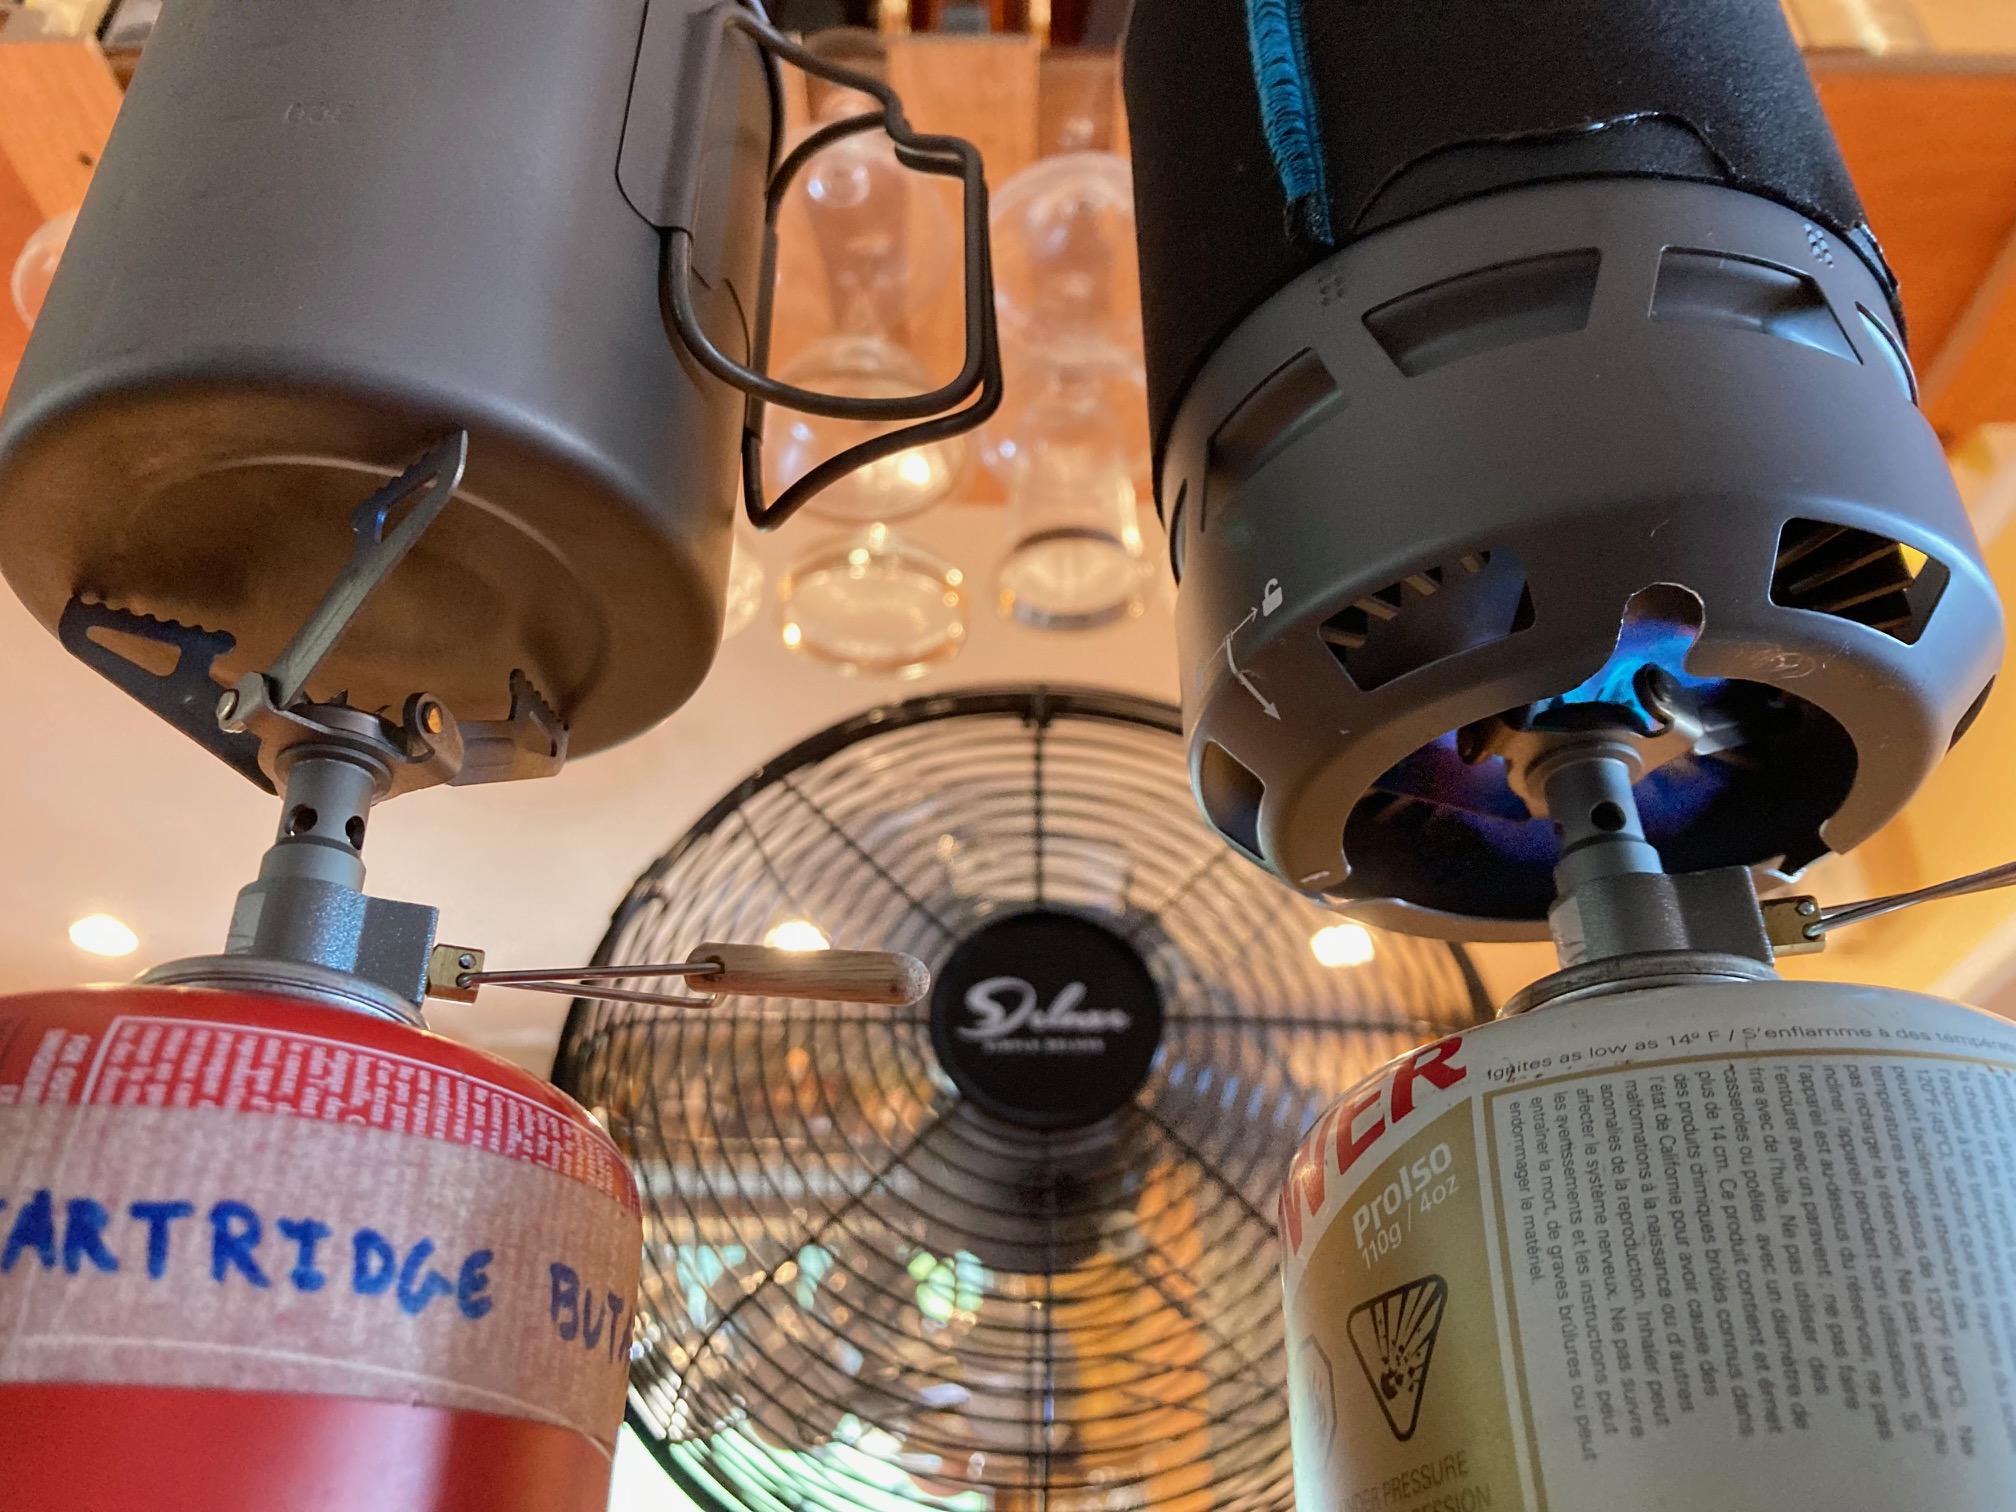
    Same setup as before, but from below.


    Fan is now on and the BRS with the Toaks immediately blew out. Flame at QBP looks good.


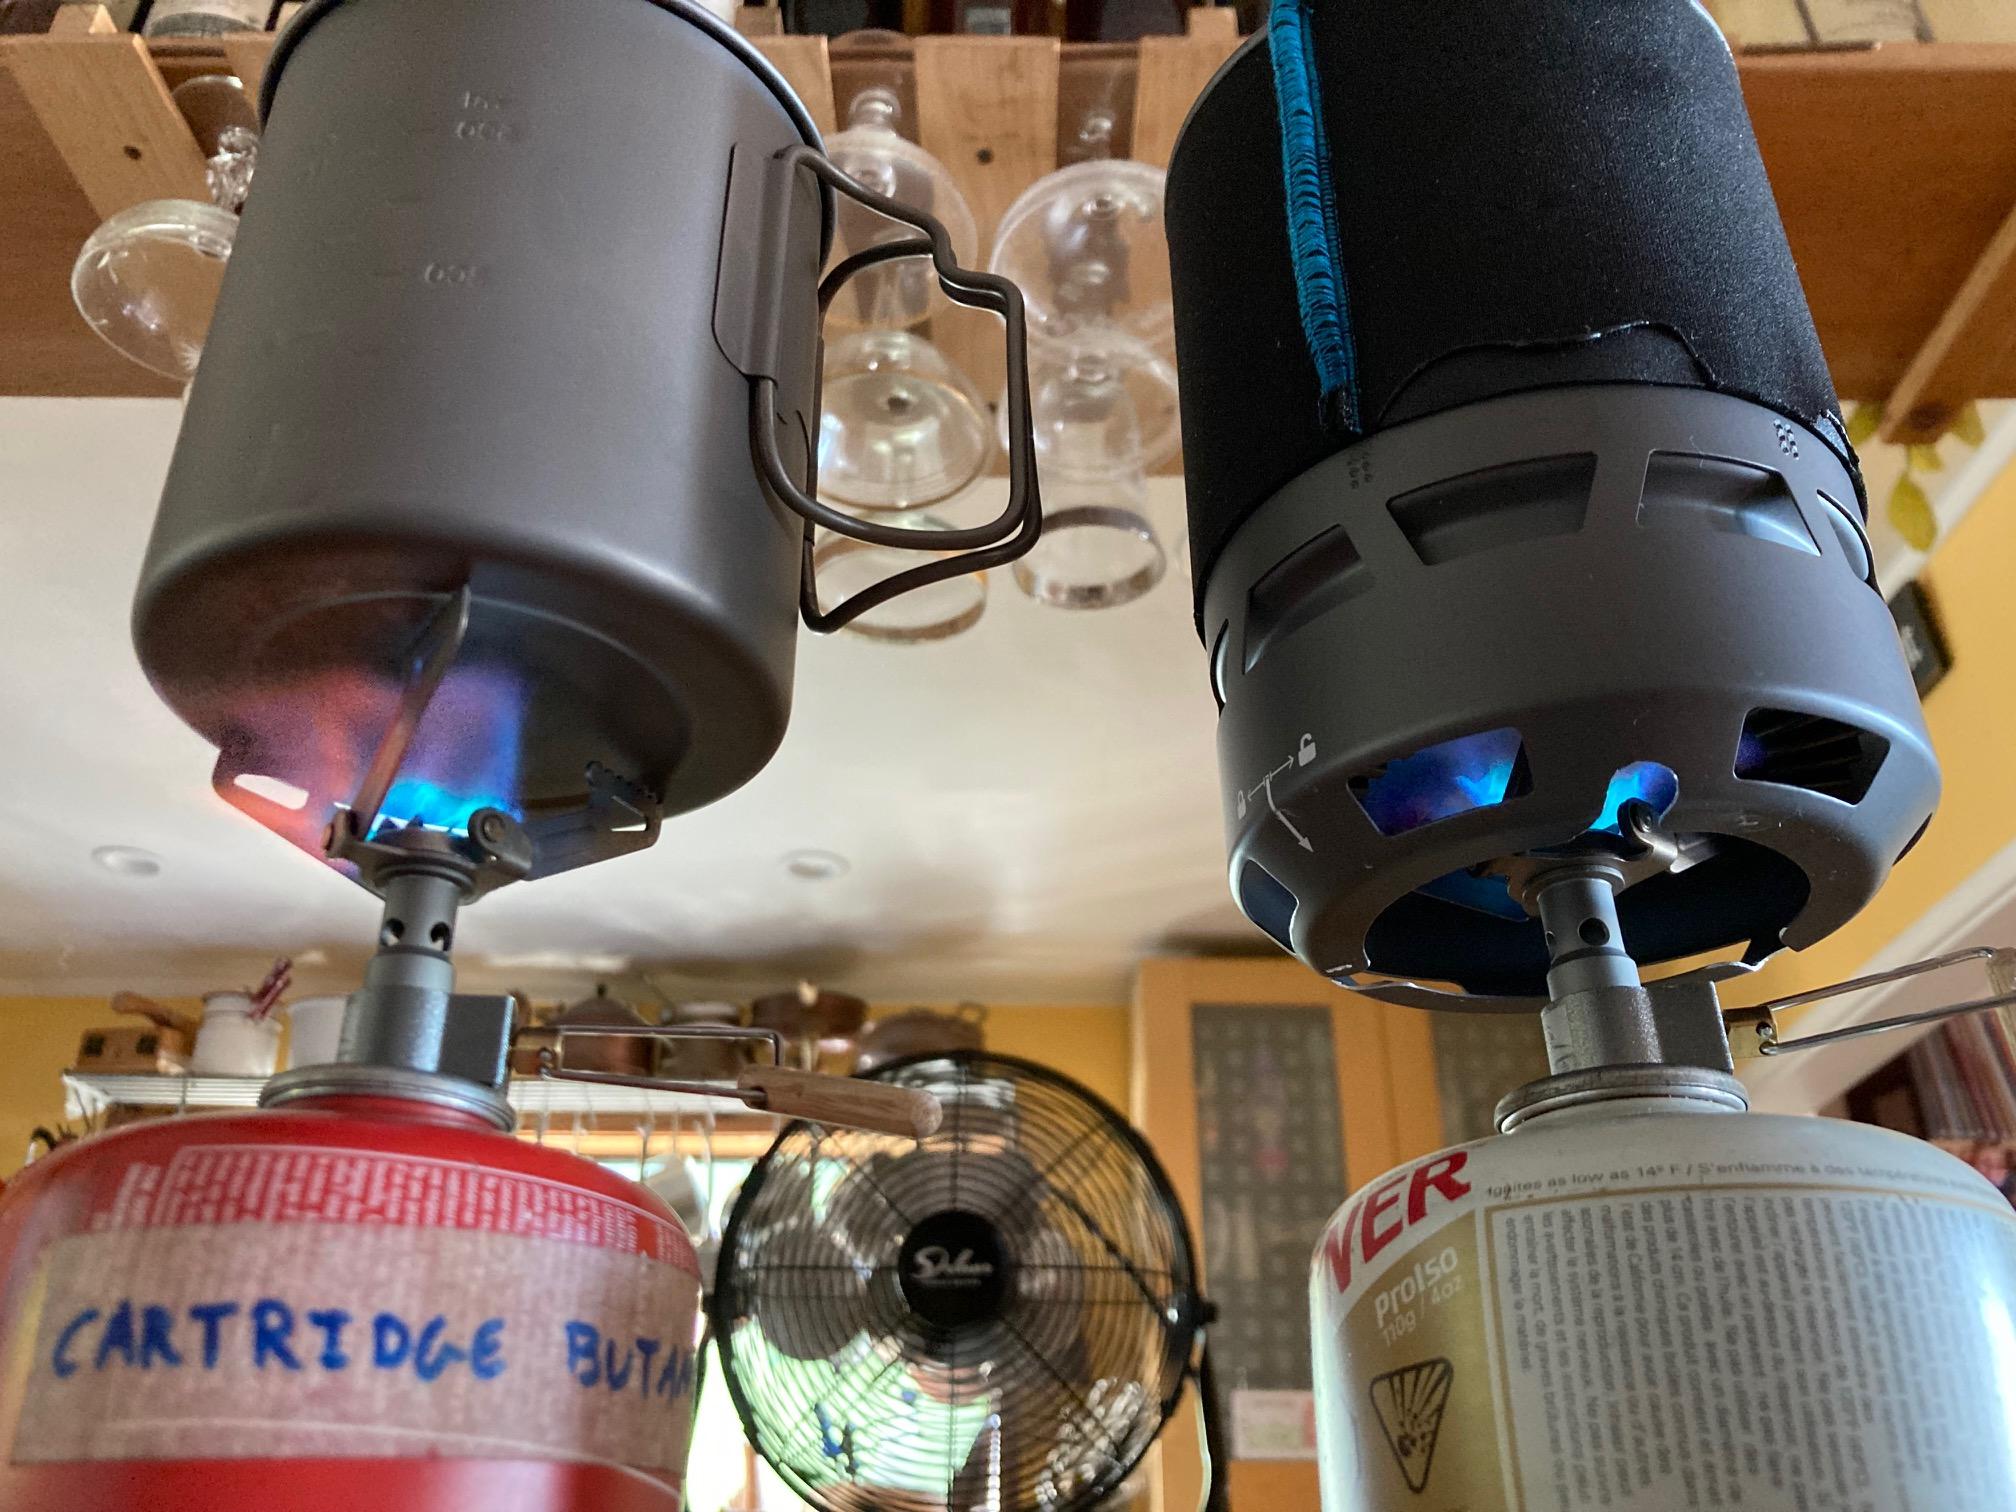
    Fan has been moved back. BRS with Toaks no longer blows out but the flame is horizontal. Flame at QBP still looks good.


    Fan is blowing from the left. Not much flame reaching the Toaks pot.


    Fan blowing from left. QBP does a great job protecting the flame.


    Stock lid (left) has been replaced with a Ziploc screw top lid with the threads cut off. The lid, as shown, has inner and outer flanges that fit the top of the QBP pot perfectly.


    Inside of the QBP pot. Note that it has an indentation at the bottom, which may make it harder to clean.


    Weights of stock FM QBP kit and modified kit. Note that I removed the pot handle and use a DIY neoprene sleeve instead. I also use a string and cord lock to hold everything together instead of a bag.


    #3840499
    Jon Fong / Flat Cat Gear
    BPL Member

    @jonfong

    Locale: FLAT CAT GEAR

    Looking good! nice job trimming the slots.

    #3840691
    todd
    BPL Member

    @funnymo

    Locale: SE USA

    Outstanding!

    #3840696
    David Thomas
    BPL Member

    @davidinkenai

    Locale: North Woods. Far North.

    Nice job, Casey!  I’ve been using an Olicamp HX pot on top of a BRS-3000T and it needs to be wiggled on just so for the three pot supports to fit within the bottom support ring and between HX fins.  I ought to 1) cut out some of the bottom support ring like you did, 2) take off 1/4″ from each BRS pot support arm, or 3) both.

    Was using that set up on Adak last month.  My first non-lethal trip to Adak (went with Kristin) – nothing died, except a whale, which we didn’t kill.

    It’s hard to beat that plastic Tupperware lid you’re using for weight.  One step above a piece of aluminum foil is the peel-off inner liner on a can of Blue Diamond almonds – stiffer aluminum, dimpled (for stiffness?), and nicely malleable to bend over at the pot’s radius.  Middle photo on right side, below:

    #3840703
    Bonzo
    BPL Member

    @bon-zo

    Locale: Virgo Supercluster

    Hell yeah, that’s a clean job.  Bonus points for the rounded inside corners of the slots.  I like how deeply-seated the stove is, with that pot.

    I wouldn’t worry too much about cleaning, unless you’re cooking in the pot itself.  In that case, yeah: the step at the lower rim is gonna be a bit finicky.

    #3840726
    Casey Bowden
    BPL Member

    @clbowden

    Locale: Berkeley Hills

    I wouldn’t worry too much about cleaning, unless you’re cooking in the pot itself.  In that case, yeah: the step at the lower rim is gonna be a bit finicky.

    Got to use the setup over the weekend while exploring Muir Gorge. Happy to report it worked great in the field. And I did cook in it, my version of Skurka’s cheesy rice and beans. Happily cleanup at the lower step was NOT an issue. I’m pretty stoked with the kit.

    #3840729
    Bonzo
    BPL Member

    @bon-zo

    Locale: Virgo Supercluster

    Statement officially retracted, then: if you cleaned up cheesey beans and/or rice without hassle, then pretty much everything else will be simple as well.  I might not try a frittata, though. 🤣

    #3844311
    Alf B
    BPL Member

    @alf-outdoors

    A much better choice of pot than the Toaks 750ml is the Toaks Light 650ml pot. It uses thinner Ti, which not only reduces it’s weight, compared to pot’s made from thicker Ti, like the Toaks 750ml, but it allows much better heat transfer too, so you can boil water faster in it than with the 750ml and using less gas too.  Obviously not on the same level as an Aluminium pot with a heat exchanger, but good enough and with all the advantages of Titanium. (It’s 100% non toxic, much higher scratch and dent resistance, and it’s impossible to melt it on the trail).

    As mentioned before, the BRS only really has one Achilles heel…It’s not good if exposed directly to the wind.  The simplest solution is to rest your backpack on it’s side and use it as a windbreak, and I have done this on many a windy hill top to great effect, but having a an efficient stand alone wind screen is obviously far more convenient.  But making it ultralight is a must.

    Building on the success of my original two part design, made from Titanium sheet, which clipped onto the neck of the gas canister, allowing it to be rotated to face the wind independently to where the BRS valve handle is facing, I redesigned it using thinner Ti sheet to make it lighter, and I added two folding wings to the clip on base bracket so it could be folded up smaller than a single fixed base bracket design allowed. The original wind screen part on it’s own weighed 16.6g.  The new one weighs 6.2g.  The original with both parts together, weighed about 22g and the new one weighs 13.7g.  Both parts fit easily inside my Toaks Light 650ml, along with a 100g gas canister, the BRS, a Bic Mini lighter, a 300ml Wildo Fold A Cup, plus an ultralight lid for the latter (a Pringles lid).  I keep the pot in a Toaks pot cosy, I replaced the lid with an ultralight Titanium version (5g) and keep it all in a HikeLight real tree camo DCF, drawstring pot storage bag (3.4g). A total weight (with a completely full 100g gas canister) of 377g (13.2oz).


    #3844361
    Casey Bowden
    BPL Member

    @clbowden

    Locale: Berkeley Hills

    Great setup Alf. Could you please share some photos?

    #3844362
    Matthew / BPL
    Moderator

    @matthewkphx

    That looks like a very nice setup. Super-clean execution!

    #3848160
    Casey Bowden
    BPL Member

    @clbowden

    Locale: Berkeley Hills

    It’s been cold and wet here so I made a 5-minute video showing how I modified the Fire Maple Petrel Quick Boil Pro (QBP) heat exchanger pot to work with a BRS stove. Video includes side by side shots of the QBP and Toaks titanium pot, both with and without wind, that shows the impact of wind on the flame in a way that photos can not. Video also shows how a cold soak jar can nest inside the QBP, so you can eat and have a hot drink at the same time with no extra bulk. Enjoy and let me know if you have questions.

    https://youtu.be/RkGspcaZcMs?si=uyRooMOwgaYsrvss

    #3848161
    Jon Fong / Flat Cat Gear
    BPL Member

    @jonfong

    Locale: FLAT CAT GEAR

    Video looks great and very detailed. Any data on fuel consumption in the wind?  Cool stuff.  My 2 cents.

    #3848271
    Casey Bowden
    BPL Member

    @clbowden

    Locale: Berkeley Hills

    Working on it Jon. Should have something later today or tomorrow.

    #3848308
    Casey Bowden
    BPL Member

    @clbowden

    Locale: Berkeley Hills

    Fuel (cartridge butane) used to raise temperature of 500 g (mL) of water from 68 to 212 F.

    5.0 grams, no wind, std dev = 0.05 g
    7.0 grams, with wind, std dev = 0.4 g

    Each result is based on averaging six (6) trials. Wind speed is not known but can be seen in the video above. Pot was cooled with tap water between trials. No lid was used. The house was 66 and 67 F respectively and 727 feet above sea level. Sorry for mixing units.

    #3848311
    Jerry Adams
    BPL Member

    @retiredjerry

    Locale: Oregon and Washington

    Not that it matters to a stove user, but interesting the std dev is so much bigger in the wind

    #3848315
    Jon Fong / Flat Cat Gear
    BPL Member

    @jonfong

    Locale: FLAT CAT GEAR

    A bigger STD indicates higher variability and is exactly what you would expect as the winds pick. Casey – As a reference, a BIC lighter is good to about 2 mph. A BRS with aa regular pot has trouble boiling water at about 3-4 mph. That might help to bracket the actual wind speed. Good stuff.

    #3848385
    Casey Bowden
    BPL Member

    @clbowden

    Locale: Berkeley Hills

    Made a DIY anemometer. Counted 30 revolutions in 60 seconds. Radius is 5″ so this converts to 0.9 mph wind. Obviously way low, but I’m having fun.

    diy

    For reference, here are a couple screen shots from the video showing the effect of the fan on the BRS with a standard pot.

    #3848389
    Jon Fong / Flat Cat Gear
    BPL Member

    @jonfong

    Locale: FLAT CAT GEAR

    Glad that you are having fun! FYI – a cheap anemometer cost $20 – $30.

    #3848390
    Matthew / BPL
    Moderator

    @matthewkphx

    Wow I love the calculation behind the DIY anemometer!

    #3848445
    Adrian Griffin
    BPL Member

    @desolationman

    Locale: Sacramento

    Going back to lightweight lids, here’s one I made out of pie-dish aluminum foil for my Evernew ECA 532 600ml. I made it 2mm smaller than the internal diameter of the pot rim, so it’ll fit under the pot in my stuff bag without getting dinged up. The tabs around the edge hold it in place. Tabs and handle are made from foil tape as used for heating and ac ducts.

    Weight is 2.9g. Scaling it down from 126mm to 3 1/8 inches (79mm) would give 1.1g.

    BTW, don’t put it in the dishwasher. The abrasive dishwasher detergent oxidizes the aluminum, turning it into onionskin.

    Foil lid

Viewing 20 posts - 1 through 20 (of 20 total)
  • You must be logged in to reply to this topic.
Forum Posting

A Membership is required to post in the forums. Login or become a member to post in the member forums!

Loading...