Topic
Down the Evazote rabbit hole and other load hauler pack questions
Forum Posting
A Membership is required to post in the forums. Login or become a member to post in the member forums!
Home › Forums › Gear Forums › Make Your Own Gear › Down the Evazote rabbit hole and other load hauler pack questions
- This topic has 113 replies, 17 voices, and was last updated 3 years ago by
 Greg Pehrson.
-
AuthorPosts
-
Jun 7, 2021 at 6:37 am #3717516
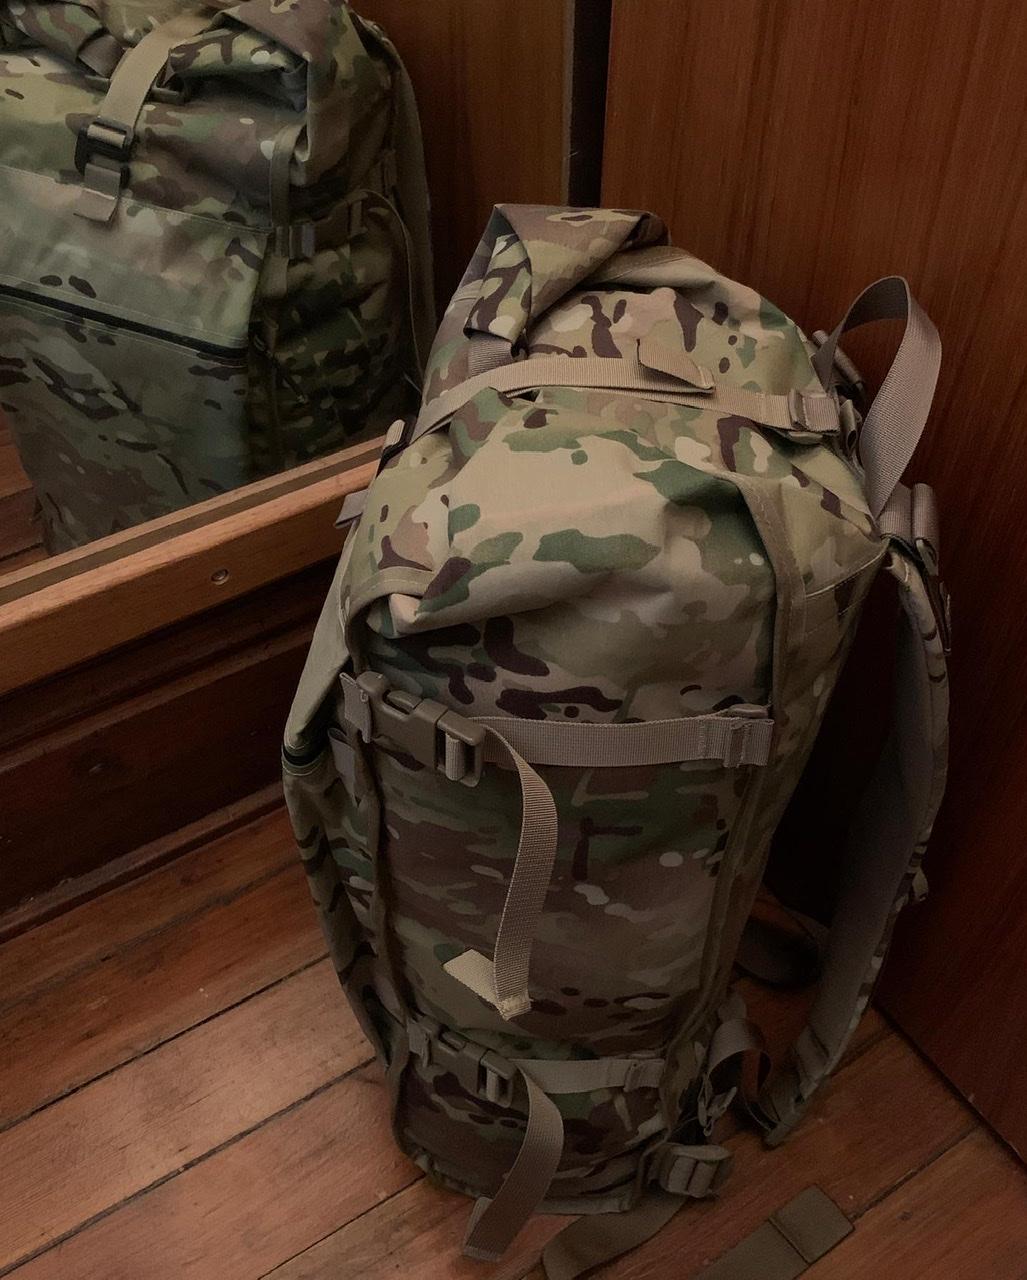
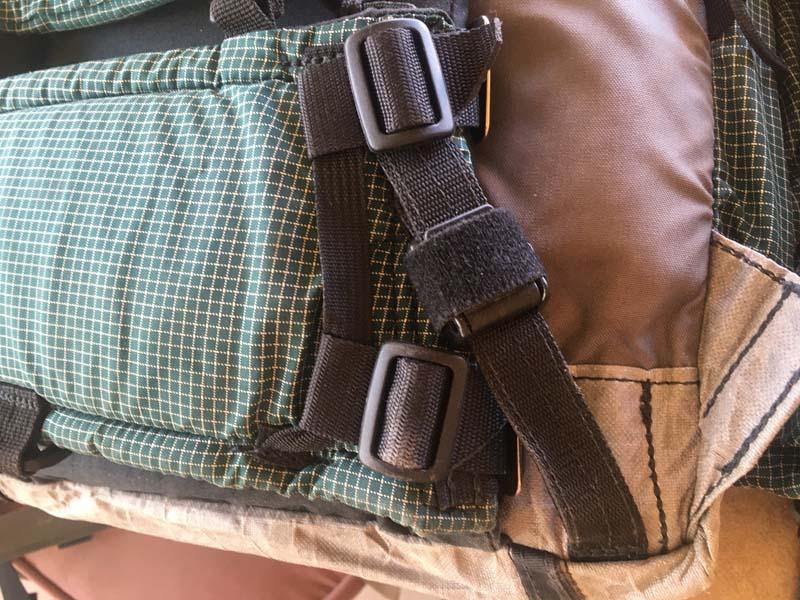
No glue on this belt! It was messy and wasteful to little gain; besides only the X line of fabrics from Xpac bonded well, and I’m over Xpac for now. I believe the long term ‘waterproof’ pack is a myth so I have no need for a laminate (the LS07 on this pack is mainly to use up a remnant).
This belt is just two layers of foam. A thin dense part for a little structure and fatter, softer stuff for cush.
The Velcro is also there to minimize chafe from the belt grinding against the pack body with impurities in between. Seen alarming deterioration on another pack from these tiny, repetitive movements.
Jun 7, 2021 at 8:57 am #3717533Could you tell us what foam exactly you’re using, as well as the body-facing fabric on the ‘wings’? I think its like a durastrech or similar. And if you have any opinions about these choices or what direction you’d head in to improve it?
You also mentioned that this pack isn’t for super heavy loads but more medium. Why is that, what about this design prevents you from taking ~50lbs? It seems to have all the components, as I’m sure you’ve got 7075 aluminum and some nice padding and load lifters.
That makes sense to prevent repetitive abrasion. I you tried spectra or other similar fabrics? McHale uses a huge array of these hyper durable woven face fabrics. Clio Gear has some neat new fabrics as well.
Jun 7, 2021 at 9:03 am #3717534Another idea I just had for abrasion resistance is just having sacrificial layers. Many mention ‘doubled up’ bottoms, etc, but based on your testing you can identify specific areas and place strategic Velcro, just like you’ve done behind the belt, then just have cordura or cotton duck or even something cheap and lighter weight, or whatever, that mates with the Velcro and is easily replaceable. Think of that nice cordura bottom with the 2 darts, you could basically duplicate that bottom and it could just attach externally with loop locs or a few patches of Velcro, doesn’t need to be perfect, in fact being a bit lose would prevent some of the abrasion. You could have lots of drain holes too.
Jun 7, 2021 at 1:20 pm #3717564Sacrificial layers seem like a sound idea for a pack that will be subjected a lot of friction. You wouldn’t have to overbuild so much and could keep it a bit lighter.
But I wonder if it’s something you could sell to the commercial market – even to the kind of experts that Nunatak supply? The great thing about a MYOG project is that can experiment with ideas that would be too niche or off-the-wall commercially.
Though maybe this could work – a lot of people have bought into the idea that you buy a tent with a lightweight floor and protect it with a sacrificial footprint. If you framed it like that, people might understand the potential benefits.
Jun 7, 2021 at 2:54 pm #3717576Jan – always a treat when you join a thread. Your attention to detail is another level, and we all have so much to learn from you!
With that prototype pack in your last post, can you confirm that there’s no horizontal stay across the bottom? It doesn’t look as if there is.
If I’m right – how does it carry without the stay? What would you rate as the max comfortable load?
Also, I see your point about the velcro. But do you find that you lose some of the freedom of movement offered by a hanging belt? It begins to look quite similar in function to the style of belt that’s attached by velcro behind a lumber pad.
I do like the look of the bottom with the dart. Not sure I’ve seen that before – and doesn’t look too intimidating for a newbie like me to sew. Or maybe I’m delusional?
Jun 7, 2021 at 4:56 pm #3717591Thomas: I do not want to publicly describe the exact build and materials of the hipbelt, as it is a unique design also integral to the Bears Ears pack. PM for info.
Thomas: I call it ‘medium loads’ because this latest iteration has never been used, as mentioned. It is, however, ridiculously similar to an older version which carried well to 40 lbs. I just finished it last night and have a trip coming up in the Uintahs, so we will see.
Geoff: No horizontal stay. Should be good. Another goose chase; adds nothing imo.
Geoff: You’re right, the simple act of adding Velcro to the belt tempts a comparison with the regular type. The main difference is that this one takes the weight directly off the ends of the stays, and applies it to a one piece belt of some structure.
Not even sure the floating belt idea adds much to my personal comfort, and/or allow better movement on difficult terrain. There are specific use cases where the floater is essential (the unique load pattern of the Bears Ears pack must have a loose connection from belt to pack to be comfy), but other than that I’m open to hybrids, so to speak.
Geoff: The single bottom sheet is incredibly easy to sew, but pretty difficult to draw up.
Jun 7, 2021 at 5:44 pm #3717607Good luck with testing that new pack out there, it looks like it will preform great. Iterating on my own packs with a 50lb load walking around my neighborhood during the lock downs I sometimes thought “Is this version better, or am I just getting use to the discomfort?”
My desire to use the full wrap, hanging hip belt is simply because of McHale, SeekOutside and others implying that it is a major part of heavy load carrying with lightweight packs.
The majority of McHale packs are not ‘Critical Mass’ style hanging hip belts, but have a built in lumbar pad and removable wings. These wings do not look comfortable or sophisticated in shape…but apparently are wonderful. These style hip belts are not meant to carry crazy loads but can still do a lot (apparently). He still uses a direct to hipbelt frame connection as shown here:
http://popupbackpacker.com/wp-content/uploads/2020/07/hip-belt-stabilizer_2-2.jpg
http://popupbackpacker.com/wp-content/uploads/2020/07/lbp-hip-stabilzer_2.jpg

From: http://popupbackpacker.com/mchale-backpacks-long-term-review-bump-32-and-little-big-pack-36/
Jun 7, 2021 at 6:08 pm #3717609Jan – many thanks for the info. I suspect you’ve nailed that belt attachment – I may well be “borrowing” your ideas!
Thomas – so far as I understand it, the hip-belt connection on the smaller McHales that don’t use the Critical Mass is through the so called stabiliser straps at the side. They aren’t meant for adjustment – just for attaching the belt to the stays.
I suspect you’ll know that, but just to make it clear for anyone else.
As you’re much farther down this road than I am, from your experience do you have any ideas on the pros and cons of McHale’s attachment method vs Jan’s method above? The McHale method seems to put the weight farther up the strap, but I don’t really understand the rationale for that?
Jun 7, 2021 at 9:10 pm #3717633I’m pretty clear about how the webbing goes from the stays to the belt, but the stabilizers / other straps seem weird and unnecessary on that McHale pack.
The further you put it up the belt the more collapse/rotation you’re going to get and therefore the stiffer vertically the belt needs to be. McHale doesn’t have this issue because the attachment is immediately beside where it mounts to the lumbar pad. McHale’s system here just seems messy and complex, with the Critical Mass and Jan’s systems being theoretically better. I mean, if the CM belt allows you to take much more weight, why not put onto the other bags too. Not for the ultralight bags, but if you’re carrying 30, 40, etc.
The SWD bag that has ladder locks attached to webbing further up the belt are for this same reason. Because the belt seems to be attached to the stays ~1.5 inches above the bottom.
Jun 8, 2021 at 9:57 am #3717740These wings do not look comfortable or sophisticated in shape…but apparently are wonderful
Mchale says the critical mass/alpineer belt is the ” the result of studying how active rectangular panels wrap around the side of the pelvis.” http://www.mchalepacks.com/sarc/03.htm I think Mchale is using quadrilaterals in his smaller packs because that is the simplest polygon with the degrees of freedom he needs to adjust for each user. Also do the wings attach to each other or just the pack? I’m still surprised they are removable; I’m thinking they function more like a full wrap than pictures or descriptions let on…
My take away from Mchale’s website (mainly these two pages http://www.mchalepacks.com/sarc/05.htm and http://www.mchalepacks.com/sarc/03.htm) is that the critical mass hipbelt + lumbar system is about achieving what seetoutside calls an ‘avoidance frame.’ At lower weights the frame on your lumbar is comfortable and the hipbelt doesn’t pull into the stomach; so a full wrap with a separate lumbar system doesn’t get you anymore comfort and you don’t need the park n ride handles to counterbalance the weight on the stomach. The merit of the full wrap belt is cited as load distribution via sheer loading the bottom of the belt; I read that as saying a conforming full wrap belt slips less than wings. I think Mchale might say the critical mass setup is the more messy/complex one…
Concerning the EV50, I just received a seekoutside flight one (which might not use the same foams as the revolution framed packs?) and both its hipbelt and shoulder straps are far more plush and flexible than the shoulder straps in the evergood mqd24. If seekoutside knows cushion this flimsy is good to 50-60lb (and they are right), then the ev50 is potentially perfect for your hipbelt. The flight one hipbelt has medium to thick plush mesh and seemingly just a thin layer of denser foam behind that, then the outer fabric and pockets. I wonder how much the resistance to flexion in the mqd24 shoulder straps is the foam vs the differential cut in the 420 denier nylon…
Jun 8, 2021 at 4:04 pm #3717824I think McHale achieves a good fit and decent load carry in the packs with the removable hip belt wings because of the direct connection to the stays, good foam, friction from the cordura and most importantly, lots of prototyping, trial and error, etc to get the angles, fit, etc perfect.
Yeah they are definitely removable, they’re just attached with two tri glides on 1” webbing. Which I guess adds some adjustability to the length.
My understanding of what the call ‘avoidance frames’ is just the frame does not perfectly conform to the shape of your back, thus it needs air space, padding, etc to be comfortable. I think most packs these days do a mixture of avoidance and non-avoidance(by having some curve or shape). I think a full on avoidance frame would be old school solid vertical pack frames/boards.
I’ve read that lumbar pads are very important for some body types, or even most body types but I have mixed feelings about the design. I have a removable one that mounts onto a full wrap belt, like seek outside, on my most recent design. The most extreme lumbar pads create a huge void in the corners meaning the load / friction isn’t distributed in that area.
Thanks for the observations about your Flight One. I wonder if they use the same foam, etc as their heavier weight packs.
Jun 8, 2021 at 5:05 pm #3717844From memory, I think McHale is saying that for the smaller packs:
1) The stays go down to each corner.
2) The lumbar pad is wide, but not quite as wide as the stays. This keeps it closer to the body of the pack, and less rigid, I guess, because he advises packing your down at the bottom of the main compartment behind the belt and there’s no metal behind your back.
3) The full-wrap belt slides behind the lumbar pad and is locked to the bottom of the stays using the two stabiliser-type straps from the side of the belt to the bottom of the stay. These are only to lock on the belt – they aren’t designed to be adjusted in use. I don’t think he’s using velcro or any other fastening behind the lumbar pad – but you may know better. Having part of the belt in a tube like that will also help give it structure, I guess? Plus it also deals with Jan’s issue of rubbing and excessive wear.
Given how smart and experienced that man is, I’d be very surprised if there’s not a strong rationale for this design – he’s be experimenting since the ’70s… But compared to Jan’s solution it does look rather heavily engineered. I wonder if any benefit is worth the extra weight and complexity. Plus I don’t really get on with any lumbar-pad packs I’ve tried on – though his is MUCH better designed than most of the commercial ones, which I find are far too narrow.
The biggest plus I can think of for the Flight-style velcro/lumbar-pad style belt is that you can adjust the length and angle. Dan has such a precise approach to fitting that he can tailor the belt to your body-shape. We’re not going to get anywhere near to this level of expertise so an adjustable belt has some attractions. You do get something very close to a full-wrap belt, and using Dan’s strap idea you can get the benefits of widely spaced stays and still anchor the belt to the bottom.
Just thinking aloud… Time to get some Tyvek and some tape and start playing with prototypes, I think. I’ve been dithering about this too long.
Jun 9, 2021 at 9:52 am #3717902Well I will throw in a few opinions here. Let me first say that I have been carrying packs with hipbelts on my own making for about 40 years. Years ago I came to the conclusion that thickness is not very important compared to width of belt. The foam just needs to be thick enough to maintain the width of the belt without rolling (Dan Mchale’s double buckle idea helps with this). I have an old Trailwise frame with belt and straps and packbag of my own make. I’ve carried up to about 65 lbs in that comfortably, and that belt is ½” foam. My ski touring/winter pack has a belt with foam from a “Mt. Washington” pad – convoluted EVA I believe, can’t recall who made those but they were very popular when they were still being made. That foam is about ¾ on the high points and ¼ on the low points. The typical trip starts with around 40 lbs, but often I’ve had to carry skis and boots on top of that for part of the first day to reach the snow, making a 50 lb load. My summer pack belt has been ¼” FY20 from OWF, have carried up to about the low 30’s in that and the ¼” foam is still good. Personally I don’t think going beyond ½” foam gains anything at all. I used to have a pack with ½” closed cell plus 1” reticulated fiber for extra cush and breathability, but comparing that to a simple belt with just closed cell, I find it as not actually more comfortable – if anything it is less, as the soft foam just moves around more unless it is so compressed that it is effectively just as firm as the closed cell.
As to recovery and durability, I would confidently use something like the FY20 from OWF. I have a pack I call my training pack that I use on local walks to keep in shape. Typically I have about 25 lbs in it, and it gets used a couple days a week. In three years, no change at all in the 3/8 FY20 foam that I used in the hipbelt. I think if it were for a thru-hike, and I expected to use the pack every day for several months straight so that the foam had no chance to recover, then I might be worried about it and try to get some genuine Evazote. But for a “load hauler” , I am guessing it isn’t going to get use daily for months on end.
As to fabrics, really light cordura has worked great for me – 160d and 330d. I look for it uncoated and I have on some packs punched holes in the foam so that some breathability can be achieved through the belt. I tried the 3d mesh on the belt for my training pack, since weight savings were not important there, but I don’t feel any benefit from the 3d mesh and it is heavier than the light cordura, so I will stick with the cordura for future packs. It grips nicely and I can’t imagine wearing it out, ever.
And I don’t see any need for stiffeners of any kind, never have.
When you look at belts on manufactured packs I think it wise to keep in mind that these packs need to feel good in the store. I worked in several mountain shops when I was younger, and we would load packs up and have folks walk around the shop with them. People always liked the idea of a thick cushy belt, especially folks who had no experience carrying a pack. So it’s a nice sales feature, but I don’t think it has any utility on the trail. People look at two packs in the store, and the one with the cushier belt seems like it must be better – so naturally manufactures compete for the cushiest belt, whether it has a function or not.
Jun 9, 2021 at 9:56 am #3717907Paul,
Thanks for the years of experience with different packs and foam, appreciated!
Dave C has stated several times that he also thinks thinner foam can be more comfortable when done correctly.
McHale uses 500d cordura as the inner surface of his shoulder/hip belt. Dave C did extensive testing and found that the cordura causes more irritation on his shoulders than inverted 3D mesh, but I think both are good options. One thing the 3D mesh does is provide some soft cushioning that harder CCF may not.
Geoff,
You should definitely read this article, or at least look at the pictures as it really shows almost every aspect of a couple of McHale Packs.
http://popupbackpacker.com/mchale-backpacks-long-term-review-bump-32-and-little-big-pack-36/
Not Critical Mass packs, but good none the less. It shows exactly how his stays are inserted(wider at the bottom, tapering to the load lifters. The CM version does have a bottom horizontal stay which he bolts a full wrap hip belt to just like that ‘Big Ugly’ pack. On his regular packs he shows that the belt does not go behind the lumber pad but has separate pieces that attach with triglides. There is webbing attached to the stays which terminate beside his built in lumber pad.Here is a BPL member’s trip album showing his Critical Mass McHale pack. You have to scroll past lots of photos, but he has some decent close ups showing the completely different belt style.
https://tipiwalter.smugmug.com/Backpack-2018-Trips-188-/20-Days-with-a-New-McHale-Pack/i-kPWxCb9
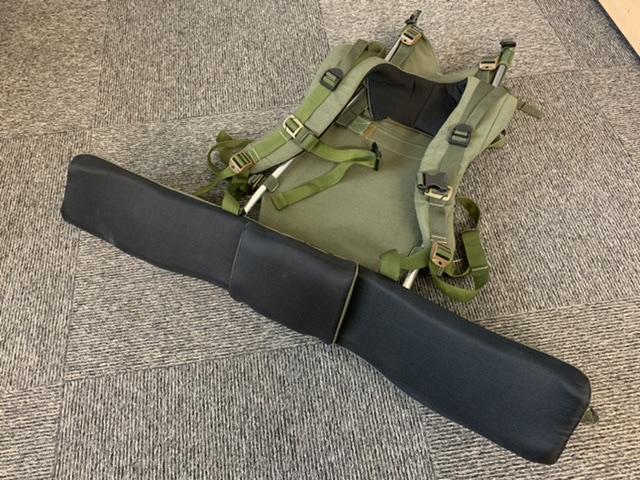
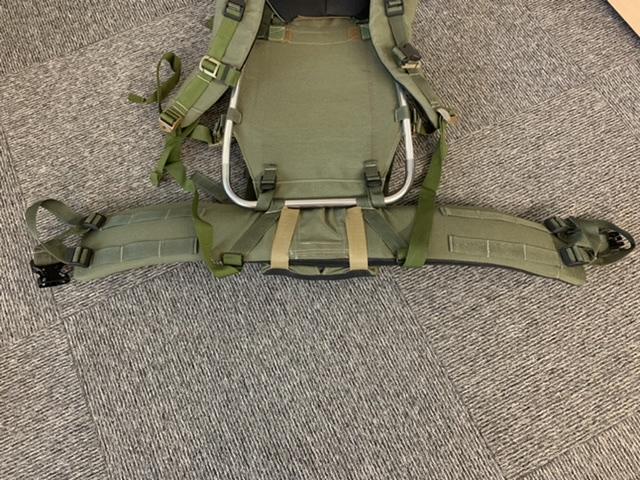
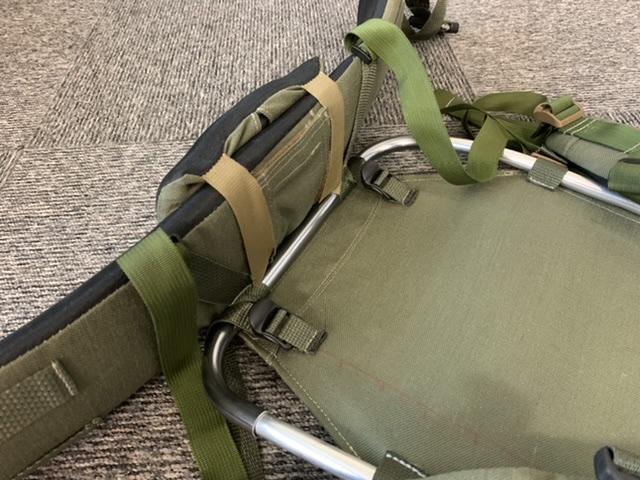
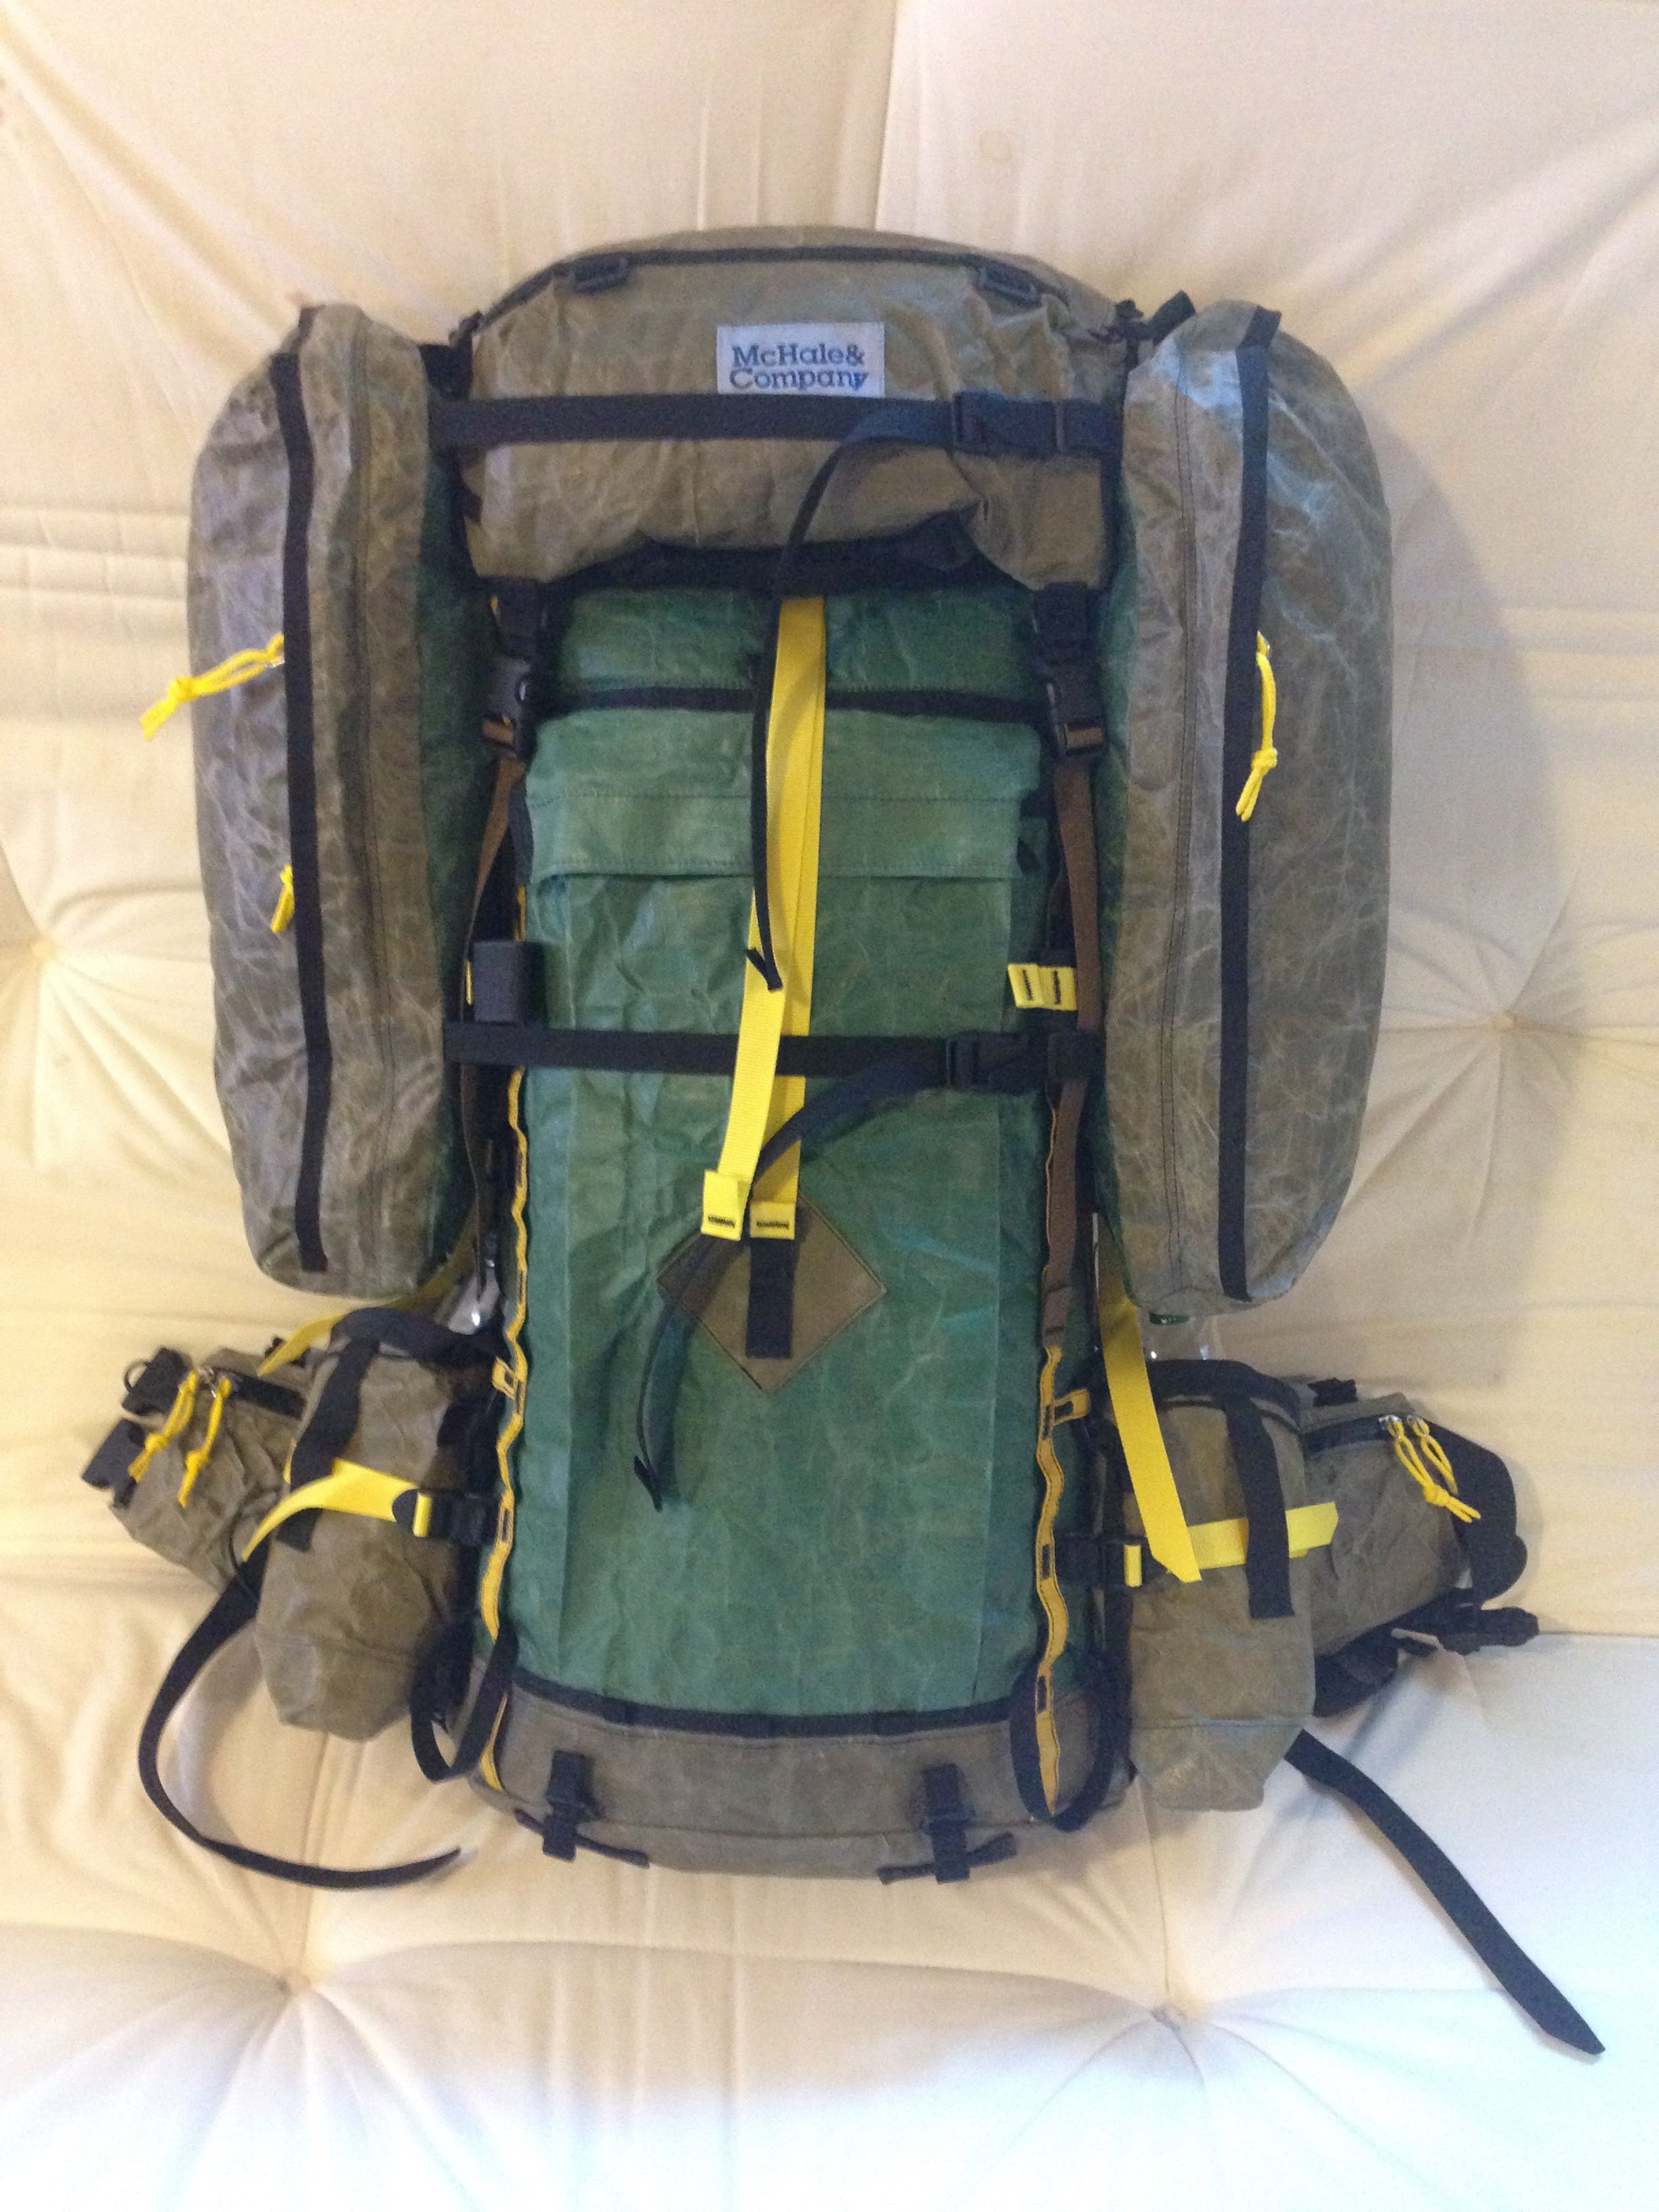
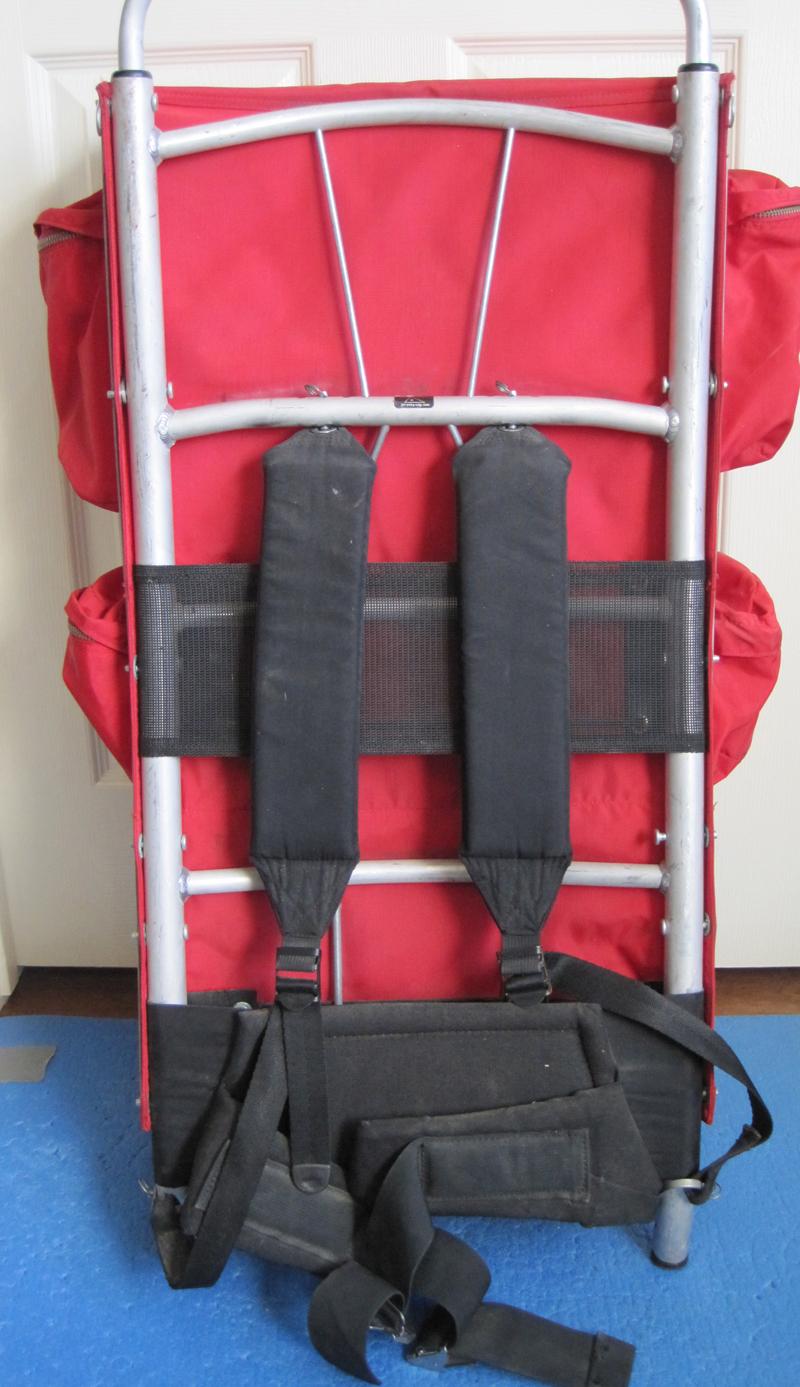
Here are some photos of my current prototype, kind of a Seek Outside clone now but it didn’t start as one. I am not one to post prototypes online as I am a bit of a perfectionist, so the poor quality stitching, corner cutting, mismatch hardware and webbing kind of bothers me. This 1000d cordura and polyester webbing is also something I won’t use on a final piece as I hate it, especially the low quality dark green polyester webbing.
This one has been seam ripped and re-sewn about 6 times. I started with two aluminum stays similar to Jan’s pack but could not find 7075 aluminum in my area so I scratched that idea as the 6061 is not stiff enough. (I have since found 7075 online and ordered but but haven’t gotten a chance to test it yet) This is 1/4” 6061 tubing, with 7075 tubing for the bend at the bottom(its part of a camping stool from AliExpress) The belt is dual density with a very hard open cell 1/2” foam and a very soft 3/8” CCF. The CCF won’t sit flat against the other foam and its upper edges will curl down after using it, but this doesn’t affect comfort too much.
Here you can see that the hipbelt has webbing loops sewn on the bottom corners that the aluminum tube goes through. This is not ideal as it causes the whole belt to rotate and deform. This webbing could hang from the bottom seam to prevent this, however you will need a taller frame and it may rub when down climbing.
The removable lumbar pad Velcro’s on and also isn’t great as it slides upwards about an inch when in use, further decreasing the overall frame height. This is almost exactly how seek outside makes their lumbar pads. The black ladder locks are just to secure the pack fabric to the frame and don’t attach to the belt.
Jun 9, 2021 at 3:58 pm #3717960Paul – the voice of experience. Extremely useful, and thanks for posting!
You’re certainly right about the longevity of Cordura on the belt – I have a Lowe technical pack I bought in the ’70s that’s still going strong. I’ve used it for literally thousands of walks, and the fabric looks like new. There’s not even any wear on the bottom seams, which have been plonked on the ground countless times. It grips just fine, and I prefer it to the mesh on my other pack.
Thomas –
If that prototype is your rough and ready work I’m keen to see the finished article, because it looks pretty slick to me! You’re clearly very skilled.
I think you’re right – I misspoke about Nick’s article, which I last read some time ago. It’s a bit frustrating, as he gives such detail on pretty much everything else, but he’s somewhat vague about what’s going on with the interface between the belt and the bag and there doesn’t seem to be a photo of the detached belt anywhere on the web.
For some reason my memory was that the belt was threaded through a channel behind the pad, but on re-reading Nick talks about what sounds like metal tri-glides at the edge of the lumbar pad. You can just make them out, I think, in this pic:
It’s not strictly a full-wrap belt but if it’s good enough for McHale’s Bumps and LBPs I’m sure it’s just fine for me. And attaching with a strap gives a little scope for adjusting the angle of the belt to the hip. I prefer this approach to using great slabs of heavy velcro, which feels like a bit of an ugly brute-force solution. I think my mantra will be: “When in doubt, assume that McHale is right”.
Nick at Rogue Panda kindly replied to my query about why he didn’t use a horizontal strut in his Zoro design:
As for the hip belt without the strut, I’ve tried frames both ways and found that the horizontal strut added undesired rigidity to the frame, and I could feel my hip motion changing as a result. I can’t really speak as to why it might be needed because we omitted it pretty early in the design process and never had a desire to bring it back.
So that’s McHale, Jan and Nick who all agree that it’s not needed in this class of pack. So I’m happy to take that on trust and save a wasted prototype.
Nick’s had to drop the Zoro from his range for now because it’s a complicated build and he’s fully occupied with demand for his bike gear.
Thanks for starting this thread – it’s proving priceless for a pack-building newbie like me…
Jun 9, 2021 at 4:55 pm #3717964Geoff,
Thanks for the kind words. Unfortunately I’m trying to cater to a certain image of finished quality because I sell stuff sometimes. I say this is unfortunate because I will rarely post prototypes, or half finished stuff, etc and that isn’t so good for the creative process.
Here’s my instagram with a small amount of my stuff if you’re interested. https://www.instagram.com/tbhwin/
Jan’s prototypes are beautifully crafted with construction and material choice exceeding many commercially available packs, but I tend to cut a bunch of corners, like cut off webbing with scissors rather than seam rip it, etc as I’m fiddling. I’m also using my scraps or parts that I wouldn’t use otherwise. That polypropylene webbing? That was mistakenly purchased online thinking it was nylon. Polypropylene is shit.
McHale’s Lumber pads are also tapered towards this top, this looks to give the wings a nicer conical shape which will hug the hips better than normal horizontally flat belts.
I agree about the horizontal / strut at the bottom as far as medium class packs go, but I will be replacing the tubular frame on this prototype with a Critical Mass style 3 piece 7075 aluminum frame. It will have a 12” strut bolted to 2 x 27 or 28” verticals then webbing or sleeves for it to pass through as an external frame. It will probably be similar to the “Big Ugly” pack but with less fabric covering the frame. I think I will hang the belt off the bottom with webbing and a triglide or ladder lock for testing purposes and bolting it after I’ve nailed the design. I didn’t mention this before, but this frame, hipbelt and shoulder straps are designed to move to other bags / packs kind of like what Seek Outside does.
I’m also thinking about making an ultralight, but capable pack without the strut. I’m picturing a simple 40L roll top bag with 4 x 3” webbing sleeves sewing in the bottom and top insides. Externally webbing will be sewn to these pockets for the hip belt and load lifters. So once the 2 x stays are inserted they will kind of ‘float’ inside the pack pack and create a space in front of them for a sit pad or similar. This frame system may be better done completely externally. I would then make a wide conical hitbelt, but would only have 3/8 or 1/4” foam. This would all be done in VX21 or similar. Then you could pull out the stays and the hip belt and have a nice frameless pack for a day hike.
Also, if you haven’t experimented with ‘Loop locs” as a webbing attachment system I highly recommend. I’ve started adding the webbing part (~3/4” of webbing folded 3 times and stitched in the middle) to various locations on some of my gear and then you can directly attach buckles, ladder locks or loop locs sewn to webbing. McHale extensively uses this attachment system, so it must be good.
Take a look at the below photo to see how no plastic hardware s actually mounted to the sides of this pack. This pack is also bound externally so it is easier to seam seal on the inside. Got the idea from Rogue Panda.
Jun 10, 2021 at 3:38 pm #3718056I’m afraid I’m locked out of Instagram at the moment by some weird bug on their side. Do you have any pics I could access on another venue?
I like the look of the Big Ugly design – same concept as the Critical Mass, but probably easier to build. And according to the maker, the best carry he’s achieved in years of trying…
Personally I’m designing the pack to take up to 10 days of food and elbow-season shelter & sleep gear. My base is under 10 lbs excluding pack (I really do think it’s stupid light to include your pack in the base and cut corners on carry just to get ultralight bragging rights). And 10 days of food is around 25 lbs. Add a bit of water, bear can etc and even then I’ll rarely be over 40 lbs. Typically very much less than that – 5 days between resupplies and I’ll be carrying under 25 lbs on the 1st day out. So I think a medium-class Merke style will do me fine. I’m also adding Aarn style front pockets, so most of the time 1/2 the weight will be in front – I’ll only have the full weight in the back on technical ground or when there’s a lot of windfall or other obstacles where the front pockets can be a pain. So I think the CriticalMass/Unaweep style frame would be overkill – though I’m happy to be talked out of that. I find that carrying over 40lbs is simply no fun, so tend to avoid project that involve load hauling on that scale.
So what’s your scenario for the big pack? The most common use seems to be packrafting, which I haven’t got into so far – or hunting…
I’ve never thought about external bound seams. I’m personally a bit cynical about the idea of a waterproof pack – I always use a plastic liner bag for down and clothing, so don’t know how much weight I’d give to ease of seam-sealing. How long to you find a pack like that retains it’s waterproofing in reality?
I have been giving a bit of thought to an attachment system. Again it’s hard to see past McHale, with the combination of 2x daisy-chains and some well-placed loops in the seams. I’m no fan of those mesh-net pocket thingies (I’m hard on packs), so would be using a detachable or sewn-in solid kangaroo pocket.
Guess I’m being dim, but I can’t quite follow what you’re recommending with the Loop Loc system – a pic would be appreciated. I was thinking of using basic toggles for lightness and simplicity, but am very open to better ideas.
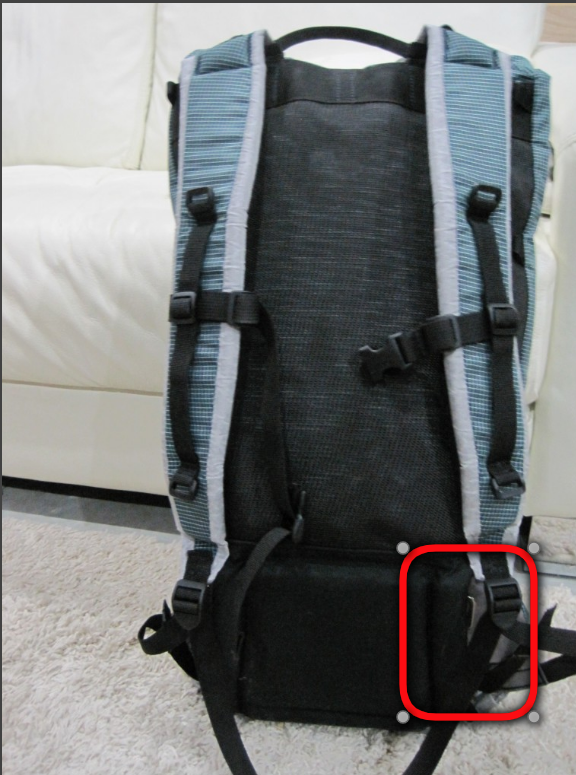
The main reason I’m building the pack is to adapt the Aarn concept to my needs. I love the front pockets 95% of the time on the trail, but they can be a royal pain when you are scrambling, bushwhacking, hitching, shopping etc. Aarn doesn’t give you any option to get them out of the way. So my big idea is to have a quick-release system so I can stow them on the sides army-style when required, a bit like this:
I need to figure out a quick, stable and reliable system to attach the pockets to the side of the pack. Losing a pocket down a cliff would be catastrophic… Any suggestions welcome!
Jun 10, 2021 at 4:52 pm #3718058Here is a link to my Reddit profile which you can see posts I’ve made in MYOG. Ive made a bunch of stuff I would never use myself, like those black backpacks on the request of customers.
https://www.reddit.com/user/Bandittheone1/posts/
Your back use case there isn’t too much different than mine in terms of weight. I certainly don’t go on trips that long, but going with friends or my wife, I’m often carrying additional items. A mountaineering trip (pre-COVID) I found because I was the most ‘ultralight’ of my group I end up carrying the rope, the tent and extra food. We don’t really do summit-sprints, more like 3-5 day trip. I think I was carrying 30-40ish lbs on this one wishing I had a sturdier suspension on my pack. One 5/6 day trip in the mountains in September with my wife last year we decided to take some fresh stuff, like fruit and avocados. I’m carrying more food and all the shared items…somehow my 10lb base weight became 40 with food and water.
I’m also interested in this from a hobby and production perspective. Putting the work in to see if I can make minimalistic, lightweight packs that can actually take a reasonable or even large amount of weight. Maybe sell some too. I think a lot of commercial designs have little science in their development…goes to show how many have such bizarre suspensions that are most often over complicated and under tested.
That waterproof pack was made of X33, X50(bottom) and it should be reasonably easy to fix holes, etc as you can just go crazy painting the inside with seam sealer. However I will say that this would be best for an occasional use pack. If you’re expecting it to last years and years with huge abuse than I totally agree that waterproofing is a bit of a fools errand. That being said, it will still be very water resistant even after a lot of abuse.
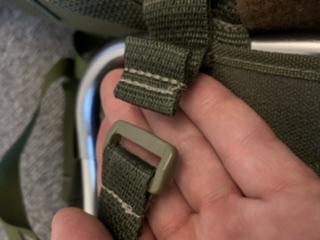
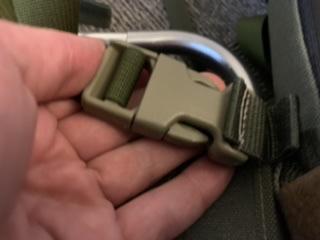
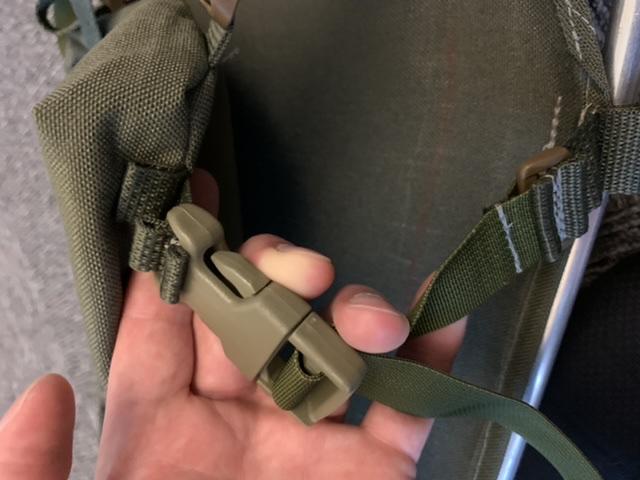
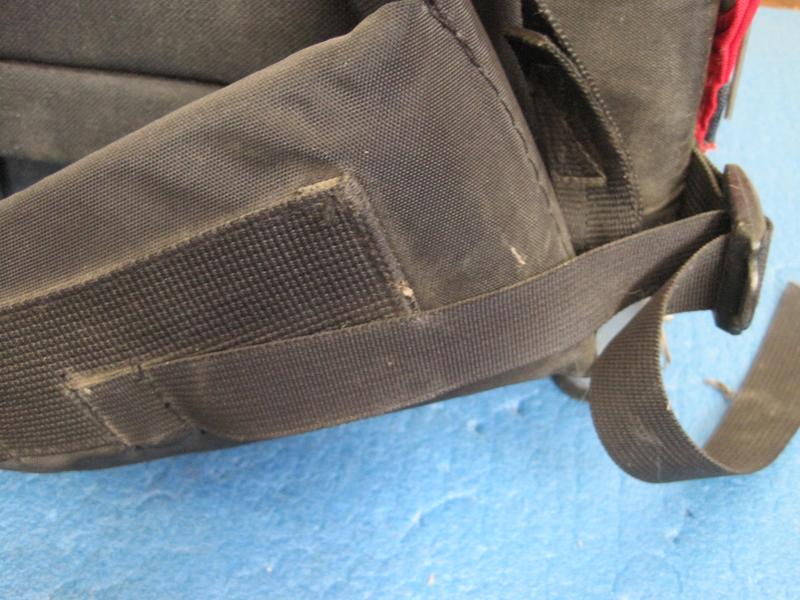
Here are a series of photos showing how I use ‘Loop Locs’. Again, if you look at McHale packs you’ll see he loves these too, but he often mounts the plastic loop on the pack, whereas I mount it to the removable parts and have the webbing all over the pack. This saves on weight and hardware.
This is disconnected:
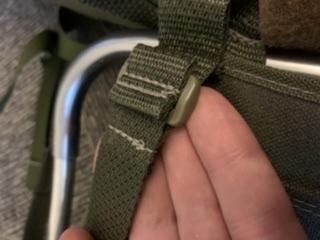
Connected:
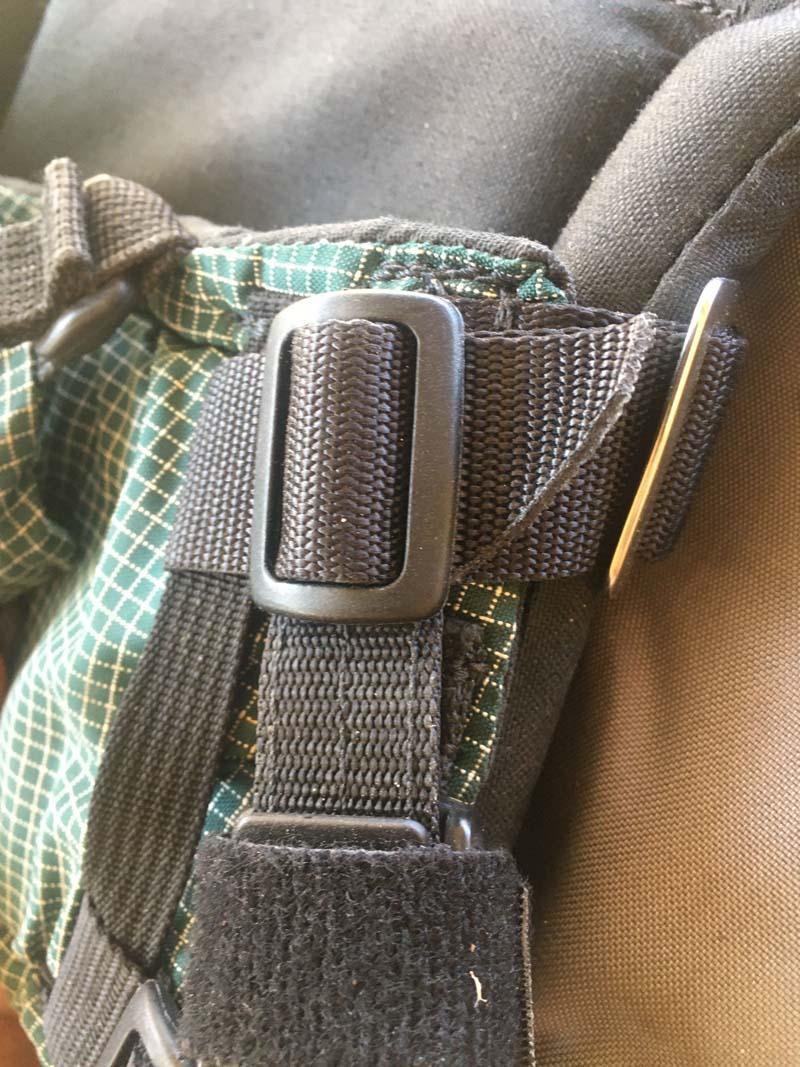
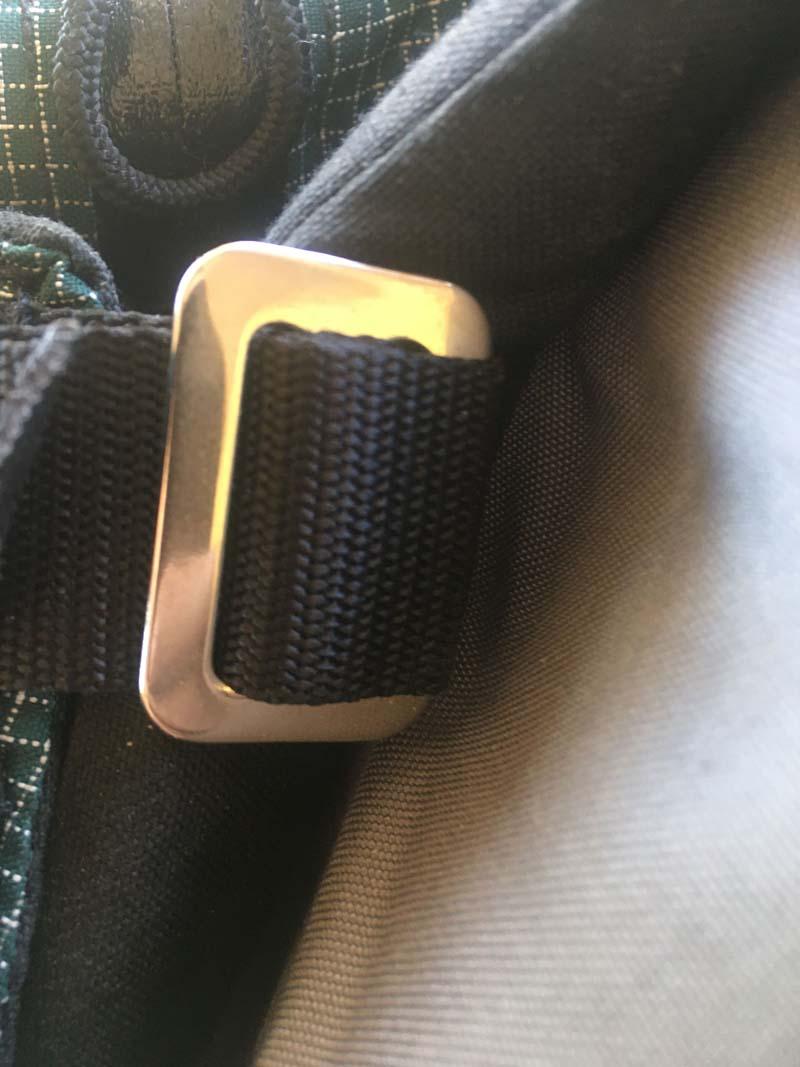
Using a duraflex buckle instead of a loop loc. Most rectangular holes on buckles, ladder locks, etc will work fine like this.
Here you can see it on both ends of a removable strap.
Before you commit to it you should test the buckles and webbing. Some buckles have too small or too wide holes and some webbing isn’t stiff enough.
I recommend you take your two long pockets and attach them together along the tall side with something like the above or just side release buckles. Then you effectively only have 4 points you’d need to connect. Your pack could have 4 compression straps you could use to attach to the two vertical pockets. This would be much simpler than attaching 2 pocket completely separately, but it would be easier to compress/prevent from flopping around.
Jun 10, 2021 at 4:57 pm #3718059Yeah the loop loc thing is crazy handy for compact connections that cannot waste space; or anything else! Thanks for the further inspirations, Thomas.
Pocket to daisy:
Jun 10, 2021 at 5:13 pm #3718064Jun 10, 2021 at 5:49 pm #3718069Jan,
No problem, that is a great use around the daisy chain, hadn’t thought of that exact method!
Nick,
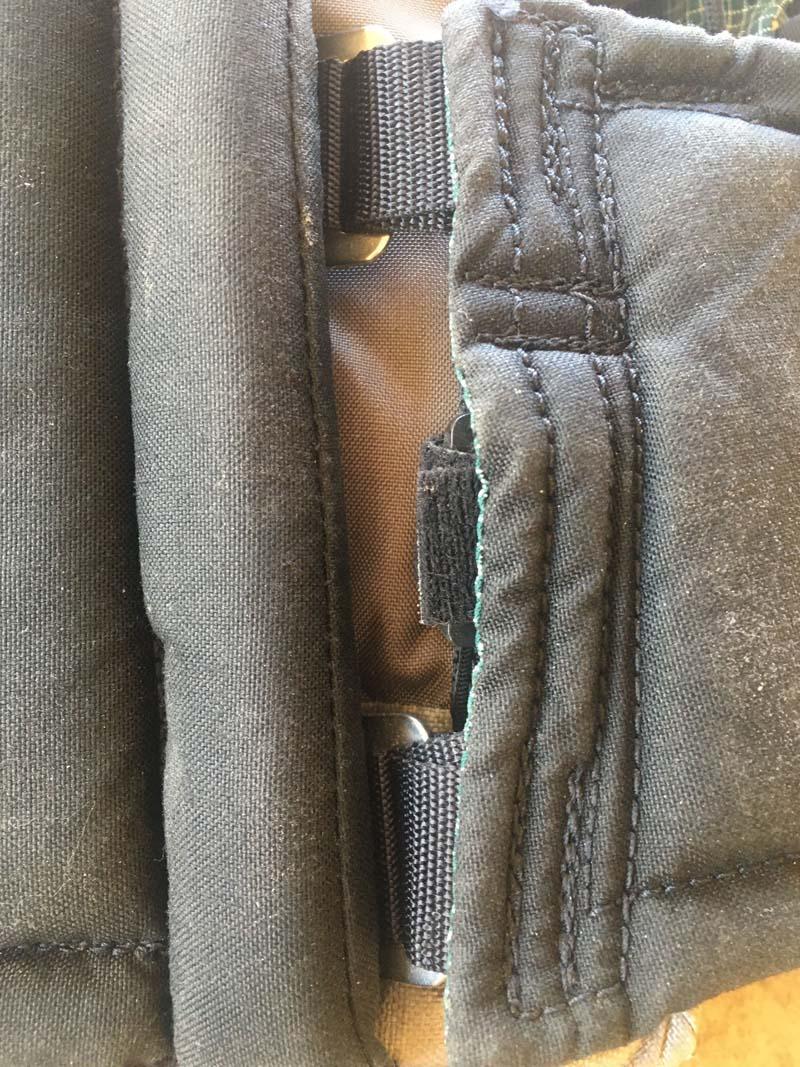
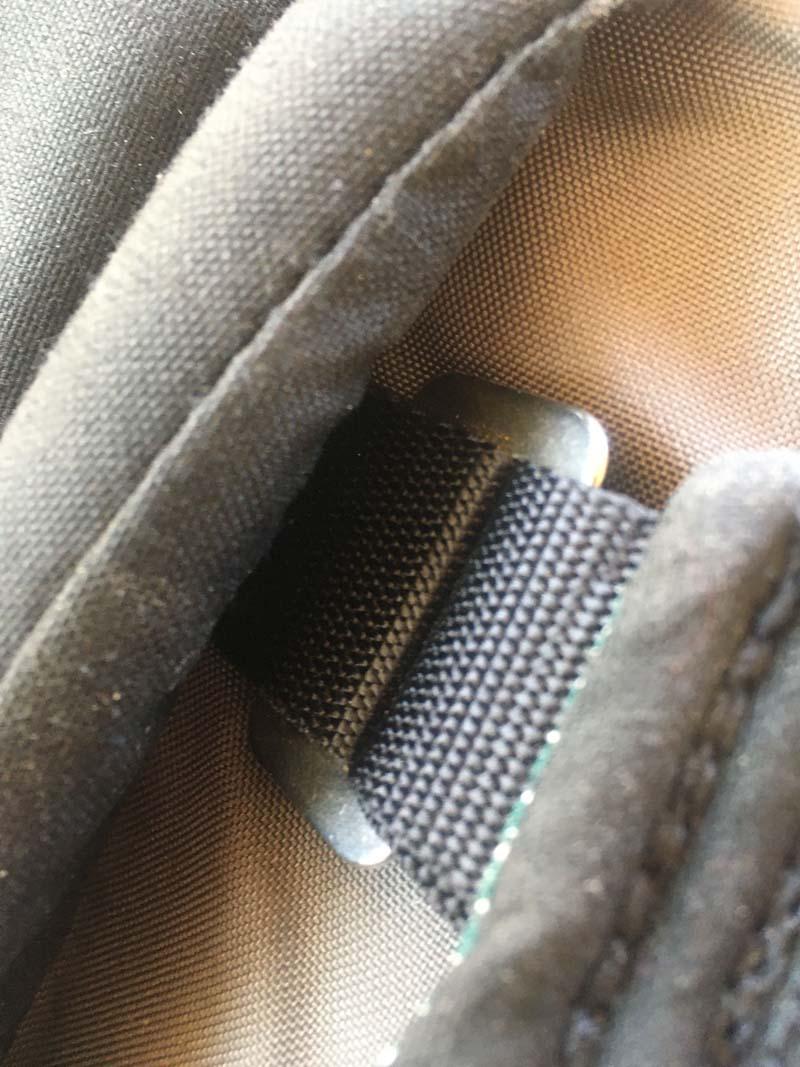
Thanks for the up close photos of the hip belt attachment. I wonder why he added the vertical daisy chain for the webbing to go around and another triglide as well…I cant picture it doing too much. But I bet he had a good reason.
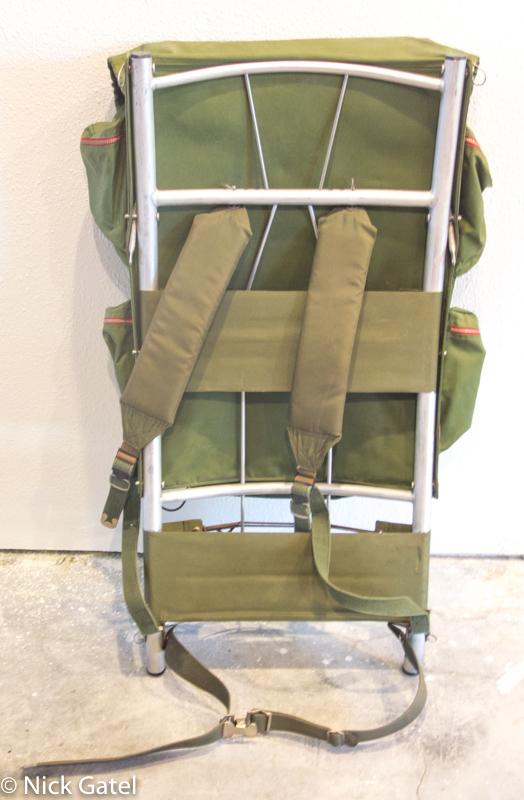
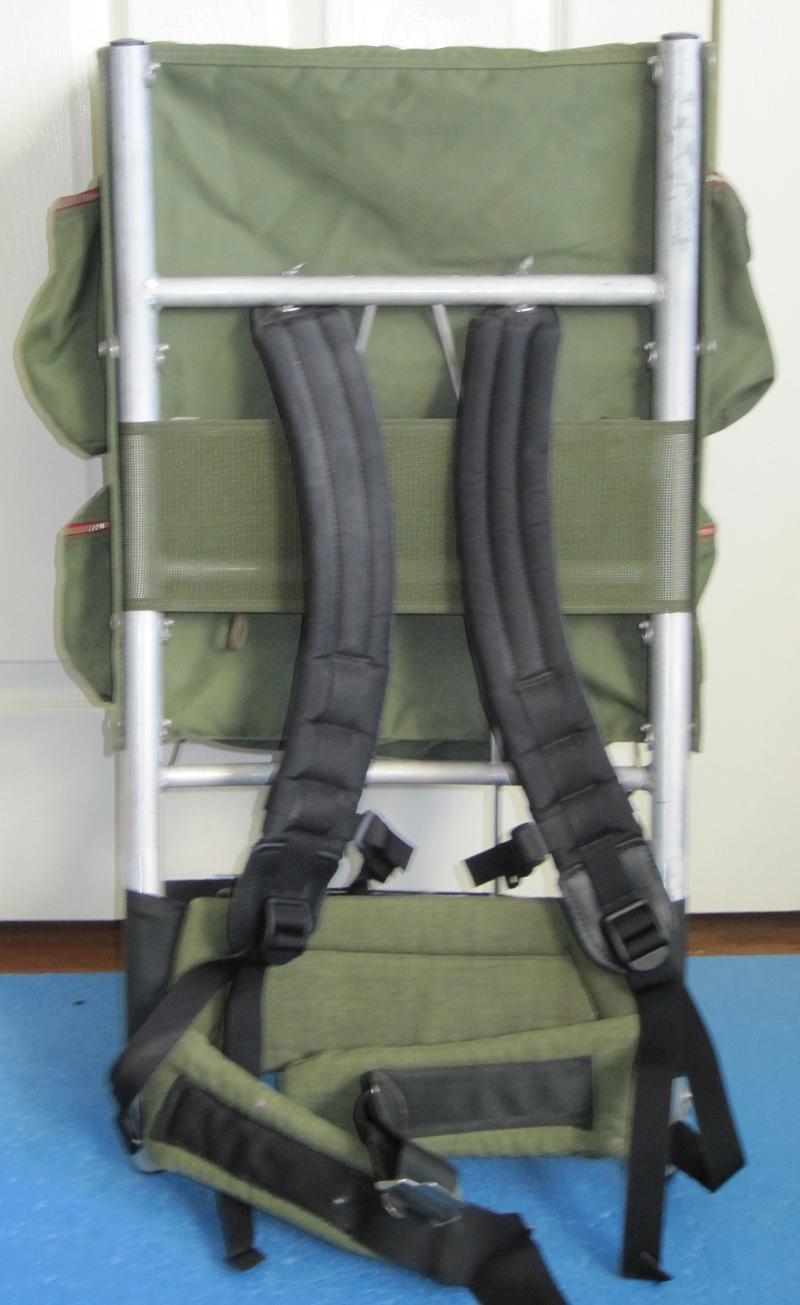
Jun 10, 2021 at 5:50 pm #3718070My Kelty A, B, and D model external frame packs came with a simple web belt.
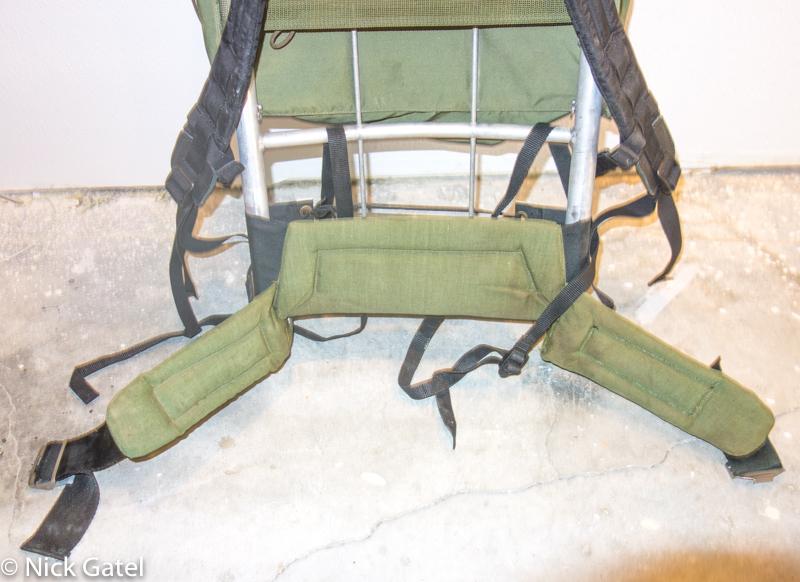
I bought my D4 in 1971 and installed an optional Kelty belt. It isn’t really a wrap-around, as the wings work separately from the lumbar pad. Note the shoulder straps are not the originals, as I replaced them about 10 years ago because the foam got brick hard.
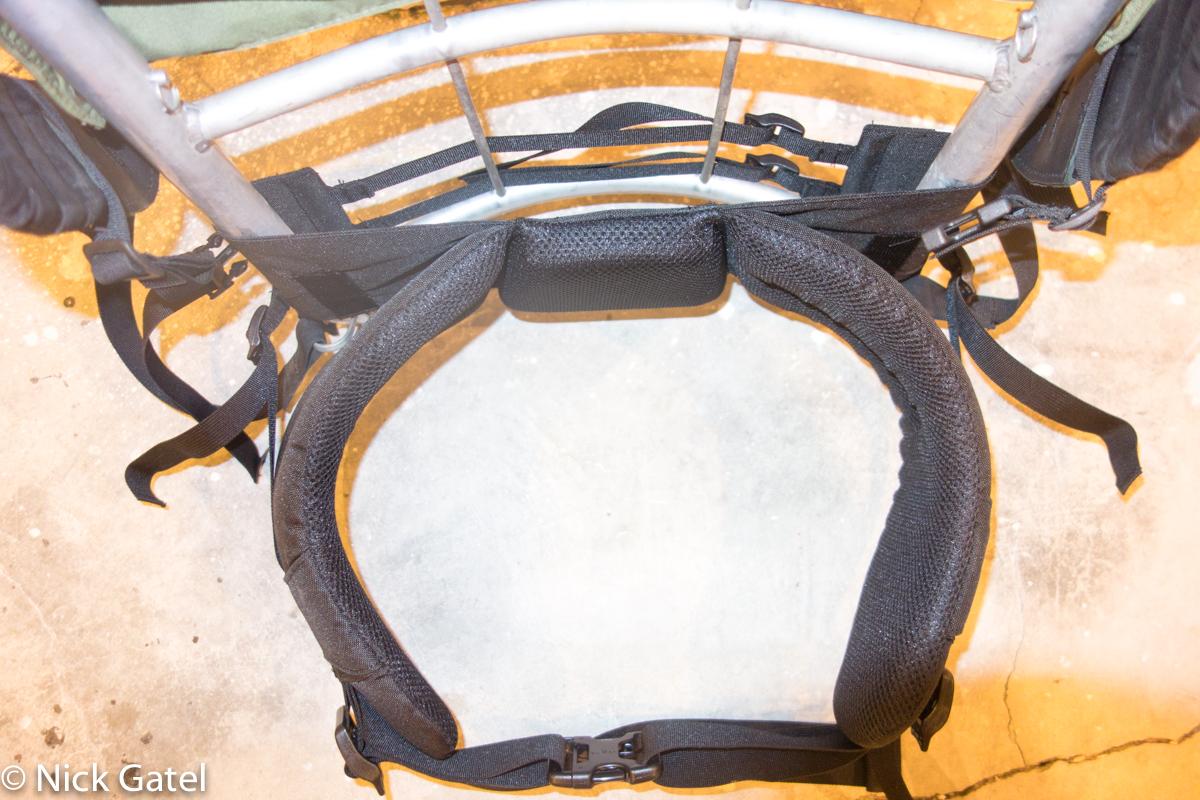
About 3 years ago, the foam in the upgraded Kelty belt also got too hard to be uncomfortable. I ordered a Trekker 65 belt, hoping it would fit, which it did. Post here:
http://popupbackpacker.com/update-your-old-kelty-external-frame-backpack/
The new wrap-around belt (below), although nice and cushy, doesn’t carry as well as the old one. Of course the old one was much more labor intensive to manufacture.
In the late 70’s I bought a Kelty Serac (I still have it) that had the nice Kelty belt(below).
In 1985 I bought an even larger Serac, the Expedition, which also has the same kind of belt. The Expedition also has a stabilizer strap (below).
All of these belts, except the newer Trekker 65, allow more hip movement somewhat independent of the pack frame.
Jun 10, 2021 at 6:00 pm #3718073Nick:
Are those bottom two pics the attachment of the waist-belt to the lumbar pad? I’m interested in the detail of what Dan is doing there…
Thomas:
Thanks for the Line Loc pics. That really is a cunning system – haven’t seen it before. I’m with you – I like the idea that any buckles or whatever are modular rather than sewn-in. You can leave them behind if you don’t need them, and replace them when they break. The only breakage on my Lowe in 50 years of continuous use is a buckle I slammed in a car door, and I’ve been too lazy to fix it. Much better if I could have just popped another one onto the pack…
Checked out your Reddit and am genuinely impressed by the quality of your work. You have real skills, both with making and design. I’m envious of that binder foot too – I’m going to check eBay for something similar for my 1930s Singer. Looks much more practical than making sleeves and trying to stuff in the foam afterwards. But I’d be concerned that it might make a hard edge that would dig in under load. Or is that not an issue?
As for turning it into a side-earner, I know a guy here in the Lake District who started it as a hobby and now has a thriving little business. He makes fairly standard packs with minor scope for customisation. We have a number of other pack-makers here too, but they are basically short-run off-the-shelf operations.
I suspect that the gap is for radical customisation on the McHale model for people who understand the value of a good carry and are willing to pay for it. Most of the cottage makers seem to specialise in those silly frameless, beltless things or in packs with pretty minimal suspensions. As Dan says in his famous rant, people really are kidding themselves that they are comfortable as soon as you are carrying a bit of food and water. Your featherlight base weight becomes fairly academic as soon as you have 8 days between resupplies. Anyone going deep into the wilderness needs something better, and they will be the people prepared to invest in their hobby.
My Lowe is frameless, and I’ve worn it for thousands of days so I know what I’m talking about. I use it on training walks precisely because it’s so inefficient, and it helps keep me in shape. Wouldn’t dream of using it for anything serious where I want to be comfortable.
http://www.mchalepacks.com/ultralight/detail/UL%20Pack%20Comments%20from%20Dan%27s%20Letter.htm
I suspect you have the design smarts to pull that off – you have a great depth of knowledge already and are obviously learning fast. It will be interesting to see where you end up with this.
Jun 10, 2021 at 6:09 pm #3718074I wonder why he added the vertical daisy chain for the webbing to go around and another triglide as well…I cant picture it doing too much.
Apparently the position and angle of the stabilizer strap is important. The daisy chain moves the hipbelt attachment points further away from the belt to lumbar point. I don’t know if moving this forward position also improves how the belt carries.
To be honest, I just use the pack. All the little details and functionality becomes clearer to me as the years pass by.
Jun 10, 2021 at 6:13 pm #3718075Are those bottom two pics the attachment of the waist-belt to the lumbar pad? I’m interested in the detail of what Dan is doing there…
Yes. Webbing goes under the lumbar pad. From what I can tell, without turning the pack inside out, the webbing doesn’t go all the way across the lumbar pad, which would seem to me to be easier to sew. I can feel the webbing under the pad is folded over and sewn, apparently.
-
AuthorPosts


- You must be logged in to reply to this topic.
Forum Posting
A Membership is required to post in the forums. Login or become a member to post in the member forums!
HAPPENING RIGHT NOW (February 11-21, 2025) - Shop Hyperlite Mountain Gear's Biggest Sale of the Year:

Our Community Posts are Moderated
Backpacking Light community posts are moderated and here to foster helpful and positive discussions about lightweight backpacking. Please be mindful of our values and boundaries and review our Community Guidelines prior to posting.
Get the Newsletter
Gear Research & Discovery Tools
- Browse our curated Gear Shop
- See the latest Gear Deals and Sales
- Our Recommendations
- Search for Gear on Sale with the Gear Finder
- Used Gear Swap
- Member Gear Reviews and BPL Gear Review Articles
- Browse by Gear Type or Brand.
