Topic

DCF 45-50 Liter Pack


Forum Posting

A Membership is required to post in the forums. Login or become a member to post in the member forums!

Home Forums Gear Forums Make Your Own Gear DCF 45-50 Liter Pack

Viewing 13 posts - 1 through 13 (of 13 total)
  • Author
    Posts
  • #3591198
    Andrew Stevens
    BPL Member

    @nuttool

    I just completed a backpack with predominantly DCF 5.0 with artwork by Ann Piersall of the Bishop Skyline printed on the fabric by Ripstopbytheroll.  I sealed most of the seams with dcf tape.  I think the one thing I did that I haven’t seen is that I made the straps that pull down the drybag closure male and female so that if I overstuff the pack, I can just close the pack with one or two rolls.  I’m also working on different belt combinations and I have moved the belt in from the sides of the pack so that it conforms better to my waist; it is non-padded with 3D mesh.  I also used the ice axe loops to use for additional shock cord and to tack the pockets onto the pack since the sides and back are all one piece.


    #3591213
    Medic16
    Spectator

    @medic16

    Pack looks great. I like the hip belt design and artwork.

    #3591309
    Doug Coe
    BPL Member

    @sierradoug

    Locale: Bay Area, CA, USA

    Cool looking pack. I think that hipbelt attachment placement makes more sense than the usual wings.

    Is that a zipper at the top of the “front”? For a pad?

    #3591344
    Andrew Stevens
    BPL Member

    @nuttool

    Hey Doug, thanks,  The zipper is for my keys, mini, etc.  I know this backpacking light, but I really need to have a zippered pocket that is accessible.  It doesn’t add all that much weight and I actually have a design where the pocket has velcro on the bottom so that I can put a DCF sleeve under it and put a pad inside and have it held down cleanly.

    The pictures aren’t the greatest, but I’ve used this design on my climbing packs and like it.  I went with a #5 zipper just so it would hold up better.  I’ve made lighter packs but I wanted this one to last.  I used 1.5 DCF.  I’m thinking about attaching a piece of lt wt. plastic to the inside of the pocket and then attaching load lifters.  I can’t decide.

    The pocket is one of the trickier things for me to do.  I have to really stop and think about the steps to incorporate the pocket into the zipper.  It’s this kind of stuff I love and hate, because if it can be tedious but it stretches your mind a little.

    #3591349
    Lester Moore
    BPL Member

    @satori

    Locale: Olympic Peninsula, WA

    Nice looking artwork on the DCF- really makes the pack look like one of a kind. For your hip belt, did you make it as a single assembly and then sew it to the back panel in one piece? Or did you make hip belt as two pieces (right and left sides) and then sew the ends into vertical seams on the bottom of the back panel, inset from the sides? I’ve mocked up both methods and each has pros and cons for ease of construction and apparent attachment strength.

    #3591353
    Andrew Stevens
    BPL Member

    @nuttool

    Hey Lester, thanks,

    I’ve actually also done both methods; I made a one piece design for the crag pack I made.  This one, I made the two wings and then bartacked them to the pack back, then I made a rectangular pad that I sewed over the top of it.  I’d probably go this route again because it seems easier except that I was designing for the first time.  Now I know how to do it.

    How is your business coming along?  I’ve resolved myself that I’m just doing an expensive hobby.  Still having fun though.

    #3591361
    Lester Moore
    BPL Member

    @satori

    Locale: Olympic Peninsula, WA

    Thanks for the detail Andrew. Have you considered sewing the right and left wings into seams on the back panel (see photo below)? This way you can attach both wings with strong flat felled seams (folded inward toward center of the back panel) and reinforce the top and bottom edges with bar tacs too. Depending on the person’s hip shape, you can angle the wings where they come off the back panel (for wider hips, as in the photos) or leave the seams vertical (for bean pole body builds with no hip bulges). The center panel can be simple single layer fabric, or two layers of fabric with foam in between for lumbar support, mimicking the feel of a full-wrap hip belt.

    The business is going slowly but well – been making about 3 packs a month, which allows me to keep from going into back order with a wait time. It’s enough work to allow me to keep making backpacks on the side, which I enjoy.

    #3591367
    Andrew Stevens
    BPL Member

    @nuttool

    So are you having complete double material from the side seam to side seam with the wings incorporated into the two spaces on either side of the lumbar pad?

    I wasn’t too worried about the strength with my design because the wings lay flat and are bar tacked with the pull being in line with the bar tacks as opposed to pulling out on the bar tacks; the bar tacks aren’t going to fail but I could see the fabric failing in certain situations if the pull is against the bar tacks.


    #3591379
    Lester Moore
    BPL Member

    @satori

    Locale: Olympic Peninsula, WA

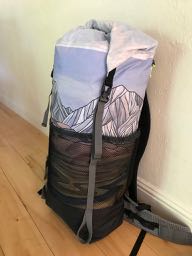
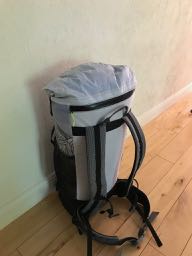
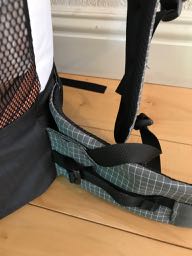
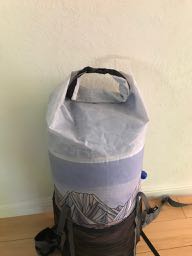
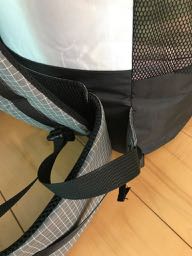
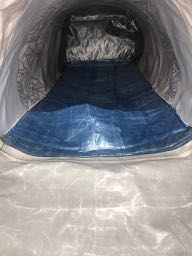
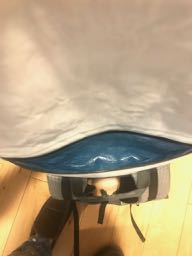
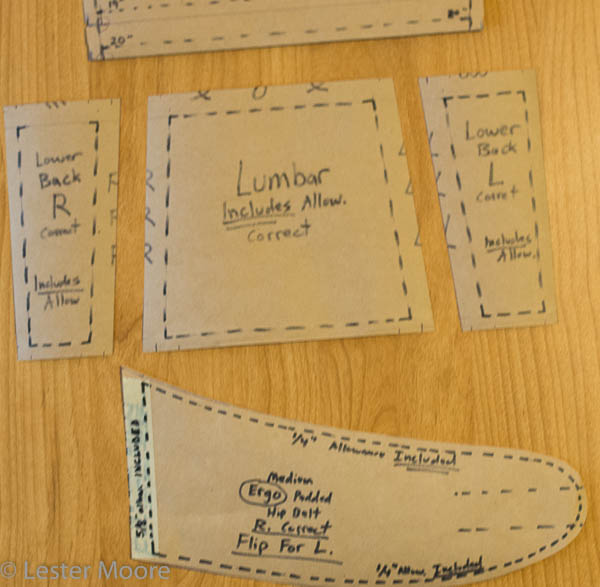
    The Lower Back L and Lower Back R panel are single layer. the Lumbar panel may be either single layer fabric, or double layer (fabric on inside and spacer mesh outside) with foam between both layers. Each hip belt wing gets sewn into the seam that attaches the appropriate Lower Back panel (R or L) to the Lumbar panel – these seams are marked “R R R” and “L L L” vertically where the patterns join. After sewing these seams with hip belt wings untrained into them, the allowances are folded flat inward and a row of top stitches added to each side (pseudo flat felled), then bar tacks are added to the back panel where the top and bottom corners of each wing attach.

    You make a good point on the pull force being in line with the bar tacks (vertical) rather than being outward. Most of the pack’s weight should result in a vertical force vector where the hip belt attaches. In theory, hip belt attachment seams should disperse this force somewhat, even though the seams are inline with the force (vertical). But since the force is vertical rather than horizontally (outward), the top stitch part of the “flat felled” seam really isn’t providing any additional force distribution – most of the stress will be on the first primary stitch line only.

    However, there is some component of force exerted outward (horizontally) as one tightens the hip belt around one’s waist. Although this horizontal force is minimized or eliminated by cinching down the “load lifter” straps that you have installed between the hip belt wings and the outer edges of the backpack.

    #3591386
    Andrew Stevens
    BPL Member

    @nuttool

    It’s a pleasure to discuss this with a fellow builder; most of the people I talk to have know idea what I’m talking about.  Good luck on your designs.

    #3591414
    Eric B
    BPL Member

    @eb

    “I made the straps that pull down the drybag closure male and female so that if I overstuff the pack, I can just close the pack with one or two rolls.”

    Yes!  I’ve made packbags this way too.  I wish all rolltops were made this way.  I have a bike seat pack that is not and it annoys me to no end that I have to clip each side separately rather than just quickly clipping the ends together into a loop.

    #3591423
    Scott Nelson
    BPL Member

    @nlsscott

    Locale: Southern California and Sierras

    One way to have the dry bag top opening able to be clipped on the side or up top is to use side release buckles that are adjustable from both sides. Many of these buckles only adjust from one side.  MLD gets around this by having one side of the drybag have both male and female buckles attached on one side.  Then one buckle is used if clipping to straps on the side and the other is attached if clipping over the top.

    Was this printing a one shot deal? Or do you or RSBTR have move of this fabric with the art?

    Nice pack!

    scott

    #3591447
    Andrew Stevens
    BPL Member

    @nuttool

    Scott,

    I just used male and female ends on the rolltop, and used male and female ends on the straps, as long as you have male and female that have sliders on them.  I’m actually surprised that I haven’t ever seen this on a pack.

    As far as the artwork, the artist Ann Piersall is a local artist in Bishop.  I am making her a pack in order to use her artwork.  The first six panels I bought were 19×24 and costs 21.00 each on 5.0 DCF.  I only used one of prints for the first six; my favorite.  By the way, I have the whole print that I bought from her in three 2×2 panels that looks awesome and is very affordable.  She is going to send some more of her artwork to Ripstopbytheroll.  They are now making 36×54 panels which should look even cooler.  A little pricey, but if you’re going to make a custom pack, it is kind of cool to have something original.

Viewing 13 posts - 1 through 13 (of 13 total)
  • You must be logged in to reply to this topic.
Forum Posting

A Membership is required to post in the forums. Login or become a member to post in the member forums!

Get the Newsletter

Get our free Handbook and Receive our weekly newsletter to see what's new at Backpacking Light!

Gear Research & Discovery Tools


Loading...