Topic

Could use some help with a carbon fiber tri-leg stool


Forum Posting

A Membership is required to post in the forums. Login or become a member to post in the member forums!

Home Forums Gear Forums Make Your Own Gear Could use some help with a carbon fiber tri-leg stool

Viewing 18 posts - 1 through 18 (of 18 total)
  • Author
    Posts
  • #3756847
    Fifty Weekends
    BPL Member

    @fiftyweekends

    Hey folks, first time posting. I’m really desiring an ultralight backpacking tri-leg stool. I generally push my legs pretty hard when hiking and just don’t find it comfortable to sit on the ground. On my last trip, I spent the time in camp just standing/squatting even though I really needed to rest my legs. I think I can skip the back rest as long as I can get off my legs.

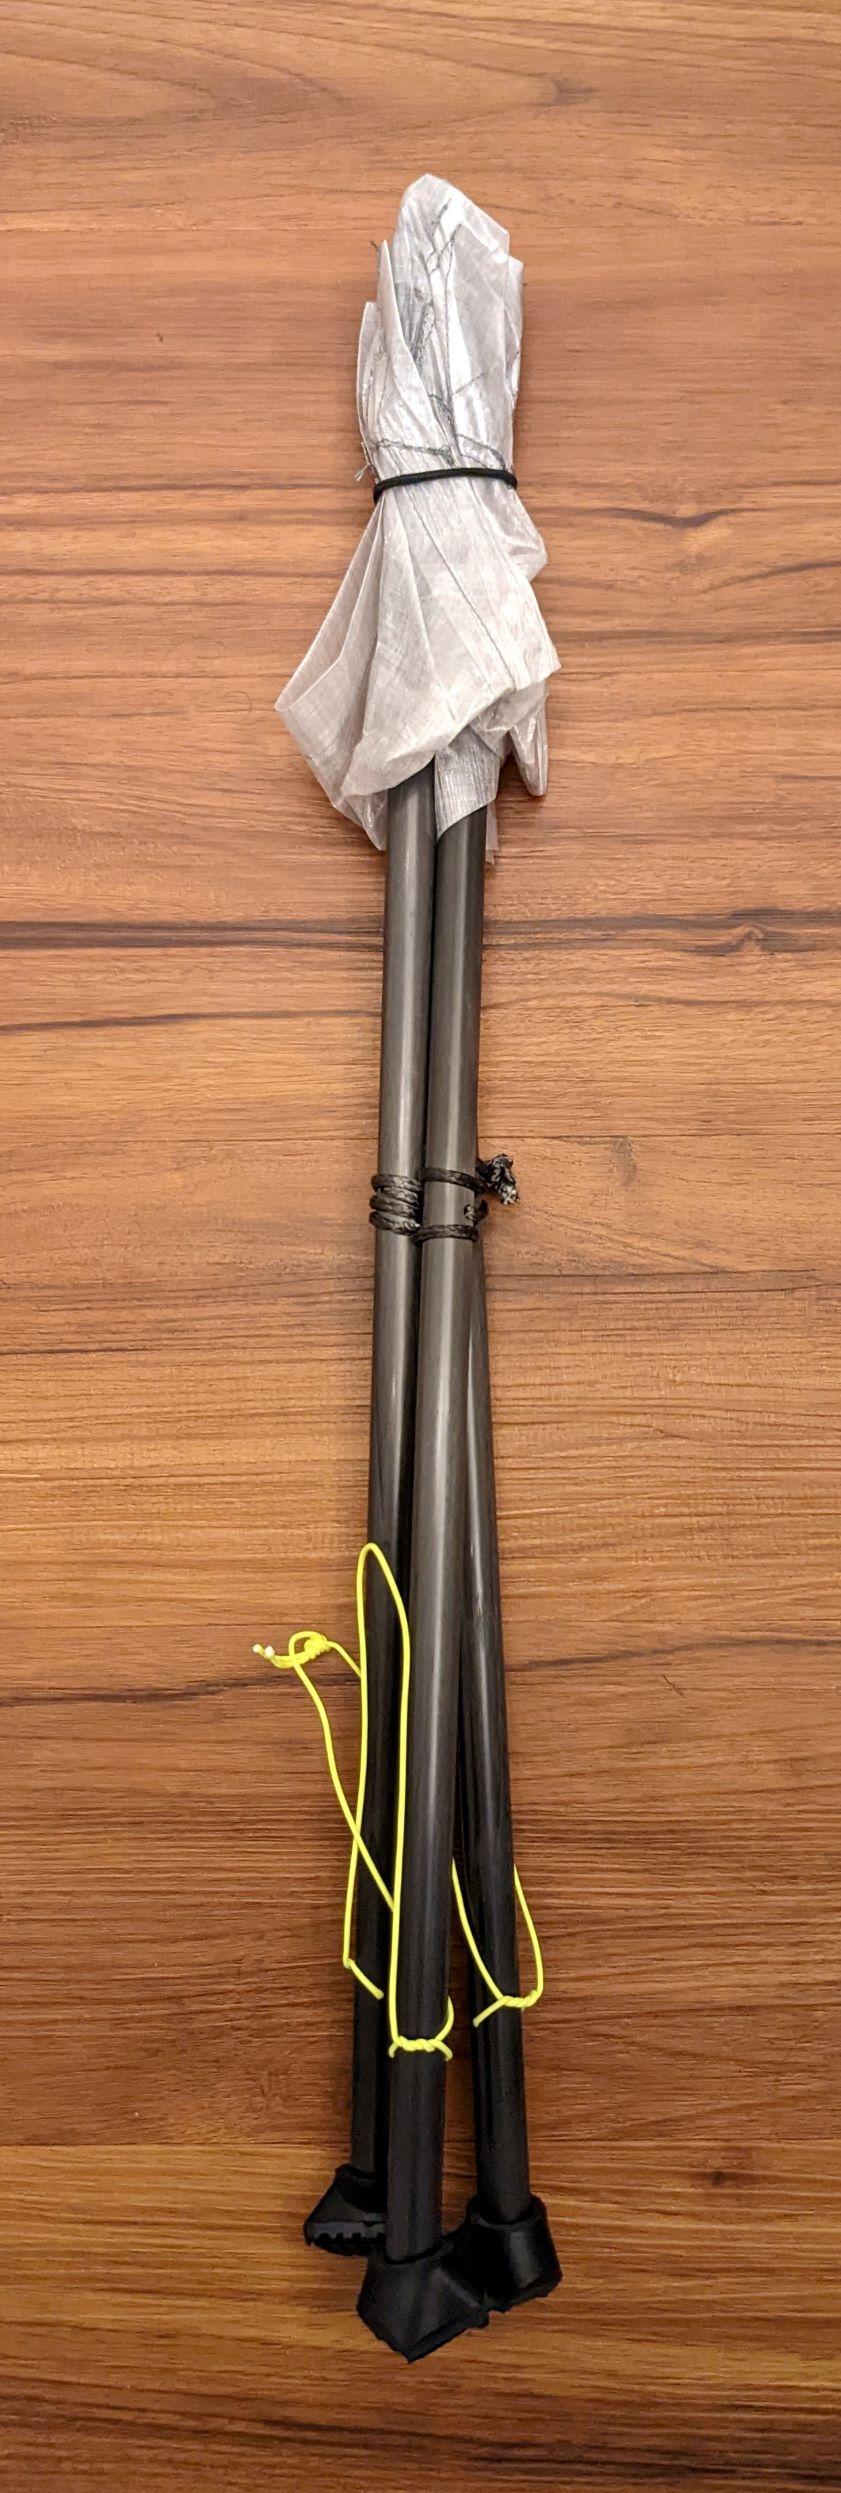
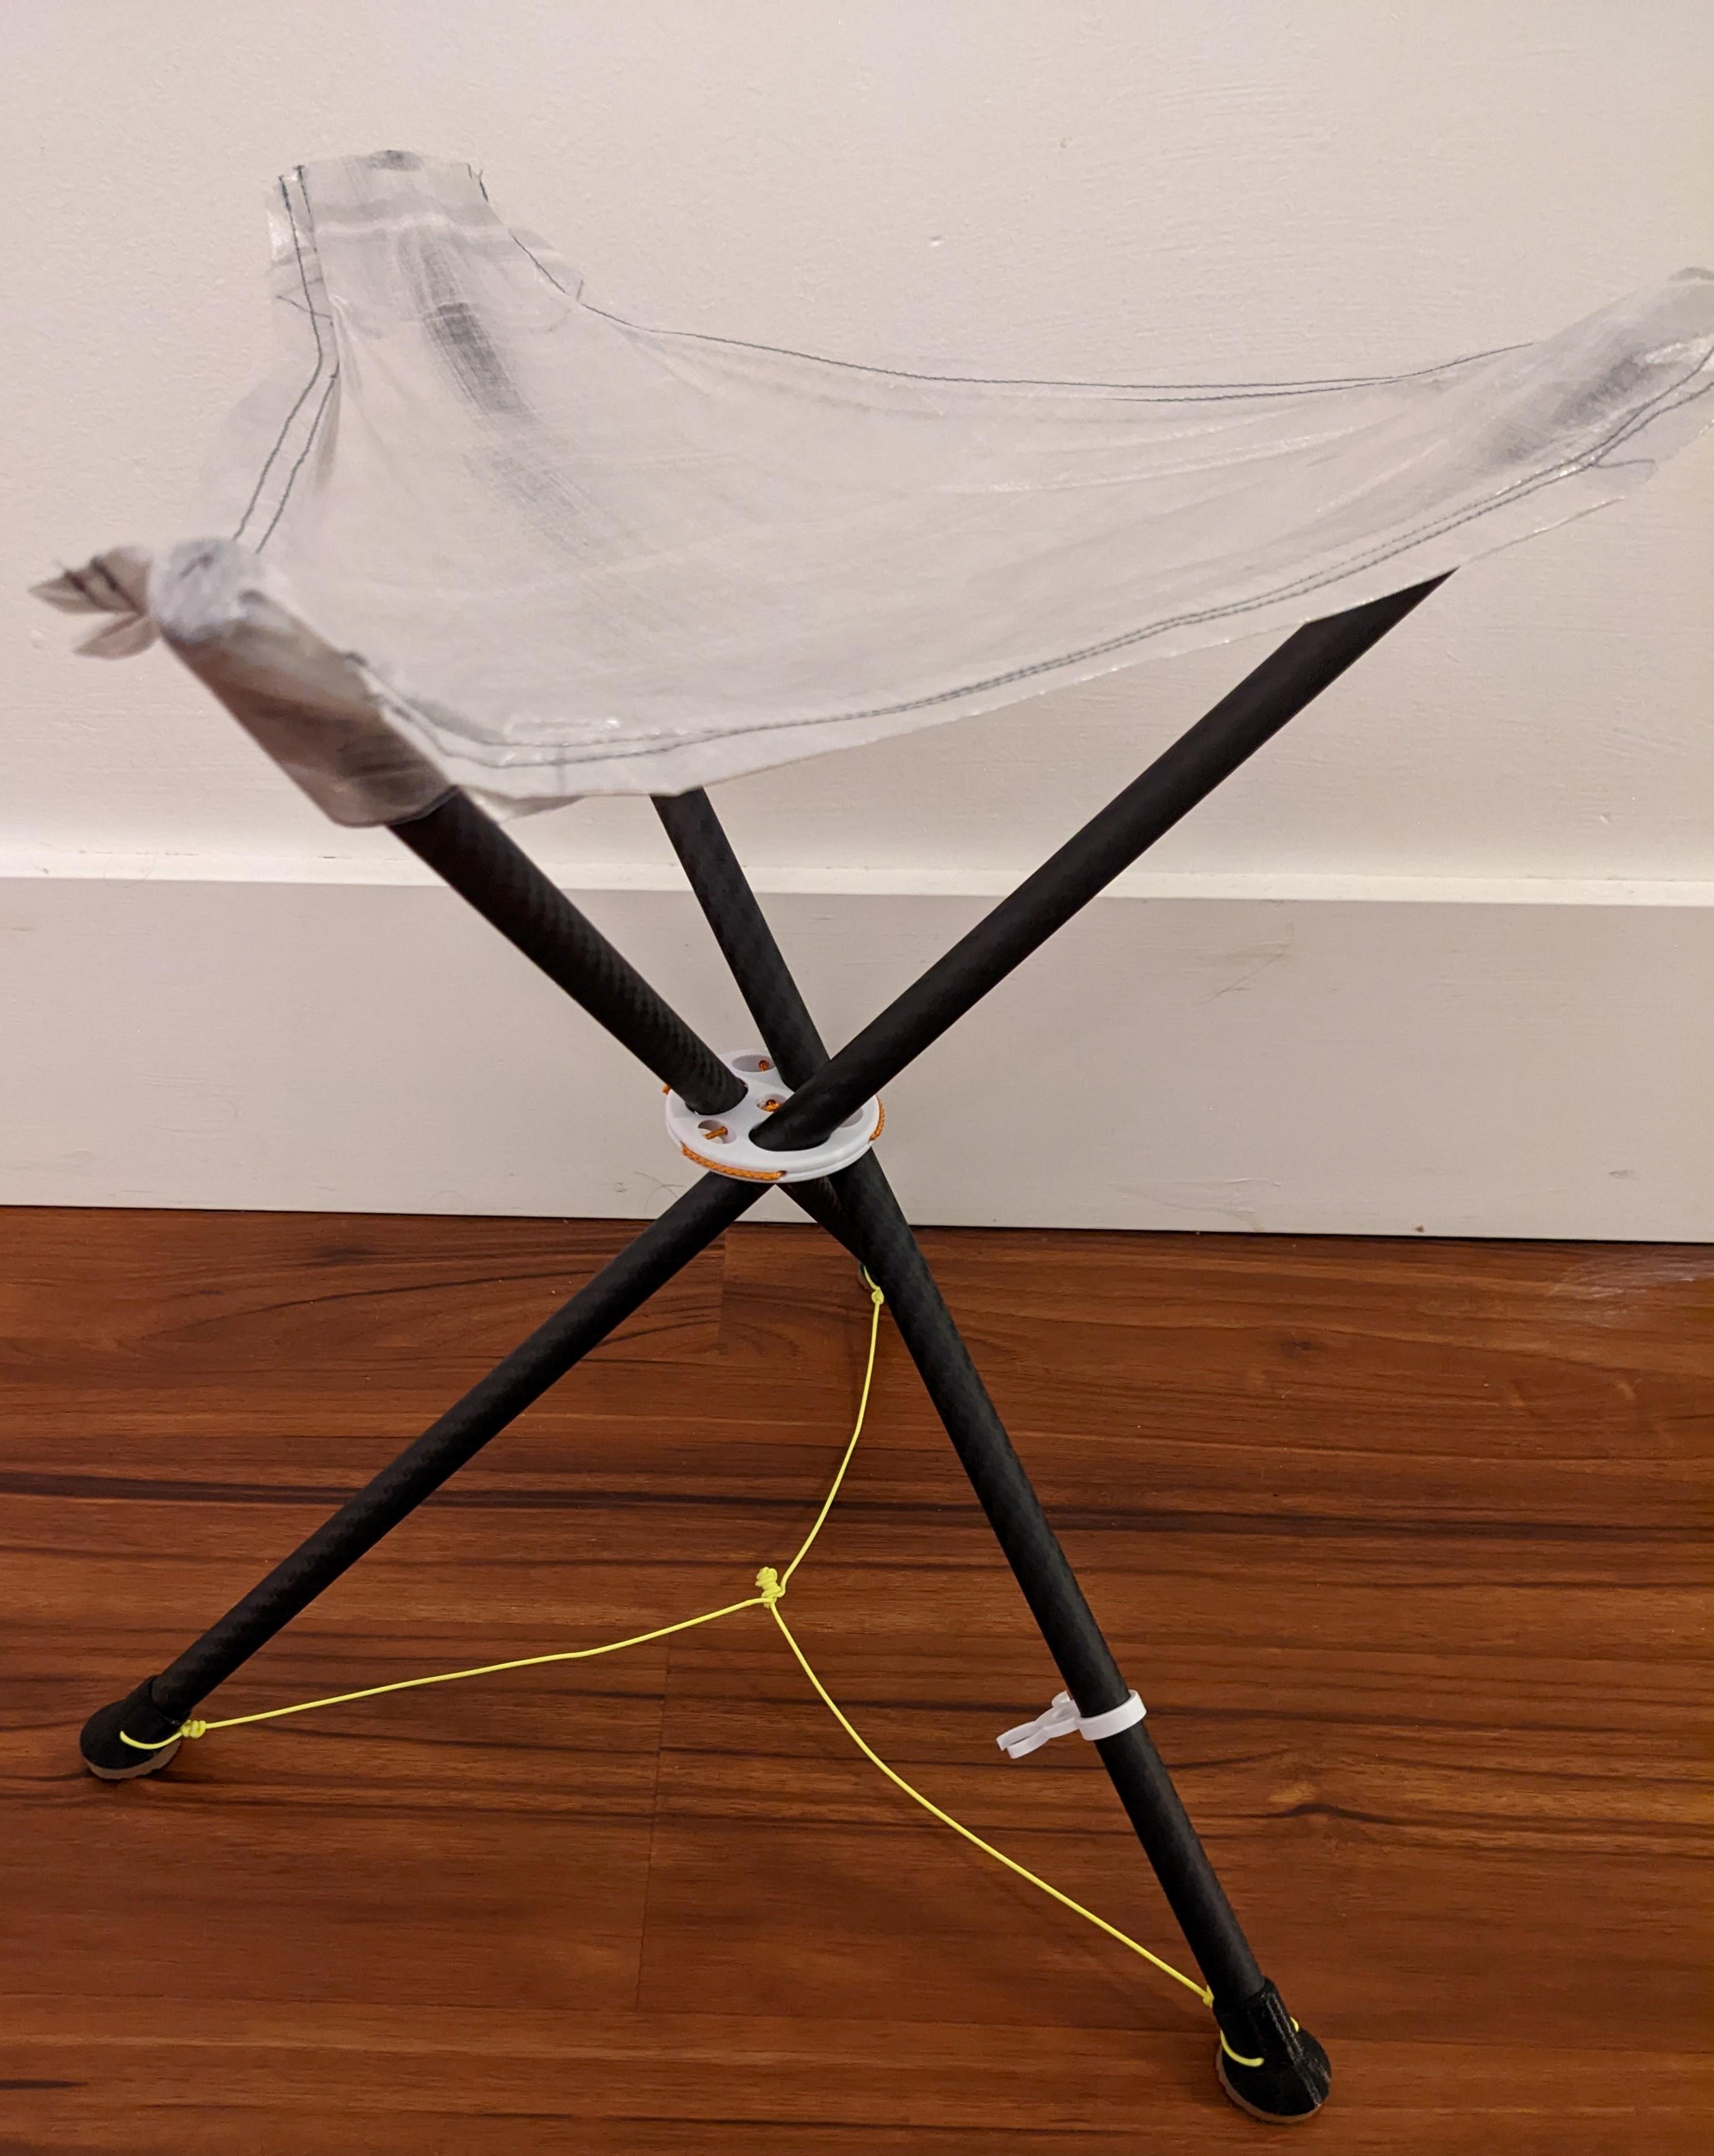
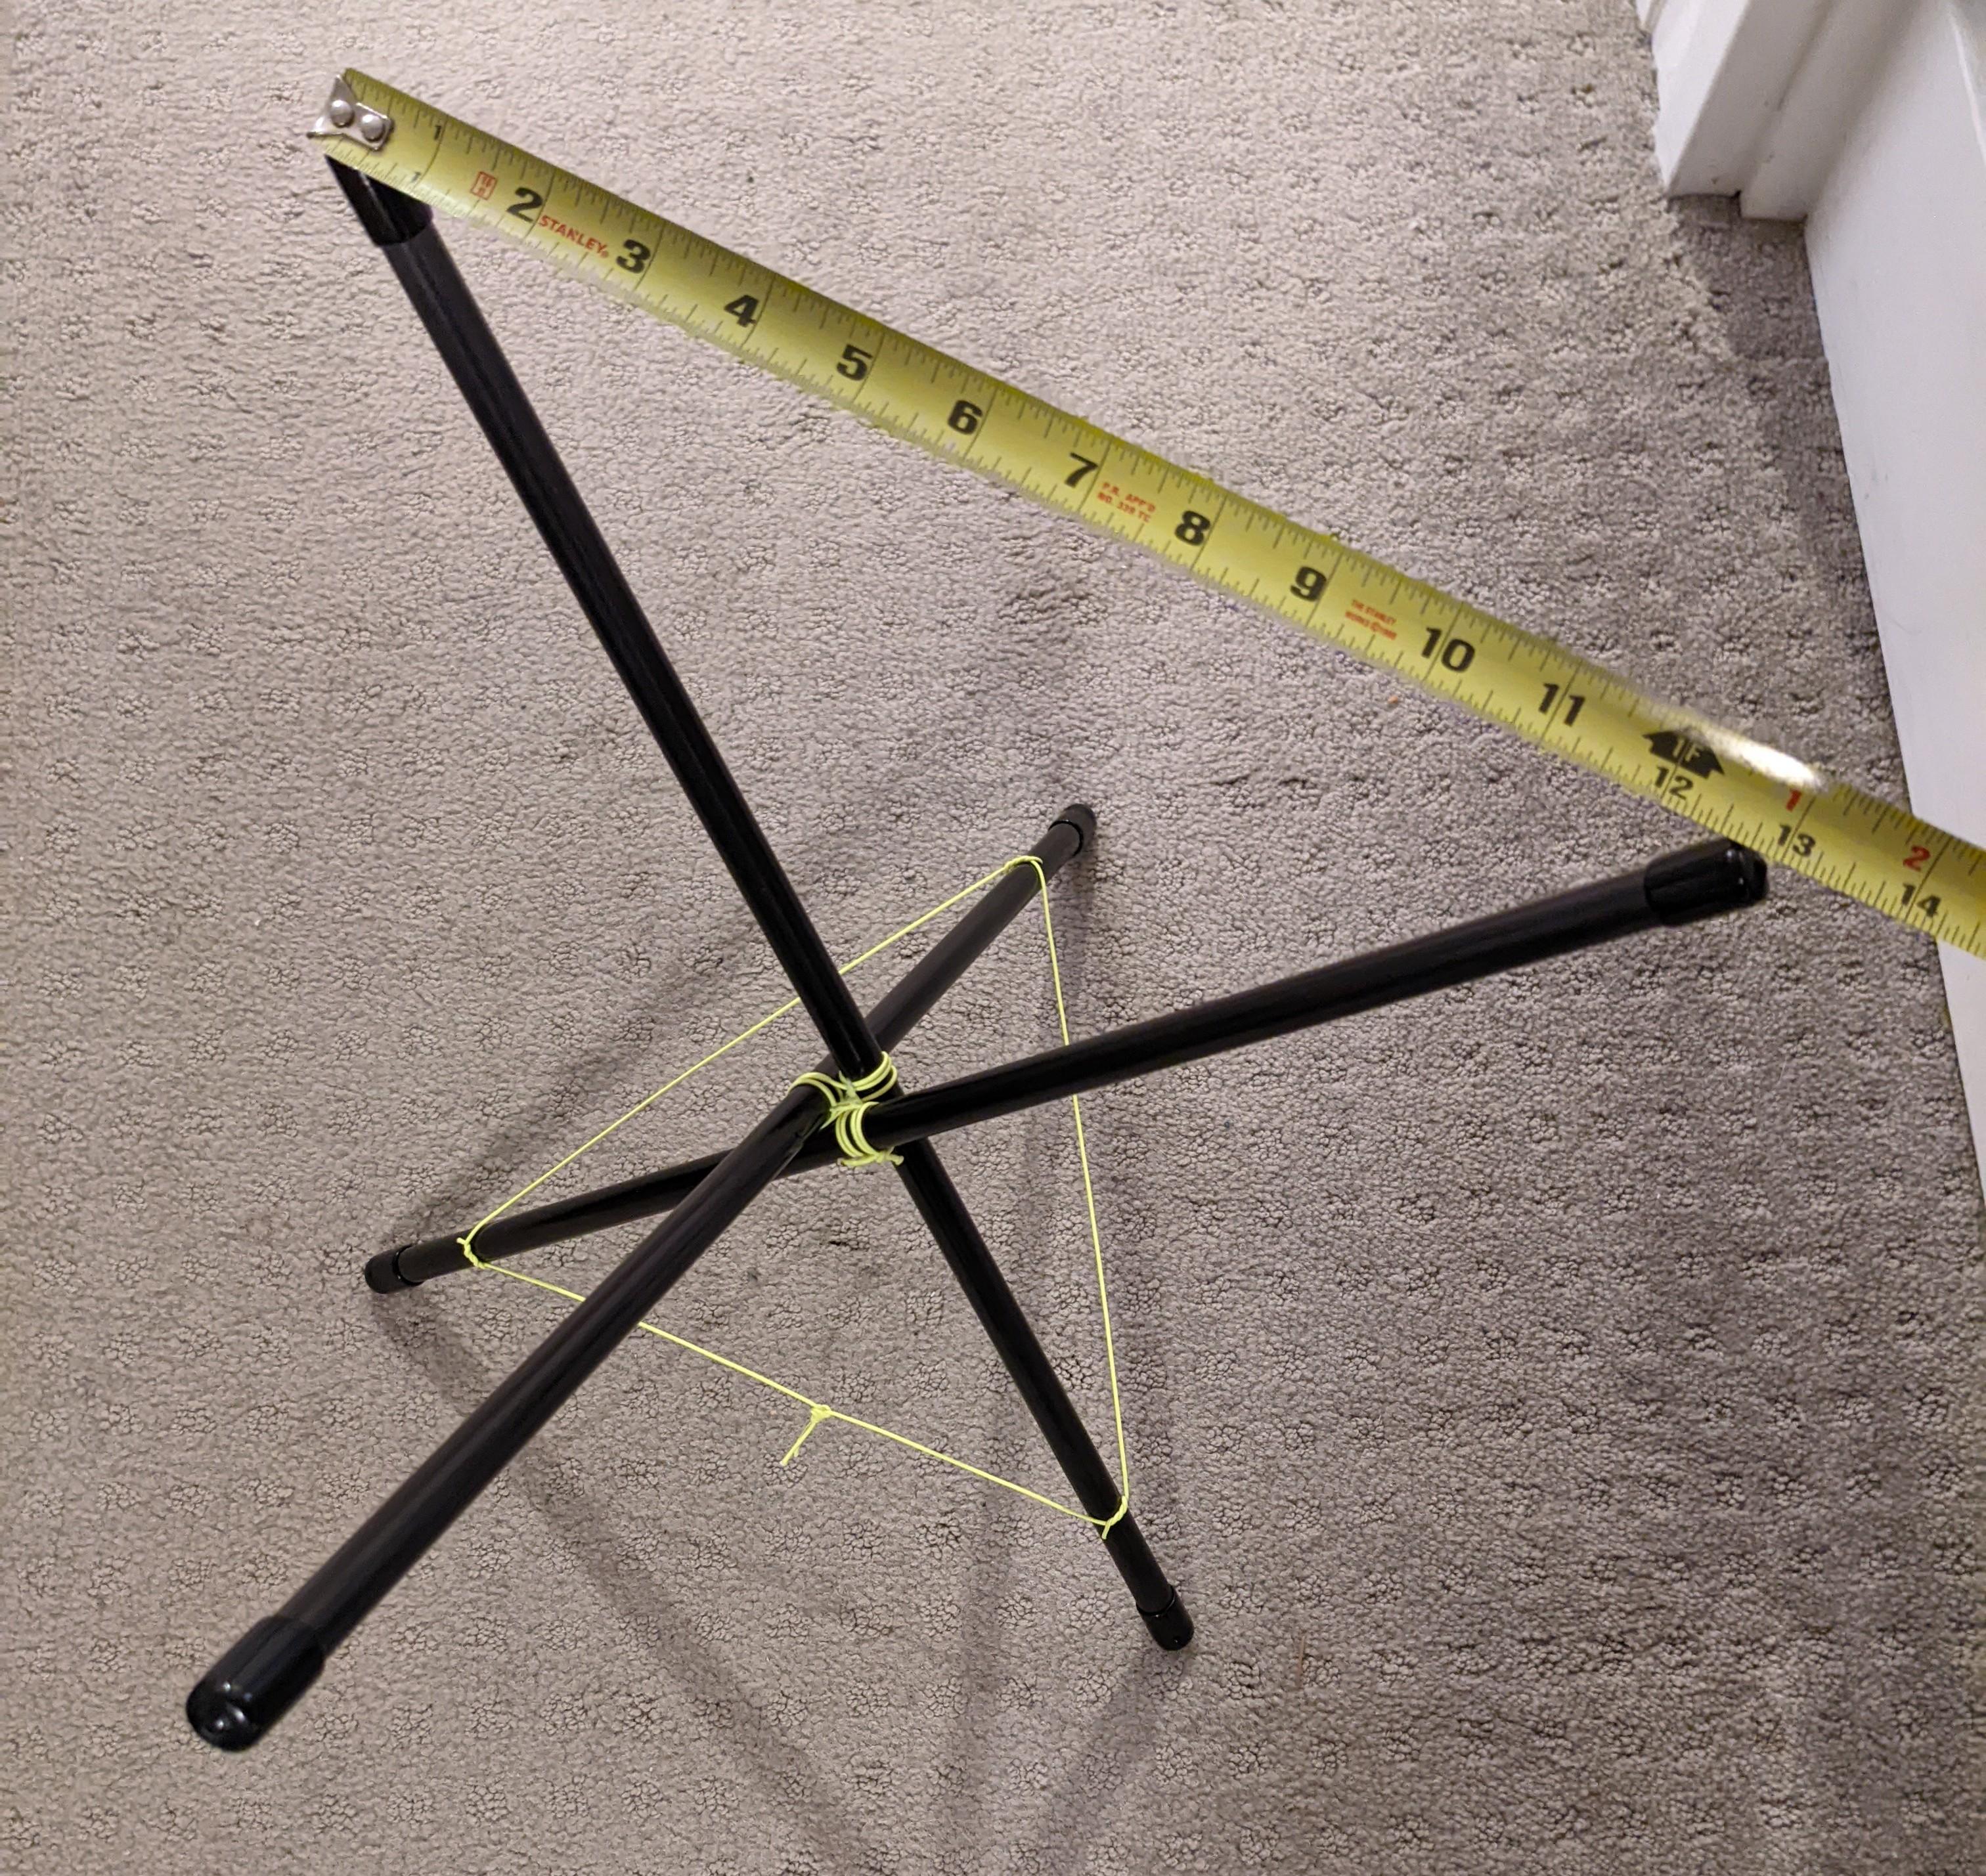
    It actually required a surprising number of adjustments to get a stool that works. I eventually had to drill holes in the tubing to keep the lashings in place.  I wanted this thing to feel solid even though it’s very lightweight and this makes sure the pivot point does not slip whatsoever. For now, I’m using a cheap canvas seat. The problem is the canvas is heavy and it stretches. I think DCF would be superior in both ways. The total weight I have right now is 6.5 oz, but the canvas seat is 2.5 oz of that.

    Current WIP Canvas seat

    Previously, a couple others have done similar builds on BPL:

    Chris Zimmer made this seat:

    https://backpackinglight.com/forums/topic/48893

    Ron Rod made this prototype:

    https://backpackinglight.com/forums/topic/94198

    Is there anyone interested & able to do some custom work and make a dyneema seat similar to the one Chris Zimmer made? I really have no experience sewing, especially with DCF and I just don’t think I could make one nearly as good.

    Also, the carbon tubes I have are 0.5 inch diameter. They are super light, but also I think I could go lighter. They actually feel overkill at the moment.

    Thanks for any/all help and advice!


    #3756942
    Sam Farrington
    BPL Member

    @scfhome

    Locale: Chocorua NH, USA

    Am not suited for a stool, vs a chair, but want to mention a few things about carbon fiber tubing.  First, I use flexible carbon tube for tents, and have learned that the lower diameter tube is more easily crushable when force is applied to the sides of the tube.

    Second, the quality of carbon tube is all over the walk, from junk sold on ebay, to cloth wrapped, to cloth wrapped with layers that run both parallel and diagonally to the tube, and Third, the highest quality is filament wound tube, which is very expensive.

    Fourth, the larger diameter tube, such as those used on hiking poles, are far less prone to breakage than the low diameter; but depending on the layup, also vary greatly in strength; and the better quality should be preferable, because of the large forces concentrated at the point where the struts cross.  A couple of less expensive poles I’ve used that are strong are the Cascade Designs and Yukon Charlies.   But you may have already found the best source for your application.

    Last, drilling in the sides of the tube would weaken it; so if  you can devise any other  approach, you’d have a much sturdier stool.  If you cannot, reinforcements of the tube at the pole crossings with short lengths of alloy or carbon tube that slip snugly inside or outside the strut  tubes for a few inches and are bonded in place.  Note that epoxy can weaken carbon, so try some JB Weld first on a short piece of the tubing you are using.

    For my canoe style chairs, sturdy mesh sold by most of the suppliers is great because it does not collect water, and makes for a dry seat that molds to your shape.  But not sure it could be adapted to a three legged stool.

    In the Scouts we learned how to lash three poles together, but this was for tables, and not sure how it would work on three struts of a small stool.  Could not make out the structure of the binding exactly in the photos of your project.  There are some very strong Spectra and Dyneema cords, though.

    #3756955
    Eric Blanche
    BPL Member

    @eblanche

    Locale: Northeast US

    JB Weld Plastic Bonder is the new easily found go to for carbon fiber bonding/gluing, IMO.

    Seat top looks easy enough to recreate. If I had more time, I would make it for you!

    #3757117
    Fifty Weekends
    BPL Member

    @fiftyweekends

    Thanks for the protip about the JB Weld, I was actually going to use Epoxy on part of it -glad I didn’t.

    The tubing I’m using is some pultruded tubing from DragonPlate. It’s pretty thick, in fact probably overkill. Even after drilling holes in it and bouncing around on the stool.. it seems super solid. It is a good point though about the large forces concentrating on the pivot where the struts cross. This is where I see the slightest amount of bend forming when I’m sitting on it.

    About the mesh idea, if I could find a way to attach some Cloud71 without sewing, that would be awesome. Perhaps with some kind of hammock knot around the end of the pole tips.. I’m not sure.


    #3757826
    Fifty Weekends
    BPL Member

    @fiftyweekends

    Sharing some photos of the finished product. My sewing is terrible but at least it’s functional. The carbon tubes are 20″ long and the final weight is 5.1 oz. The dyneema is the 1.43 oz/yard variant, and the actual seat weighs 0.4 oz. That’s over 2 oz less than the canvas one, and comfier as it doesn’t sag/stretch.

    The other nice thing about dyneema (both fabric and the bear line) is that when you fold it into a position, it stays put, so very easy to pack and unpack quickly. Contrast to a helinox chair for example, where the setup time is a bit too much to make sense for a rest stop.

    #3757983
    Dan
    BPL Member

    @dan-s

    Locale: Colorado

    Nice job with that project!

    #3760585
    Fifty Weekends
    BPL Member

    @fiftyweekends

    I’ve made some further modifications and the stool is now 4 oz exactly, which is 14 oz less than a similar shaped REI Trail Stool.

    – Resewed the dyneema seat using a different pattern which has no high spots when tension is applied, and is also stronger because force is not concentrated at a single thread point.

    – 3d printed a center pivot to prevent the legs from rubbing and hold them in position better, held in place with kevlar cord.

    – 3d printed feet which are lighter and also include holes for the bear line. also tied the bear line in a different fashion which won’t ever come out of position.

    – 3d printed a small clip to keep it secure for storage (1.5 grams)

    -“downgraded” to cheaper, lighter, and slightly larger diameter carbon fiber tubes (shaved weight)

    Some pics of the MK II..


    #3760589
    d k
    BPL Member

    @dkramalc

    That’s really great!  I’m so coveting that…

    #3760603
    Kevin Babione
    BPL Member

    @kbabione

    Locale: Pennsylvania

    Nice work – it’s fun to see the evolution in this thread.  Get ready for the PMs asking if you’d consider making and selling them…

    Have you thought about a lighter version of the Helinox Ground Chair?

    #3760641
    Jan Rezac
    BPL Member

    @zkoumal

    Locale: Prague, CZ

    Very nice. What are the specs of the tubes used?

    #3760788
    Fifty Weekends
    BPL Member

    @fiftyweekends

    Thanks for the feedback. I got a chance to test it out on the trail this weekend on a hike with a lot of elevation gain and it worked great. I just stowed it next to one of my water bottles and was able to take a seat without taking my pack off.

    I have thought about cloning the Helinox in CF + dyneema, but likely my sewing skills are not up to the task. The ground chair does seem like an easier chair to replicate vs the Chair Zero though. I have a Helinox chair and it is definitely overbuilt (for obvious reasons being mass market).

    The tubes I used were 19.5 inches long, roll-wrapped, 13mm in diameter, and weigh 0.95oz each. They have 1mm walls. I suspect if there were tubes with 0.75mm walls those would still work. 0.5mm may be too thin.

    Also here is a pastebin of the fulcrum/pivot piece in OpenSCAD if anyone is looking to make their own: You can change the tube diameter/leg angle/etc: https://pastebin.com/3mB6kC9C

    Now while I’m on this track of needlessly optimizing luxury items: the one thing I’m missing with this chair is a table…

    #3760800
    Kevin Babione
    BPL Member

    @kbabione

    Locale: Pennsylvania

    Here’s a thought for your table – Try the corrugated plastic (that’s used for yard signs and the like).  If you carefully score the bottom along the seam you’ll be able to fold it into thirds pretty easily.  With your 3D printing skills, I’ll bet you could create attachment points for your current stool base that you could permanently mount to the bottom of the corrugated plastic table top.  That would give you a table when you have another seat (rock, log, etc.) unless you want to carry two bases so that you could use the table with your stool.

    #3760826
    JCH
    BPL Member

    @pastyj-2-2

    I have two of these UL tables, which are made of the material I think Kevin is describing.  Only trouble is they are kinda low and have a tendency to run away in a moderate breeze :)

    The material is super durable and strong for the weight…I think a common use is for political yard signs.

    #3760831
    David Thomas
    BPL Member

    @davidinkenai

    Locale: North Woods. Far North.

    I too recommend lashing over drilling any holes.  A “constrictor knot” (google it) is a clove hitch with an added twist of the running ends under the middle loop and holds much better.  When it’s really where you want it, a dab of epoxy would secure it there without any holes or fasteners.  I’d use 100- to 150-pound test Dacron as strong enough and low-stretch.

    To strengthen the entire CF tube (or just the bottom) fill it with a bit of expanding foam on the inside.  And/or a wood plug at the very bottom of the tube where it meets the ground and has added forces/stresses to deal with.

    #3760869
    Fifty Weekends
    BPL Member

    @fiftyweekends

    JCH I had the same thought exactly, I have the same table and it’s too low and also the top is not quite flat and rigid enough.

    Kevin good idea on the folding. First I’m just going to try an unfolded version and see how functional it is, then that seems like a good next step to collapse it down. But yes this corrugated polypropylene stuff seems to be some of the highest strength-to-weight surface material available.

    Thanks Dave, I tried out this constrictor knot for the bear line on the legs (since I’ve already gone and drilled the holes for the pivot). It is ridiculously strong. Just one constrictor knot and nothing else and it does not budge. Also super clever on the expanding foam, I’ll add some to the leg tips to reinforce.


    #3760886
    JCH
    BPL Member

    @pastyj-2-2

    Also super clever on the expanding foam, I’ll add some to the leg tips to reinforce.

    Agreed, but choose the foam carefully…some types remain very flexible when cured. I would think you want some that gets quite rigid?

    #3760892
    David Thomas
    BPL Member

    @davidinkenai

    Locale: North Woods. Far North.

    Agreed, you want the expanding foam to be rigid when cured.  Or, instead, jam the tubing through multiple layers of rigid foam (like polyisocyanurate “blue board”, the denser the better).  If so, remove any inner burr on the tubing – ideally it flares out a bit to bit into more foam, not less.

    The expanding foam is the better option, but any filling resists bending and kinks a bit.

    If there’s a single axis with more stress on it, you could cut 1/8″ plywood to fit inside and then fix it in place with expanding foam.  Rather like a surfboard has stringers of thin wood / plywood along its length to make it a very strong, but very light beam.

    #3782188
    Philipp Kaiser
    BPL Member

    @philippkai1

    Hi all, I‘ll give this a try! How is your stool holding up? Initially bought some of this tubing from Sunlike to try to cut some weight off a helinox zero but the 13mm version is slightly too big. Anyone knows if going below 13mm diameter makes sense and which finish to get? I’m 70kg 😆. Cheers

Viewing 18 posts - 1 through 18 (of 18 total)
  • You must be logged in to reply to this topic.
Forum Posting

A Membership is required to post in the forums. Login or become a member to post in the member forums!

Get the Newsletter

Get our free Handbook and Receive our weekly newsletter to see what's new at Backpacking Light!

Gear Research & Discovery Tools


Loading...