Topic

Cutting down a Ti pot

  • This topic is empty.
Viewing 25 posts - 1 through 25 (of 28 total)
Marko Botsaris BPL Member
PostedMar 27, 2014 at 11:14 am

I've seen several post over the years here about people cutting down their Ti pots to make them smaller. I am interested in doing a Mod on one of my cook systems and was wondering what is necessary to do this – cutting and grinding the resulting edge of a Ti pot.

I am assuming I may need to find someone to do this for me. Has anyone done this with regular power tools. I'm guessing it is not too easy without causing some sort of damage to most types of tools.

PostedMar 27, 2014 at 11:55 am

An abrasive disc for metal cutting in a 4" grinder will cut through most anything, and the abrasive discs are meant to wear down and be replaced, so no real damage to your tool. But your cut down pot won't have a rolled edge anymore, will it? Sure it's not easier to buy a smaller pot?

David Drake BPL Member
PostedMar 27, 2014 at 12:16 pm

A fiberglas-reinforced cutoff wheel in a Dremel tool should work–more control and much thinner kerf than a 4" wheel in an angle grinder. A die grinder (also with cutoff wheel) would be in between the Dremel and the angle grinder. As Delmar says, should't be any risk of damage to the tool, and the disks are consumable.

Marko Botsaris BPL Member
PostedMar 27, 2014 at 12:55 pm

If a dremel tool will in fact work on the Ti then I'm on the case. I have cut a lot of metal with mine, just never tried Ti before.

Delmar – "we don need no stinkin' lips!"

I'm wanting to cut a jetboil pot down to something resembling correct capacity for the amount water I ever need. I don't use the original lid , and no lip is actually better for my ziplock top replacement. Plus better as a coffee cup, and I already have a silicon "hot lips" thingy.

Still not %100 sure about doing it yet.

Bob Gross BPL Member
PostedMar 27, 2014 at 1:17 pm

"Still not %100 sure about doing it yet."

I'm not sure at all.

A Dremel tool wheel will cut the titanium, but it isn't pretty. It will give you a nice sharp edge at the cut. Since that edge is no longer rolled, it won't be nearly as strong.

I suppose it depends on whether you are trying to cut off some top or some bottom.

–B.G.–

  BPL Member
PostedMar 27, 2014 at 1:35 pm

Ken T and myself went whacking on some Jetboils over the course of the last few months.

http://hikelighter.com/2013/11/27/jetboil-sol-ti-titanium-cup-resizing-modification/

We have done it to both Ti and Al versions.

We started using a dremel but ended up spinning the blades off the little attachments, so Ken just took a handsaw and it worked faster and without any issues. Next he took some sandpaper and smoothed off the edges.

Here is an article where I did some testing to see if the Jetboil Sol Ti or Jetboil Sol Al version would perform better: http://hikelighter.com/2014/02/22/jetboil-sol-titanium-vs-jetboil-sol-aluminium/

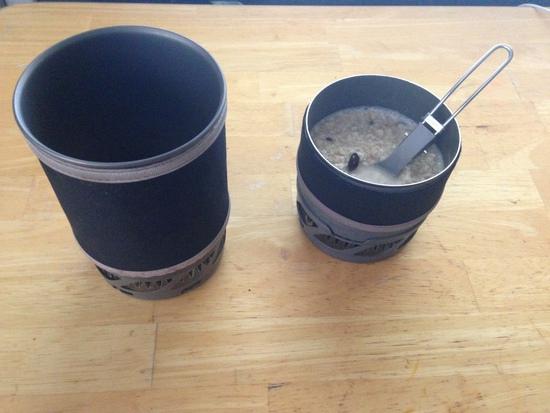
My most recent one we did was an aluminium version and I asked Ken to cut it at ~450ml mark so it would be as close to the EBY265 that I have been using.

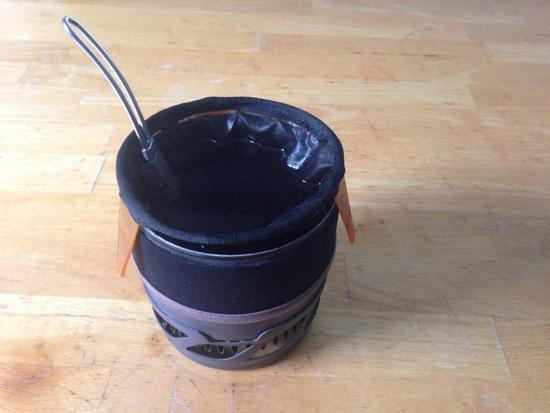
It has worked out really well. I can get two packets of breakfast oatmeal in it. Or an entire packet of that nasty noodle stuff we all seem to eat. I can also get the standard size (for me) prepackaged meals that I use when out on the trail. Perfect for a cup of coffee or hot cocoa.

Anyway, yeah, super easy to cut both Al and Ti with a hacksaw. Word of advice… do not use a press to hold it… they tend to bend too easily – I’ve had at least two people tell me they destroyed their pot from putting them into a press while cutting them. Just hold them by hand, if you can.

ps: I discovered if you have one of those GSI Outdoors Ultralight Java Drip Coffee Maker it will fit perfectly inside! It’ll even fit inside the jetboil with the stove unit while hiking. Its become my go-to way for coffee!

GSI Outdoors Ultralight Java Drip Coffee Maker

jb

The one thing we haven’t figure out is how we could do a rolled lip. It would be sweet to whack off the top 2 or so inches, then roll the top like it normally has. Not that it is that big of a deal, but it would allow the default lid or even the philadelphia cream cheese that fits onto the top of a JB perfectly and saves you some weight. Anybody got ideas on how that could be done, without having anything beyond just basic tools in Kens garage??

(edited… typos… sigh)

Bob Gross BPL Member
PostedMar 27, 2014 at 1:49 pm

Rolling the lip on an aluminum beer can is one thing. Doing it on a titanium cook pot is quite different.

–B.G.–

PostedMar 27, 2014 at 2:15 pm

First off, don't do it. :-)

The factory rolled edge does two important things. First, it increases the comfort many fold, preventing cuts to you or your gear.

Second, the rolled edge reinforces the top lip of the pot. Without the rolled edge, the pot will be much more prone to bending and denting. To illustrate, cut the center top out of a pop can, but leave the rolled/crimped edge. Still decently sturdy, my family does this to pop cans to keep rain out of our tractor exhaust pipe when it is parked. However, if you remove that rim as well it is bendy city.

Now if you still want to do it, I recently read a tip that should help. Fill the pot with water and let if freeze. Once frozen, saw through the pot with a hacksaw, rotating as necessary to avoid cutting too much ice. The ice keeps the pot from bending and crumpling at the edge as you cut it. I recommend a "grit" hacksaw blade, such as made for tile or stone. The pot will be too thin to play nice with a toothed blade. In general you want atleast 3 teeth in contact at a time with a piece of metal you are cutting, but with the thin Ti pot you will have less than a tooth at times.

Marko Botsaris BPL Member
PostedMar 27, 2014 at 2:32 pm

John, what is your feeling about the stability if the final Ti pots? Do they feel squishy? The Jetboils are not quite as thin as some Ti pots I think.

  BPL Member
PostedMar 27, 2014 at 2:35 pm

John, what is your feeling about the stability if the final Ti pots? Do they feel squishy? The Jetboils are not quit as thin as some Ti pots I think.

I am unable to bend them in. All of this talk about them not being strong enough is just a bunch of hyperbole.

PostedMar 27, 2014 at 3:07 pm

I didn't explain why or how I'd use a 4" grinder, so took sniper fire for the suggestion.

If you attack a pot with a Dremel in your hand you'll get a wavey cut. Block up a 4" grinder on a flat surface so the abrasive wheel is at the height you want your pot to be, then strap/clamp the grinder down solidly. Then you'd rotate the pot (which I assume has a flat bottom) into the wheel. (Carefully.) That way the cut is flat and even all the way around, and you won't be deforming the pot. You won't have to follow a line you drew on the pot. You won't even have to put much pressure on the pot, as you would with a hacksaw. The wheel will do the work. Willingly, and with a minimum of deformation.

If you're cutting the top off the pot, what difference does it make if the kerf is 1/16" or 1/32"? And the thicker wheel will be more stable and less flexy.

Often you get more accurate work if you make the tool stationary and move the work. (Tablesaw vs circular saw, mill vs file, etc).

Bob Gross BPL Member
PostedMar 27, 2014 at 3:19 pm

"Often you get more accurate work if you make the tool stationary and move the work. (Tablesaw vs circular saw, mill vs file, etc)."

Delmar, some of us missed that in the junior high school industrial arts class. Is there a good general reference that you would like to recommend?

–B.G.–

  BPL Member
PostedMar 27, 2014 at 3:20 pm

Because, you know, its really important to have a perfectly straight cut on a cup/pot that you are going to be hiking with :-D

Roger Caffin BPL Member
PostedMar 27, 2014 at 3:26 pm

Seems like an awful lot of hard work.

I cut Titanium with heavy professional snips. Works just fine up to about 0.8 mm with 6Al-4V, which is WAY thicker (and probably harder) than any pot.

But you MUST smooth over the edge afterwards!!!

Cheers

PostedMar 27, 2014 at 3:26 pm

Bob: Oh man, I'm stumped. You're talking to a guy who grew up in a shop, and knew how to weld before he knew his multiplication tables. Let me think on that; I think the book I'd recommend is on loan to a friend and I can't recollect the title. Give me some time.

EDIT: Bob I couldn't send you a PM so hopefully you're monitoring. If I were to choose one book I'd think would be helpful to the shop-inclined MYOGer (ie, metal/wood), it would be a book called Shop Savvy by Roy Moungovan. I think Roy is no longer with us, and the book is a little dated — Roy is amazed by the "new" technology of the cordless drill — but the book is packed with interesting kinks and tricks for making what you need, and often with a less-than-complete shop. It covers both wood and metal. No plastic or fabric.

John: Some people like to hack, and some people like to craft. To each his own.

Note to self: Stay out of the hacker threads.

  BPL Member
PostedMar 27, 2014 at 3:30 pm

Delmar, I posted my above post with a grin on my face, I wasn't attacking you ;)

David Drake BPL Member
PostedMar 27, 2014 at 3:33 pm

Didn't mean it to come across as sniper fire, Delmar. Yeah, a Dremel cut will take some cleanup (I assume since my Ti mug is soft enough to have a few dents, it's soft enough to file smooth–happy with the mug as-is, so not going to test this).

You idea with the clamped down grinder sounds good in theory–in practice, I'd be a little worried about the cutoff wheel binding in the cut and ripping the pot out of my hands. I've had a few grinder adventures in the past that taught me respect for the tool. But then, part of my day job is keeping architecture students attached to their fingers, so I may be a little overcautious.

I like the hacksaw method above. Or, you know, just use a CNC water jet (insert smiley).

Marko Botsaris BPL Member
PostedMar 27, 2014 at 5:22 pm

"I am unable to bend them in. All of this talk about them not being strong enough is just a bunch of hyperbole."

John, I am nowhere near your SUL level, but as someone who carries around a cuben shelter and a xlite pad I am assuming the danger I would squash my cut down jetboil by, say, sitting on it was minimal, at least by comparison. As for the "sharpness, I WAS planning on carefully finishing the edge.

Still it is a toss up. The weight savings is minimal – my main desire was to have a more practical size, but if I cut it down the canister will not fit inside – wasn't planning on using a different burner at this point. I find packing two things with the same total volume easier than one thing. Plus a lot of work as I assume I would also end up modding the cosy to fit the smaller pot.

For people who like doing such things, if they don't have a truly meaningful DIY project to do they may end up just coming up with an arbitrary one to fill the time :-)

PostedMar 27, 2014 at 6:11 pm

" if they don't have a truly meaningful DIY project "

There's always room over on the stovie threads ;)

Ken Thompson BPL Member
PostedMar 27, 2014 at 6:37 pm

It took less than ten minutes to hacksaw and file smooth the Ti pot. Even less time for the aluminum one. I think they are still plenty rigid. I used masking tape to work as my guide and just had at it. Nice file to finish off. Looks factory almost.

Used a regular hacksaw blade too.

Marko Botsaris BPL Member
PostedMar 27, 2014 at 6:45 pm

Did you guys redo the cozy? It is hard to tell for sure from the picture, but it looks like you cut that down too. Can you provide any details?

Ken Thompson BPL Member
PostedMar 27, 2014 at 6:48 pm

I just folded the cozy over in half. No logo, twice as cozy. Would be easy enough to cut down and put some edge binding on if so inclined.

Marko Botsaris BPL Member
PostedMar 27, 2014 at 6:55 pm

Pretty nice. With if folded over it partially answers my question about picking it up without the handle. I was considering resewing the original handle as a possibility as well.

I doesn't take much to get me going – I just realized the canister is a perfect fit inside my re-hydration vessel of choice, so the hacksaw out in my shop is calling to me. :-)

PostedMar 27, 2014 at 7:39 pm

Wanted a ti version of the rather heavy windscreen sold by Snow Peak for the GigaPower Ti stove. Took the cheapest ti pot in the pot box that knew I would never use and used a diamond coated wheel from Dremel, a little over an inch in dia., and a B&D high speed rotary tool that was much cheaper at Home Desperate than the Dremel. The cuts were clean and quick, but the project finished off the cutting wheel, what with all the cuts needed for the slots show in the pix below.

A bottom view of the screen is on the right:
WindScr2

And here is a top view of the screen installed:
WindScrInst

Used a buffing wheel to smooth the edges, but agree with some others that for a pot, a rolled edge would be much better. There are a number of Ti pot makers on the web that sell pots in many shapes and sizes, all with rolled edges.

Marko Botsaris BPL Member
PostedMar 27, 2014 at 9:24 pm

Very elegant solution.

This is the same stove I used for years. More or less the same wind screen bottom too – at least conceptually. Mine was pretty sloppy and made out of thin Al cut with scissors, but it was wide enough to serve as a platform for a wrap-around windscreen. Never was completely happy with the plate-size bit – I always had to figure out where to put it. But I still have it.

Viewing 25 posts - 1 through 25 (of 28 total)
Loading...