


> I did some experiments…
Helluvan interesting post James, thanks for taking the time to write it out.
Topic
Become a member to post in the forums.
> I did some experiments…
Helluvan interesting post James, thanks for taking the time to write it out.
"A mid-sized grease pot with a built in "fresnell" style heat exchanger to increase the bottom area by about 15-20%, and a tight fitting wind screen is what I use on most camping trips."
James, the heat exchanger you're referring to is new to me. Maybe it has been explained elsewhere and I missed it. Do you mean that the heat exchanger has concentric ridges like a Fresnel lens? And it is built into the pot? I have thought about making a die that would press large concentric ridges into the bottom of a pot to increase the surface area. I imagined relatively deep, rolling ridges that would give the bottom of the pot a wavy or rippled shape inside and out. Do you have any photos of your heat exchanger?

maybe rather than increasing surface area, the advantage is it creates turbulent flow which better conducts the heat to the pot?
Hey proofreader bob, take a look at his photo, see the moisture droplets being absorbed………:-)))
About the moisture on the pot….Wikipedia says heat transfer is much less at that place on the pot.

Hi Dan
> see the moisture droplets being absorbed
Most unfair – you will lose a lot of novices that way!
For anyone puzzled by this: the water droplets are obviously the result of condensation, but not from the atmosphere. The source of the water vapour is the burning of the alcohol: the hydrogen in it is converted to water vapour when it is burnt. The cold pot simply condenses that water vapour. Well known, especially to people used to melting snow.
Cheers
PS: also happens with white gas and canister stoves.
Dan, you have a chemical reaction going on there. The droplets are Dihydrogen Monoxide. It certainly seems like a waste.
–B.G.–
Bob, what was coming down there was….I was pulling your leg :-)
Dan, do you admit to creating that chemical reaction?
Dihydrogen Monoxide can kill.
–B.G.–
> Dihydrogen Monoxide can kill.
It's showing up everywhere. I read they're often finding large quantities of dihydrogen monoxide INSIDE the new BPA-free Nalgene bottles…and the larger the bottle, the more dihydrogen monixide…looks like smaller bottles are safer.
But having a stove that creates it…is truly worrysome…makes carbon monoxide pale by comparison. Maybe we should start a social action campaign against it? I'll bet Halliburton is at the bottom of it.
Blame it on Dan. He did it.
–B.G.–
I take full responsibility :(
That's the good thing about working with small stoves. Whether they are successes or failures, they all go up in flames.
–B.G.–
Dihydrogen Monoxide aka water can kill. Usually through drowning.
or if you drink too much – but takes a lot
Hi Dan
> You and Roger could not see that, my bad
You jest!
Cheers
"… Do you mean that the heat exchanger has concentric ridges like a Fresnel lens? And it is built into the pot? I have thought about making a die that would press large concentric ridges into the bottom of a pot to increase the surface area. I imagined relatively deep, rolling ridges that would give the bottom of the pot a wavy or rippled shape inside and out. Do you have any photos of your heat exchanger?"
Yes. Here is a pic:
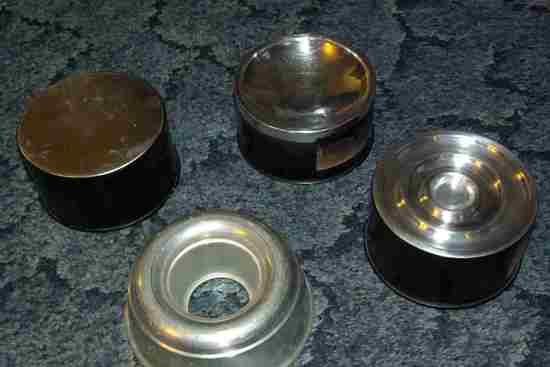
Note that this pic traces the design evolution from a small bundt pan to a dished out pot to the ridged design. I am currently using a 5 ribbed design rather than the one pictured with 3 ribs. I just anealed the bottom then used a piece of maple as a form to hammer around it. Took about a half hour, but stamping them would be far easier at about a second or two.
I called it the Xpot for the combination between heat exchanger/pot directly. Simple and foolproof on the trail. I found that three rings were too few, though. The pot would not sit level. I simply added a couple more on the next iteration. The metal sort of "tempers" back up fairly well from the shaping, but the sidewalls are still fairly soft.
James,you might find some interesting information about heat flow on the bottom of a pot in this thread over at my website:
Heat flow Around a Pot by “Tony”
Does that bundt pan fit perfectly inside the grease pot?
"James,you might find some interesting information about heat flow on the bottom of a pot in this thread over at my website:
Heat flow Around a Pot by “Tony”
Does that bundt pan fit perfectly inside the grease pot?"
Dan,
I will check it out. Sorry about the delay, been pretty busy…
No, the pan doesn't fit into the grease pot…more document my thought process. I dragged the wife down to the Salvation Army Store to buy up every bundt pan they had. The one medium sized one holds 2.5 cups of water. Boiling was MUCH helped by heating the inside and outside simultaneously. So, I took a grease pot and dished in the bottom, but this only helped about 7%. To me it looked like a proportunate increase with surface area minus a but due to heat "puddling" in the hollow bottom. So, I made one with some deep ridges. This increased the heating surface slightly, and, also allowed better heat flow around the bottom. Roughly, about a 10% decrease in heating times for the same fuel. I made three others (not pictured) that performed a bit better at about 12-15% (14.5% average, 13.2% average and 12.8% average. I tested each for 5 runs and averaged them.)
It occured to me that they looked like a Fresnel lens, and hold the same conditions. Heat (IR radiation) was being focused into the pan/water in the same way, a working hypothesis, but never tried to test this. Sounded like a ray gun if pushed much further. (I did some research into IR lasers, etc…old stuff…aluminum is very lossy.)
Anyway, I pushed the limits to 9 deep rings but found I could not clean them easily in the field. The piece of scrubbie I carry would not fit easily into the inside. I later cound that 7 rings was a bit too tight even though I was getting about a 20% increase in heat transfers. I dropped to 5 rings and about a 17%-18% transfer and let it go. I am not exactly sure it works by heat/air flow, or, IR refraction. But it does work. The picture was more to document my thought process and maybe prevent patenting (along with my notebook.) I do NOT belive in patents, and am not sure it is patenable, anyway. Feel free…
Become a member to post in the forums.
 Brynje Mesh BaselayersBrynje baselayers use open mesh construction to move moisture away from the skin, create insulating air pockets, and help regulate body temperature across changing conditions and activity levels.
 © Beartooth Media Group Inc.
 Loading...