Topic

Please help me make ridges in my Fosters pot.


Forum Posting

A Membership is required to post in the forums. Login or become a member to post in the member forums!

Home Forums Gear Forums Make Your Own Gear Please help me make ridges in my Fosters pot.

  • This topic is empty.
Viewing 25 posts - 1 through 25 (of 27 total)
  • Author
    Posts
  • #1290204
    Scott Simcox
    Spectator

    @simco

    Locale: Nashville

    I searched "ridge" through the forums for the past year and didn't see anything; sorry if I missed it.

    This is the only method I've been able to find aside from making/purchasing a bead roller: http://www.youtube.com/watch?v=yclKeJ2E1qc

    I just went to three hardware stores and can't find ball-peen hammers that are small enough to use. Any advice on what I should be looking for or where to go? Or is there something besides a hammer I could be using?

    #1880235
    Nathan Hays
    Member

    @oroambulant

    Locale: San Francisco

    Try the tapper end of a glass cutter. It's a nice round, hard tool. Use the technique in the video.

    #1880245
    Logan K
    BPL Member

    @logan

    Locale: Florida

    If you are looking for something for the top of a caldera cone to grab, I used fiberglass wick and jb weld with fantastic results – thus avoiding the ridging dilemma.

    Good luck,

    Logan

    #1880275
    Michael Ray
    BPL Member

    @topshot

    Locale: Midwest

    From my comment on that video 5 months ago:
    "… small round head screws could be placed into a thin piece of wood at the desired spacing (maybe marking off 0.5, 1, 1.5 & 2 C) so you index off the bottom of the can and can do all the ridges at once though you may need someone else to turn the can while you hold the stick."

    I haven't tried it yet since I have a Heineken pot, but I bet you could get it to work.

    #1880577
    Fred F
    BPL Member

    @55284

    Made these a few weeks ago. Used PTFE (teflon) roller , shaped by hand (router/file,then spun on end of drill) then slipped it onto a 6 inch by 1/4 bolt with nuts stacked onto bolt topped off with 1 inch washer; washer acts as stopper/guide at edge of can…

    Lay high density foam on flat surface , place can at right angles to direction of roll, insert rolling tool… and roll and stretch,,,, roll and stretch…potsinziplock

    Pots Placed in appropriate ziplock…pot ridges extended all the way down, also threaded top added for screw on lid

    More ridge detail…Closeup of  screw on , aluminum threaded throat and aluminum lid..

    and side view.. of threaded collar with matching throat on pot..more lid detail, ( threads are pressed in pieces from other containers)

    And the ridge tool , with the aluminum tube I use to slip on the exposed "nut stack"
    for the depth to reach into can, extension can be adjusted by adding/removing nuts on
    bolt up to the washer…ridgetool

    But the best way by far to get stiff-side cans …
    Buy the pots with pre-made ridges from "Zelph" and save the swearing, and the frustration….

    P.S

    This is NOT the way "Zelph" makes them I am sure..

    #1880583
    Tim K
    BPL Member

    @cfdtim

    Locale: PNW

    I hear you on avoidin' the swearin' but dang, those are lovely!

    #1880585
    James Reilly
    Spectator

    @zippymorocco

    Locale: Montana

    I like those. Good job Fred

    #1880594
    Scott Simcox
    Spectator

    @simco

    Locale: Nashville

    Tried the wood + screw method with limited success. It may have been my patience that gave out, but after a half dozen revolutions I only had very minimal ridges. My leverage with pressure at the bottom of the can was likely poor, too.

    #1880595
    Fred F
    BPL Member

    @55284

    Thank you sir(s)….

    Adding curves to the cans , do make them look like centerfold material ;)

    I hope "Simco" finds the info useful, and perhaps the "threaded top" beercanpot
    will catch on..

    Unseen in these pics is the whistle/vent that will be on the next lid to prevent
    blow-outs during an unattended boil; also opposite the vent is a resealable , silicone
    ringed drink spout ( all made of sugru, and ti);

    Having a mason-jar like screw on lid has many advantages but the pressure build up, during steam production, if left unchecked could result in trouble….

    P.S to Simco

    DO NOT use metal for your "contact" points on your ridge tools; after sanding the can,,
    the walls are thin enough that taking the can line off or damaging it any way, would
    just encourage "splits" in the vallety of the ridges, add lube (a little silicone grease) to encourage a gradual "roll and stretch " of the metal and to protect the
    inner lining.

    #1880598
    Angus A.
    BPL Member

    @mangus7175

    Locale: http://theshadedtrail.blogspot.com

    Pretty nice job. I need to make a new pot and ill try to use that process. On my video i just used what i had available, but im glad it has helped others come up with a better way to do these ridges.

    #1880601
    Fred F
    BPL Member

    @55284

    Yes, I forgot , the actual technique of "rolling the ridges" are as described in the
    youtube video mentioned, except the "teflon" wheel , gets to spin freely in this approach.

    Further , varying the angle, while keeping the depth of the wheel , constant pressure ,
    helps to widen the valley/ridge between rolls, allowing each successive pass to go deeper; if properly done the can will actually shrink in height , by up to 1/2 inch or so as the the height of the can goes "sideways" at each ridge.

    #1880621
    Scott Simcox
    Spectator

    @simco

    Locale: Nashville

    Angus, I haven't replied to you on youtube yet, but thank you for the quick message.
    I was waiting to get you a positive report, which I haven't accomplished.

    #1880830
    Angus A.
    BPL Member

    @mangus7175

    Locale: http://theshadedtrail.blogspot.com

    No worries, I am looking forward to your results. The Fosters pot still remains to be my go-to pot when I backpack but a good option is the 10cm Imusa mugs as well. It's light and works well especially when the handles are taken off.

    #1881668
    Harris Goldstein
    Member

    @hmgolds

    Locale: Minnesota

    What do you use to fill the holes in the Imusa mug? I just got one of these and have been debating whether to take the handle off or use as is (until the rivits loosen up with use).

    #1881685
    Chad “Stick” Poindexter
    BPL Member

    @stick

    Locale: Southeast USA

    I cut mine off using a dremmel. Just cut the handles where they meet the cook pot at rather than popping the rivets out. Then if you would like, you can work the edges down a little so they won't be so pointy.

    #1881863
    Sean Rhoades
    Member

    @kingpin

    Locale: WV

    Fred,

    What kind of cans are those you're using? They don't look like Fosters cans to me.

    #1881893
    Joe Newton
    BPL Member

    @grayjoe

    Smokeeater908 has a video on his youtube channel about removing the handle from a 10cm IMUSA cup. Works well. I believe he used a dremel with a cut off wheel. Ground down the remnants of the handle and then covered the area with JB Weld. After the JB Weld sets up the two areas can be smoothed over with a sanding wheel on the dremel. He also has a lid for the 10 cm IMUSA cup in his store. He makes some good stuff. Check his store out.

    (edited for spelling)

    Joe

    #1881968
    Fred F
    BPL Member

    @55284

    Back to "Kingpin";
    The cans used in the "ridgetool" illustration, are indeed Foster beer cans, cut down,
    sanded, homemaded "beercan ring" inserted, threaded top (from an aluminum container,
    "newdirectionsaromatics" the 150 ml size), pressed into the beercan ring, then the ridges put in the sides; Slicing aluminum container in half also gives me the lid i use
    that is held in place by the threaded band of aluminum you see in the pic.
    That threaded band is the original lid of the 150 ml screw top container with the center cut out, so the result looks like a fosters can/canning jar hybrid, which is sealable, watertight,lightweight, and still retains (for the most part) the dreaded, plastic beercan liner, which I prefer to raw aluminum…

    #1882044
    Harris Goldstein
    Member

    @hmgolds

    Locale: Minnesota

    I was wondering how he dealt with the need to grab to pot with the handle off (other than bringing a clamp type holder). Certainly makes for a more compact kit.

    #1882047
    Angus A.
    BPL Member

    @mangus7175

    Locale: http://theshadedtrail.blogspot.com

    A bandana, silicon ring, multi-tool, many ways around a handle-less pot.

    #1882049
    Chad “Stick” Poindexter
    BPL Member

    @stick

    Locale: Southeast USA

    I keep half of a Lightload towel in my cook pots. I use it to simply dry the pots out since all I do is boil water in my pots. The LightLoad towel works great as a pot lifter though and only weighs in at 0.25 oz!

    #1885549
    Jon Fong / Flat Cat Gear
    BPL Member

    @jonfong

    Locale: FLAT CAT GEAR

    After Fred's post, I remembered a supplier that I looked at in the past: Elemental Container. I requested a sample part to evaluate (see below). Its close, but no cigar. It is an aluminum bottle with a screw top lid. The volume is 21 oz. and it weighs 70grams. The three main problems are 1) even with a seal in the lid, it is not water tight, 2) The aluminum is uncoated and 3) The upper lip of the can is rolled inward not outward. A bottles with lid would cost $3.60 if purchased by the case (56 units).
    A new seal could be fashioned out of a silicone disk. It is possible to anodize the bottle. I am not sure what to do about the inward rolled lip. Fix these issues and add some ridges and this could be a killer pot. Best regards – Jon

    Bottle can1

    Nice screw top

    Seal in the lid

    #1885623
    Fred F
    BPL Member

    @55284

    The use of "Elemental" container as a cook pot is viable one, since I know of at least one resourceful lad (pastprimitive.com) who sells them unridged , as pots and seems to be doing fine..

    I did try to put ridges in the original aluminum containers that I get from –

    newdirectionsaromatics.ca .. and did not have too much success.

    Even after annealing the can, I was not able to put even, consistently deep, ridges into the sides of that can, no matter what I did; I pressed and grunted and called on the metal gods (mostly "Zeppelin" and "Motorhead") for assistance… to no avail..

    I seem to remember seeing one of the "Elemental" containers in a hospital once..
    (I think they use them for sending sealed plastic jars of "Bio-material" out
    for testing, Stool samples and such…), and at that time it seemed that the aluminum was not as much "rolled" into existence as much "Hot" pressed like the "aromatics" cans which might make them just as hard to ridge…

    Worth a try though…
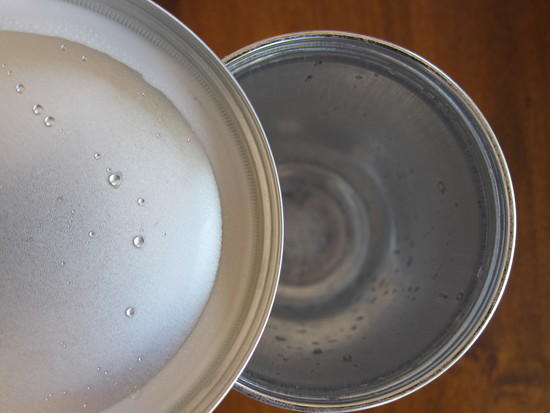
    Regardless a little more detail on the lids of the Fosters ridged cans I made, might clear the air on how they seal in the liquid..

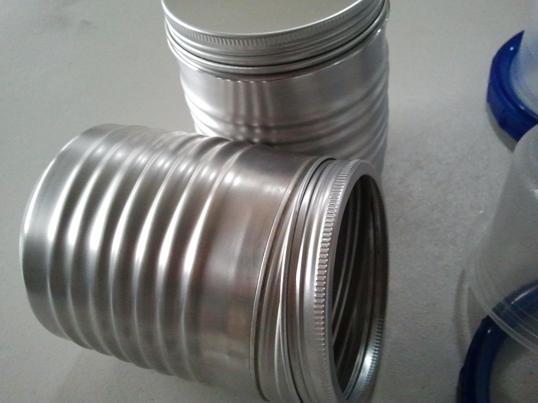
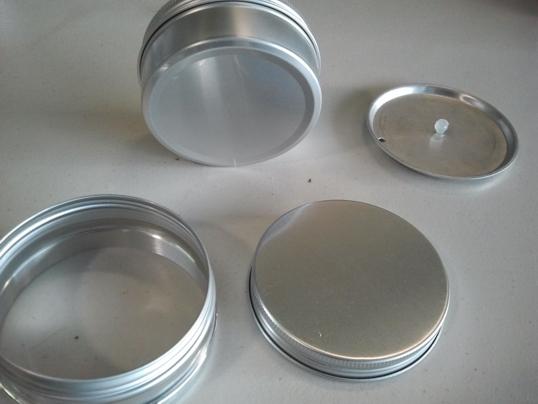
    In the following pic:

    The "aromatics" container is on top, with original lid screwed on, (a "Minibulldesign"
    beercan lid sits to the right for "scale"), lower left is the cut-off threads (top of aluminum container) sitting on top of Minibulldesign" beer-can ring (I usually use my diy rings, but for these pics his rings are just so much prettier..), bottom right is a top view of screw on cap , which after the center is cut out, will become the "screw" band to keep cut-off can bottom, in place, as lid for the whole unit..bottomofcanbecomeslid

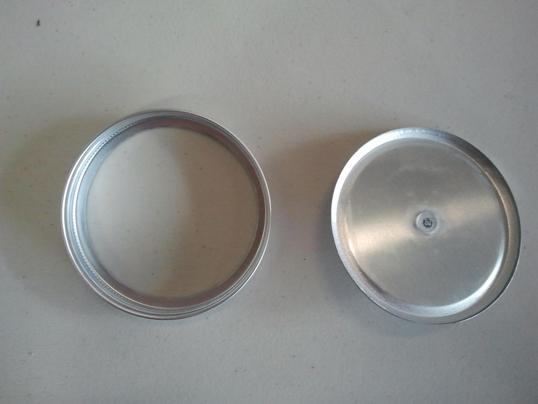
    The beercan-ring gets pressed into the cut-off threaded top of can and its edge is rolled over the bottom in a way as to seal it between the beercan and the beercan-ring , preventing it from ever coming out.. after that the whole she-bang is pushed into the fosters can and T H E N the ridges are rolled in, otherwise the can might collapse accordion style .(Yeah, I have learned that lesson over and over..)

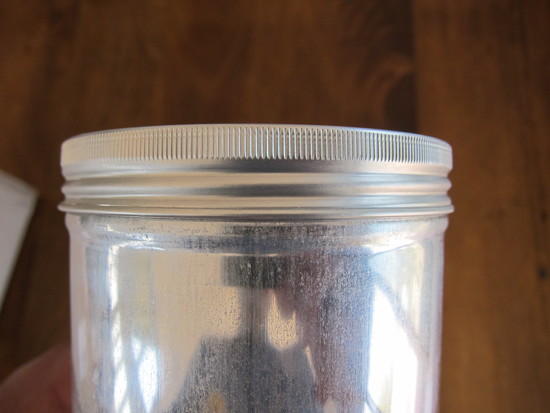
    Next pic , the "screw band" beside the upside down "aromatics" container bottom , which is now the lid , which can be held in place by the "screw band" for liquids transport..
    (you can see the bead of thinned silicone I applied to the outside edge of lid which does the sealing)lidandscrewband

    Hope this makes things clearer , as I am not sure the same functionality (never mind the expense of anodizing the insides) can be gotten from the "Freund" container cook pot. ("Freund" is another supplier of the "elemental" style containers.

    #1885654
    Bruce Thibeault
    BPL Member

    @brucetbo

    Locale: New England

    I came across this video a while back, seems easy enough though Ive never tried it.

    http://www.instructables.com/id/Tiffin-Box-from-Tuna-Cans/

    #1885932
    Scott Simcox
    Spectator

    @simco

    Locale: Nashville

    I wasn't able to come up with a good way to make ridges before leaving, but I use a piece of fleece sewn into a tube as my cozy. It also doubles as an "oven mitt." That is how I handle the pot without a handle.

Viewing 25 posts - 1 through 25 (of 27 total)
  • You must be logged in to reply to this topic.
Forum Posting

A Membership is required to post in the forums. Login or become a member to post in the member forums!

Get the Newsletter

Get our free Handbook and Receive our weekly newsletter to see what's new at Backpacking Light!

Gear Research & Discovery Tools


Loading...