Dan thanks, that was my guess. Is there a fave nest?
Topic
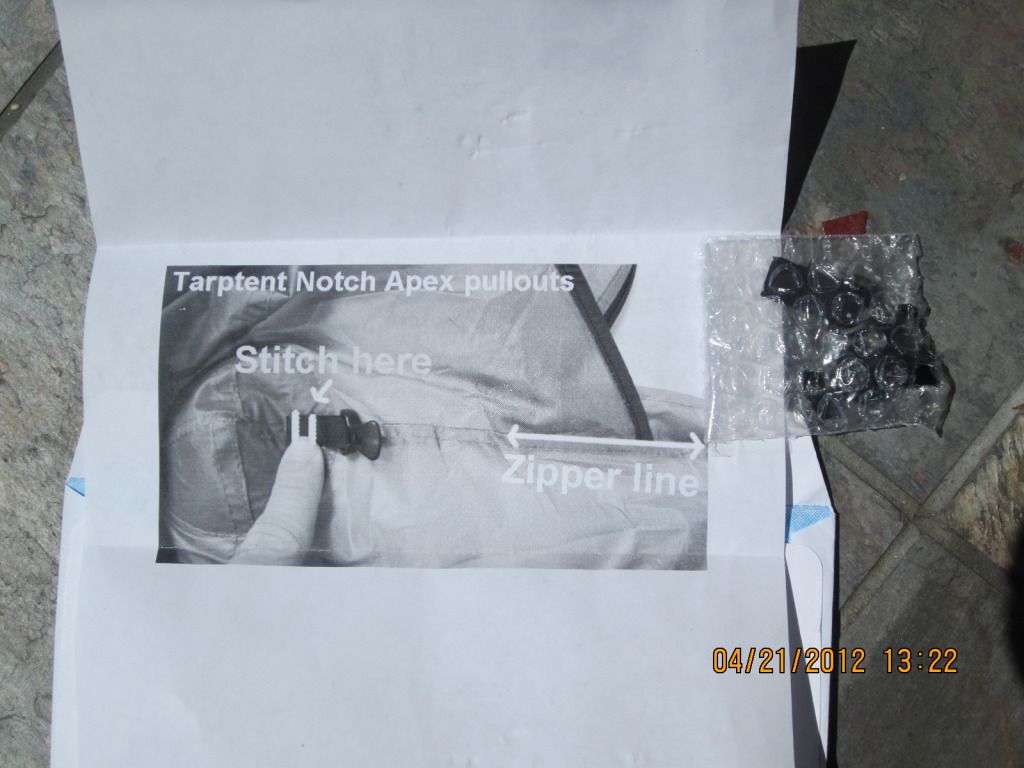
Tarptent Notch
Become a member to post in the forums.
- This topic has 223 replies, 51 voices, and was last updated 9 years, 4 months ago by
 .
.
Nigel, by 'nest' do you mean a mesh hanger with which to hold stuff up above? Not for me, at least. I usually keep most of my personal items in a small silnylon drawstring bag and it's easy to just clip or tie on to wherever (or even stow it in the corner of the tent near my head).
Uploaded some pics+vids after a garden pitch
http://s334.photobucket.com/albums/m421/NigelHealy/Notch
These initial vids are focusing on the aspects which were a problem with my *last* shelter, which were porch size and headroom, it is not representative of my interest in shelters.
Thanks Franco. Those are actually the stakes i was looking at but i wasn't sure if 2" would make much difference. Sounds like maybe it does.
I should clarify that i only have this problem when the ground is soft (i.e. after heavy rain). When i've pitched with dry ground there has been no problem. i was also happy that i could stay under the fly and stick my arm out the strut end to stick the stake back into the ground when it did pop out :) in any case, with the longer stake on the two ends i think i will be fine.
so far i am really pleased with the Notch.
nice shots Nigel.
not to digress too much but what camp chair are you using? i've always been too chicken to use one with my neoair.
Its this one
http://cascadedesigns.com/therm-a-rest/seating/fast-and-light-seating/compack-chair/product
Thermarest modified the chair so you don't need to fold it back so reducing stress on the Neoair. It does though mean the seat is protruding up yer back so either bend it back down or use a short. The mat shown is Neoair Short.
I had an earlier Thermarest chair, I had to bend double inside the chair and the Neoair did NOT like that!
http://www.outdoorsmagic.com/reviews/sleeping/miscellaneous/therm-a-rest-trekker-chair-20/20444.html
Very fast pitch and so simple. Only "trick" is to not make too tight the head-tail end too early. That's different from my last tent where I had to get that axis tight first.
Now I've pitched the Notch myself, the pegs are in this order
– head
– tail
– vestibule 1
– vestibule 2
So the pegs which you can move around the most flexibly are the head-tail ends, because the tent isn't pitched so you can put head in first moving around freely til its secure (e.g. avoiding rocks), then the tail peg can rotate around the head til its secure, these would hence be the ones you can focus longer pegs as you can move around.
The pegs on the vestibules you have a smaller degree of flexibility, starting from furthest out and going slightly inwards as required, these would be best shorter pegs such as those supplied.
Contrast the 4 pegs with my last tent, admittedly with 4 guys, was 12 pegs, and I'd use Ti toothpicks for all but 4.
4 pegs total…. hmmmm, seems very few….. I don't think the Notch is the one you'd use in very windy conditions using the factory-defaults. I'm in email contact with TT to see if there are extra guying options. Given the head/tail can be made secure by luxury of being 1st and 2nd pegging points, the logical extra guying points should be near the apex of the top of the poles, to relief force on the 3rd/4th pegs. These 5th & 6th pegging points can have quite long guys and enormous flexibility. Then I think it would be very secure.
The SS1 from the video seems totally different pegging sequence? Begins with the vestibule pegs it seems?
The Notch in the garden, the supplied Easton poles bend before the pegs move. I try to show that in one of the vids.
Had email chat with TT and I'm going to fit some guy attachments near the pole apex. I reckon that will be all that is needed to allow both more resilience to wind, idiosyncronies of the campsite, and flexibility to unpeg and fully open the vestibule for cooling / views.
Great customer service, arrived a day later.
Photos and vids showing Scarp compared to Notch
http://s334.photobucket.com/albums/m421/NigelHealy/Notch%20vs%20Scarp/
The video showing close to completion of the Notch bomproof project.
[video src="http://s334.photobucket.com/albums/m421/NigelHealy/Notch%20vs%20Scarp/?action=view¤t=MVI_1971.mp4" /]
Very interesting Nigel. I did a similar thing with the front pole of my Squall and also added a couple of extra guylines at the rear. I've never been able to understand why this isn't std on TTents, but I am sure Franco will have an answer :)).
Same reason why cars don't come with snow tyres or tow bars…
To elaborate a bit on that…
TT shelters are designed to be a lightweight easy to set up solution that is also good value for money.
Some tent users notoriously like to customise their tent and so they do (I do…)
Usually we believe that the way we do it works best and often does(well at least for self) , but that is just the same as many like to customise their car or bike.
Stakes, guylines, groundsheets are all very much a personal choice.
TT does include the minimum amount of stakes required but it is no secret that no stake will work best in every situation, for example I usually have three or four types (some of each) on every trip.
All tents should have guylines attached so folk should add the type they like.
Some will go for the reflective type, others for the lightest and other still for the cheapest or whatever happens to be that they like.
And that is why often enough people will comment on how they substituted stock stakes and or guylines for something else ( by…I saved 1.7 oz !!!!)
(a good example,right now, is the comment from David Goldberg in the Hilleberg tent thread in the gear forum,second page)
Anyway it is a bit difficult for a manufacturer to balance between "not enough" and "feature creep".
Franco
Jason, well I can see a few reason. In general, it is simply not required for 90%+ of nights pitched, I'm racking my own brain for my own pitches failed and I think I've had 1 collapse due to soggy ground and pegs just moving out, and only 1 collapse from wind.
I've seen far far FAR more pitches fail of other's tents but they were ALL choice of bad pegs or simply not following the pitching instructions.
To me… this basically makes the Notch have for only 38g more (the Dyneema) and 6 pegs (which I'll need to buy, these were borrowed from a Scarp for the test) it turns it from a floppy to a rigid shelter.
Also, 4 pegs…. that is simply wonderful for most pitches but on some pitches either a stone is in the wrong place so you can't push peg all the way in, or the ground is too loose and the tent pulls the peg out, and with the Notch's design, only 1 peg failure = tent collapsing. So just a simple bit of redundancy. You'll know when you're putting in the pegs do you need to add more pegs. If the weather is windy you can put in the extra pegs.
So… I vote this is giving you best of both worlds, light and quick pitch when situations call for that, but you can pitch it better when situations require.
If you watch the "before" shame I broke a pole but this is why I do garden tests, apply years of experience without any risk to oneself….
I think a simple improvement would be a flexible lightweight pole that went between the two trekking poles at the apex. That way the stakes at the two entrances doesn't require as tight of pitch and that would help in camp sites where you don't have great holding strength.
Yes that was one my first thoughts too, but ….
I reckon there's a need for give in the design, too much rigidity will tear the grommet. Force comes from wind and the design has to give, move, to transmit that force all over the tent, if its too rigid in one place it will increase the force around that rigid point. Placing a stiffening pole between the two trekking poles will mean force on one side instead of causing a softening of the flysheet will simply shove the other pole. The elasticity in the Silnylon is what gives the tent a better chance to survive harsh forces, admittedly with some flap.
I'm going to modify the guy line attachment to solve a few problems at once tomorrow, because a stiff Alu pole and Dyneema is, ironically, too strong for Silnylon and will kill the plastic grommet, I need to make it strong but not rigid. I have it in my mind's eye drawn as I was biking around 2600ft today and I'll make it tomorrow.
I used to design aircraft, and if we made the wing too stiff it would transmit more shocks to the passengers as turbulence and fail earlier in the wingspan snap test.
It will all make sense once I've assembled it and will be unique to the Notch.
This is great. Soon we will have a 3lbs Notch that will withstand a hurricane.
That pole failure was rather shocking to see. You hardly applied any force at all when it snapped. I've always felt the vertical poles supplied with TarpTents were inadequate for the job, and I've never understood why anyone would use them unless they live in completely windless regions.
I also don't understand why proper (and reasonably strong and simple) guy out loops have not always been attached as standard for all TarpTent models regardless of the differing desires of customers. They are not something you can easily add to the designs once you get your shelter, and they are very important aspects of shelters that need to be done right (the best guy out loops wrap around the poles and are not simply sewn to the fly fabric) during the shelter manufacturing process. They don't add any significant weight whatsoever and I feel are as important a feature as stake loops. You don't have to use them, but they should be there for those who do want and need to.
Nigel, in the days of A-frame tents the end poles were always guyed out with two guy lines set in an inverted "V" shape drawn from the apex of the poles, not with one guy line, as is customary with UL shelters today. The V-shape took into account both the transverse and longitudinal stresses that the pole encountered with the wind. I've been trying to figure out a way to do this with the Notch ever since I watched your videos. I feel the three guy lines that you are using are a working solutions, but the whole set up is inelegant, especially when considering the elegance and simplicity of the Notch design. Have to think of a way to get the V-shaped guy lines attached to the hiking pole within. A grommet that does not take the stress of the guy lines might be the best solution for getting the guy lines through the fly fabric.
Another idea that might help with the tension on the poles (though I don't know if it is necessary, since the fly fabric is strong enough to take the stress of the wind), is to get a length of dyneema cord with two loops at either end, that when deployed is exactly the width of the distance between the two poles inside the tent. When setting up the Notch, just slip these two loops over the tops of the poles, slip the V guy lines over the top of the poles, slip them through the grommets on either side of the fly, set the poles, peg out the fly, then pull out the V guy lines, peg them, and tighten. The guy lines will keep the tent tight and the dyneema cord in the apex will keep the poles from being pulled outward by either the stress of the wind or the V guy lines.
I've had my Notch for a while now, but haven't had a chance to use it. I'm taking it out this weekend and will give this idea a go. I'll let you know how it worked out.
+1 to Miguel's opening two paragraphs.
One can always add these:
Miquel, I'm hoping my ideas will bounce of yours and others and between us we'll figure it out.
Your idea of looping Dyneema between the poles… it will be important to not cause rubbing on the Silnylon as that will rapidly wear a hole in it and leak.
I know exactly what you mean – elegance. My guess is the Notch factory-delivered design will meet about 80% of my needs, from my camping experience, but its those last 20% which I'm worried about as tent failure in the worst situations have the greater consequences.
IF we're not careful we'll build a 50G "exoskeleton" of Dyneema to transfer forces off the 4 pegs.
What FG said, yes due to bendy poles rending the Notch no-wind-only for 800g invalid, its already for hiking with poles if 800g, or its a 1.3Kg shelter which is already the weight of the Scarp. The Dyneema doesn't add much weight but the extra pegs will.
Pole breaking, well it was very useful to learn that lesson when at home than learn it far from home. I know exactly what happened, that Brompton I had placed it around the pole and the pole bending it was pinched at the bike and snapped. If the bike hadn't been there it would not have broken so easily, but still those poles just sway soooo tooo much. Easton do make thicker poles. TT has chosen to not offer them with the Notch, I think from my limited ownership experience some simple collapsible but stronger poles still have merit.
Nigel – I should have added this to that post: ; )
My Notch will have a windy shakedown in just 4 days for a week and I suspect it will get battered by coastal winds a bit. I always look for natural wind breaks but will, for the purposes of testing, avoid them for a night or two. I do NOT have the additional guyouts but will take extra line to wrap around the trekking poles should things get out of hand. There will be to Notch on this trip so should one of them become a kite, we will have another to experiment with.
Thanks FG.
The single simplest thing you can do is use trekking poles and not use the supplied 6" Easton pegs but better pegs. Fundamentally, if those pegs don't budge and you got a stiff trekking pole, I think you'll be fine.
Even just a single guy in the direction facing the wind will help take a bit of relief off the 1 peg in that direction and so help. If the head end of the tent is facing the wind, it will have one vent facing the wind and so easily guy out one to double the number of pegs facing the wind.
Doesn't have to be the 10-peg ultimate I assembled.
Looking forward your field report, a lot of it will depend on the randomness of the weather you encounter. There's wind and there's wind obviously….
So I'm done with this, bored, mind's eye ideas expunged.
Adding 2 guys per side, total of 4 guys total adds little weight and is really simple. Video shows the 2 guy per side option, and shows the more complicated 3 guys per side option.
Here the Notch is pitched as close to the ground as possible because you're guying for windy conditions presumably right? If it aint windy, you don't need the guys…? Well no, I think you should guy it anyway because the additional pegs on the guys reduce the forces on the 4 pegs near the fly so they don't tend to drift out the ground, if they do drift out they've weakened the soil there, so I think even if not windy, you should always add these guys just to help keep the tent tight and reduce flap anyway.
This system is adding probably about 20g of Dyneema and about 40g of pegs so 60g added to a 700g shelter. Hardly heavy!
This is a method I invented to get 3 guys, 2 external two internal.
Complicated, is an exercise in origami and physics but someone might build on the idea and improve it. This would add say 40g of Dyneema and 80g of pegs for 120g added, for total of 10 pegs.
If someone, I guess TT, want to offer guys attached to the Notch, then I think they will need to be right on the apex so they are pulling with the line of the fabric and not off the the fabric, less stress on the stitching, and it would benefit from an external reinforcer to spread the force so it doesn't pull the apex stitching apart. My 2cents. Til then I trust the pole attachments.
The last thing I need to do is get some more sliplocks, because of the Silnylon damp sagging solution of adjusting the trekking pole length. After I got all the tent tight, the Dyneema won't stretch but the Silnylon will so I can't just push up the pole to tighten Silnylon from inside the tent, I have to loosen up the guys. A clever solution would be put those sliplocks right up near the pole so you can reach them from inside, so you'd slacken the guys, push up the pole, tighten the guys.
I'm done, any ideas to build on mine welcome.
Next problem is a storm flap for the vent… so I'm *almost* done :)
I was hurrying off to work when I wrote my last post, and I forgot to mention that Henry had, without my asking, installed two guy loops onto the apex on each side of the tent. So there is no worry about finding a place to attach guy out lines. These I want to try out before I try the internal guy line attachment method. I guess Henry anticipated my having asked him many years ago to attach guy out loops onto my Rainbow (which later became standard on the Rainbow).
Nigel, I'm curious about your stitching coming loose for your guy line tensioners. Did you sew two bar tacks? And did you sew the bar tacks first with 3 or 4 longitudinal, regular stitch lines, followed by the zig-zagging bar tack stitch that covers the regular stitches below? Your stitch shouldn't have come loose.
おはようございます
Miquel no I didn't do two bar tacks, and I'm glad I didnt.
Guy loops? So how will that look? Might work better than a sliplock stitched on, the loops will be stitched over more of the ring around the apex and so be stronger?
Look at this video before the guy came off, the links are at the point in the video where you can see the guy attachment, play just a few seconds, so here the stitching not failed but you can see the forces at play, look at the shape the fabric is taking, it you put the guy there, imagine if the weakest thing was not the stitching but the Silnylon…..and that point in the tent is where the entire tent comes together.
http://www.youtube.com/watch?feature=player_detailpage&v=h5_umAo4VWQ#t=22s
http://www.youtube.com/watch?feature=player_detailpage&v=byamYwHvSHA#t=14s
So as to approaches, if the ultimate force is applied, the weakest thing cannot be the SilNylon as that then rips your shelter apart for the rest of the trip. The ultimate force must unslip the sliplock or pull the peg out the ground. With the 4 pegs as supplied the pegs are too-weak relative to the SilNylon, if you add the guys it risks making the pegs stronger than the SilNylon so I think it needs a different solution than the simple stitching of a sliplock at the that point below the apex.
My solution is not perfect, it actually makes the weakest point the strengthener inside the shelter apex as the pole will basically not move if the shelter were to be blown hard but that force is already being spread by the strengthener being stitched to a ring of stitching.
The guys attaching internally to the pole still has the advantage you can easier slacken and loosen from inside for SilNyLon sag tightening.
Become a member to post in the forums.
advertisementYour privacy is protected: We do not transmit your user data to third-party ad platforms or advertisers, and we do not host third-party tracking pixels. Backpacking Light serves ads on its own custom, native, and internal platform.
 Air-Permeable Fleece HoodieLightweight fleece hoodie weighing just 5.2 ounces.