How's your Shelter holding up Paul?
Topic
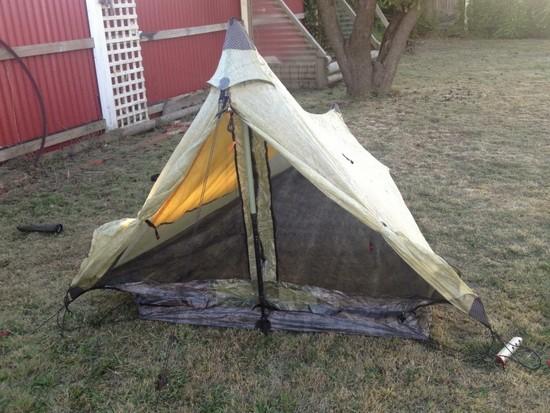
Small Solo Cuben Tent
Become a member to post in the forums.
- This topic is empty.
That is one beautiful job!
You could consider using two carbon poles for the inverted 'V' suggested.
If they were 5' long each, plus ferrules, the pole set and the V-shaped elbow would be in the 4-5 oz. range using very durable materials. The V could be slightly bowed for stability, as while the carbon is very stiff, it still has some flex.
Should you decide to pursue that, please PM me for sources of materials.
Sorry, haven't checked this for a while. So far so good. I have a number of tents, use a bivy for guiding so the little tent has only has a few weeks pitching. All the seams were bonded.. well, before I added any liner. I use a walking pole Samuel, it will still pitch ok at a fair angle but I might add a carbon pole or two at some stage, the walking poles are a hassle to carry through our scrub with a small pack.
A couple of weeks back I made an inner, kind of a half inner. It may seem all wrong, a bit of an experiment but therein lies the fun : ). Posted to our Ozzie forum if anyone is interested:
http://bushwalk.com/forum/viewtopic.php?f=53&t=7726&start=60
"I would like to find a way to draw the knot right up to the D ring, no linelock. I was thinking some form of prusik but it would need to act in a similar way to a lineloc, not just half the cord.."
Paul,
Wouldn't replacing the D rings with the linelocs achieve this? (I may be misunderstanding the question)
Daryl
> OK, perhaps a bit of overkill?..
In SW Tassie? The concept does not exist.
Cheers
> To achieve the necessary elasticity, I want to use shock-cord.
Don't.
Fow ALL windward anchors use 2 mm or 3 mm nylon cord. Do NOT allow any movement.
Cheers
Roger,
I have a 7'by20' tarp over the open front of my woodshed and this year tried securing it with double guys of heavy shockcord, heavier than you'd want to carry for a tent.
After replacing the shock cord three or four times, switched to nylon cord. No problems since. Funny thing was that for a while, I could not even find the remains of the shock cord. The wind just took it away. When a few pieces finally survived attached to something, the wind had ripped off the covering, then severed the rubber inner.
So plus ten for your advice. BUT, haven't you mentioned something about using elastic cord at your stake pull-outs to keep your tents taut when the nylon sags?
Please let us know why one and not the other. Thanks.
Hi Daryl, I have replaced the door tie outs with linelocs. I wanted to keep D rings at the foot end for now.
The only bungy iv'e used is on the mid-length tie outs (which are just pegged with enough tension to hold shape)(these might be better with cord loops but there really isn't much distance to tension them) and on the mid height guylines (which I haven't needed to use as yet)
There are a few things that I would do differently. The peaks and tie outs would be tough with half the fabric weight for eg… which would likely result in cutting 150grams (5oz) or so. Its at a stage now where building another shelter be easier.
Paul, So I know you mentioned that the tent was designed for strength and resistance to the elements but out of curiosity, what is the weight on that bad boy? By the way it looks great! Nice Work!
Hi Zach. Thanks. I'd say that if it was built with mainly weight in mind, lighter side panels and floor, lighter tie outs etc- would be more like 650-680 and a could be a bit higher, the width works well.
Hi Sam,
"So plus ten for your advice. BUT, haven't you mentioned something about using elastic cord at your stake pull-outs to keep your tents taut when the nylon sags?
Please let us know why one and not the other. Thanks."
Shock cord and bungees are basically rubber bands. And I'll admit to having tried using shock cord as part of a tensioning system for my tents and tarps. At first my application relied simply on the shock cord at the tie outs. Before I field tested this I was shown the error of my ways by other posters on this site and moved on to this design.

The basic idea here being that the guy never depends solely on the shock cord. In practice the shock cord is stretched out until the guy line itself is under tension. Hopefully during the night if the shelter material "relaxes" the shock cord will help to keep the pitch taut.
FWIW the guy lines themselves are Triptease.
Here is the link to the original thread for anyone who is interested.
Here is a picture of these guys in use.
;-)” height=”413″ src=”https://dpcr19kltm61a.cloudfront.net/backpackinglight/user_uploads/1363430532_77993.jpg” width=”550″ />
As you can see some of the guys aren't as tight as they should be but it does give a good visual of the design concept. While in use, if the shock cord fails, the guy line is there to keep everything from tumbling down. ;-)
Party On,
Newton
Newton,
That photo is the best visual I've seen showing this technique. Very helpful.
Daryl
Wild,
If you want to keep the D rings but cinch things up closer to the ring you might try adding (tying on) another D ring so you have a double D ring. It would work like a double D ring belt works.
I used this technique on a tent I made about 40 years ago. I used two round flat rings instead of D rings. The round rings were more like flat washers than rings (Boeing Surplus).
If you decide to replace the D rings here’s a way you can do it without cutting the webbing.
That is a good idea. Sorry haven't been back for a while, I see so many cuben diy projects!
I kept some D rings, removed some that weren't close to the ground (in practice) (as well as the two front main ones) and replaced with cord locs.
Little tent is great, only had perhaps 15 more nights in various places (have limited chance for over-nighters and a bevy of other tent choices) but some in narly weather. I'd like to build another one day, mine looks a bit 'hand hewn' with all the alterations. Lighter, a few thoughts to getting more height from the cuben (width), not much else i'd alter tbh, even end opening is ok.. maybe this will change as age robs nimbleness : (
About to build a mega tarp/shelter.. well.. 4×4 m so 'big', so i'm catching up on the latest design thoughts here.
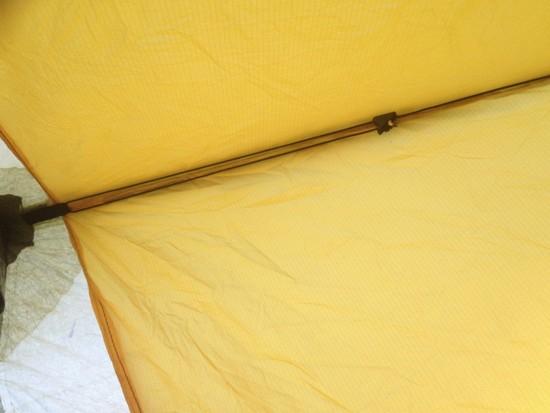
Oh, I realised I hadn't finished off the inside here.
It may be of interest to some. Enclosed floor and mesh foot end and dividing door (everday A frame style). However..
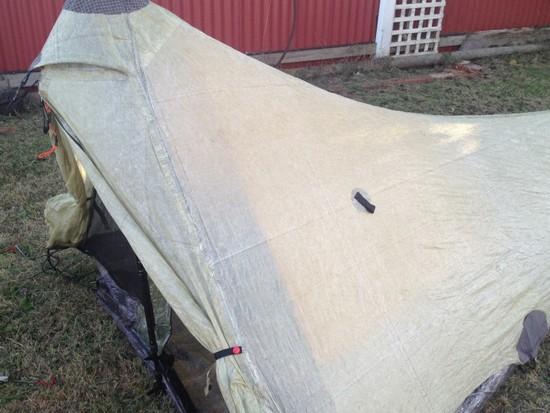
The floor is bonded directly to the sides and the liner to the floor with extra CF (easiest to see this section in the last pic)
The (yellow) liner 'gathers' the floor into a gutter : ) rather than eliminating condensation (which can be over the top in such a small space) the bulk of what does form on the inner is redirected off the liner into this 'gutter'. It then has drain (openings) at the two front and two middle tie out points. I don't walk in excessive heat, as a winter tent it was toasty and condensation manageable.
The clothes line ; ) has also gone a long way to easier tensioning front> back when pitching.

I wasn't around the forums when you first posted this but I'd come across it at some point and was really impressed.
It looks like you must have been having some condensation issues too add the "yellow gutter liner" and a vent which was a very interesting solution. I don't think I've seen something like that before…most people just add vents until they give up and accept that condensation and tents go hand-in-hand.
Condensation wasn't unusually bad Jordan, I can sit up in inside facing the door to cook, the liner was more to stop brushing against the cuben fabric. I haven't actually seen anything 'run' off the nylon.
Had originally intended this to be just a tarp and separate inner. In starting the inner it was more a case of not seeing the point of a full inner roof/mesh.
I'm not sure it was the best idea, a separate inner would be much easier to build and attaching the mesh door and end vent meant sewing to those seams (which I couldn't avoid).
I'd agree though, especially in a small tent intended for cold weather, trying to control condensation through added venting is a loosing battle. Ventilation 'Hatches' could be cut into the eves under the 'gutter' though, so far, was not at all needed (ventilation from the side).
Glad someone at least browsed by, got something from it. Cheers!
Become a member to post in the forums.
advertisementYour privacy is protected: We do not transmit your user data to third-party ad platforms or advertisers, and we do not host third-party tracking pixels. Backpacking Light serves ads on its own custom, native, and internal platform.
 New Ultralight ShelterFreestanding silpoly shelter for lightweight adventures.