Topic
7d Karo Step Sewn-Thru Quilt
Forum Posting
A Membership is required to post in the forums. Login or become a member to post in the member forums!
Home › Forums › Gear Forums › Make Your Own Gear › 7d Karo Step Sewn-Thru Quilt
- This topic is empty.
-
AuthorPosts
-
Jul 24, 2011 at 9:47 am #1277124
A lot of quilts being made right now, might as well throw mine in the mix. I was planning to buy some M55 for a summer quilt, but once the SevenD fabric was released figured I would give it a shot instead. Pics below. The 7d was pretty easy to work with in my opinion. I haven't tested the DWR yet, but the cire finish seems really good. Not a single bit of down has escaped thus far(quality of down helps too)
Final weight with cord, toggles, etc is 11.3oz which I am really happy with.
For the sake of weight it would be much nicer to be short! Between extra fabric and down this quilt would be ~10oz if it was made for someone 5'10" instead of 6'5".
Specs
Length: 85"
Width(head): 54"
Width(foot): 42"
Down: 7 oz 900fp
Fabric weight: 4 oz
Toggles: Quest Mini Mini's…FYI Lighter than the Zpacks tiny toggles
Cord: Zpacks Poly Cord
Baffle type: Karo Step 12/6Hard to tell here but it has a curved taper from head to foot.

Closed up and ready for action.

Thanks for looking!
Ryan
Jul 24, 2011 at 10:15 am #1762548Nice work Ryan.
I'm curious though, what are your measured "finished" dimensions vs the "rough" dimensions?
Being sewn thru, and "box" quilted, I imagine you're loosing quite a bit of length and width, vs either horizontal or vertical stitching, where I've observed an average of 7-9" linear shrinkage on a sewn-thru quilt with 5" stitch line offset (chamber size if you will).
Another interesting thing is when you factor in that shrinkage, you're not actually saving any weight over using baffles made out of say sevenD or .33oz cuben. Although it's definitely less work.
Jul 24, 2011 at 11:11 am #1762573Hi Javan,
You're right, it's less work. Baffles over a sewn thru will definitely save you on area, but it will definitely not save you time which was one of my main concerns. I only need a light summer quilt so why over build it? I went with Karo instead of horizontal stitching solely because I hadn't used that style before and was curious if I would like it.
Ryan
Jul 24, 2011 at 11:30 am #1762584Ryan, certainly, I totally agree.
Just putting that information out there, and still curious what your observed shrinkage was?
How wide did it end up coming out from a 54" starting width?
Loft wise it looks too warm for a summer quilt! ;) Did you calculate for desired target loft based on area or did you use an arbitrary "x" oz of fill to determine the 7oz fill weight?
Jul 24, 2011 at 11:49 am #1762590Javan,
Finished width came in at 50". Length is 79" which is about what I figured based on others who used a sewn thru with horizontal stitching. Wasn't sure where the width would turn up, I had guessed about 3" loss.
Calculated the amount of down based on a desired 1.5" loft and it came out to about 6.5oz of down. Put seven in there because I was a little concerned about down shifting too easily, but after playing with it I wouldn't be concerned next time. Final loft is little less than 2".
Ryan
Jul 24, 2011 at 11:54 am #1762592Nice.
I expect you'll be warm to 35 in that thing at-least.
Jul 24, 2011 at 2:27 pm #1762626Ryan,
Musings.
I like the simpler (than box) construction of your quilt and, of course, the weight.
I wonder if there is any way to logic out how to compare a bag with sewn through construction with one having box construction. Would, for example, a box construction bag with 1.5" of loft be about as warm as one with 2" of sewn through construction?
To go one step further I've considered trying a short quilt that only covers me from neck to knees. My feet sleep warm and are usually out of the bag all night anyway.
How did you come up with the size of the sewn through boxes? Why not half the size or twice the size? Any guidelines or thoughts on this?
I like anything that moves toward simplicity of construction and your quilt is a move in that direction.
Daryl
Jul 24, 2011 at 5:02 pm #1762652Hi Daryl,
All things being equal, I think a sewn thru Karo style would be warmer than a standard sewn thru with horizontal stitching but I don't know of a way to test that other than out in the field. I am basing this assumption off the fact that my quilt has ~219" of stitching, the same quilt with horizontal channels would have ~565 inches of stitching. So, much more area for cold spots to develop. One of the quilt gurus like Tim or Javan can jump in here and correct me if I'm wrong. Maybe this only makes a couple degrees difference, I dunno.
Box sizing – The most common box sizing for Karo quilts is a 12"/6" box. I figured why invent the wheel and just used that for mine(except on the four outermost boxes, those are 10"/6". If I was doing this exact quilt again I would use 14"/6". There is no down shift with the current set up so I think you could get by with a larger box. It would make the construction even more simple.
Ryan
Jul 24, 2011 at 5:26 pm #1762657The major issue with sewn through construction regardless of style, is that below 35 deg (this is the generally accepted baseline, but YMMV), the issue of cold air "drafting" through the stitch work becomes very difficult to counter act by adding more down around it.
We often refer to it as "drafting", but it's really more like seeping. The primary issue of course, is that where your stitch work is, you've got effectively "zero" insulation, ramping up from that area to the middle of your "chambers", where you've got the thickest insulation.
So, it depends on your sleep temp, but don't count on going below 35 with something like this, and just bear in mind, that it's tougher to layer insulative clothing under a sewn-thru quilt also.
Jul 25, 2011 at 5:47 am #1762761very nice work! for what it is worth my first KARO quilt was 10/6, then i did 12/6 and like you i was very impressed with the down control and now do them all 14/6 and have been very happy
-Tim
Jul 30, 2011 at 1:17 pm #1764686Can anyone give a little more info on the 7d fabric as to where to purchase it?
I've done a few searches and came up dry.
Jul 30, 2011 at 1:30 pm #1764688tigoat sells it
Jul 31, 2011 at 8:48 am #1764868Hi Ryan,
if you want try a 14-6 karo with same fabric.I order one from you.Why not?if you interested PM me.Jul 31, 2011 at 8:01 pm #1765035Maybe during your winter time…
Jul 31, 2011 at 8:45 pm #1765044So how do you get the down in the boxes? And what's karo for us non-cognescenti?
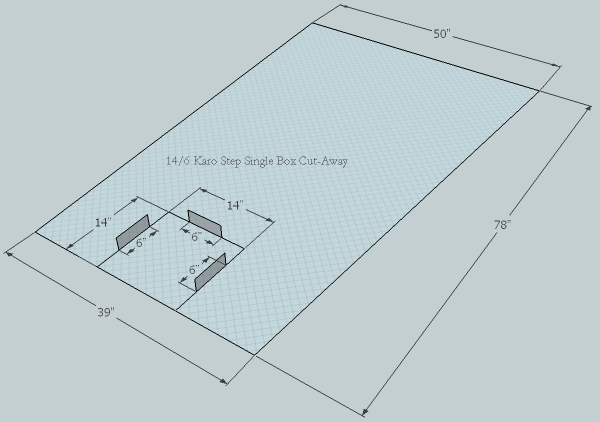
Aug 1, 2011 at 5:59 am #1765093KARO Step is a type of baffling commonly found in goods made for the bedroom. Some guys on H.F. made a few quilts with this baffle design and it has gained interest because the entire bag is just one large chamber. This allows all the down to be inserted and at one time and then evenly distributed. When we talk about 12/6 10/6 or 14/6 we are talking about the size of the boxes, 10, 12 or 14 and the size of the baffle walls, 6. Each box has a baffle centered on each side. if the box is 14" and the baffle 6" then there will be a gap of 4" on each side of every baffle. when you start putting these boxes side by side the 4" gap is next to another 4" gap so you have 6" baffle 8" gap. With baffles going in both directions your down control is very high but the overall baffle length is very low, almost half that of a traditional quilt. It allows for a lighter quilt, less baffle materials, and simpler construction, less sewing and only have to measure down once then stuff it all in.
-Tim
Aug 1, 2011 at 6:17 am #1765095Nice explanation, it turns out I didn't properly understand this concept either until I read your explanation. I threw together a quick SketchUp model for those of us who are more visual learners than auditory.
 Aug 1, 2011 at 9:51 am #1765144
I started watching you guys explain this process a month or so ago. I just assumed it wouldn't work with a real baffle, I took it as it had to be a sewn thru construction. Do you see a limit in the height of the baffle for this sewing process?
Could it also be used on other garmets? I made the thru-hiker pattern down jacket last winter, and I am thinking about eventually making a baffled jacket for extremely cold weather.
Aug 1, 2011 at 11:26 am #1765188Would there be too much down migration in something like a jacket that you wear vertically and rustle around in?
Aug 2, 2011 at 5:25 am #1765440it might be possible. obviously you'd want a smaller box than 14" for a down jacket but with some scaling you might pull off a great piece of kit. I may have to give it a go myself (add to list of projects i want to do but will never have time for, go)
-Tim
Aug 3, 2011 at 7:28 pm #1765992I think I will start with a quilt first. Jacket second, many moons down the road.
Aug 3, 2011 at 8:24 pm #1766008For this sewn through project you:
– Sew the quilt's perimeter
– add the down to the level you want (7oz in this case)
– sew the perimeter closed
– shift the down to even out the level around the quilt
– sew in the 12/6 or 14/6 baffles
– ???
– ProfitEssentially my question is, you sew in the baffles after you distribute the down inside the quilt, correct?
C
Aug 4, 2011 at 6:58 am #1766093i would sew everything first just leaving a 24" section on one of the sides open for stuffing. Put the down in, sew it shut then re-distribute the down evenly. This is what i do on my baffled KARO quilts and i assume it would work the same on a sew through.
-Tim
Aug 4, 2011 at 11:14 am #1766150I did this one pretty much the same way Tim outlined. I did leave a couple sewn thru "baffles" unsewn while I put the down in, then sewed them together after I shifted all the down to the bottom just to make it easier to get the down in. Not really necessary, I just go out of my way to make it easy when working with the white devil(down). Let me know if you need some tips along the way if you decide to make one.
Ryan
Aug 4, 2011 at 4:28 pm #1766229I am ordering materials to make a karo quilt as I read this. Mine will be 1.5" thick average, with 1" tall baffles. (I have done a sewn thru quilt before and I like baffles). I am still vacillating over the box sizes.
-
AuthorPosts


- You must be logged in to reply to this topic.
Forum Posting
A Membership is required to post in the forums. Login or become a member to post in the member forums!
Our Community Posts are Moderated
Backpacking Light community posts are moderated and here to foster helpful and positive discussions about lightweight backpacking. Please be mindful of our values and boundaries and review our Community Guidelines prior to posting.
Get the Newsletter
Gear Research & Discovery Tools
- Browse our curated Gear Shop
- See the latest Gear Deals and Sales
- Our Recommendations
- Search for Gear on Sale with the Gear Finder
- Used Gear Swap
- Member Gear Reviews and BPL Gear Review Articles
- Browse by Gear Type or Brand.
