Topic

First 1-person tent design


Forum Posting

A Membership is required to post in the forums. Login or become a member to post in the member forums!

Home Forums Gear Forums Make Your Own Gear First 1-person tent design

  • This topic is empty.
Viewing 18 posts - 1 through 18 (of 18 total)
  • Author
    Posts
  • #1274480
    John Julyan-Gudgeon
    Member

    @cyanide

    Locale: Red Deer, Alberta, Canada

    Here is my first attempt at designing a 1-person tent. Once I figure out the SU plugin that lays all the pieces onto a flat plane (material sheets) then I will order the cuben and start building. Unless, of course, I come up with a better idea in the meantime. I cut my teeth on SU building a 2-person design using a fairly standard A-frame paradigm. As I started to translate it to a 1-person tent I started to realize some inefficiencies in that format, that is what convinced me to turn the A-frame 90 degrees, offset the peak and bring the vestibules to the sides, each gathered to a single point.

    1person tent w vestibule visible

    1 person tent w vestibule removed, mesh in place

    1 person tent w vestibule removed, mesh in place

    1 person tent floor plan

    Lets hear your comments

    Cheers

    John

    #1741666
    John Julyan-Gudgeon
    Member

    @cyanide

    Locale: Red Deer, Alberta, Canada

    back view of tent

    #1741675
    Ken Thompson
    BPL Member

    @here

    Locale: Right there

    You going to use struts of some sort to hold up the head and foot ends?

    #1741684
    David Drake
    BPL Member

    @daviddrake

    Locale: North Idaho

    The plugin I use to get pieces on a flat plane is called "flattery." It works well, but you can also do it by hand, if you group each face separately. Takes more work, and more familiarity with SU interface.

    I'd leave the dimensions out, until you have the pieces separated, flattened and laid out. In the 3D model, all the extra lines get in the way. Your "person" gives enough sense of scale for me to understand without knowing exact dimensions. BTW, you can get decent 2D and 3D people from SU warehouse for free–easier (and look more realistic) than making your own. See this thread (my MYOG tent project) for example: http://www.backpackinglight.com/cgi-bin/backpackinglight/forums/thread_display.html?forum_thread_id=47007.

    Once I have a design I'm sorta okay with, I copy it a few feet away and make changes to the copy, so that eventually I have a whole line of variations, all in the same file. Learn to use layers, components and groups, if you haven't already–they'll save you a lot of time. And SU's "sticky" geometry (the way tugging a corner or edge of a face changes the shape of attached faces) is a really powerful tool for tent design, but takes some practice.

    Regarding your design: to my eye, there's elements that can be simplified, including number of poles and number of seams. It feels somewhat "overbuilt" (ie, heavier than necessary). Take advantage of SU's ability to calculate area ("entity info" under "window" drop down menu). Use tape measure tool to get lengths (and create guidelines). These tools, plus knowing how much your materials weigh by area or length, will let you ballpark final project weights. I'm not sure what the little rectangular openings in the foot and head end of your canopy are.

    Looking forward to seeing how it evolves.

    #1741730
    John Julyan-Gudgeon
    Member

    @cyanide

    Locale: Red Deer, Alberta, Canada

    Yes, those are struts at the foot and head.

    These struts AKA aluminum (or maybe carbon fibre, why not) tent pole sections will actually be second duty from modular backpack I am building at the same time. Struts come out of backpack frame, go into tent support. When tent pulled down, struts go back into backpack.

    If you distribute the weight accounting between the pack and the tent, that only adds about 22 grams to each. Hopefully I won't have to turf the design when I do the estimates on weight and push past my goal weight.

    We will see.

    Cheers

    John

    #1741733
    John Julyan-Gudgeon
    Member

    @cyanide

    Locale: Red Deer, Alberta, Canada

    Those little rectangular openings were sort of proposed air vents. I didn't build them in there to any great degree as I am not certain if that is where I will put them. Seems to close to my face when laying down, and too low in the tent profile to properly deal with water vapour. Unfortunately though, as you climb the canopy in a tent of similar design, the vents start being right over the sleeping space, which might be a horrible design flaw should the weather turn aggressive. I am thinking of putting them out on the vestibule fly area.

    What I didn't mention was that this tent is meant to be modular. Top canopy detaches from bug netting, and floor. So, one can choose to travel with floor, canopy, netting, or any combination of the three. Further, each part can be second-dutied as well.

    But, yah…I need to simplify the design a bit.

    Cheers

    John

    #1741770
    Kevin Beeden
    BPL Member

    @captain_paranoia

    Locale: UK

    An easy way to cope with this is to put the measurements on another 'layer', and turn that layer off when you want to get a clear view of the design (Window/Layers).

    I also create components for the main elements of the design; e.g. fly, inner, poles. these won't then get auto-merged when you place then next to each other, and you can hide individal components to reveal the underlying design.

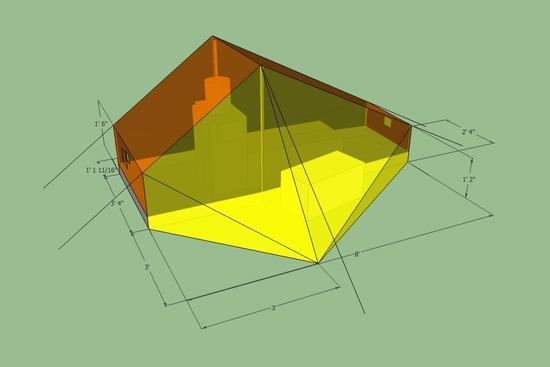
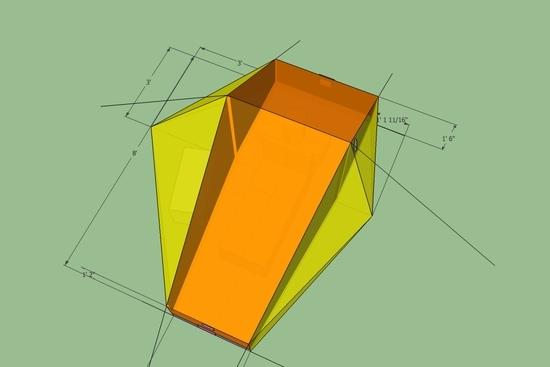
    For flat panel designs, based on triangular panels, it's fairly easy to plan the flat layout. Use the measurement tool to find the lengths of the three sides. Draw a line as long as one side. Draw a circle centred on each end, of radius as each of the other two sides. Then draw lines from the line ends to the intersection of the circles. Delete the circular sections. Ta-da!

    (My tent designs started as AWK scripts generating PostScript (which plotted the flattened panels), then became a spreadsheet to use Solver, and then migrated to SU. The AWK scripts now use coordinates taken from the spreadsheet, as does SU. I'll have to play with the flattery plugin recommended by David.)

    As poles end struts, I found some 'telescopic fishing rods' in my local pound (dollar) store, and the largest element of those is light and strong, and tubular. And cheap, of course…

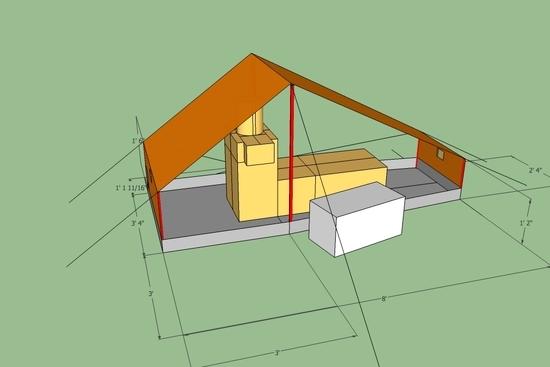
    I wondered at first whether the internal features were meant to be a stove of some kind. And then I realised it was meant to be a human body model…

    The guying at the corners will probably be better if it points out from the centre of the tent, so it will apply tension to both edges at a corner point.

    #1741800
    John Julyan-Gudgeon
    Member

    @cyanide

    Locale: Red Deer, Alberta, Canada

    I put the crude human model in there specific to my measurements (well, more towards a simple delineation of limits, clearly I am not really even close to that shape).

    #1741819
    David Drake
    BPL Member

    @daviddrake

    Locale: North Idaho

    You can resize the SU warehouse people using the scale tool. Height is probably the only real important variable. Just start moving one of the corner handles (that preserves original proportions), then type percentage of increase or decrease into VBC (measurement box, lower right corner).

    Re: venting. I'm sure no expert on tent design, but coming from an architecture background I'd say you need some sort of "stack effect" to get efficient ventilation, eg an exit for warm, moist air up high, and an entrance for cooler replacement air down low. Having said that, my understanding is that ventilation/condensation is a pretty hard problem for single wall tents, without any perfect solutions (yet).

    If I had to go to the trouble of disassembling my pack frame every night to set up my shelter, I'd want there to be a big pay-off in shelter comfort/functionality. Making the shelter and pack part of an integrated system may save some weight, but it locks you into using them both. Also, plenty of folks here (not me yet) use packs without any sort of rigid frame, and find it works just fine for light loads.

    Last, I found I exhausted what I could learn from a purely digital model pretty quickly, and needed to move on to real-world mockups to push the design forward.

    #1742076
    John Julyan-Gudgeon
    Member

    @cyanide

    Locale: Red Deer, Alberta, Canada

    back view of tent

    #1742549
    John Julyan-Gudgeon
    Member

    @cyanide

    Locale: Red Deer, Alberta, Canada

    Yep,

    So I have fiddled a bit with the tent design and sketchup. Got it into its most efficient form for spreading out on 54" wide sheets of Cuben….And I am coming in at 9 yards just for the main canopy and vestibule canopies. That's without the floor or the netting.

    Is this typical for a one-person single wall tent? I am thinking this project needs some drastic re-simplification.

    Mind you, I only have 4 seems in the whole canopy. Actually, it can be simplified to 2 seems but then the number of yards starts to increase.

    Another thing I am wondering: if you look at the main canopy, you can see that there are 3 bends in the material (between the end walls, and the two angled sections of "roof"). Is it reasonable to just have the native material turn those corners, or should I make them into seems anyway, resulting in seams with more than normal material thickness and thus maybe increased tension resistance and strength?

    Cheers to you all

    John

    #1742561
    John Julyan-Gudgeon
    Member

    @cyanide

    Locale: Red Deer, Alberta, Canada

    Based on the Zpacks weights posted for materials, this tent will come in at no less than 309 grams with 0.51 wt canopy or no less than 369 grams with 0.74 wt canopy (10.8 oz, 13 oz respectively).

    #1742717
    J C
    BPL Member

    @joomy

    Looks quite similar to the new Sea to Summit Solo and Duo tents. But they are not under 400g!

    #1742721
    Ken Thompson
    BPL Member

    @here

    Locale: Right there

    Why not get rid of the interior walls and use perimeter bug netting? Or use an inner net tent that can be left behind when conditions warrant.

    #1742724
    John Julyan-Gudgeon
    Member

    @cyanide

    Locale: Red Deer, Alberta, Canada

    Actually, I had already altered the tent a bit, got rid of the "back wall" netting and switched it to a "perimeter netting" as you had suggested. The front wall netting is still present in this weight approximation (which does not include any cordage, ground stakes, or weight added by tie out points, seams and whatever additional ventilate structures that might be added etc).

    I am thinking that if I start eliminating the frontwall netting I might start having real problems with condensation (cold, wet environment where I commonly backpack). Further, I will lose the function of the last vestibule (the secondary smaller one disappeared as I switched backwall netting configurations). At that point, I will probably have to expand the bathtub floor for more gear space. I have to keep my gear inside the tent at night, as I have had birds peck through my food bags even when suspended 30 ft up on a bear pole, I have had every pocket in my empty pack torn through by rodents looking for food that wasn't there, even had a boot eaten by a porcupine -despite the boots being in a relatively protected (not perfectly protected) vestibule.

    But, that isn't meant to be a rant. I do appreciate the commentary and suggestions. I guess I am just giving the rationale for some of my design decisions.

    #1742745
    Daryl and Daryl
    BPL Member

    @lyrad1

    Locale: Pacific Northwest, USA, Earth

    I have considered using the carbon fiber spars from my pack for poles in my tent. So far I haven't done it but here are a few of my thoughts, for your consideration.

    The tubing in my pack frame weigh less than 2 ounces so there isn't a lot to gain by multiple use.

    Taking the pack apart every time I erect the tent would be inconvenient at best and a hassle at worst.

    Ideally I could use the pack frame intact as part of the tent frame. That way I wouldn't have to take the pack apart.

    I sometimes like to use the pack while the tent is up so there would be a conflct there.

    I do use the same struts in my pack and tent so the pack frame does serve as a back-up if a tent pole breaks and vice versa.

    A friend of mine put my multiple use efforts into perspective by saying "You could use your hat as a cereal bowl but is it worth it?"

    #1742756
    John Julyan-Gudgeon
    Member

    @cyanide

    Locale: Red Deer, Alberta, Canada

    Hmmm, Cereal Bowl you say? That might get in the way of using it as toilet paper as well.

    (JK, good natured jest)

    #1743098
    Daryl and Daryl
    BPL Member

    @lyrad1

    Locale: Pacific Northwest, USA, Earth

    John,

    Your estimated weight of 13 ounce using 3/4 ounce cuben does seem a tad high. For comparison, using the same weight cuben fiber, the Solomid weighs 9 ounces and the fly/tarp shown in my avatar weighs about 8 ounces.

    Daryl

Viewing 18 posts - 1 through 18 (of 18 total)
  • You must be logged in to reply to this topic.
Forum Posting

A Membership is required to post in the forums. Login or become a member to post in the member forums!

Get the Newsletter

Get our free Handbook and Receive our weekly newsletter to see what's new at Backpacking Light!

Gear Research & Discovery Tools


Loading...