Topic
How to bond a cat curve on cuben shelter
Forum Posting
A Membership is required to post in the forums. Login or become a member to post in the member forums!
Home › Forums › Gear Forums › Make Your Own Gear › How to bond a cat curve on cuben shelter
- This topic is empty.
-
AuthorPosts
-
Nov 25, 2010 at 12:49 pm #1265898
I've got a few ideas on how I would do it and plan on trying it in the next few days, but hopefully someone has done this before. Who has bonded (not sewn) a catenary curve on the ridgeline of a cuben fiber tarp/shelter? And, what method did you use?
I was thinking of doing it the exact same way you would sew one but then the seam would be in peel. Maybe putting another strip overtop of the seam?
Anyone got a better idea?
Nov 25, 2010 at 4:12 pm #1667984Steve, I'm not sure I can visualize the seam in peel along the ridgeline. Could you provide a little line drawing of the cross-section of the seams you have in mind?
In another thread I remember someone who had made a cuben shelter saying that they were able to achieve a shallow cat edge by just folding the cuben over. They reported that wrinkling wasn't a problem. Maybe two pieces of cuben with a cat-cut top edge could be layed down on a surface with the top one hanging over a bit, and then the cat-cut overhang just folded over and bonded to the other side of the underlying piece? The material in the folded-over section would have to deform a little in order to lay perfectly flat, but according to the contributor in the other thread, it can.
Nov 26, 2010 at 1:04 am #1668042> Maybe putting another strip overtop of the seam?
Only way I now of for doing this. On the other hand, do it carefully with adequate width in the cover strip and it should look very good.
Hint: make the hem wide enough that you can sew little sky-hook loops to it on the inside, to run a clothesline along inside.
Cheers
Nov 27, 2010 at 11:21 am #1668344Colin, here is a quick picture of what I had in mind.
Basically, I would bond the parent material first, just as when it is sewn (this would put it in peel), and then place the strip overtop so that it is no longer in peel. The two bonded pieces that hang down on the inside of the shelter could either be trimmed or as Roger states, used to sew small loops and such.
I think it was Dan Durston who had mentioned that the cat curve is possible. I tried a smaller version of a tarp and cut two pieces with a curve on each and then bonded them in lap shear and I couldn't do it. It was too much for the material to handle and wrinkled quite a bit. I can't imagine that is how manufacturers are doing it, but maybe I need to practice a bit more.
Anyone have a BPL/MLD tarp that can share some info?
I've got all my material and the design hammered out, I'd just like to put a cat curve in it so I'm holding off until I know how.
Thanks for the help guys!
Nov 27, 2010 at 12:40 pm #1668360Hi Steve
Sometimes it helps to apply the seam tape in shorter sections. That can sometimes (not 'will') help relieve the build-up of mismatch.
Also, the wider the seam tape, the more difficult it gets.
Cheers
Nov 27, 2010 at 3:08 pm #1668406You could sew it first. Then fold back the raw edges and tape
over the whole thing. (Tape on the other side of your drawing.) This would hide the raw edges, seal
the needle holes, and the sewing would be a backup if the tape should fail at spots.Belt and suspenders.
Nov 27, 2010 at 4:15 pm #1668427What about a 1.000" + a 0.500" strip of tape, one on each side, with the fabric in proper pull (assuming a relatively short ridgeline, such as in your avatar photo):
Nov 27, 2010 at 4:22 pm #1668437The cuben fly I made doesn't use cat curves where the panels join, but it does use a lot of arbitrary curves, since it fits on a 3D dome shaped tent. If you flipped the fly inside out, some of the curves might be similar to a cat curve it seems. I would feel reasonably comfortably trying to make a cat curve tarp using a similar technique.
To join the two panels to create a curved 3D shape, I used a liquid adhesive. Theoretically you could use tape, but a slow-ish drying liquid adhesive gives you time to improve the work before it dries. I think it would be hard to use tape and not wind up with at least a few large wrinkles unless you practiced a lot. I'm not sure how the cottage manufacturers do it with tape.
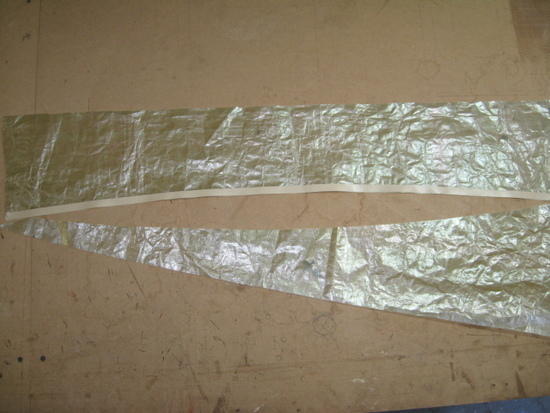
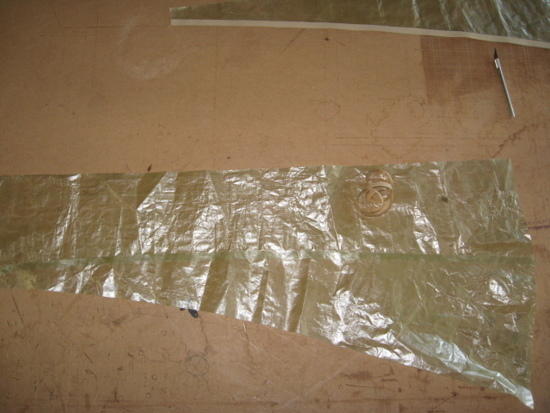
To start, I cut one half of the material exactly to shape, and I cut the other half with an extra 1" of material which acts as the bond overlap. You could do 1/2" of overlap on each, but I figured this was simpler and accomplished the same thing. I drew a line with a dry erase marker on the second piece of material one inch in from the edge, so that I knew where to line-up the edge of the other piece. Dry erase marker comes off easier on one side of cuben than the other, so do some tests first before you draw a fat line down the material that might not come off.
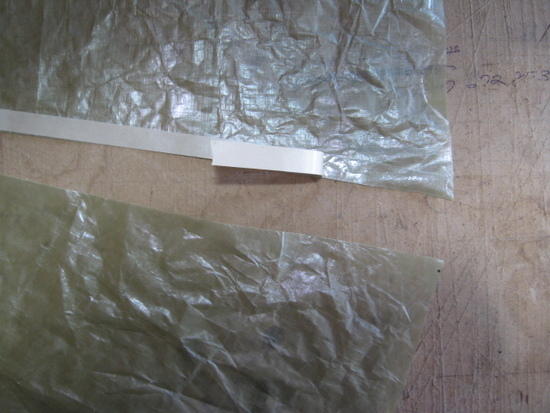
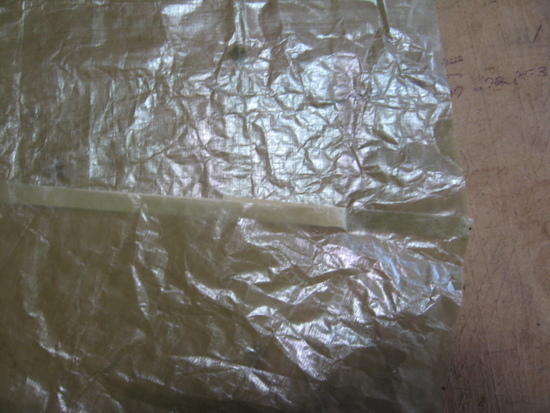
To actually bond it, I used Hysol liquid adhesive and I worked slowly from one end to the other to get it bonded. Make sure to keep the fabric lined up, by putting a few ticks along the way that should line up. You don't want to get to the far end and find out once piece of material sticks out 2" further. Once it was bonded, I went over it a few times to smooth out any large wrinkles into a few smaller ones etc. As long as you keep the wrinkles small, it goes together well. The wrinkles can be pressed down and if you go over the seam every 30-60 minutes for a few hours to make sure it's all pressed down then you'll get a nice result. If for some reason you weren't happy, you could try adding one sided tape over the seam on one or both sides afterwards but I don't think this is necessary.
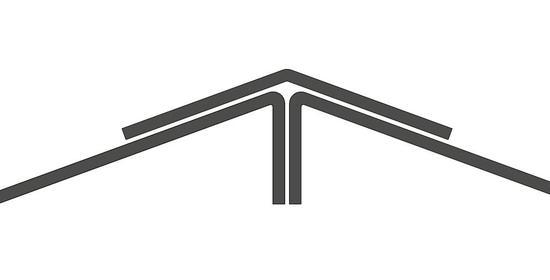
Here is an example of a curve I did on the cuben tent fly:
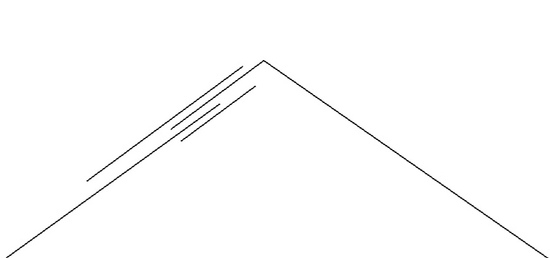
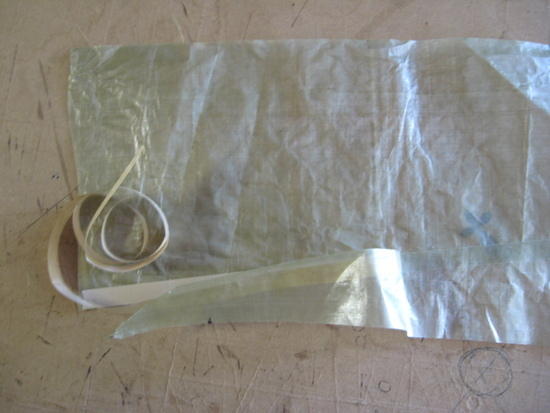
I suspect a 1" seam isn't totally necessary. A 3/4" overlap would look nicer, be lighter and have less wrinkling. I have done any scientific tests, but a 1" overlap seems like it may be overkill. Here is an example of a curve using a 1/2" bond. Since the bond is narrower, you can achieve a significant curve with not much wrinkling:
Nov 28, 2010 at 9:22 am #1668591David: I was thinking of sewing it first and then taping like you mentioned. I think this is the easiest/fastest except I don't sew so I would have to bring it to the seamstress. I'm also interested in pursuing a fully bonded curve.
Aaron: the ridgeline I am looking at is very long, about 90".
Dan: OK, I understand what you did. It seemed in my mind that it would not work, but looking at your picture is allowing me to visualize it better. I think I will do a small test tonight to see if I can pull it off.
Nov 28, 2010 at 12:56 pm #1668650Hi Dan
Now that is a new technique and VERY clever. My compliments on the results.
Cheers
Nov 28, 2010 at 9:43 pm #1668888Hey Steve,
I would only use a lap seam if I were you since peel is always an issue with cuben. A cat type curve is very easy to do especially if you use a 1/2" tape. Just lay out your tape on one side first and then peel off your kraft backing as you go along. I can go all the way down to a 6" diameter circle but thats a pain in the ass and takes a long time to figure out all the tricks. You should have no problem doing your cat curves.
If you don't mind me asking, why do you want a cat curved ridgeline in cuben?
Nov 29, 2010 at 10:06 am #1669042I thought it would be difficult to just glue when I glued my cuben tarp tent. So I cut one piece to the curve plus 3/16 " and the other plus 1". I laid the 2 pieces outside to outside with the ridge marks above one another. Everything is still flat.I stitched with long stitches along the ridge lines, Then I opened the 2 bits up, folding the little overlap in doing it. I turned the whole think over and glued and weighted the seam. The seam was almost as yours Steve.
Nov 29, 2010 at 5:05 pm #1669164Lawson, thanks for the tip. The reason I want a cat curve is mainly experimental, just for fun really, but I think it will hold my poles better aswell, almost like pockets. If you look at my avatar, the poles in the shelter need to be pushed apart in order for them to stop falling inward. I think if I could put a nice curve in there, they would stay up easier. That shelter isn't the one I am working on, but it is the same concept in my new one.
Derek, good to know, That was how I was originally going to do it, but I'm going to play around a bit first to see what works. I envision making a bunch of tiny curved 24" ridgeline tarps over the next week or so. :)
Dec 1, 2010 at 3:41 pm #1669903How much curve are you after and how wide are you going? 24"? I will make a cat curve while taking a bunch of photos if you give me the dimensions. I personally wouldn't go more then 1" per foot.
Dec 1, 2010 at 4:06 pm #1669916I haven't "calculated" how much of a curve I want, but in my shelter design, one of the ridgelines is 40" long and drops 4" in the middle. It looks super agressive but since I have no experience with cat curves, I thought it would be possible…too much? You know what, I'll post a picture of it, gimme a second….
a few minutes later…
Here it is – it's the side profile. I;d post a picture of the entire shelter but it's top secret and I'd be forced to take you out ;)
Dec 1, 2010 at 5:55 pm #1669965If I understand everything correctly your cat cut is 1.20" per foot. (4" at center?) In my opinion its a little aggressive but it can be easily done. Let me see what kind of scrap I have laying around that long and let me find my camera. Any kind of specific photos your looking for that would be really helpful?
Dec 2, 2010 at 2:22 am #1670058Lawson, it's great that you're willing to show Steven a trick or two. I expect my cuben fiber to arrive today, so I'll start working on the cuben shelter in the weekend and might also be interested in a picture of the finished curve and somewhere along the way while you're actually bonding it. What width of tape do you use BTW?
Dec 2, 2010 at 8:41 am #1670111Lawson,
Yes, you are correct – 4" in the middle. I really appreciate the offer. As for specific pics, if you have the time, I guess a step by step would be great, just a few though, no need to go onto extreme detail. Thanks for doing this. It will help both myself and others in the future.Thanks again!
Dec 2, 2010 at 9:32 am #1670125Here are some photos of a taped centenary curve. I have a 1/2" per foot template that I use on all the edges of my tarp so I just used that for deminstration purposes only. I would say you could use this method up until a few inches per foot.
I used a continuous piece of 1/2" tape for the bond. If you want to add some extra strength you could use a single sided tape on the top or bottom.
The photos kind of suck and probally hard to understand. I think a video would be better so maybe I should shoot a video in the future.
In any event. The first step is to cut your cat curves inwards so the create a football type shape. After you get everything cut and layed out you need to lay down your strip of 1/2" wide tape. After that start on one end. I always go from right to left but I am not sure why and slowly pull back the tapes paper backing 6 or so inches at a time. You want to make sure as you pull back the backing you replace it with the cuben fiber. This will keep everything nice and tight and wrinkle free. Slowly work your way down the ridgeline until you are all the way done.
Dec 2, 2010 at 12:44 pm #1670174Lawson, at least on my behalf, but I guess on someone's elses too, thank alot for these pictures. Those pics tell the tale quite well IMO. Very kind that you were willing to specifically make these pics for insights! Thanks!
Dec 3, 2010 at 5:47 pm #1670615Awesome…it's as simple as that, eh? :)
Big thanks Lawson. I'll most likely give it a try this weekend, got a bit swamped with work, but I'll definitely let you guys know how it goes.
Dec 4, 2010 at 4:38 pm #1670856Lawson,
You just made it look too easy for me to continue to delay building a cuben tarp out of fear. Thank you!What is the brand of tape you are using & where did you get it?
Dec 5, 2010 at 11:00 am #1671070Hey Michael,
As far as tape goes you can use any of the more common ones. C3, 3M9485PC, Venture Seam Stick. There are some other ones but they are harder to use and are hard to find in small orders. I would personally use 1/2" tape since the wider stuff can complicate things a bit.
You shouldn't have a problem bonding the ridgeline. Just make sure you don't do too much curve. I personally wouldn't go more then 1" per foot. Not only is it harder to bond but there really isn't much advantage with cuben. Cat Cut edges are a little harder but its still pretty easy to do.
If you have any other questions let me know.
Dec 5, 2010 at 4:23 pm #1671159Thanks Lawson,
I've been using 1" per foot for silnylon. I'll probably back off to 1/2" per foot for cuben on the ridgeline.
I plan to simply fold the edges 1/4" and sew, also with 1/2" per foot cat cut. I'll then re-enforce the tie-outs with more tape and layers of cuben.
Dec 6, 2010 at 7:53 pm #1671610FWIW, I've found this to be a good source for the C3 and 3M tapes Lawson mentions:
-
AuthorPosts
- You must be logged in to reply to this topic.
Forum Posting
A Membership is required to post in the forums. Login or become a member to post in the member forums!
Our Community Posts are Moderated
Backpacking Light community posts are moderated and here to foster helpful and positive discussions about lightweight backpacking. Please be mindful of our values and boundaries and review our Community Guidelines prior to posting.
Get the Newsletter
Gear Research & Discovery Tools
- Browse our curated Gear Shop
- See the latest Gear Deals and Sales
- Our Recommendations
- Search for Gear on Sale with the Gear Finder
- Used Gear Swap
- Member Gear Reviews and BPL Gear Review Articles
- Browse by Gear Type or Brand.