Topic
MYOG F1 remote canister conversion
Forum Posting
A Membership is required to post in the forums. Login or become a member to post in the member forums!
Home › Forums › Gear Forums › Make Your Own Gear › MYOG F1 remote canister conversion
- This topic is empty.
-
AuthorPosts
-
Mar 14, 2010 at 10:42 am #1256470
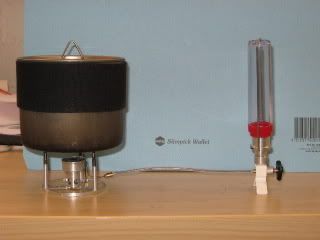
I wanted a lightweight inverted canister stove that is easy to operate. I specifcally wanted the control valve to be easily accessible and give good flame control. This meant that the control valve needed to be on the stove itself, not at the canister like all commercial remote canister stoves.
I took a F1 Spirit canister mounted stove and made a vapouriser tube and legs, and added a fuel hose from a Brunton stove stand. Total weight is 155g

 Mar 14, 2010 at 10:52 am #1586310
Sweet. How did you manage the vaporizer tube?
Mar 14, 2010 at 12:30 pm #1586328Hi, the vapouriser tube is #13 gauge stainless steel 'hypodermic' tubing bent to the required shape.
cheers S
Mar 14, 2010 at 1:29 pm #1586344Hi Stuart
Very nice! I am especially impressed with the heat exchanger arrangement.
And I 100% agree with the desire to have a control valve at the burner after the heat exchanger too.Cheers
Mar 14, 2010 at 1:48 pm #1586351Hi Stuart,
Very nice, extremely impressed with your high quality workmanship.
Tony
Mar 14, 2010 at 2:45 pm #1586362I am very impressed too.
I had to take a close look at the F1 just to remind myself why I could not do it.
OK, now I am depressed.
FrancoMar 14, 2010 at 3:13 pm #1586365Thanks guys – and thanks for the inspiration provided by yourselves and fellow contributors to this forum.
Franco – it's not too hard to do with just some basic hand tools like hand drill, a saw and file, some taps and a bench vise
Mar 14, 2010 at 3:34 pm #1586367I failed playdough at kindy…
FrancoMar 16, 2010 at 2:01 am #1586978Hi Roger
I hadn't thought of the vapouriser tube as a heat exchanger but you're right of course. Which then leads to the obvious question – how much heat is required to be exchanged?
The answer is just 0.8% of the stove's heat output – from the latent heat of vapourisation divided by the heat of combustion (butane and propane give much the same figure).
I need to move the vapouriser tube a little further away from the flame to get less heat coupling…
cheers S
Mar 16, 2010 at 2:52 am #1586984Hi Stuart
You are right that very little heat is required in practice – see my article on using a Brunton Stove Stand with a strip of copper as a heat exchanger. In that case the gas goes nowhere near the flame even.
However, I wouldn't sorry about moving the vapouriser tube away – it really doesn't matter if it runs red hot! Take a look at the huge vapouriser tube on an XGK! All that can happen is that the hydrocarbon chain might start to break down inside where the tube is red hot – but it has to break down somewhere for the stuff to burn anyhow.
Cheers
Mar 16, 2010 at 6:06 am #1587004Neat job!
Has anyone come up with a neat clamp/fuel take off for a cigarette lighter refiller yet?
Mar 16, 2010 at 6:08 am #1587007Agreed it doesn't really matter if the vapouriser tube gets red hot, but the hotter it gets the more heat is conducted down the tube to the rest of the stove which can then become a bit too hot to handle after running for a while. That is all I am trying to reduce – I never like to settle for something that can easily be improved…
Cheers S
Mar 16, 2010 at 2:31 pm #1587196Mar 18, 2010 at 2:30 pm #1587984"Has anyone come up with a neat clamp/fuel take off for a cigarette lighter refiller yet?"
They have! As I recall, a member in Japan made a great little clamp which fitted on butane cylinders of the size which fitted into curling tongs.
It was excellent! (o:
Mar 19, 2010 at 10:13 am #1588293Through my work on making this and another stove, I have realised something I hadn't before: the type of metal used for the mixer tube has a large effect on the heat conducted from the burner to the stove base.
Aluminium has a very high thermal conductivity (240 W/K/m), so stoves made from aluminium, such as this one, conduct a fair amount of heat to the base.
On the other hand, a previous stove made using a Pocket Rocket has a steel mixer tube which has a much lower thermal conductivity (43 W/K/m) and so much less heat is conducted to the base.
This effect might be useful in a canister mounted stove: a aluminium stove might conduct a useful amount of heat to the canister and help to keep the contents warm in marginal conditions.
-
AuthorPosts
- You must be logged in to reply to this topic.
Forum Posting
A Membership is required to post in the forums. Login or become a member to post in the member forums!
Our Community Posts are Moderated
Backpacking Light community posts are moderated and here to foster helpful and positive discussions about lightweight backpacking. Please be mindful of our values and boundaries and review our Community Guidelines prior to posting.
Get the Newsletter
Gear Research & Discovery Tools
- Browse our curated Gear Shop
- See the latest Gear Deals and Sales
- Our Recommendations
- Search for Gear on Sale with the Gear Finder
- Used Gear Swap
- Member Gear Reviews and BPL Gear Review Articles
- Browse by Gear Type or Brand.


