Topic

New quilt almost done but …..

  • This topic is empty.
Viewing 25 posts - 1 through 25 (of 38 total)
PostedMar 12, 2009 at 5:28 pm

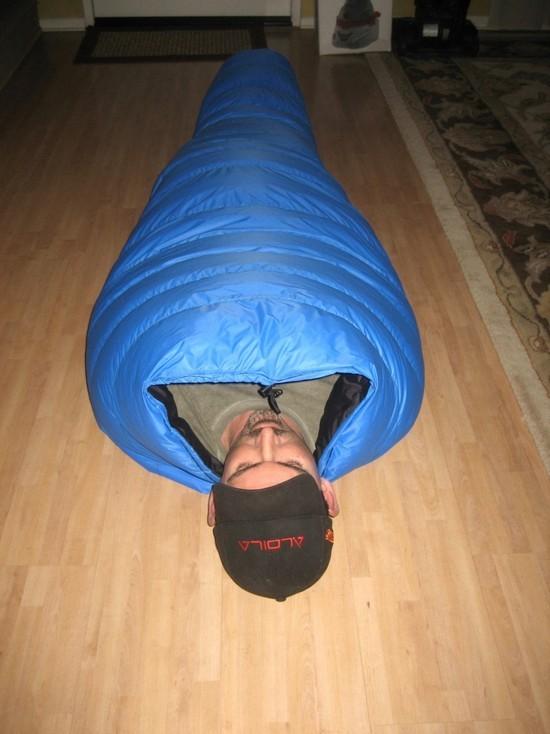
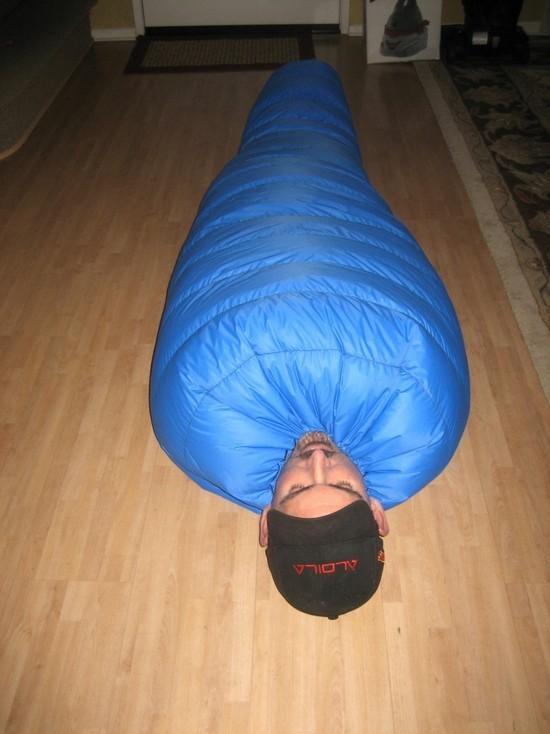
My new quilt is 99.9% complete but I can't figure out the last important item !!! I guess I just wasn't paying enough attention and assumed this was going to be the easy part but now I need to ask for the expert quilt makers help!
HOW are you sealing the neck area? I just assumed that I was going to be adding a snap to close the neck area .. Just doesn't seem like that is going to work properly. Did everyone else make a draw string closure on the neck opening as well?

Details on the quilt that so many of you have already done:
Thru Hiker quilt kit with 1.1 nylon and Momentum 90.
12 oz of down and I think I got 99.99% of it IN the bag thanks to the great description on how to transfer the down using the shop vac system.
Sized for me at 6'2" and 185 lbs.
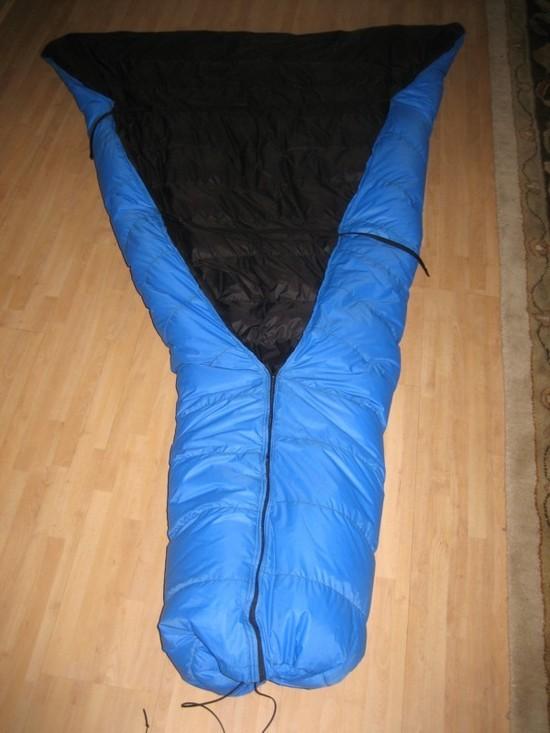
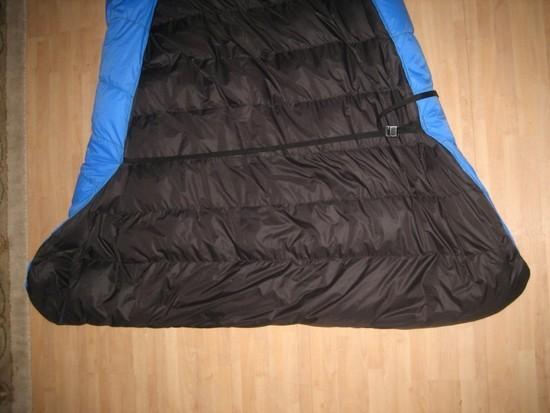
26" zipper on the foot end that unzips to make it completely flat and I should be able to dry it out quickly and easily (Thanks for the suggestion Tim). Drawstring closure at foot for venting. 2.25" baffle height on 5.0" spacing. Two straps on the back. Total weight is 20.7 oz

Tim, how do I make the neck area seal properly ??

Thanks
Kevin
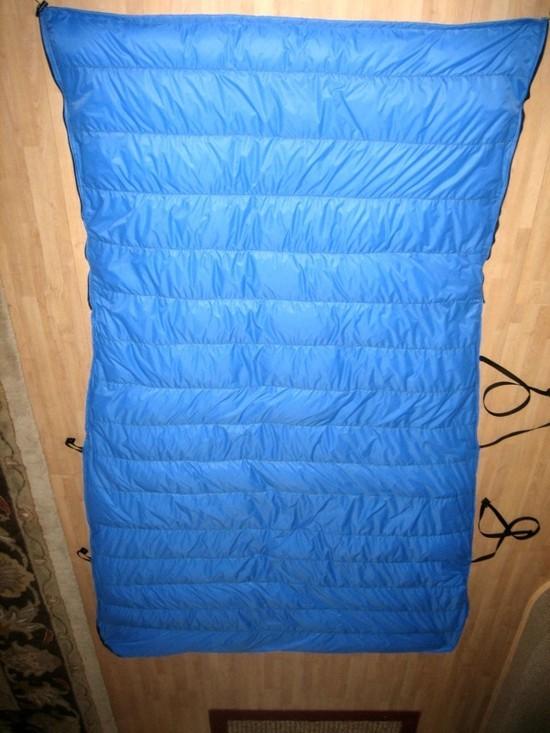
Quilt 1
quilt end view
Quilt head end

Tim Marshall BPL Member
PostedMar 12, 2009 at 6:30 pm

You want a drawcord at the top too. This will pull it tight around your neck.

Looks pretty nice!

-Tim

PostedMar 12, 2009 at 6:50 pm

Thanks Tim !!!

How come I never read the draw cord around the neck from any of the other posts ?? Maybe I just have a bad memory.

That pretty seam I made at the top is now going to be turned under to make the drawcord work. I guess the snap holds the top and keeps it from seperating and I install the drawcord to be on the inside and pull tight from the center ?? That would seem to make the most sense ??

Kevin

PostedMar 12, 2009 at 6:57 pm

Kevin,
This quilt looks great!

As Tim mentioned, a drawcord at the top is used to keep things cozy. But you've closed the top so now you have some soul searching to do.

The drawcord needs to be sleeved. If you just run it through the top baffle space it will constantly draw out down. You have a least three choices.

1) Make a tube/sleeve, open the top seam, and sew the tube to the inside of the baffle. Oufff!

2)Make a tube, open just the ends of the top seam, snake the tube through, and hand sew the ends in place. Tricky.

3) Or take some fabric and sew it to over both sides of top seam, folding both edges in for a finished look, creating a sleeve in the process. Depending on your skill level, it maybe easier to sew first one side, then the other.

In all cases you want to hem the ends of the sleeve first, again for a finished look.

Another consideration is where you want the cordlock – in the center a la Nunatak, or on one end.

The last consideration is whether to use a "static" cord or small diameter shock cord. Shock cord can keep the closure snug no matter how you move around. Some don't like it for just that reason.

Like all finish work, it is very visible and will be a testament to your skills. You may want to be done, but take your time, think it through, and end with a look that matches the rest of this quality job.

PostedMar 12, 2009 at 7:16 pm

Greg,
Thanks for the suggestions. I already used the seam ripper on one section that I didn't like so redoing one additional seam won't be that bad. I think I'm going to go with the static cord, sewn on both ends and use a cordlock in the center. This seems like it would work best for me.
I just don't know how I missed that part after doing all my research ?? Brain fade I guess.

Will post a photo once it is completed!
Kevin

Steven Evans BPL Member
PostedMar 12, 2009 at 7:42 pm

Sized for me at 6'2" and 185 lbs.

hmmm, I can't help but notice we are the same size…seems it's sized for ME aswell :)

Seriously Kevin, that is one freakin' awesome quilt. I'm lovin' the zipper down the back. That weight is surprsingly low too…12 ounces of down and still barely over 20 oz! You should be able to take that well below freezing…if you make a second one, I'll take that one off your hands. Honestly though, fantastic job.

Tim Marshall BPL Member
PostedMar 12, 2009 at 7:44 pm

to add the drawcord tube at the top i suggest you cut 2 pieces of shell material 4" x (2" longer than half the head width), this will give you a drawcord tube that opens in the center and has finished edges.

I think my explanation will be harder to understand than the process actually will be to do.

Take the 2 pieces and make a hem on (one of the short sides) each where they will meet in the center of the bag (easiest place to adjust the cord lock in my opinion). Fold the material twice to create the hem, not just once as you don't want the cord pulling across a raw edge.

Sew each 4" piece's long sides together. This will make a tube with one end hemmed and one end raw. Turn it inside out (kinda hard) so the are edges are inside the tube. You should now have 2 2" wide tubes that are half the length (+1") of the head of the bag with raw edges inside.

ok, not sure how to explain this next step.
fold the long sides of each tube together with the seam in the middle along the top. You will sew the short raw edges together here to form a square corner when folded right side out. Sew the drawcord into this seam to secure it in place.

Hope i haven't lost you yet, my head hurts.

You should now have 2 tubes each 1/2 the length of the head and the cord is secured to the end of each. They should have no raw edges anywhere. Fold the tubes in 1/2 long ways (seam inside fold) and sew them to the top of the bag. This will add 1/2 to the bag length and leave you with a finished (double thick)drawcord tube with cord already sewn in.

I hope that makes sense, i sew them i don't explain it.

-Tim

P.S.
I wouldn't do it that way unless i forgot the tube or was modding a bag, sewing it in the seam from the beginning saves so much energy.

PostedMar 12, 2009 at 8:11 pm

Tim,
You lost me there … I think I could try folding a piece of paper to see if I can figure that one out ???
I had something simple in mind but now everyone has me thinking that I need to think about this more before doing anything. You have a nack at coming up with nice projects and I wish I knew a little more what you were thinking.

Steven, this project ended up being a little harder then I had anticipated. I'm usually really good at thinking things through in my mind before doing them but this one has a learning curve for sure. Second one would be even better but I'm not sure I ever want to try this one again … as I still want to make a new two person Cuben shelter that I have been thinking about and think I could really make a nice one under 14 oz. And … I still have a lot of work to do on the carbon stay project and finish testing that one out. Close on that one.
I'm still hoping YOU start making the titanium wood burning stove so I don't have to make that one !!! That one keeps me thinking late at night!

So m any projects … so little time !!

Tim Marshall BPL Member
PostedMar 12, 2009 at 8:41 pm

Kevin,

You could do something simpler than what i suggest. My suggestion gives the cleanest possible look, but it isn't the only way.

Simplified instructions.

What i am suggesting is covering the top edge of the quilt with a tube (which has no raw edges) of fabric instead of a strip (which has raw edges). To make the tube start out with a 4" wide strip, sew it into at 2" wide tube. Turn it so the long raw edge is inside.

Now you have a 2" tube with a long seam. Line the long seam up with the top edge of the quilt and pull the fabric from the tube over the top edge of the quilt. When you stitch through the tube it will go through 2layers of tube, quilt and 2 more layers of tube. This will give you a tube without having to pin and stuff raw edges.

Hope that helps, beyond that i am lost on the explanation.

-Tim

P.S.
Maybe someone who does understand (if that's possible) what i mean can restate it as i am a horrible communicator

PostedMar 12, 2009 at 8:45 pm

Tim,
NOW I get it ….. that sounds clean and simple !!!!

THANKS. Better then what I was thinking !!!

Kevin

Roger Caffin BPL Member
PostedMar 12, 2009 at 8:53 pm

> My new quilt is 99.9% complete but …. HOW are you sealing the neck area?

Um – I don't understand. This is a quilt, not a sleeping bag, right?

Imho, you don't seal the neck area: you wouldn't do that at home to a quilt on your bed would you?

On the other hand, you haven't put a head-covering 'hood flap' on it, which is something I always do. With my head covered I don't need a neck seal.

Just my 2c.

Cheers

Tim Marshall BPL Member
PostedMar 12, 2009 at 9:09 pm

Kevin,

I'm glad you got it, not sure what else i could of said. It is actually not hard to do, but surprisingly hard to explain.

-Tim

PostedMar 12, 2009 at 9:11 pm

Roger,
Without a way to seal the area around my neck all the nice warm are will be able to easily escape and allow cold air in. Especially in the 25 to 35 degree temp range. There is quite a bit of space at the neck opening, more then I had anticipated. I should have tapered the top at the neck a few more inches I guess. The draw string closure will allow me to keep the top wide open in 40 plus temps and close it down as needed in temps below 40. I think I have a lot of venting options the way I have the foot section as well as the draw cord at the top.
Now … making a hood might have been even better …. but I would have only done that if I was going to make this the way Bill makes his bags with the bottom section being a thin piece of material more along the lines of the Gossamer Gear Sleep light.

PostedMar 13, 2009 at 11:28 am

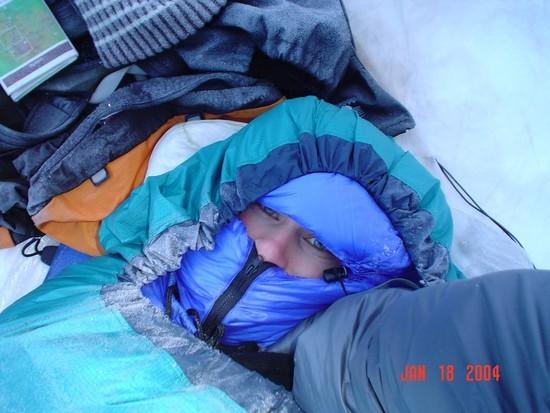
I agree you definately want the draw cord around the neck as it greatly expands the temperature range with minimal added weight. As for the hood I would recommend buying/making a separage down/synthetic balaclava. I love mine, made from leftover material and down from Thru-hiker's quilt kit. It's nice to side sleep without breathing into my hood, and I can wear it around camp in the evening. The hood adds about 2.5 ounces to my 19 ounce quilt (3" loft), but I can leave it at home when I don't need it. For what it's worth, here are a few pictures showing mine. The first is a self portrait in temperatures around 14F. You will note my grey WM sleeve holding the camera. The hood and quilt are bright blue and are inside a green bivy.

self portrait, quilt w/ separate hood inside bivy. low teens, but warm

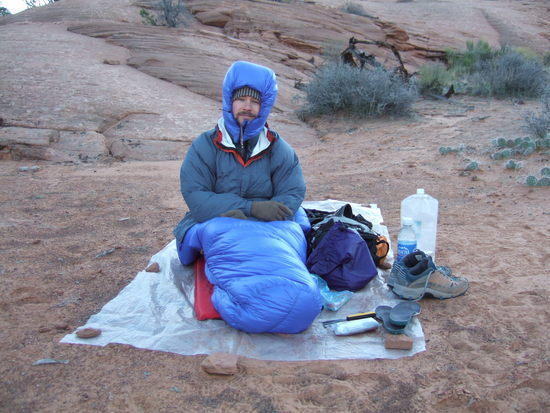
This second photo shows me wearing the hood as I'm preparing my camp area just before bed. You can't use an attached hood in this fashion- wear it while setting up your shelter, while cooking, keep it on for those late night trips to the privy. The versatility with a separate hood is certainly an advantage.

Hood worn loose here as a camp hat- try that with a hooded sleeping bag! Temps ~low 30's

You have some clever designs in your quilt, and very nicely sewn.

Be well,
Jay

te – wa BPL Member
PostedMar 13, 2009 at 11:41 am

ooohhh aegean blue on black.. exactly like my tuturial shows! i love the color combo, quilt looks fantastic. I was just pondering adding a drawstring to my summer (sewn thru) quilt. fwiw, i think 1/16 bungee stretch cording is a better option over flat cord. if you really want to save money, go to the local discount store and buy shoelaces.

PostedMar 13, 2009 at 1:13 pm

Jay,
I think you just sold me on making the new hood. I always use a nice wool beenie BUT this looks so warm and comfy!
And … multi use is always good.

I can see that same hood with a nice little fleece strip coving the zipper on the inside !!! Where did you find the pattern for this one ?? I think I rember something about a pattern on this site ?? Maybe ??

Thanks for the nice photos!

Kevin

PostedMar 13, 2009 at 2:53 pm

Kevin,

I don't know of a pattern for an insulated hood. There might be one out there. I wanted a differential cut, such that fabric on the inside of the hood is smaller than the outside part. This provides a nice smooth fit (wrinkle-free on the inside) without loft compression.

I used the hood on my rain jacket (a Marmot Precip at the time) as a pattern, making the parts a bit smaller for the inside cut and a bit bigger for the outside cut. (Though you'll note I didn't get it quite right- the top definately lofts a bit more than the sides??). Nevertheless, this hood is very warm. I've never wanted more.

It has cinch straps along each side of the face, allowing me to cinch it into a nice wide rectangle around the eyes (rather than a tight circle). There's also one cinch in back (roughly 6 inches long), but on the inside so I can adjust fit without affecting loft.

My hood is barely long enough. It is long enough, just long enough, and seals well with my quilt, but it's almost not. Make sure you have plenty of length to cover your neck.

The zipper works okay, a tad difficult to get started given it's location relative to my eyes. Velcro might be easier to use, but I have an adversion to Velcro and was slighly concerned it might snag the fabric on my quilt. Knowing how much work it is to make a quilt, you'll recognise my decision not to chance it. I don't think the thin fabric would hold up well to snaps. So I used a zipper.

Good luck,
Jay

Roger Caffin BPL Member
PostedMar 13, 2009 at 3:09 pm

Hi Kevin

> Without a way to seal the area around my neck all the nice warm are will be able to easily
> escape and allow cold air in.
?????
What do you do at home in bed? I just pull the quilt over my head – at home or in the snow. The warm air does not escape.

Having a semi-circular extension on the top end of the quilt makes this easier to do for sure. In fact, it works very well for us.

Seems to me that if you wrap the cover right around you and join it into a bag with a zip then it is not a quilt but a sleeping bag. Nothing wrong with that of course, but calling it a quilt confuses me.

Cheers

Roger Caffin BPL Member
PostedMar 13, 2009 at 3:12 pm

Hi Jay

> I wanted a differential cut, such that fabric on the inside of the hood is smaller than the
> outside part. This provides a nice smooth fit (wrinkle-free on the inside) without loft compression.

Understood, but I did see someone claim a benefit from making the hood slightly large and then having the inside bit of fabric the same size as the outside. It meant that the inside fabric would mould itself around your head and face very nicely. I can see the point of the idea. Hum?

Cheers

PostedMar 13, 2009 at 11:28 pm

Im with Roger,

I just spend my first night out, 8 C, with my Ray Jardine quilt, and wouldnt see the advantage in sewing anything for the neck area.

As a note, going from a conventional Down bag to a quilt was a great move, much more flexibility with a quilt.

Cheers
Mark

Mark Ferwerda BPL Member
PostedMar 14, 2009 at 6:55 am

Several years ago I also sewed up a quilt and put in a drawstring so I could cinch the top. I have to say that it really never worked as well as i had hoped because my shoulders were always cold when it got down to the low 30's. I finally to take out the drawstring and extended the length so I can drape it over my head if needed. Preliminary outings seems to point that this was a positive improvement, but i haven't had it out in cold enough temps yet….but for me, the drawstring didn't work the way I thought it would.
Mark

PostedMar 14, 2009 at 6:03 pm

o.k… NOW I'm done !!!

I have the option of keeping the top portion WIDE open if it is warm or I need to vent ….. or if it gets cold I can cinch the top closed around my neck and create a smaller airspace to keep warm, just like I would on my sleeping bag when the temps drop and I close everything up tight. The great thing about these DIY projects is I can modify or change anything that doesn't seem to work out in the field. I have NO problem fixing things that don't work. Looking forward to getting out there soon and testing it out. A few pictures of the top draw string closure in action. First one with it not being used and the second one with it semi snug around my neck. Feels really nice now. Laid on the floor for about 15 minutes last night and almost fell asleep but got too warm quickly!

Next project … a nice little down hood since I just found a great little pattern that I think will work great. A zip off rain hood that has great seam and pattern lines to start from. Will definitely do the differential cut and a nice little one inch baffle height. Not sure if I want to go with a zipper or Velcro ??

Kevin
Draw string open
Draw string closed

Roger Caffin BPL Member
PostedMar 14, 2009 at 7:53 pm

Hi Kevin

Not enough length to keep your head warm? [Insert smiley here]
And your head is the most sensitive and important part of your body too.

I will be interested to hear how well your sleeping bag works.

Cheers

Tim Marshall BPL Member
PostedMar 14, 2009 at 9:10 pm

Roger,

We get it you want the bag/quilt to cover the head. :)

However, Kevin has made a quilt that allows him to use gear he already has to keep himself warm as he sleeps. Instead of the bag/quilt hood he can use his warm hat, or balaclava, or puffy jacket w/hood. This saves the weight of the sleeping bag hood or added quilt length as the insulated head gear is already coming anyway.

If the bag was going to strictly be used in winter i would agree with you. But for a bag that will take him to a bit bellow freezing (which i never understood why most people call that a summer bag) i assume he will not be using it at it's temp extreme often, so the added weight is unnecessary as he can add the weight of an extra warm head piece that he would need anyway if he expects cooler temps than normal.

Obviously you are more experienced than i in cold temps and if he was making a bag for frozen balls winter then i'd shut up and bow to your wisdom (deserved bowing and silence as you know way better than me about cold) But for a bag like this save the weight and bring a hat.

-Tim

Viewing 25 posts - 1 through 25 (of 38 total)
Loading...