Topic
Zipper in a hexpeak
Forum Posting
A Membership is required to post in the forums. Login or become a member to post in the member forums!
Home › Forums › Gear Forums › Make Your Own Gear › Zipper in a hexpeak
- This topic has 35 replies, 5 voices, and was last updated 4 years ago by
 Joost D.
-
AuthorPosts
-
Mar 12, 2020 at 11:45 am #3635455
Hi all,
I’ve cut all my panels now and starting sewing in a few days 😁
I’m just not sure how to my zipper. I was planning on using a top stitched French seam like https://www.youtube.com/watch?v=LN5aOHmCrDM
I would like a zipper like this
https://luxe-hiking-gear.com/products/hexpeak-1p-tent-system
Any tips? Should I work the zipper in to the seam, or can I sew the zipper directly on the panel?
Mar 12, 2020 at 1:32 pm #3635485I haven’t heard of a top stitched french seam before. It seems like that would work.
Or a regular flat felled seam would work about equally good.
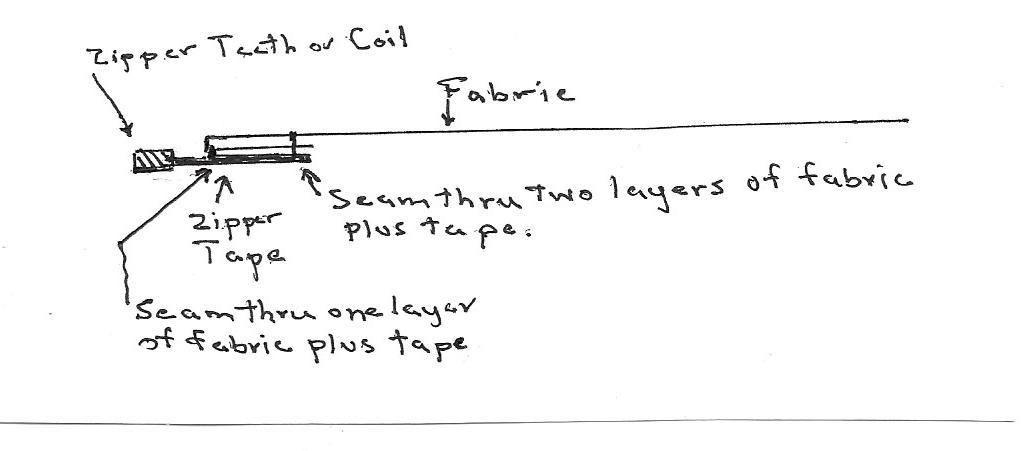
For a zipper, I just hem both sides – fold over twice and sew a row of stitches. Then I sew each side to the zipper tape, position the edge of the fabric right at the edge of the zipper teeth. Just run the zipper all the way to the top, then cover the top of the zipper with the peak circular reinforcement. Or you could cover the top with the vent as on the hexpeak
Mar 12, 2020 at 1:36 pm #3635488On the hexpeak it’s a j zip sorry. Should mention that before. It looks like a simpler way to create a vent.
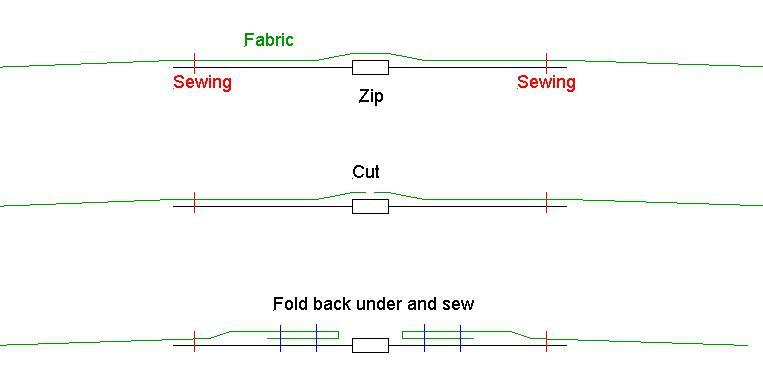
Mar 23, 2020 at 8:47 pm #3637427The video distinguishes what it calls a mock or faux felled seam from the one shown. However, both seams share one characteristic: that is, the needle holes on one side of the seam are exposed to the elements with no backing layer, as on a true flat or lap felled seam.
 So when the seam is tensioned, the line of needle holes on one side are opened wider and unprotected. Seam sealant will cover the holes for a while; but the seam will leak much sooner that a true lap felled seam. The faux seam result looks like this:
Having said all of that, don’t think that it affects your zipper seams. Usually they are done in a manner similar to the one in the video. First, the zipper tape and the fabric are pinned together with the zipper coil between them, and using a zipper foot, a seam is top stitched just the right distance from the coil.Then the top stitch is opened and reversed so that the thread is invisible, and the fabric is pulled away from the zipper and pinned to the tape so that a second line of stitching, parallel to the first but further away from the coil, can be stitched. The zipper tape is bulky enough so that holes in it are not an issue. The result looks like this:
One way to handle the vent, is to run the zip all the way up under the vent cover and almost to the peak. Then the door can be zipped fully open.Thank you for posting the video clip. It made your issue much clearer. But regret if I still missed the point of your inquiry.
Mar 24, 2020 at 3:29 am #3637466Thanks for you’re explanation!
I understand the issue of both seams. It would take a double needle machine probably to fix that. I saw a brother b835 for about 300$ second hand here in the Netherlands. Really had to hold myself in 😊
On the seam of the zipper the raw is exposed is that a problem? Or should I hem it first and then sew the zipper on?
Mar 24, 2020 at 5:14 am #3637476Joost,
use a zipperfoot.
 Mar 24, 2020 at 5:44 am #3637477
Hi Ivo,
Feels strange responding in English to you 😊
You’ve helped me before via email with my trailstar copy.
With this technique for the zipper do you hem the silnylon first and then sew the zipper tape? Or do you leave the exposed edge as it is?
Mar 24, 2020 at 7:25 am #3637487I mark where I want the finished edge to be
Then hem – fold the fabric over twice and sew a row of stitches
Then sew the fabric to the zipper such that the finished edge is as close to the zipper teeth as possible. You can even overlap the zipper teeth slightly before it will snag when zipping. Being as close to the zipper teeth as possible will provide more protection from rain.
I have a zipper foot that has the plate on just one side. You can flip it so it’s either the right side, or the left. So foot doesn’t ride up on top of the zipper teeth.
Then, flip it over and do another row of stitches on the back side along the edge of the zipper tape.
I think a zipper foot that automatically folds the fabric would be good if you were professional and had to do a lot of zippers quickly. Same thing with a double needle machine.
When I do a (faux) flat felled seam, for the second row of stitches, I pull apart the seam and press down the flap to try to get a nice flat seam with both rows of stitching taking the load.
I have never waterproofed my seams on mids and never noticed any leakage. The seams angle down steeply so the water naturally flows down.
When I attach something like a guyline to a tent, I have had that leak. I just ignore it, then if I notice it leaking, I seal it at home the next time.
Mar 24, 2020 at 9:38 am #3637508Thanks for the advice!
The zipper is between 2 panels so it’s a structural seam with cat cut. Is that a problem? And how do you do a lineloc on that zipper seam?
Sorry for all the questions, sewing a zipper is a first for me 😬
Mar 24, 2020 at 10:00 am #3637515I sew fabric with a cat cut to a zipper
It is less desirable to have a lot of tension across the zipper, but you have to do what you have to do
When you say lineloc on the zipper, do you mean at the end of the zipper, at the bottom of the tent, pulling out the side of the tent/zipper?
I use grosgrain through the lineloc, to the zipper tape/fabric of the tent. Zipper tape is quite strong, more than fabric by a long ways, in my opinion
Mar 24, 2020 at 10:00 am #3637516just call me “the pusher man” – trying to get people addicted to myog : )
Mar 24, 2020 at 10:02 am #3637517Great that makes sense!
I’m already addicted, this is my second tarp/tent i’m planning a 1p version in the near future and another backpack…… Call me addicted
Mar 24, 2020 at 10:04 am #3637520I’m drawing a 1p hexamid type of tent. I want it to fit on standard width fabric so i can try different materials like the .9 silpoly maybe .77 mtn 6.6 etc. I’m just worried that those materials might not be storm proof.
Mar 24, 2020 at 10:35 am #3637527to avoid tension on the zipper,
it’s no bad idea to tie a rope between the
two ridges (allak exemple)
 Mar 24, 2020 at 10:41 am #3637528
that’s a good idea, lots of good info from people here
I used that membrane silpoly 0.93 oz/yd2 – works pretty good
Mar 24, 2020 at 10:47 am #3637530That’s why I love this forum
Thanks Ivo!
Mar 24, 2020 at 10:07 pm #3637664Re: “On the seam of the zipper the raw is exposed is that a problem? Or should I hem it first and then sew the zipper on?”
My diagram was not clear. The zipper tape ordinarily has no rough edges. The fabric panel edges should be heat sealed before use (hot knife or flame). Initially, there is only one stitch line through one layer of fabric. The fabric can be trimmed if necessary so that it does not project beyond the zipper tape, but if trimmed, the edge must be resealed.
Note that the stitch line is in close and uniform proximity to the zipper coil or teeth by using the zipper foot.
Then the fabric is folded back from the coil/teeth so that the stitch line and thread are invisible. The whole reason for this is to have no exposed thread, no raw edges and no loose fabric between the coil/teetch and the fabric that could snag the zipper. It also looks better. When folding and pinning the fabric back from the coil/teeth, the fabric should be pulled taut to eliminate wrinkles before top stitching.
The covered and sealed edge underneath the fabric will not be noticeable after the top stitching.
Mar 24, 2020 at 10:59 pm #3637666I do a lot of my zips slightly differently – when it suits the fabric. Good for cutting out doorways for instance.
Otherwise, if the fabric does not span the zip, I run the cut edge down the middle of the zip, sew at edge and fold under and sew – same as in the above but without the cut down the middle bit. Note that you can pin this seam using the zipper tape: the holes won’t matter.
I have also found that a bit of silicone spray generally makes the zip tape reasonably waterproof.
Cheers
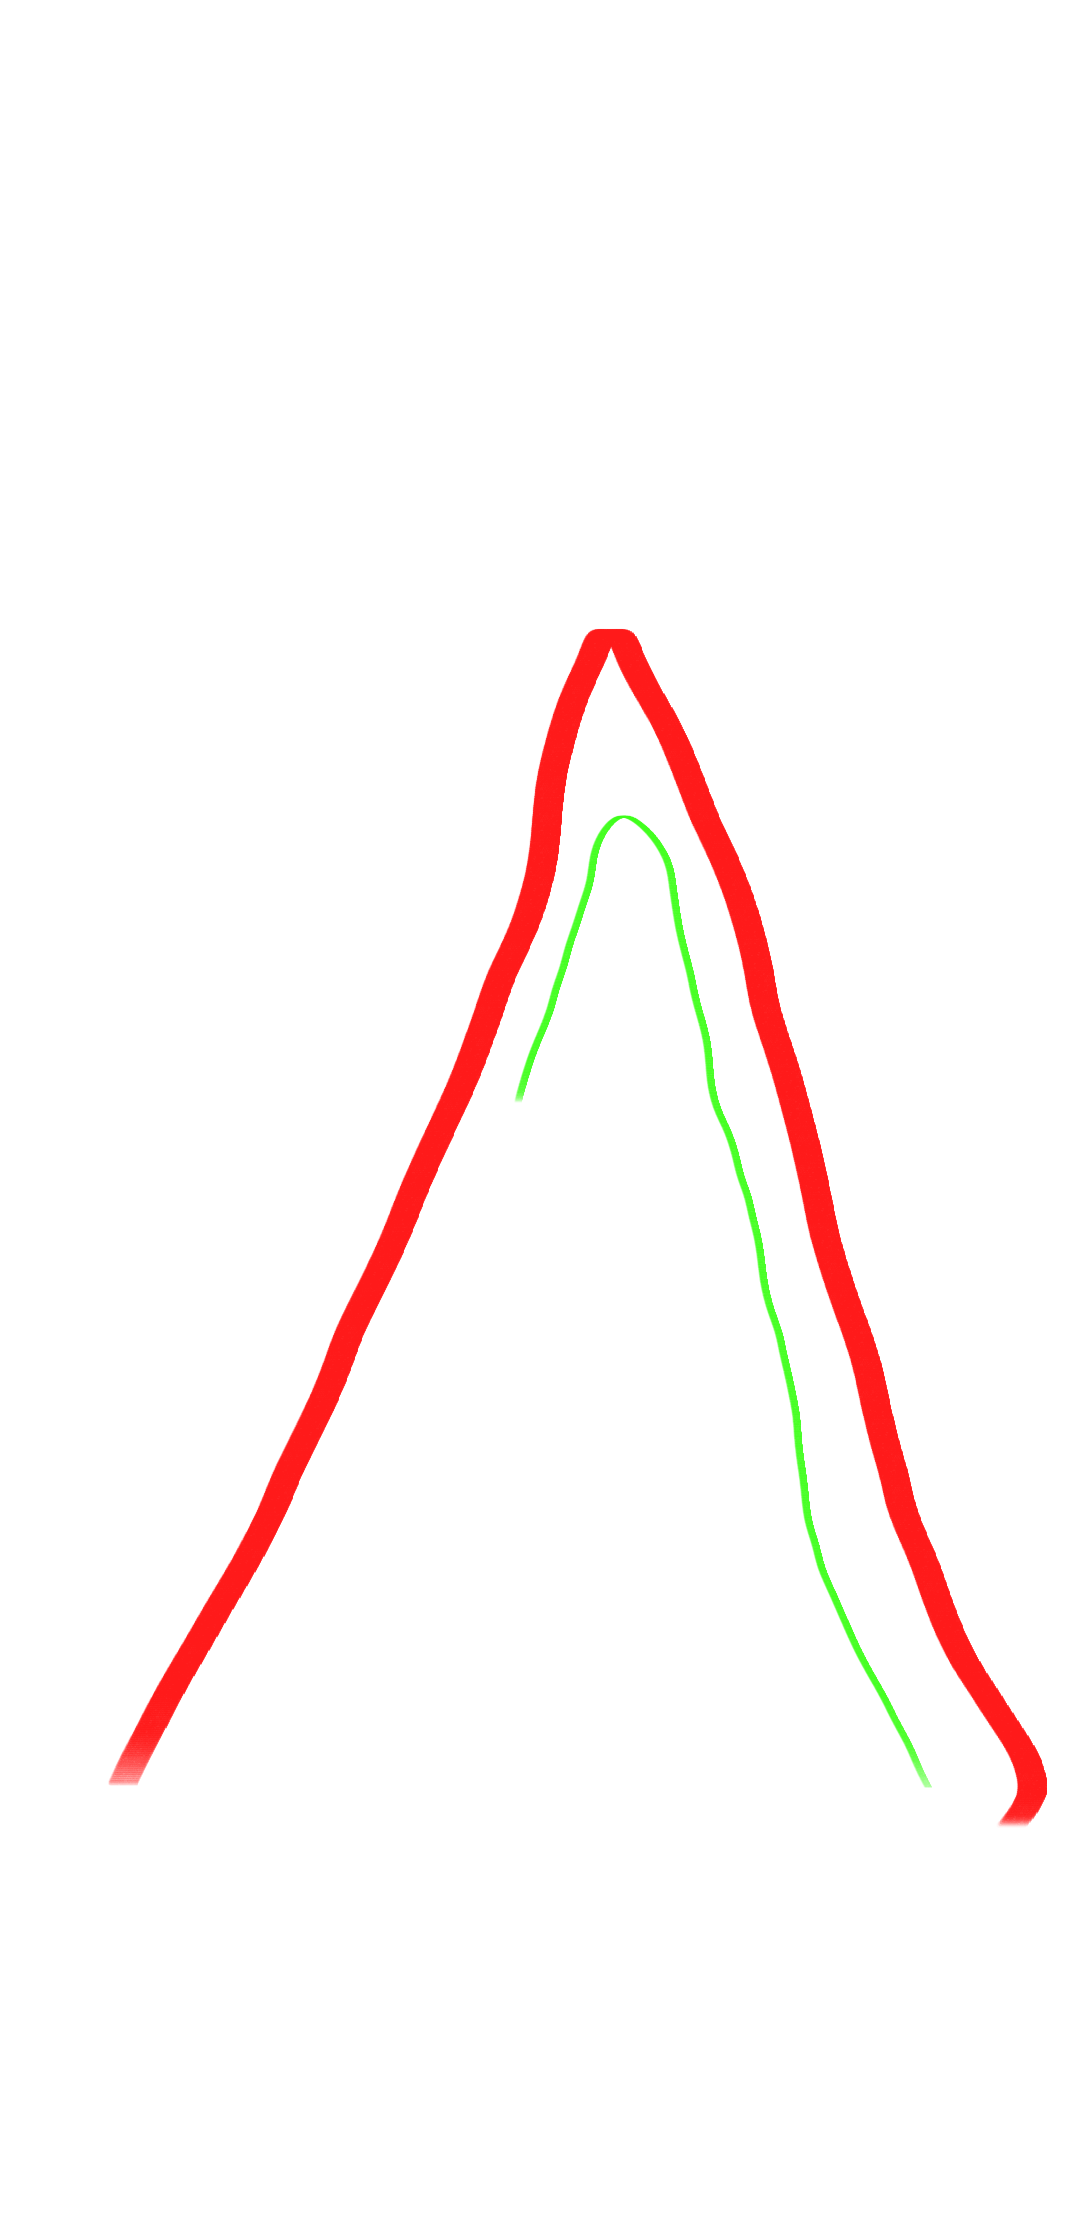
Mar 25, 2020 at 1:49 am #3637675I was planning on using that technique for the inner door. And a little arced “door” at the back so I can use the back of the tent as a vestibule too (for shoes and such) like this :
Mar 25, 2020 at 1:52 am #3637677First i was planning to do door on top of the panel not in the seam and make it a inverted J so with double pullers I could open op the top curve
Mar 25, 2020 at 1:54 am #3637678What are you thoughts on this. I like the idea but I’m afraid I’m complicating things.
I’m going to do some test runs now to practice with a zipper foot 😊
Mar 25, 2020 at 2:08 am #3637679Um. Not sure. Where are the zips?
Happy to comment, but I don’t want to head off in the wrong direction.Cheers
Mar 25, 2020 at 2:14 am #3637680Red is the fabric panel and green the zip.
Then you get this as a result:
Mar 25, 2020 at 2:24 am #3637681OK, as I thought.
Comment: the opening is not all that big. Probably not real useful imho.My version has a zip going halfway down on each side, so the door falls down. That makes a much better opening – and one which can serve, in an emergency, as a rough exit as well. The zips do not go to the ground, and their total weight is about the same.
Yes, obviously, there is a storm flap over the zip on both sides. Funny thing is, when it rains the storm flaps tend to stick to the silnylon on the other side of the zip. Unexpected the 1st time.
Hint: I Use #3 plastic coil zips and they have lasted for years. BUT, I run them in straight or nearly straight lines, no real curves. Curves make for a LOT of wear.
Cheers
Mar 25, 2020 at 2:39 am #3637682Thanks for the tip! Really appreciate it 👍
-
AuthorPosts
 So when the seam is tensioned, the line of needle holes on one side are opened wider and unprotected. Seam sealant will cover the holes for a while; but the seam will leak much sooner that a true lap felled seam. The faux seam result looks like this:


- You must be logged in to reply to this topic.
Forum Posting
A Membership is required to post in the forums. Login or become a member to post in the member forums!
Our Community Posts are Moderated
Backpacking Light community posts are moderated and here to foster helpful and positive discussions about lightweight backpacking. Please be mindful of our values and boundaries and review our Community Guidelines prior to posting.
Get the Newsletter
Gear Research & Discovery Tools
- Browse our curated Gear Shop
- See the latest Gear Deals and Sales
- Our Recommendations
- Search for Gear on Sale with the Gear Finder
- Used Gear Swap
- Member Gear Reviews and BPL Gear Review Articles
- Browse by Gear Type or Brand.
