I’m still fairly new to sewing, I can but not very familiar with seam types ect…. so how hard is it to sew silpoly? What type of seam? Any advice? Or should I give it my MIL who used to make clothes and still makes a lot of stuff.
advertisementYour privacy is protected: We do not transmit your user data to third-party ad platforms or advertisers, and we do not host third-party tracking pixels. Backpacking Light serves ads on its own custom, native, and internal platform.
Anniversary SaleMay 15 to 25 - REI's biggest sale of the year.Topic
Sewing silpoly
Become a member to post in the forums.
- This topic has 26 replies, 8 voices, and was last updated 5 years, 1 month ago by
 .
.
Perhaps you should consider asking MIL for advice and make it yourself, that way you get to experience handling Sil poly and how hard it is to make the various seam types with this material and gain hands on practise on sewing yourself. It may be handy for all those ditty bags, bug nets, packs, quilts, beanies, and jackets you may make in the future
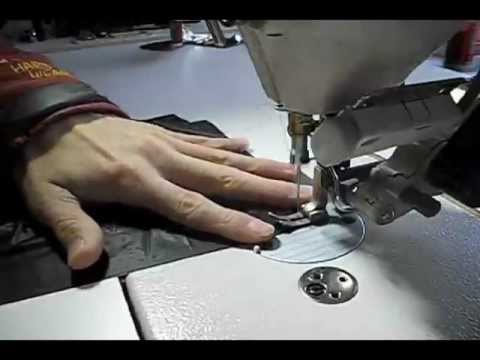
It depends on the denier and the coating, but the standard 20D silpoly is not any more difficult to deal with than other coated fabrics. Use quilting clips or binder clips to hold seams together while sewing, they won’t pole holes in the fabrics. Buy a yard or two of fabric to practice the different seams. Faux-felled and French seams are pretty common, but you are just as likely to see a standard seam with either seam tape or binding sewn on, depending on the product. I’ve found a 1/4” or 3/8” seam allowance is good for most things. I am partial to the 1/4” because my presser foot is .5” wide so I just align the material with the foot edge to get a nice straight seam.
another seam is a hem. At the edge of the fabric to hide the raw edge (so it doesn’t unravel). Fold over twice and do a row of stitches
with a (faux) flat felled seam, especially a long seam, the first row of stitches, the top fabric tends to stick to the presser foot a little and then slide relative to the bottom. By the end of the seam, the top fabric can slide an inch. You have to practice this with scrap strips. Clips or pins or a few hand stitches will help keep them aligned
ask your MIL. She’ll love you for actually listening to her. Or, maybe that could go badly : )
or youtube videos
longer stitches and thinner thread helps
Thanks,
Recommendations for thread and needle?
What silpoly (thickness) and what are you wanting to make?
I’m thinking 20d, maybe 15.
I’ve used the Gutterman polyester thread from fabric store. “Sew all” I believe it’s called. I have had cases of it ripping. So I do an extra row.
Then I switched to MARA 70 from RSBTR. Gutterman polyester thicker than “Sew all”. I’ve liked that better. I’ve been experimenting with usually doing just one row of stitches. No breaks so far
It doesn’t fit on my machine so I cut off a little of the bobbin with a hacksaw
You didn’t say what you are sewing. A tarp would be a good project if you’re new to sewing. A double hem is difficult with silpoly (at least for me). I fold over once and clip with Wonder Clips and sew the perimeter. Then fold over again and sew again. It leaves a single stitch line on top and 2 on the bottom.
I would recommend Gutermann Tera 80 thread with a 70/10 needle. I use Schmetz Microtex (Sharp).
The recommended needle size for Mara 70 thread is 90-100/14-16. With Tera 80, you can go as small as 70/10 (recommended 70-90/10-14).
From the Hammock Forum:
“….The thinner Tera threads are great for ripstop nylon as this fabric has a tendency to pucker – so the thinner the thread, the smaller the needle and the least amount of pucker. In that case, Tera 80 (Tex 35) is perfect….
Kathy V. Kierce
National Sales Manager
Gütermann of America, Inc.”
A section of tarp I did with Guterman Tera 80…..
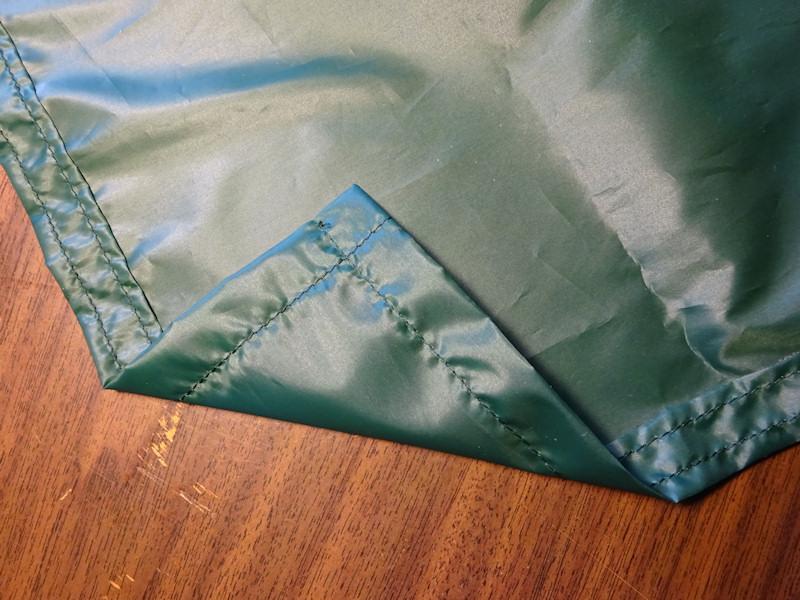
Tie out example….

I’m thinking a tarp or something similar to the zpacks pocket tarp with doors
If this is still new to sewing or not I did sew new covers for our patio cushions. I sewed all 3 sides and hand sewed the last.
Josh, I’ve made 2 quilts, several tarps, gators, stuff sacks and all turned out OK. I would struggle with covers for patio cushions. I think you’d be fine doing a tarp or pocket tarp.
Bob,
Thanks for the encouragement! I’ve also done ditty bags.
The cushions weren’t perfect but ok. So I think I just need to work out a design and buy an extra yard and go for it! The worst I’m out is material cost….
Josh, you could start with a simple small tarp. I’ve done 5 x 8 and 6 x 6 for example. The 6 x 6 was only 2 yards of the extra wide material. Pretty inexpensive. Use that project to try some ideas, improve your skills and confidence before working on your tarp with doors.
Good advice. I was thinking a 6×9 or maybe 9×9
6×6 will not be usable as a shelter. 6×9 will be, and will only cost you a few more $. I use Mara 70 and Schmetz Universal 90/14 size needles, never had issues running them once tension on the machine is set correctly for this thin and slippery material. I also use 2-2.5mm stitch length, and it seems to do fine.
Thanks everyone for the advice!
For seams, im assuming you need to add material for seams but how much? And to both fabrics? Say a French seam like Yama does.
I do (faux) flat felled seam, like for tents
Use 1/2 inch extra allowance for the seam, for both pieces. Sew the two pieces together 1/2 inch from edge of fabric. Then fold over, 1/4 inch, twice and sew through that to make your flat felled seam. So, the flat felled seam is 1/4 inch.
For french seam I’d have 1/2 inch extra allowance for the seam, for both pieces. Sew together 1/4 inch from the edge. Then turn inside out and sew another 1/4 inch in from the first row of stitches to finish the French seam.
I use French seams for clothes where it doesn’t have to be so strong. Flat felled seam for tent where it has to be stronger. There are two rows of stitches contributing equally.
For a hem, fold over 1/4 inch, twice, for a 1/4 inch hem. 1/2 inch extra fabric. Except I think I’m switching to fold over 1/2 inch twice, 1 inch extra fabric, then sew tent stake loop grosgrain in the hem area.
Thanks Jerry!
Here’s what I was referring to
yeah, that’s about what I do
silpoly or silnylon is so thin you don’t need wide seams – 1/4 inch is fine
with heavy fabric, like for a pack, 1/2 inch wide seams are probably better
But if you make the seams too narrow, the fabric can pull out of the stitching. Been there …
A decent seam with folds is always worth while.
Cheers
“Recommendations for thread and needle?” & etc.
Ball pointed needles seem to work much better because they part the fabric yarn rather than cut it; thus creating less resistance with less snags. The ‘ball’ is not visible, but it’s there.
For needles, must consider that every project is usually a different fabric. So rather than trying to generalize, many sample stitches are tried first, beginning with small needles. This also provides a chance to be sure the tension of the upper thread and the tension on the bobbin screw are compatible. If not, keep practicing with scraps and adjusting. Metler Metrosene thread (not sure of spelling) is available locally. It has worked better than any others mentioned above that are touted by the DIY sites. Used to use a cotton covered polyester available locally that was super; but they dropped it, so use the Metrosene. Searched for years for Roger’s cotton covered poly, ‘Rasant,’ but the company made it such a hassle, went to Metler.
Not a fan of faux (false) lap felled seams because the faux ones create needle holes going through just one layer of fabric on one side of the seam. When stressed the holes expand, put pressure on the seam sealant, and eventually leak. For those without expensive machines, true lap felled seams are difficult; but worth the trouble IMO. After the fabric panels are outlined with seam lines, they are cut with a seam allowance and laid flat on the cutting table. If the fabric will crease, a fold is creased with a carefully adjusted iron on both panels to be joined. The excess is trimmed off, and the creases overlapped to make a true lap felled seam that is pinned together, but only with pin holes inside the narrow space where the stitch lines will be.
It probably sounds difficult, but with a lot of practice, is done easily. I think the key is to practice on fabric of a weight similar to that to be used, and practice with felled seams on scrap, before doing the actual construction. Also helpful is a machine that will go slowly, not like a machine gun. Watching videos of professional seamsters, the machines have only one speed – fast. Going slowly, holding the fabric taut from both sides of the presser foot, and pulling out the pins just before the fabric goes through the machine, works very well for an amateur like me.
Have used Kenmore Zig-Zag machines made in the 1970’s. Bought a new one at Sears, and more recently found one in new condition on Craig’s List. They do have the ability to go slow, and have a large wheel on the right side that can be used with webbing and thicker seams that the motor cannot handle. But the foot pedals heat up and smoke, so were replaced with other brand pedals. When doing packs, though, the seams can get pretty thick, so try to design that out. Thick webbing and/or thick seams are just going to make a heavier pack, and the goal is a light one.
One way to cheat is by using thread the same color as the fabric, even threads of two different colors if the fabrics are different colors on each side of the seam. That way, the mistakes are much less visible. And after sealing, hardly noticeable at all.
NH has a tradition of self-sufficiency, possibly dating from centuries ago, and that may be a factor in this craziness called MYOG. Sometime, may learn how to bond DCF with transfer tape or other adhesive; and am considering some DCF for a narrow rectangular tent fly that has hems of course, but very few seams; so can be replaced if the DCF wears out a bit too soon. Still pondering that. It would lighten the tent considerably though.
As others have stated, it is best to start with simple projects, with kits that have the fabric pieces all cut out. And have very carefully written and specific directions. Also helpful are projects to modify and lighten gear like packs and tents, so you get to learn how things are put together without having to design from scratch. Surviving a hellish stormy night in a tent of your own making or major modification, while staying dry and comfy can be gratifying. But if MYOG turns out to be not for you; well then you get to return to the world of the living and leave us crazy people hammering away in our basements. So it’s a win-win either way.
Ha, ha,.. good points Sam
Yeah, professionals are fast. Because it costs money to go slow. I prefer slow. Since I’m only making one, it doesn’t matter. If someone was making many for a business than they would have to go fast. Its hard to make a successful business.
I see what you mean about that first row of stitches in a faux flat felled seam. When you fold over and sew the second row of stitches push the fabric really flat and try to get tension on that 2nd row of stitches. In the finished seam, you don’t want the first row of stitches to take all the load.
Become a member to post in the forums.
advertisementYour privacy is protected: We do not transmit your user data to third-party ad platforms or advertisers, and we do not host third-party tracking pixels. Backpacking Light serves ads on its own custom, native, and internal platform.
 New Ultralight GearSee the latest releases in ultralight cottage-brand gear from small makers.