Topic
Optimized Compact, Solo, Deluxe Cook Kit
Forum Posting
A Membership is required to post in the forums. Login or become a member to post in the member forums!
Home › Forums › Gear Forums › Make Your Own Gear › Optimized Compact, Solo, Deluxe Cook Kit
- This topic has 7 replies, 4 voices, and was last updated 4 years, 10 months ago by
 Joe Smith.
-
AuthorPosts
-
Mar 19, 2018 at 3:36 am #3525490
First post, please read content below…
[edit – MK]
Mar 19, 2018 at 5:19 am #3525511The goal is a solo kit that was compact, light, efficient, and also flexible enough for either 2 cup water boils or direct in-pot meals. The compact priority was driven by limited storage space during off road bike-packing . Most of my trips are short term, with the occasional 1 week journey. Plus i am often throwing my overnight kit together at the last minute so it should be integrated for grab and go. I have the old AGG 3 cup caldera cone system, as well as the foster pot caldera cone kit, but these were too big with cone/pot caddy. I even bought a ti sidewinder for AGG 3 cup pot, but still pined for a cook/drink combo with cone in pot…which is a rare breed because of dimensions. So yes, I’ve bought 3 TD cones and I am still designing my own…My early two-part cone designs were too much hassle to assemble, so i kept working. Ive been working too much on this cook kit and the result was successful enough that others may benefit from my time spent.
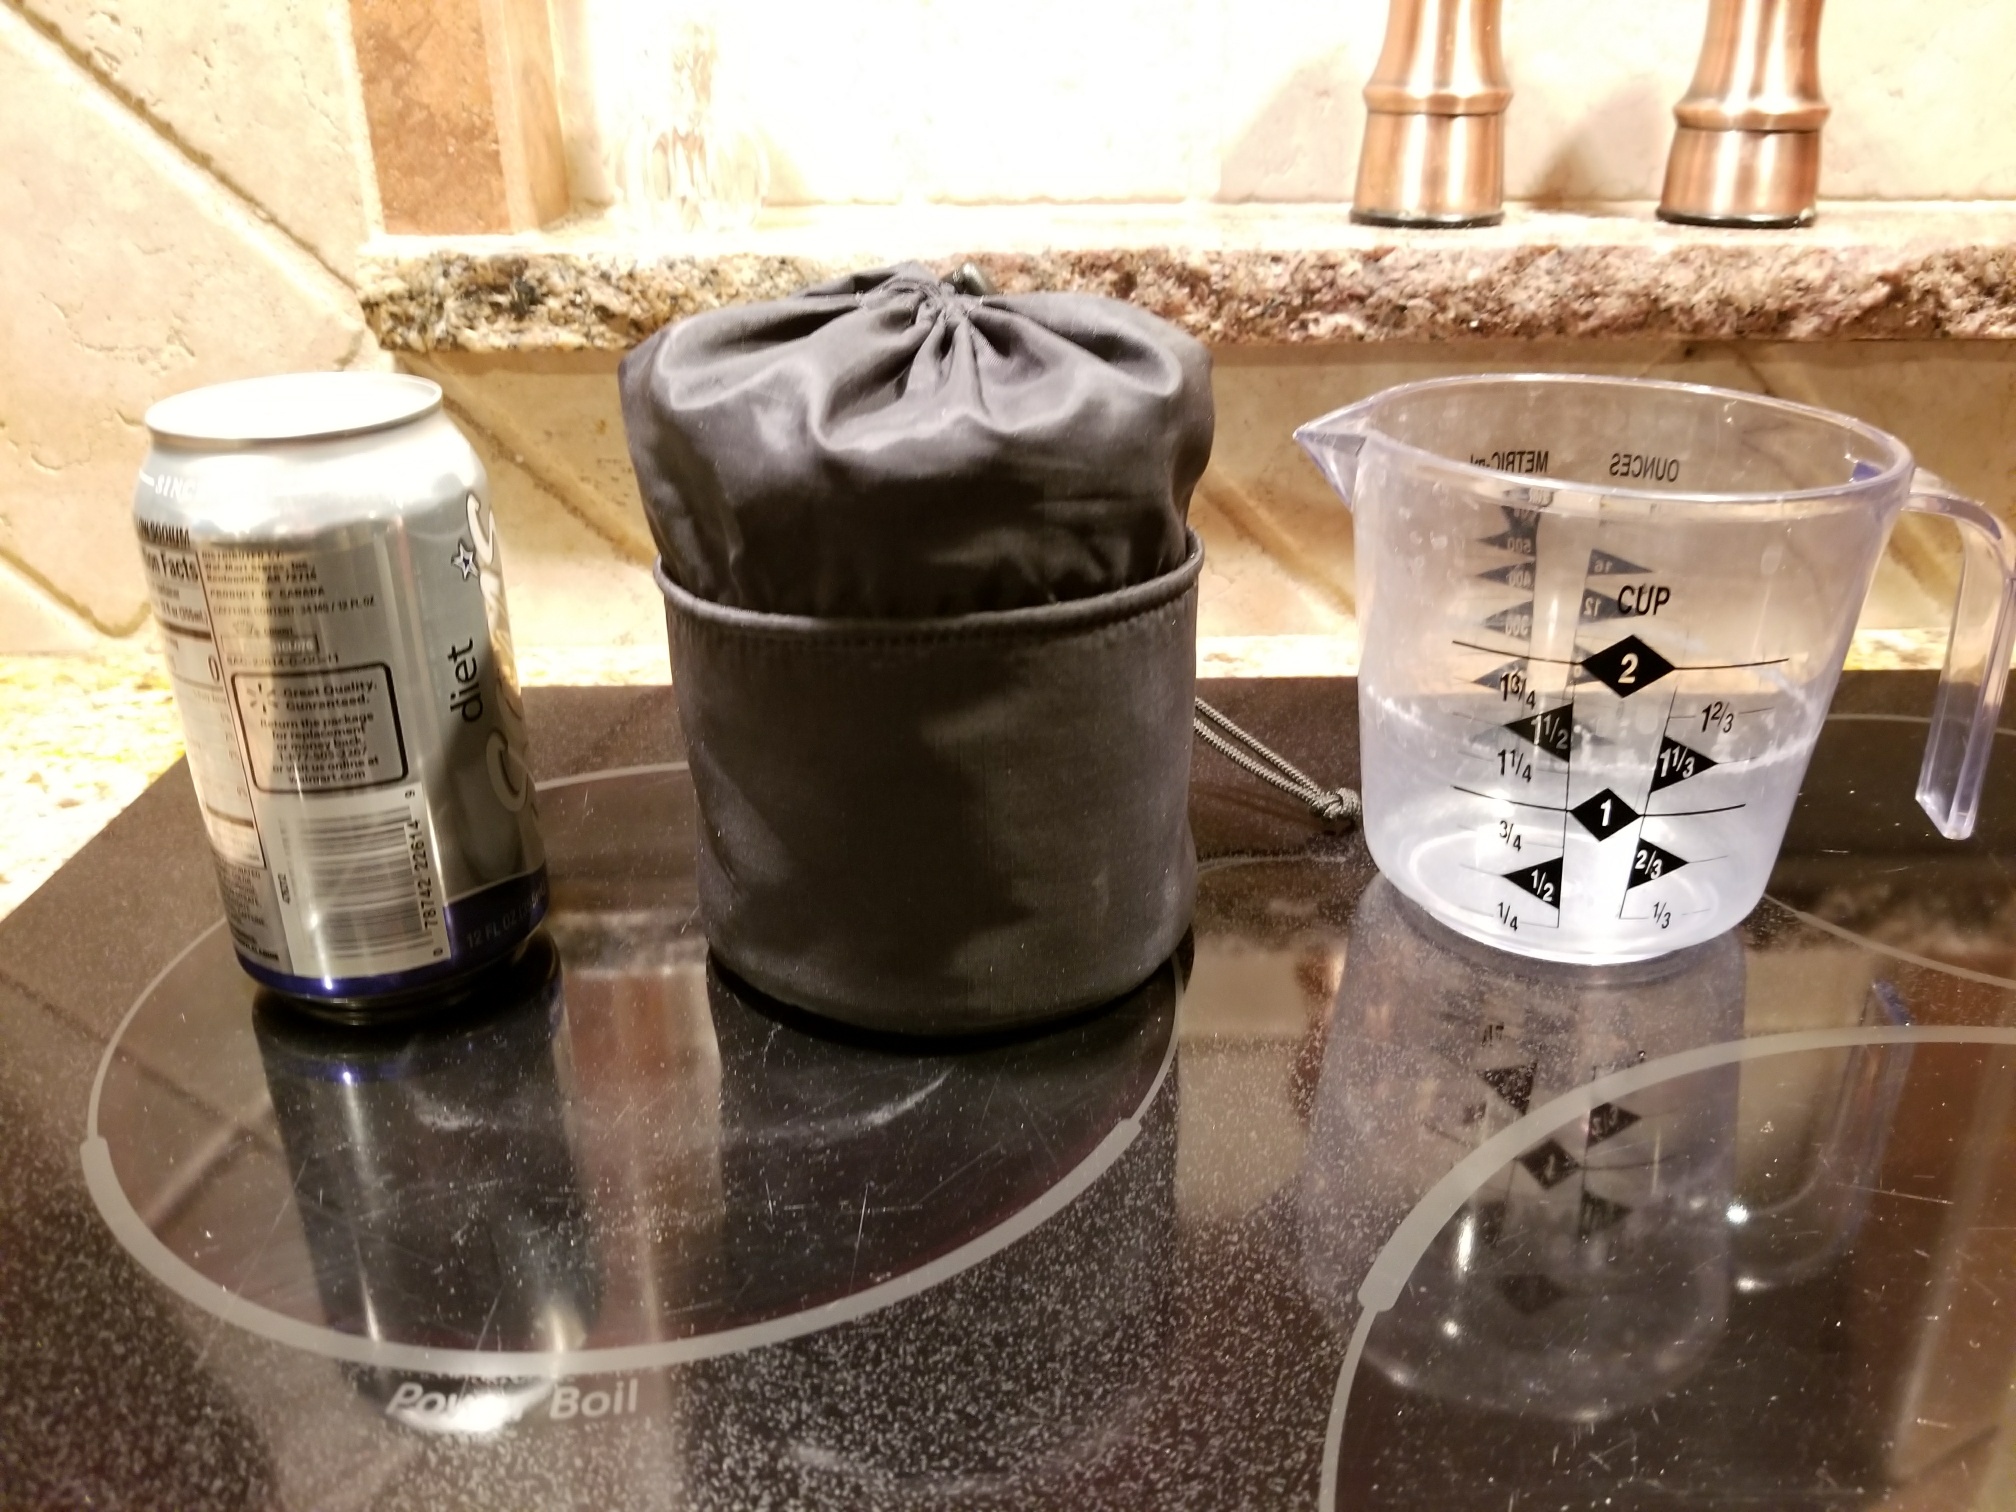
In the end, I now get 11g/13ml of heet used per 8:30 minute boil of 2 cups of cold tap water. It is as wind resistant and stable as your standard cone. It is 4″ wide x ~4.5″ tall, and configurable to be between 5 and 8oz before fuel, depending on options. Everything fits in pot, even a 4oz alcohol bottle for a 10 boil compact package. The fuel bottle and shammy towel are sometimes preferred out of pot, but still easily fits in extra space of the stuff sack for an integrated package.

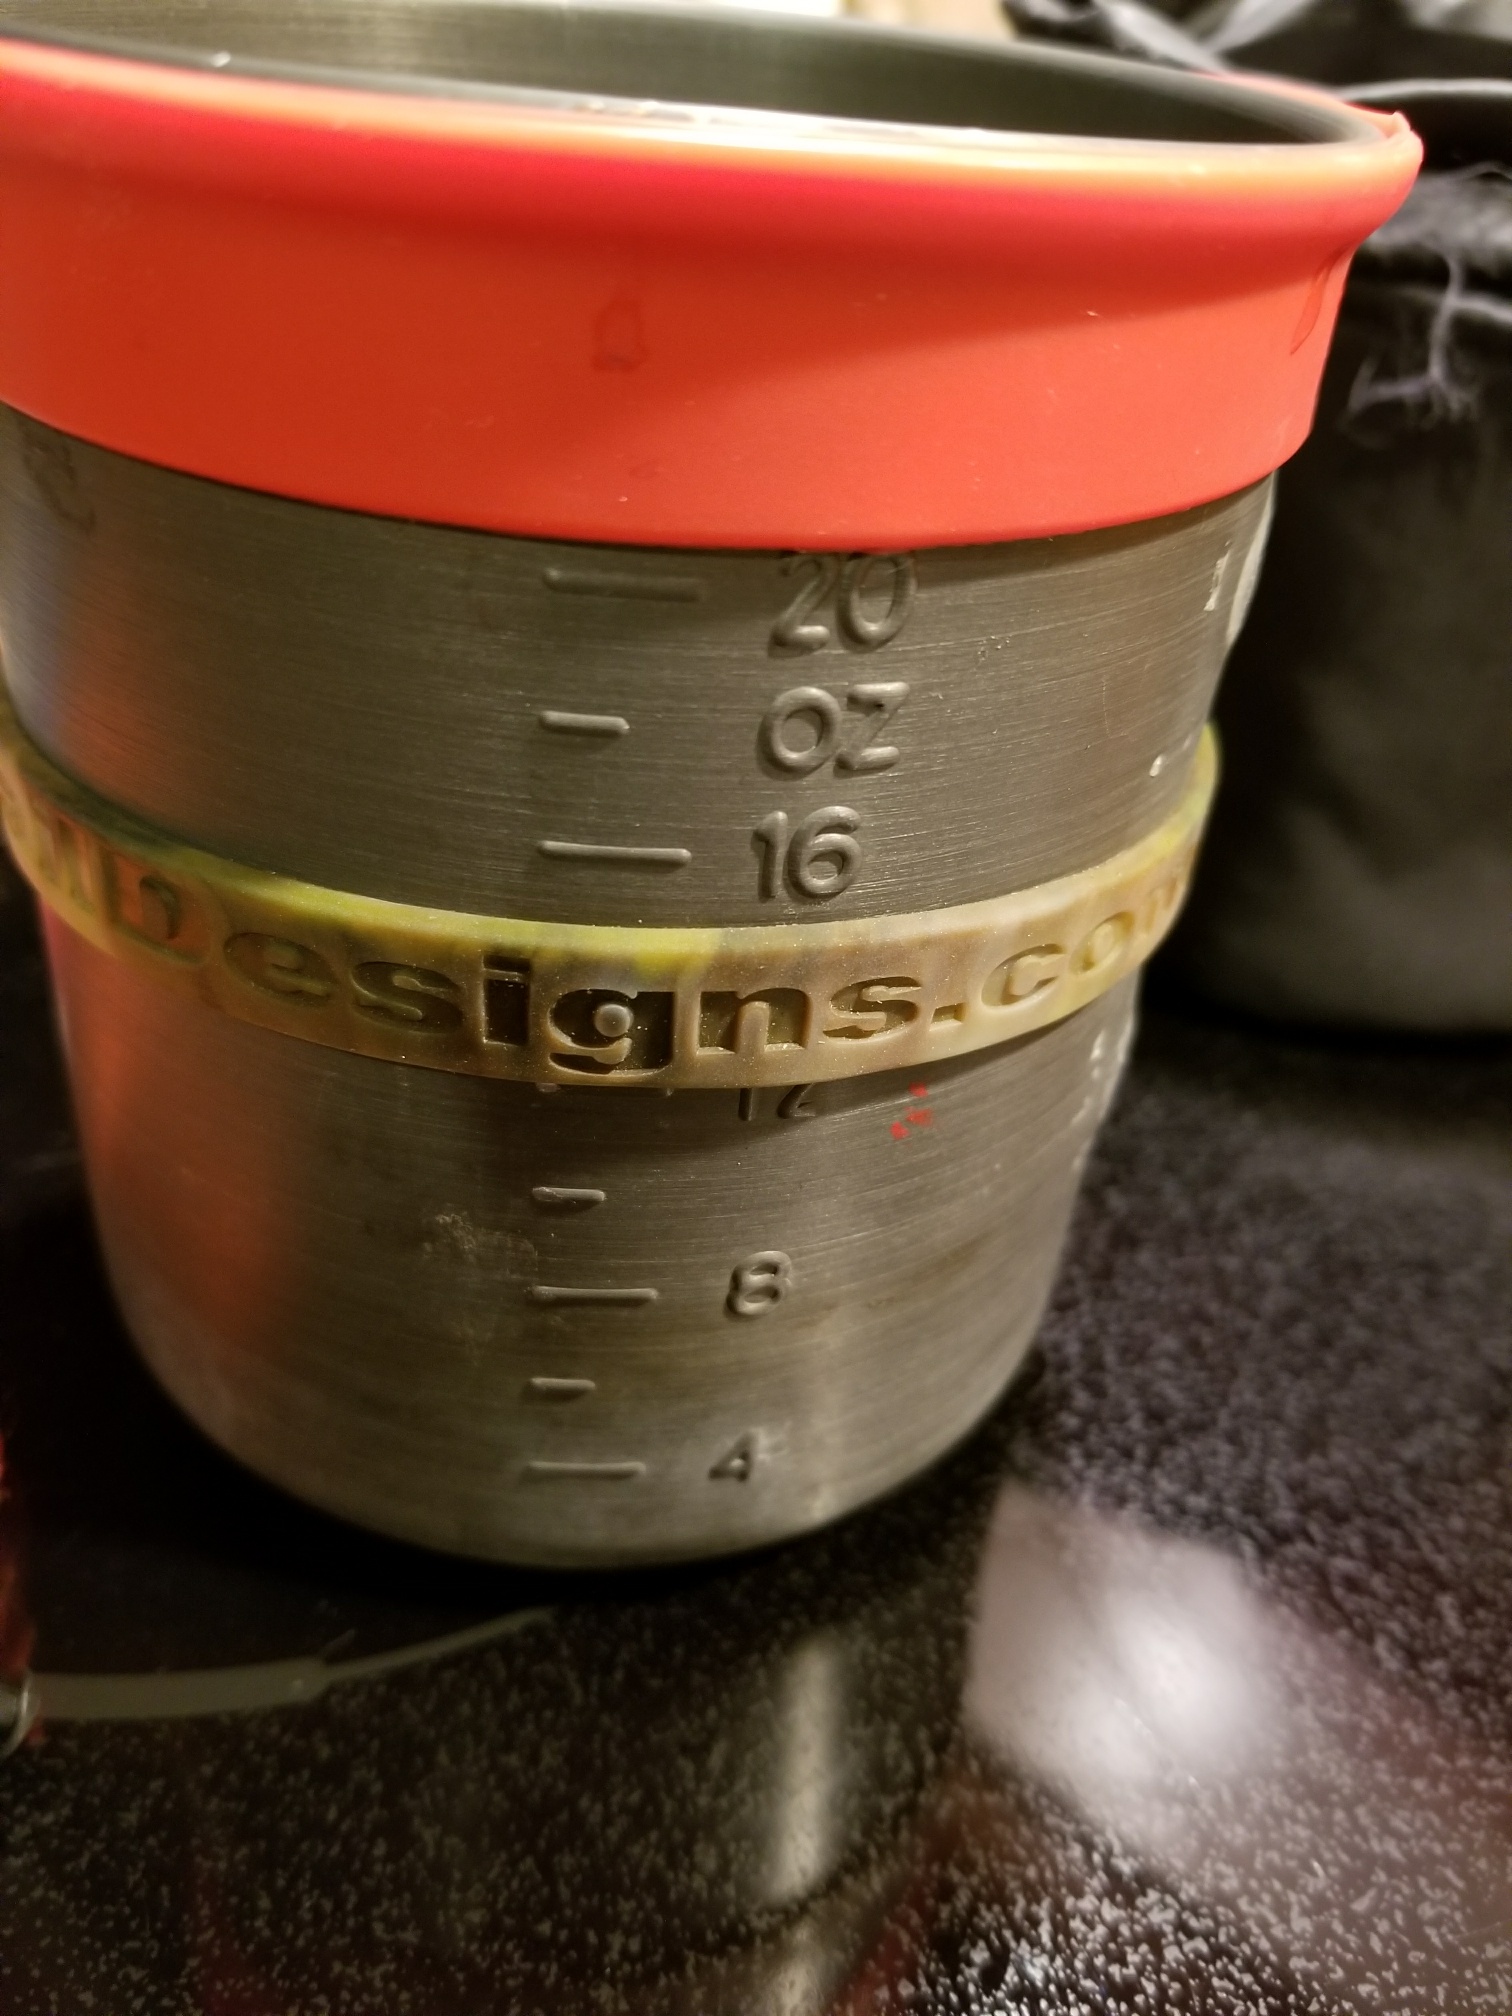
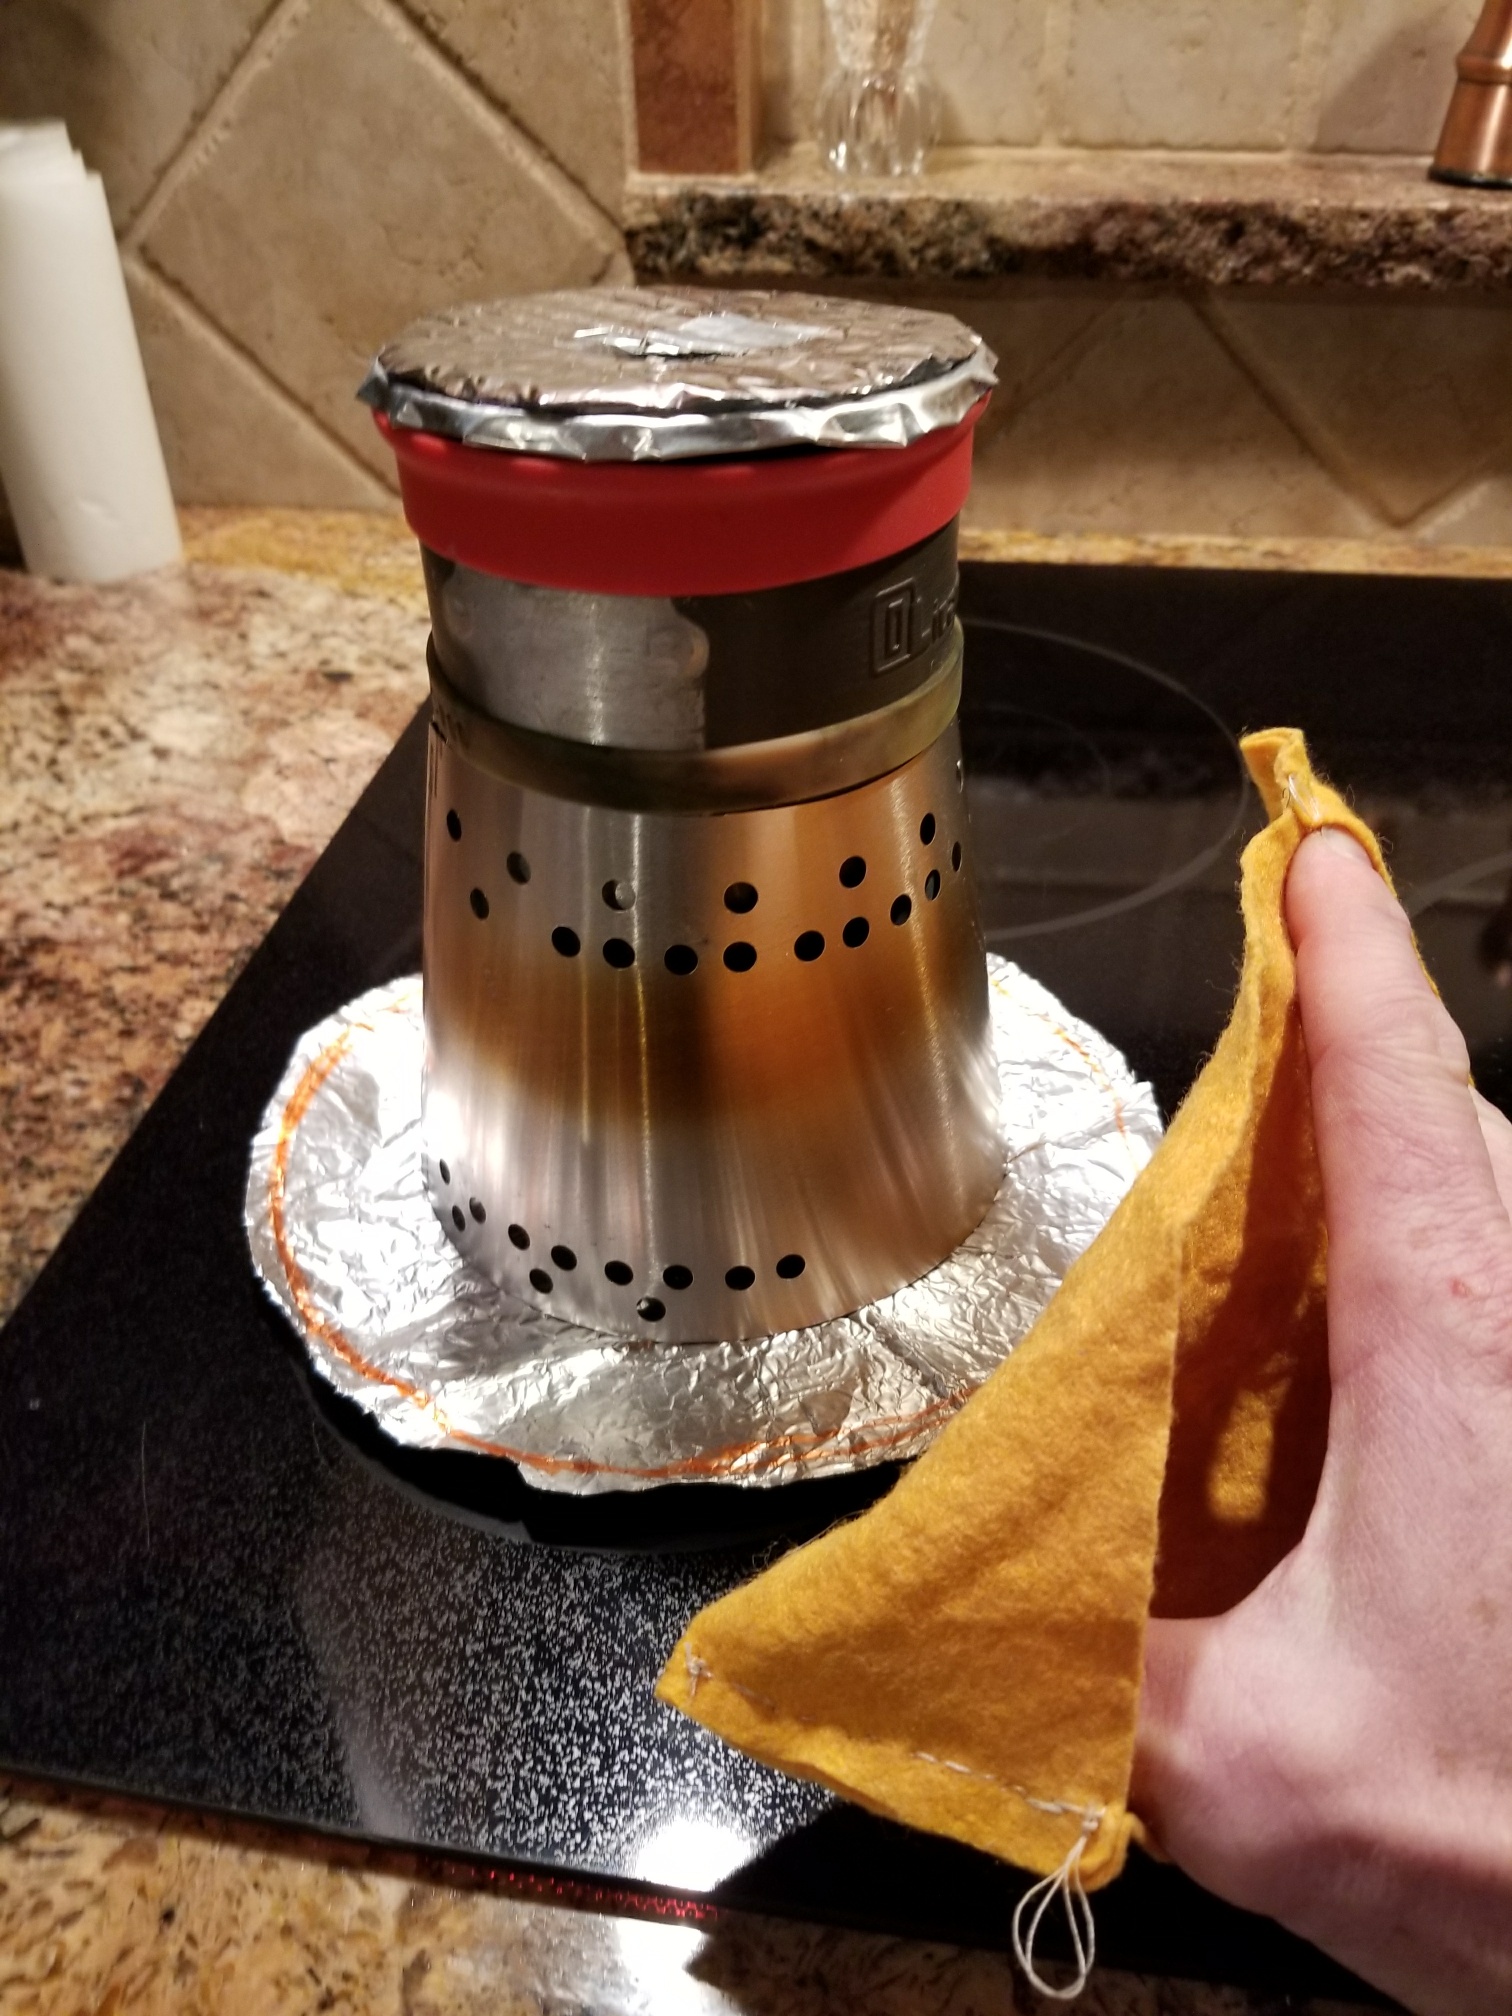
I started with the modified starlyte and $15 olicamp space saver 24oz/700ml hard anodized mug to support 2 cup pot boils and shaped for drink mug mode. It also has built in measurement marks and weighs about 3.4oz. The starlyte is just too nice for no spill, no real fuel measurements and cone ready. I removed the mug handles and handle mounting plate with a grinder, leaving a slight mound at the rivets. Rivets don’t leak or require epoxy to seal yet. The lid is a DIY tin pie pan crimped around rim, covered with a glued on reflectix layer and folded tape handle. I applied a wide silicone band for hotlip mug mode that doubles as a way to lift the pot of boiling water with bare hands from above when lid is in place.
Then I made yet another cone that would fit in pot, maximize pot coverage, hold pot 2 inches from ground, etc. The result required a silicone band over the 12oz mark on the pot/mug to rest against cone. After several iterations, i found that the cone breather hole area and location is important for efficiency. 1.9sq inches hole area on top and 1.1sq inches on bottom worked for me. Esbit would prefer an extra sq inch on the bottom holes, but i set it for alcohol and i figure i can create a gap on the downwind cone bottom when using esbit or just wait longer. It also appears that putting some exhaust holes further down from the top rim, but above the pot bottom level, helps to give heat a dead end against pot and help regulate the updraft force of the airflow out. While putting them all the way around the top prevents burner flame from drafting too far to one side of your pot. Bottom holes are on only one side for wind protection of course, but the other issues outweigh wind protection on the top. My previous MYOG cone designs got about 14g/17ml over 10-11 min for 2cup boils with less optimized holes, so it all adds up.
To allow the user to grab and pour from a boiling pot into a freezer bag, or do clean up, i made a 7gm pot grabber mitt from a shammy with a few simple stitches and sized it to fit my stretched out hand.
Then to support a simmer mode for direct cooking in pot, i made a ~weightless simmer ring from a tin pie pan with 1″ hole that lays over the starlyte burner. This simmer ring reduces the burn to about 3-4 grams per 10 minutes, yet keeps preboiled water simmering the entire time. So with the starlyte’s ~24gram/1oz fuel capacity, you can boil with 11g, then simmer for ~30-40 minutes if needed(no wind, room temp) before it burns out. Footnote: My aluminum flashing cone came out that it fits tight enough to hang on to the pot, so lifting pot and cone together makes for easy simmer ring changes.
The olicamp space saver mug is well fitted for this project. It is tall enough to allow 1.5 cups within the heat of the cone that fits in pot. But it is still wide enough for easy washing with my hand and short enough to feel like a bowl. For example, the similarly sized imusa 10cm mug is more short/wide so you would not be able to cover as much water with the shorter cone and thus lose some efficiency. The olicamp is also anodized to be longer lasting and more non-stick for the occasional in pot cooking. Titanium would be only slightly lighter for 3x the money. The olicamp also seems easily tough enough for abuse and long term.
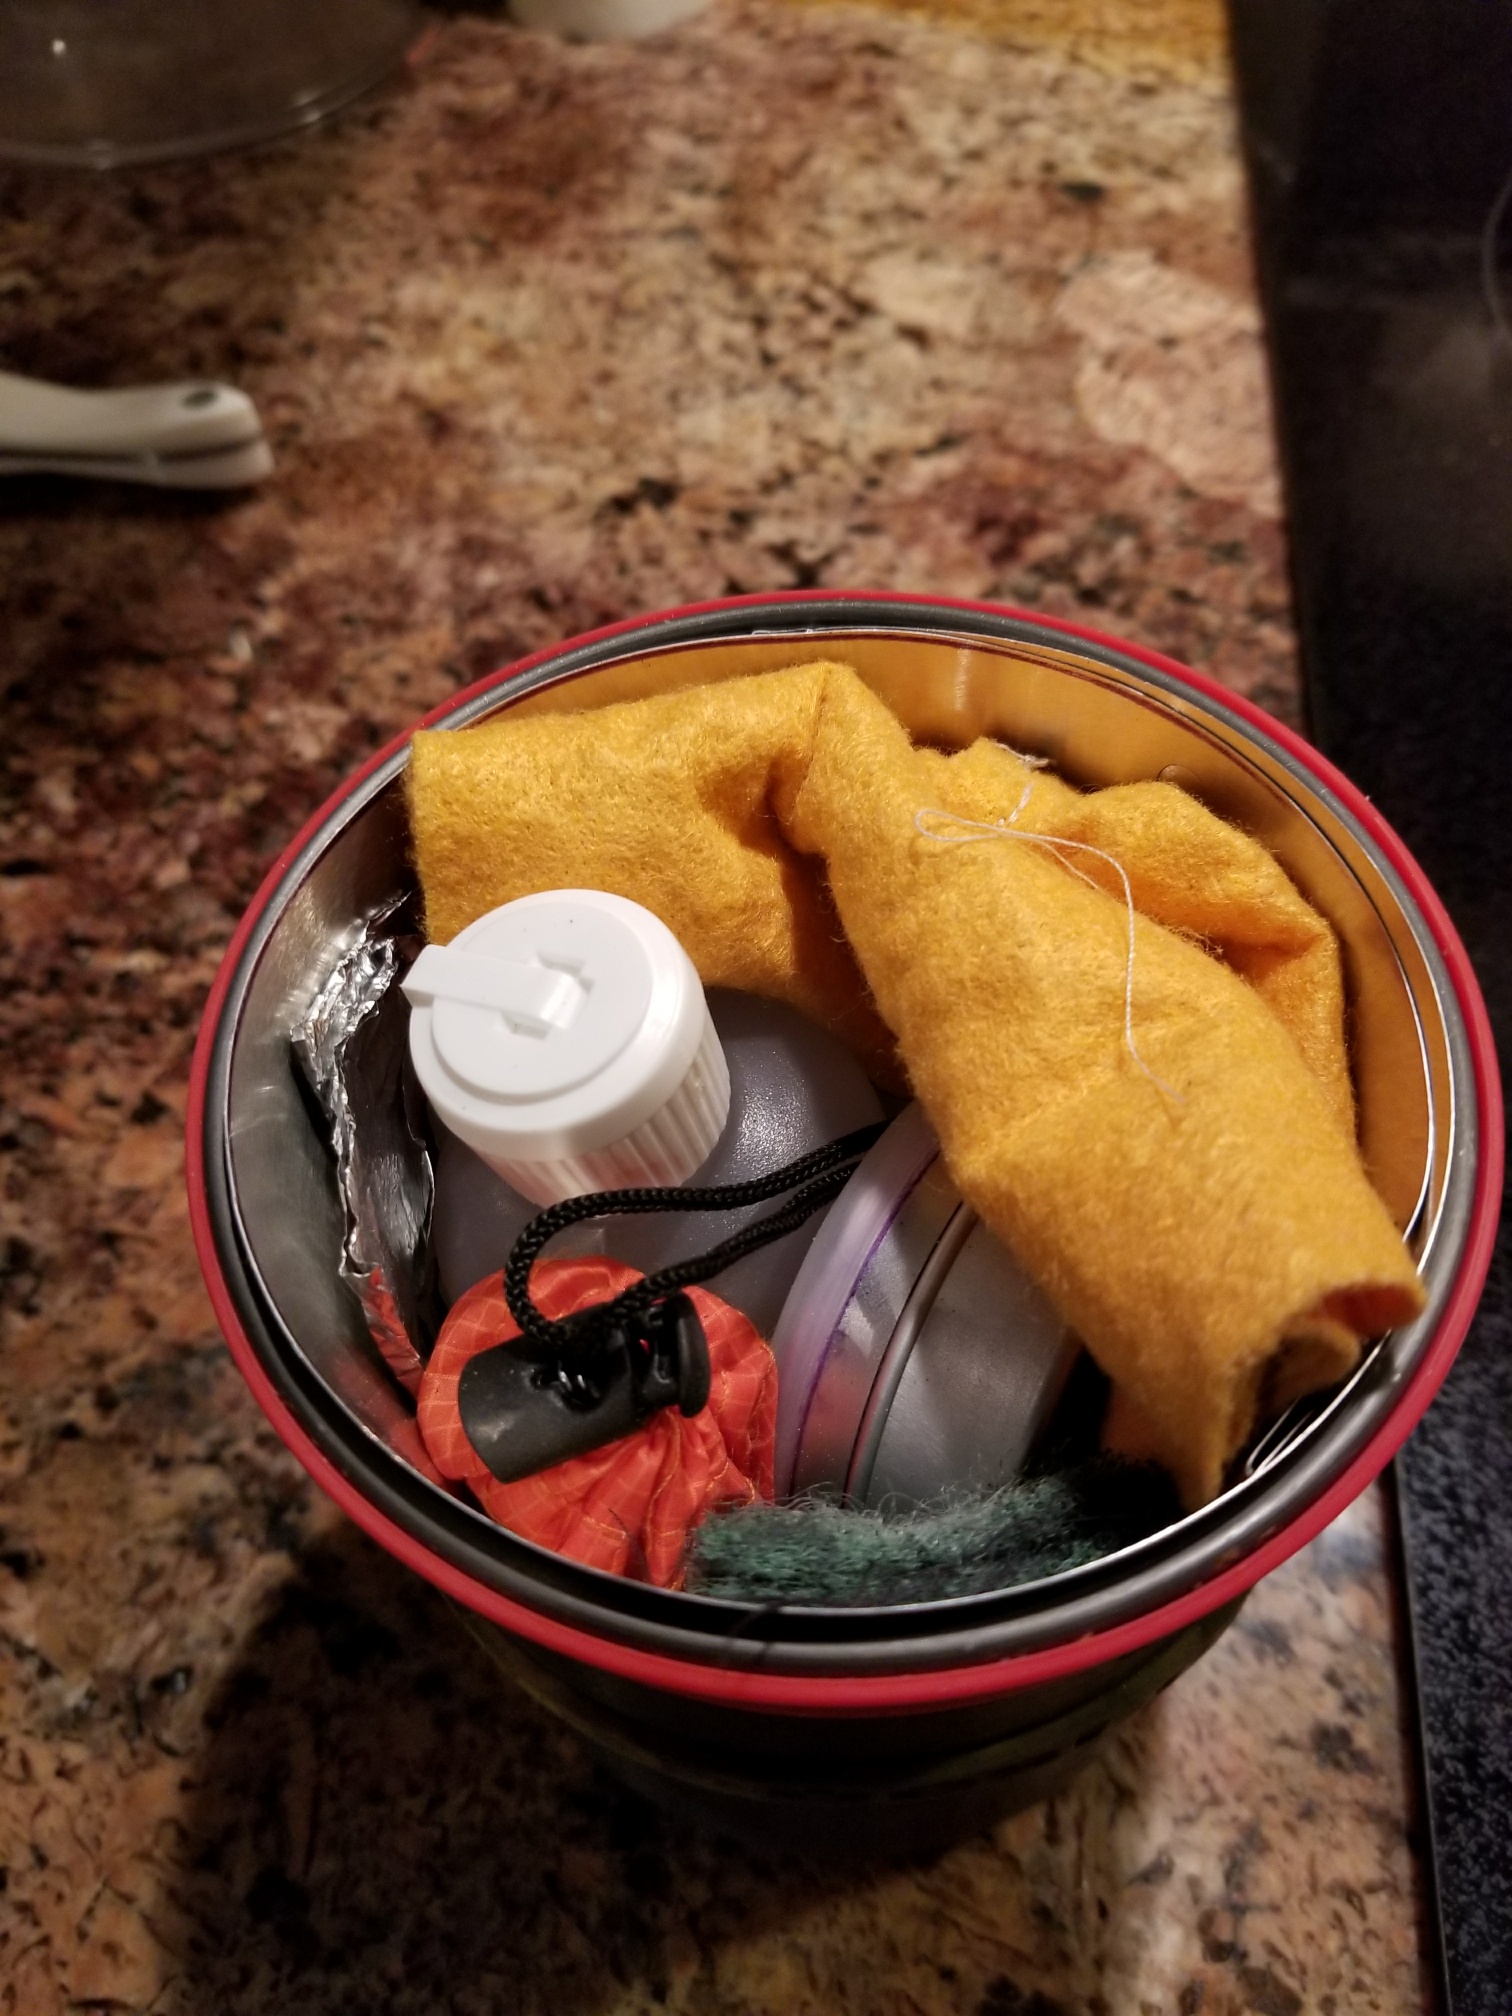
To find a spoon that fits in my pot, but long, and tough enough for my eating, I selected the Toaks, Ti folding spoon (in the orange sack in first picture). A lexan spoon is ~.4oz lighter if you are willing to store spoon out of pot.
For a cozy, i used the older Gossemer Gear warm sack which is a partially, insulation lined stuff sack. It fits the olicamp perfectly, but sadly has been replaced with new larger sizes. But they may be willing to make the old small size as well. The sack is an inch or two extra tall, but this allows you to store items such as fuel or shammy mitt outside the pot, while still integrated within cook kit sack/cozy.
To re-hydrate food, i place a 1qt freezer bag in cozy sack with food…pour in water…partially zip up freezer bag and deflate, place insulated pot lid in cozy sack and cinch up sack. A 1 quart freezer bag fits nicely in the cozy or pot. During consumption, the bag top opening folds back down over sides so you don’t need an extra long spoon. And of course, you can now hold or set down the hot meal. Once you are using the cozy sack for a freezer bag meal holder, this frees up my mug for drink usage. It all just works together.
In the end, a complete success for my goals…extra compact, light, efficient, flexible, easy setup/ take down (45 seconds each way) with room for all gear plus fuel for 10 boils within the pot or 20 boils within the warm sack. No compromise solo kit to grab and go. YMMV.
Mar 19, 2018 at 5:41 am #3525525That’s a very interesting setup. Thanks for sharing it in so much detail. I’m impressed with how well you have dialed it in.
Mar 29, 2018 at 6:36 pm #3527698Awesome write up Joe! I have that same mug in the Ti version, so obviously now I’m going to have to do a MYOG cone! Do you remember the distance between the top of your stove, and the bottom of the mug with the band set at the 12OZ. mark? TIA.
Mar 29, 2018 at 7:28 pm #35277131″ was my limit over modified starlyte. As a guideline, my cone pattern is 16″ outer radius and inner is 11.75″. This produces a 5.25″ cone diameter base when assembled. Your details may vary, but making base too wide will consume too much space in mug while packed.
Mar 31, 2018 at 1:41 am #3527905That’s a very slick setup. Well done! Did I overlook where you mentioned the weight?
Walt
Mar 31, 2018 at 3:47 am #3527912Thanks. 7.5oz fully configured as shown, without fuel.
Breakdown for variation planning is:
3.6oz Pot with 2 silicone bands (bands are 0.2oz each)
0.2oz Pot lid with reflectix top (aluminum pan material, not tin as stated in original post)
0.8oz Cone in aluminum flashing
0.5oz Modified Starlyte
0.7oz Toaks Folding Spoon
0.4oz mini Bic
0.8oz Warm sack
0.25oz Shammy Mitt
0.2oz other bits…simmer ring, ground heat shield, scotchbriteJun 14, 2019 at 3:39 am #3597790<p style=”padding-left: 40px;”>New version of Olicamp mug looks like an easier and nicer baseline with bottom of handle close to 12oz mark so you could leave them attached…and it even comes with sipper lid. Might add 1/2oz, but nicer setup with solid lid and handle.</p>
Olicamp Space Saver Mug Black with Lid https://www.amazon.com/dp/B07D85L3J7/ref=cm_sw_r_cp_apa_i_wrXaDb30RER5E -
AuthorPosts


- You must be logged in to reply to this topic.
Forum Posting
A Membership is required to post in the forums. Login or become a member to post in the member forums!
Our Community Posts are Moderated
Backpacking Light community posts are moderated and here to foster helpful and positive discussions about lightweight backpacking. Please be mindful of our values and boundaries and review our Community Guidelines prior to posting.
Get the Newsletter
Gear Research & Discovery Tools
- Browse our curated Gear Shop
- See the latest Gear Deals and Sales
- Our Recommendations
- Search for Gear on Sale with the Gear Finder
- Used Gear Swap
- Member Gear Reviews and BPL Gear Review Articles
- Browse by Gear Type or Brand.
