Topic

MYOG Heavy Down Winter Jacket


Forum Posting

A Membership is required to post in the forums. Login or become a member to post in the member forums!

Home Forums Gear Forums Make Your Own Gear MYOG Heavy Down Winter Jacket

Viewing 13 posts - 1 through 13 (of 13 total)
  • Author
    Posts
  • #3521336
    Ryan A
    BPL Member

    @rabrams

    Hello fellow MYOG crowd,

    I needed a warm winter coat for variable Toronto winters, where it temperatures range from 0 to -30 Celsius. I work as a geoscientist for an engineering consulting company and I spend a considerable amount of time outdoors collecting measurements and performing site inspections. I sometimes spend hours at one location collecting data, and don’t get a chance to move around much. I also spend time around heavy equipment such as drilling rigs and earth works machines, so I didn’t want to shell out $600+ on a jacket this might get dirty or ripped. I initially started with a down vest and lightweight jacket to learn the basics. I am glad I didn’t jump the gun and start with the winter jacket, as I made many mistakes on both.

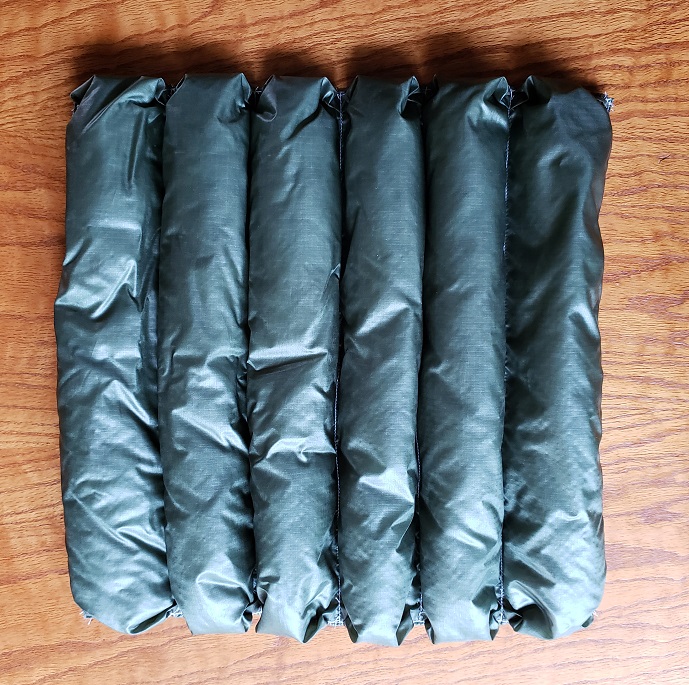
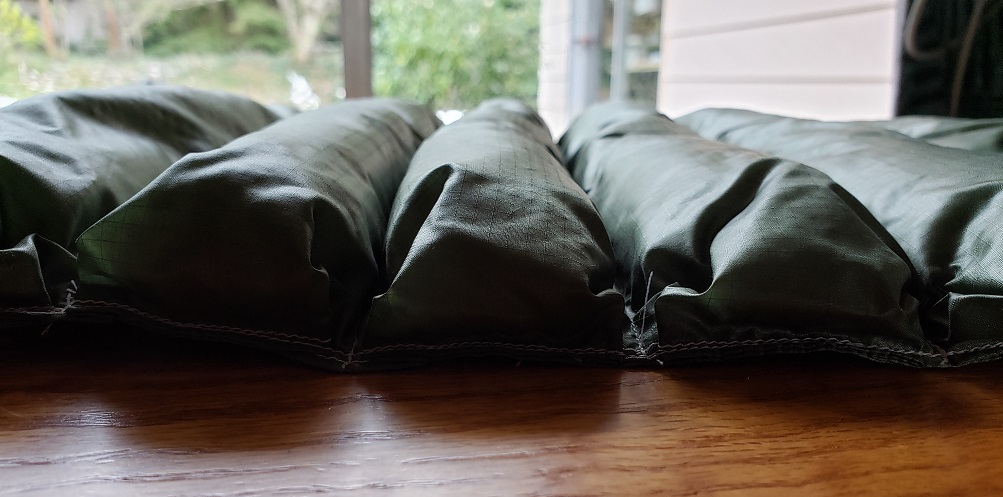
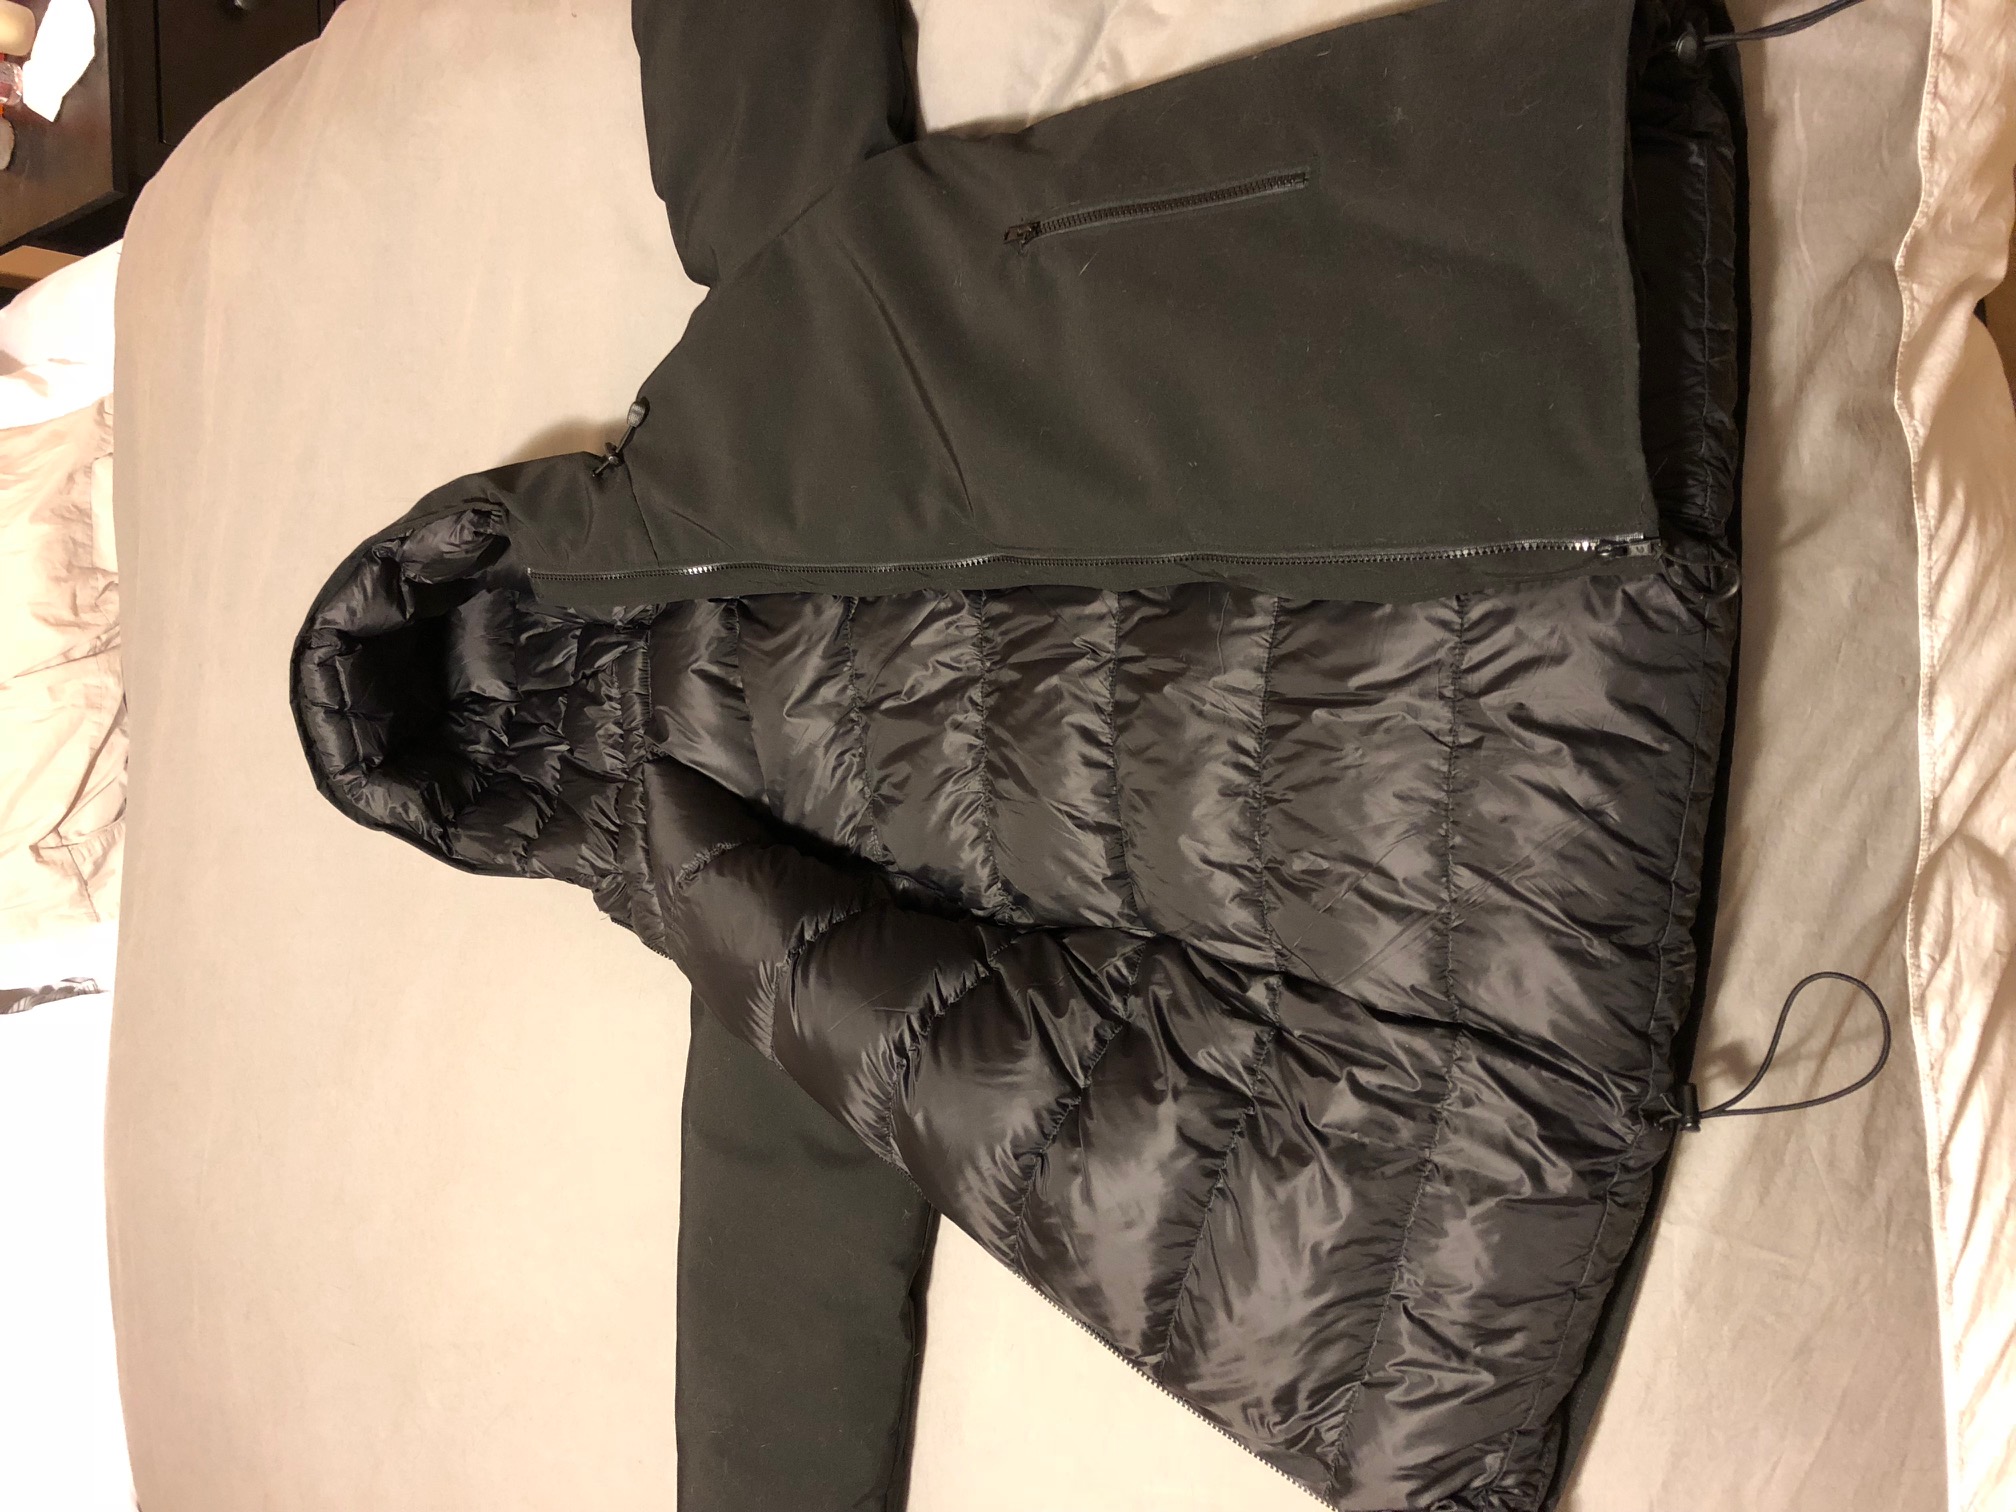
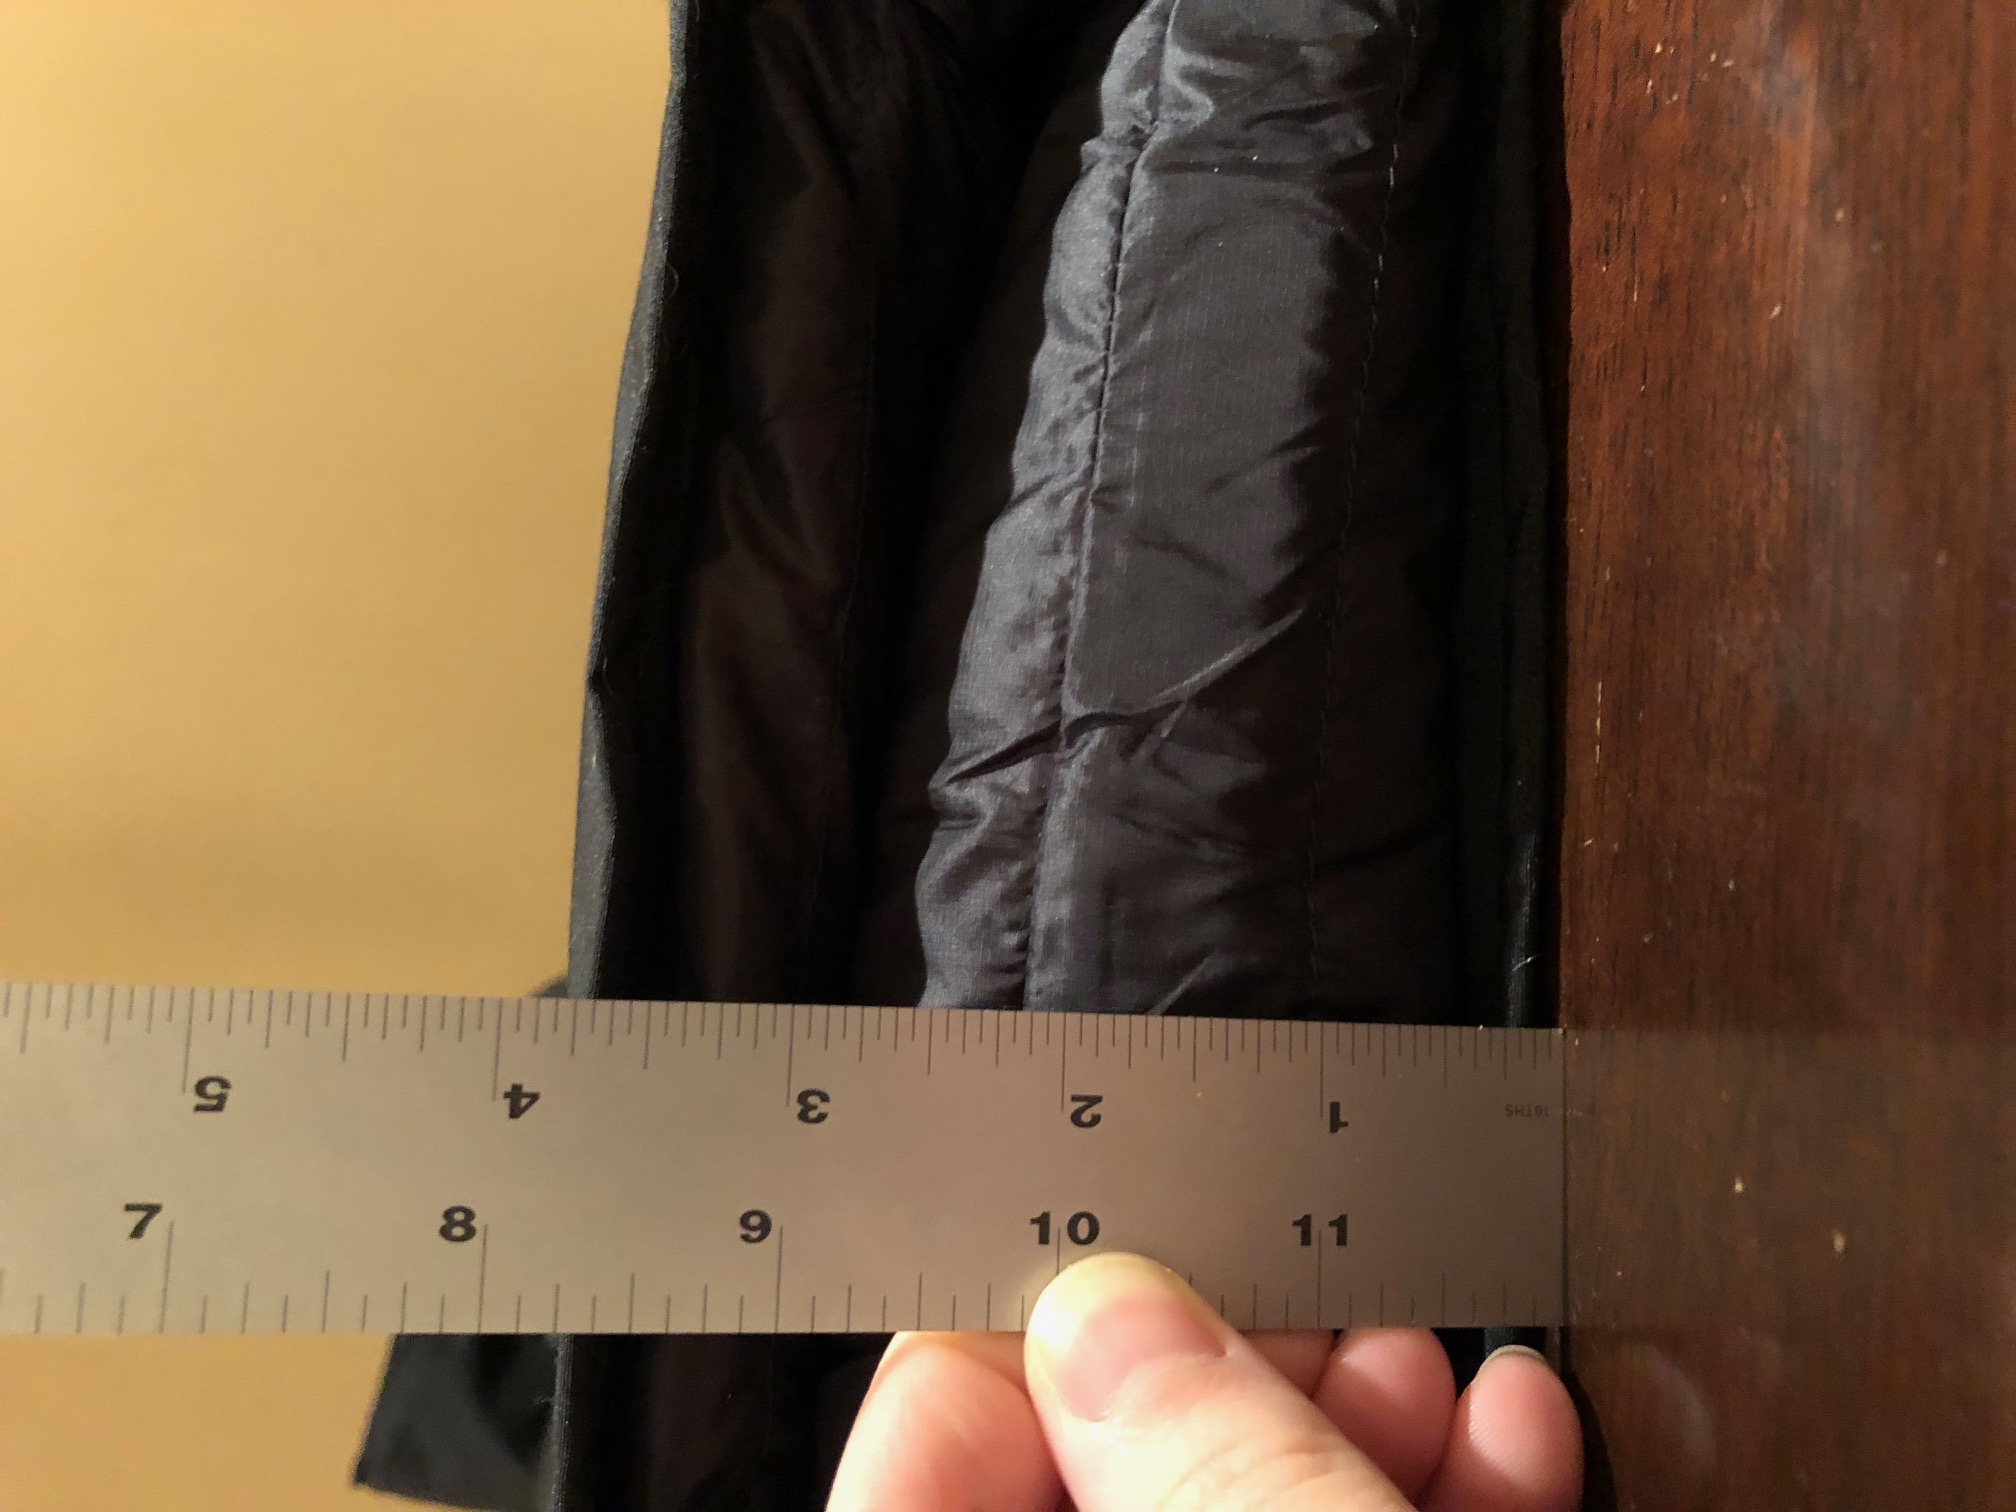
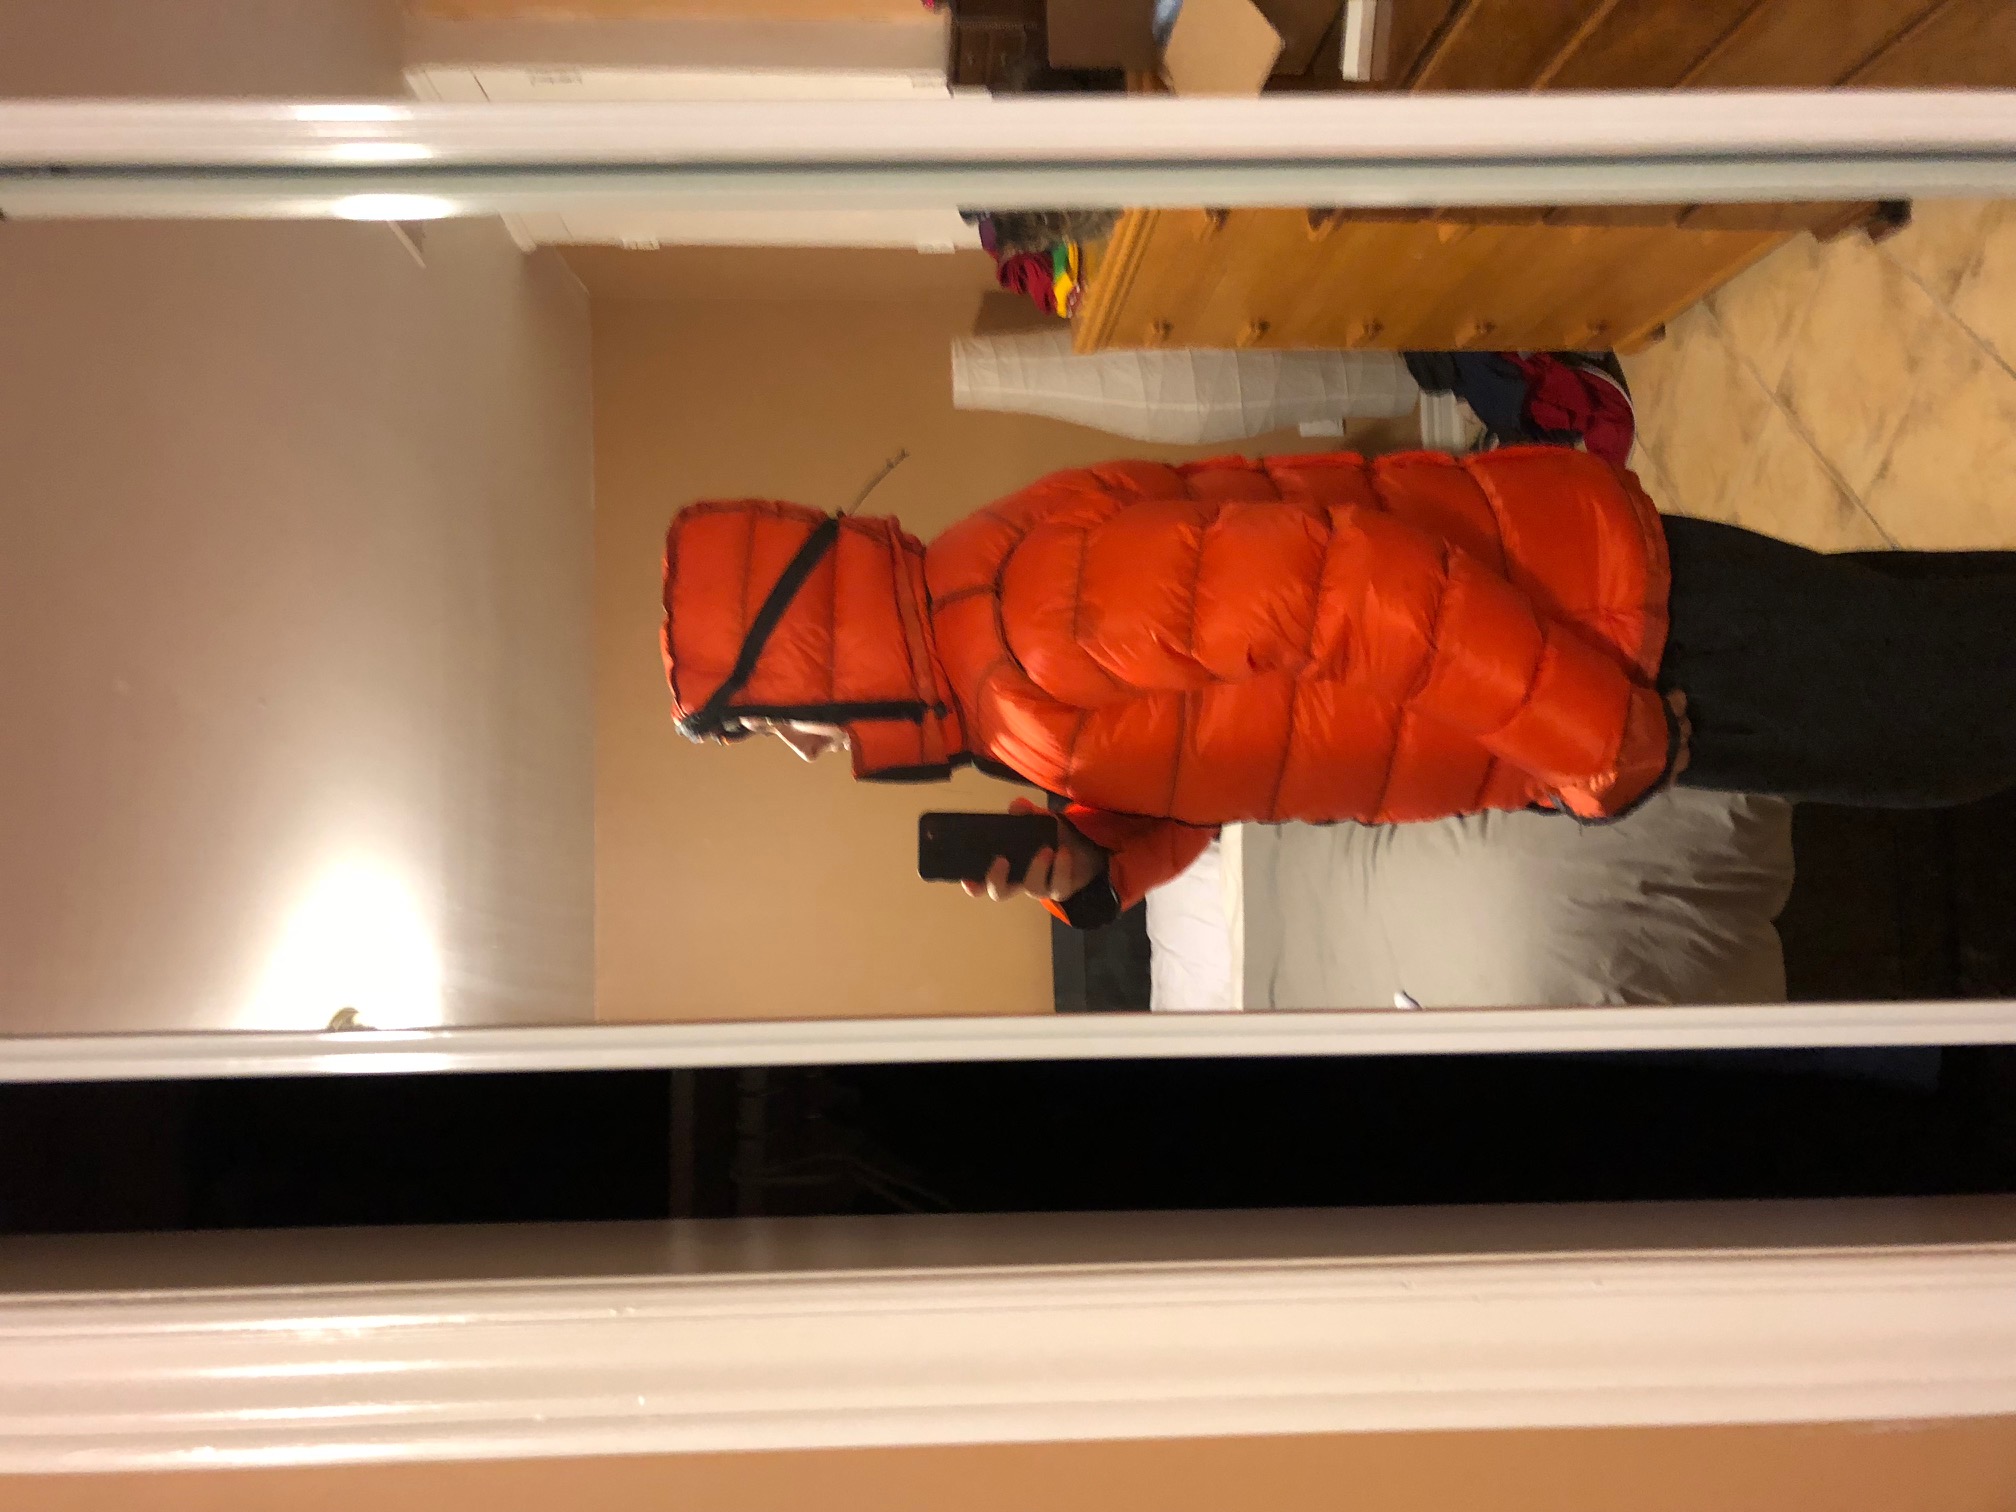
    The body of the jacket is box wall baffled (1.75” loft), the arms are sewn thru (1.25” loft), and the hood is sewn thru as well (1.0” loft). When measured lying flat on a table, the thickness of the jacket body is 3-4 inches. In total, I used around 7 ounces of 850 FP down. I constructed the main body out of one piece of nylon to reduce the number of seams, and therefor cold spots. I chose to have all the seams face outward (i.e. at the neck, arms, hood) so they are not visible on the inside. The inside has a very clean look, which keeps my OCD happy. The seams are covered by the outer shell, which is a durable Commander fabric. It is a ~6oz/yd<sup>2 </sup>fabric that is super durable and windproof, but has significant weight. It is similar to the shell that Canada Goose uses on their parkas and bombers.

    I kept very detailed notes regarding the weight of fabric, down, and amount of material that goes into each component. Now I can play around with hypothetical material weights to reduce the total weight without having to build it. Since this wasn’t a backpacking jacket, weight was not an issue for me. I prioritized maximum warmth and durability over packability and lightness. In general, I would say that I am more conservative, and tend to favor durability. It also kept the cost down by not purchasing UL material.

    Some notable features are as followed:

    • True box wall baffles using noseeum netting with 1.0” box walls
    • Cinch cord at the waist, none of the elastic nonsense
    • Cinch cord around the face
    • Cinch cord around the head to pull the hood in tighter (really similar to the Arcteryx Atom)
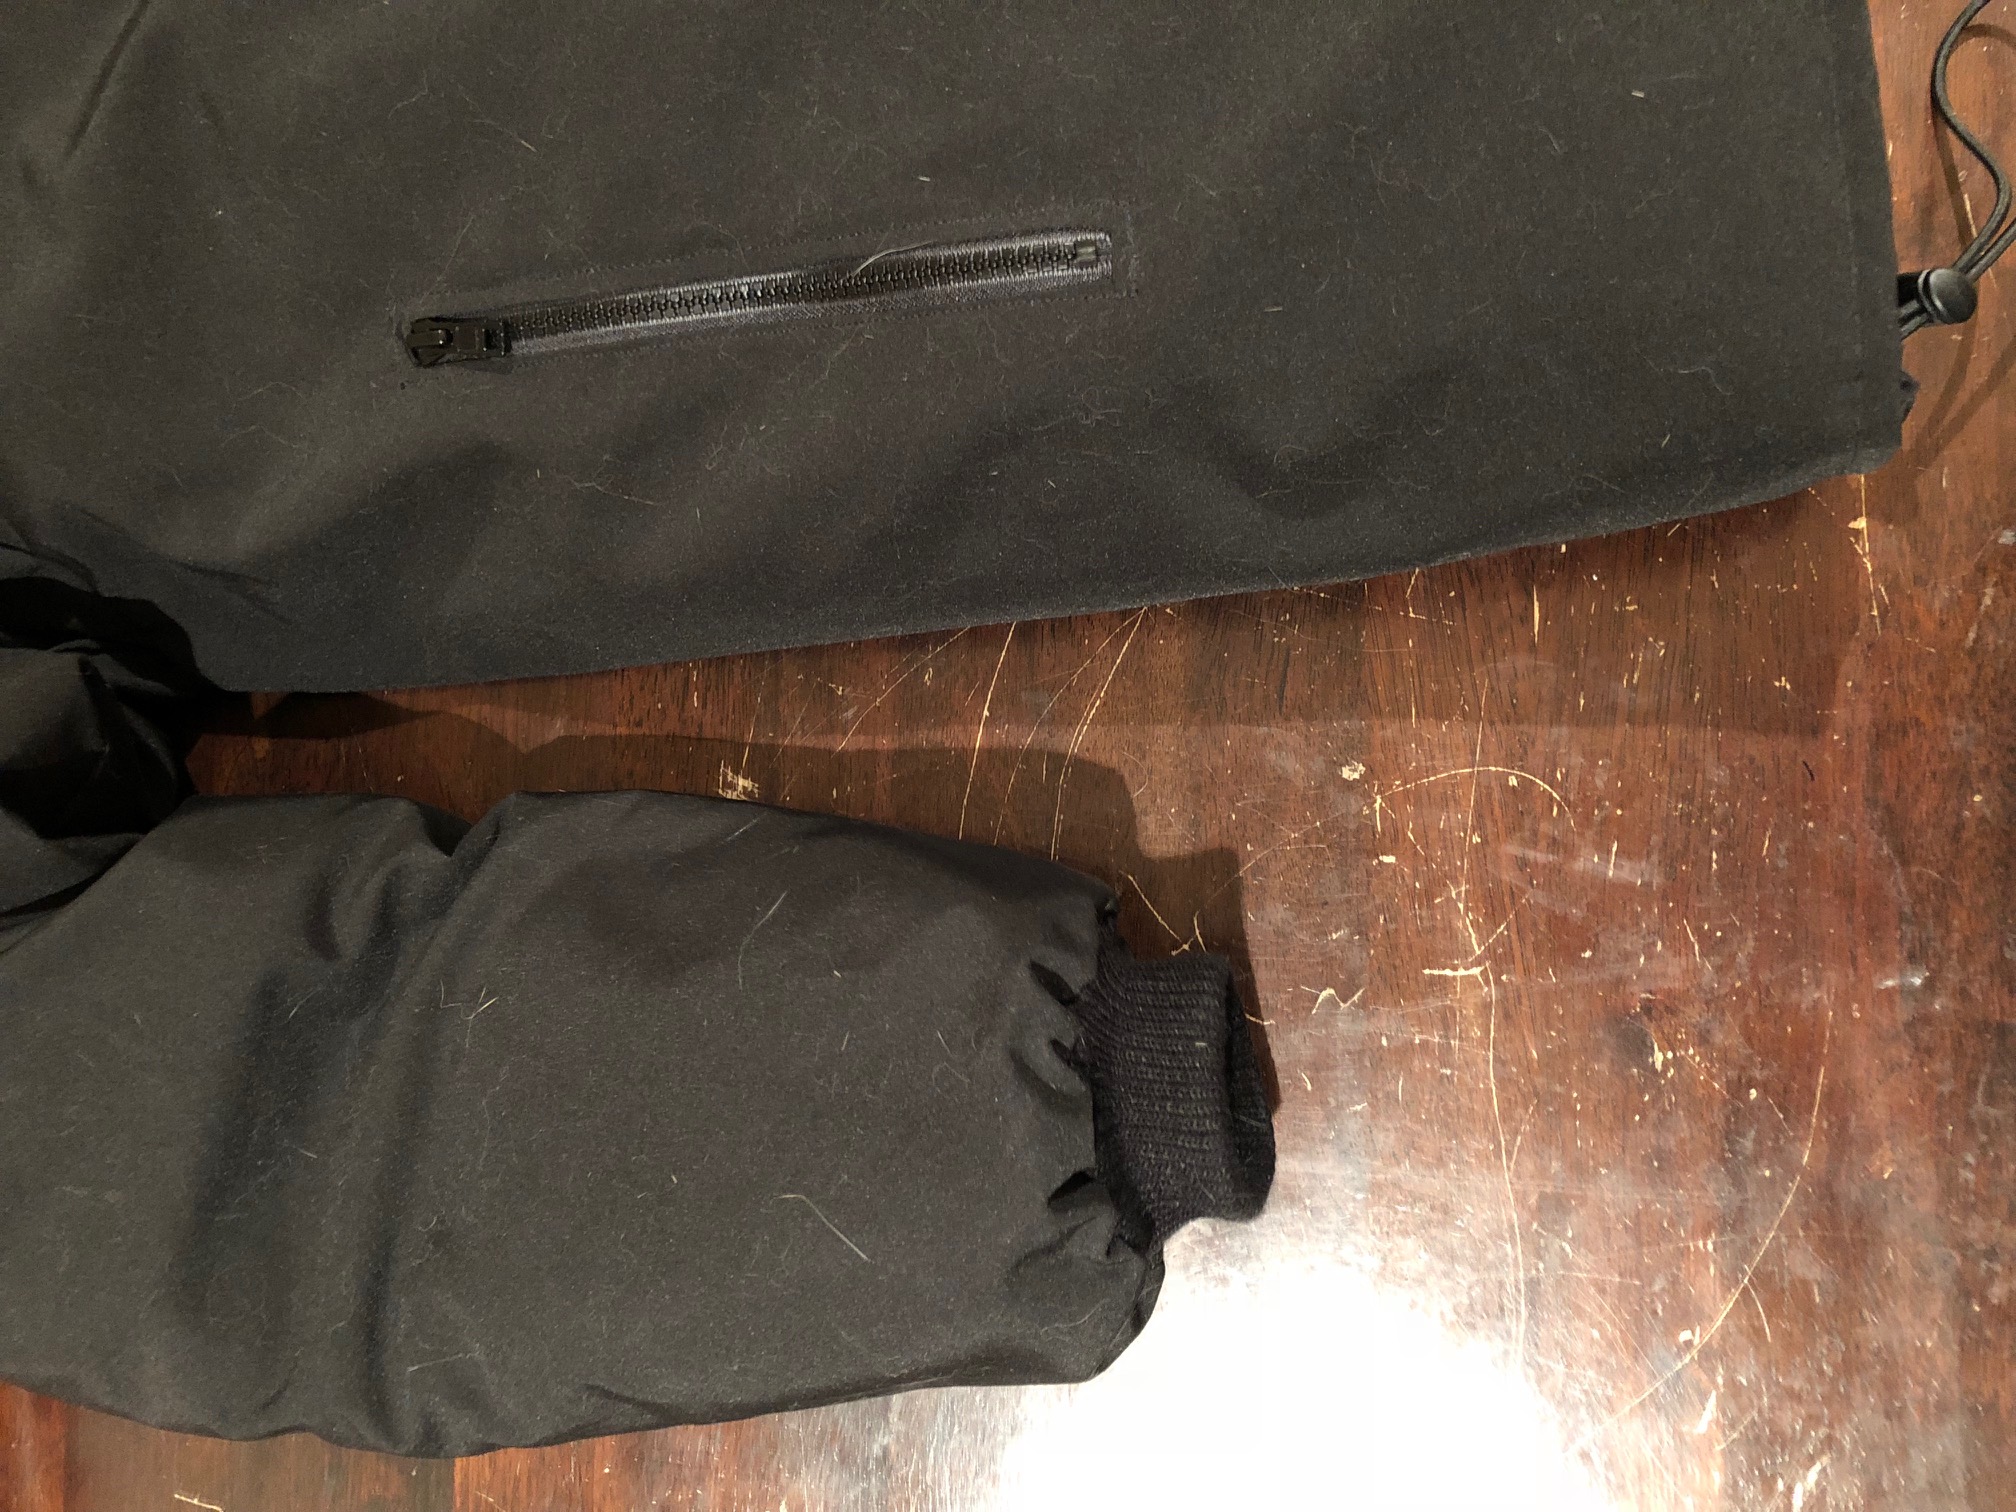
    • Ribbed knit cuffs – I contemplated using elastic biased binding, but decided not to. Ribbed knit cuffs keeps the jacket higher up my wrist so it won’t get in the way when using equipment
    • Fleece lined handwarmer pockets
    • Jacket hook loop at the neck to hang it by
    • Internal draft tube under the zipper – commander fabric where the tube touches the zipper to prevent snags


    I intended to sew in two mesh drop pockets to store my gloves, but I forgot about it when I was sewing the baffles. The worst part of this mistake is that I made a detailed list in which order pieces needed to be sewed, but I misplaced it. By the time I found it, I already sewed the baffles and two shells together. Version 2 I will get it right. I am also toying with the idea of adding a draft tube around the neck. I tried on a Arctery firebee recently and seemed like a very functional feature. Any input on this idea would be appreciated.

    I sourced the materials from:

    • 1.1 ripstop nylon and supplies – ripstop by the roll
    • 850 FP goose down – Feather Industries, the Canadian supplier of down located here in Toronto
    • Commander fabric used in the outer shell – Bradorhiver fabrics in Montreal

    The major issue I ran into with this project was the pattern/fit of the jacket. I did some test baffles (both using sewn thru and box wall baffles) to see how much each baffle will contract when filled. Since each baffle contracts by ¼ “in the body, I had to engineer/guestimate how the armholes (and whole jacket) will contract. Once I had the body filled with down, I traced the shape on a large sheet of paper to have the pattern of the exterior shell (commander fabric). I used some cheap material to make a mock up outer shell to see how it fit and adjusted as necessary to get the fit perfect.

    Unfortunately, I got very sick and had a few surgeries in the fall, loosing 45 pounds (found out I have Crohns Disease). I went from a medium/borderline large, to a size small. In order to make the jacket fit better, I added some darts to the outside nylon shell (orange fabric) to reduce the girth. I added one on each side, and one at the back. I sewed ¼” increments so I could fine tune the fitting. This technique worked quite well, and I am happy with the fit. This also affords me to opportunity to let some material out and increase the size should I gain some weight back. All I have to do is use a seam ripper to undo the seam at the waist, pull the outer shell up, remove one of the seams in each dart, and sew the waist back up.

    Overall, I am very happy with how this jacket turned out. It took considerably longer than I anticipated, easily over 100 hours. That number is artificially high since the surgeries really slowed down my pace. It helped a lot with my recovery though, it was almost a sort of physiotherapy that I could do at home at my own pace. That also includes the time to make the patterns. If I was to do it again now that I have recovered, I would say it would take around 30 hours to make. The longest part by far is measuring the down and stuffing into each compartment. I think I’ll use the down eductor method next time.

    I have had requests from numerous colleagues to make them one, I may consider doing so in the future. I have learned that making your own gear is an iterative process, each version you get closer to what you want your final product to be. I am a perfectionist, so I couldn’t give something to someone without knowing it is the absolute best it can be. Once I get everything exactly as I think it should be, then I may go down that road. With all the issues going on with a certain quilt maker recently (… canine mountain…), it has opened my eyes to how things can get out of hand if you are not prepared.

    If anyone has any questions, I would be more than happy to answer. Also, if anyone has any ideas for V2, please let me know, I think the creativity on this forum is remarkable. I plan on making the next one with a 1.9oz/yd<sup>2 </sup>PU coated nylon to reduce weight but still maintain durability (other suggestions are certainly welcome!).

    Cheers,

    Ryan


    #3521512
    todd
    BPL Member

    @funnymo

    Locale: SE USA

    Oh my WOW!

    What a great jacket.  Even if I managed to make one that looked as good as yours, I’d never build it to fit correctly!

    #3521518
    Gary Dunckel
    BPL Member

    @zia-grill-guy

    Locale: Boulder

    That looks like a great coat, Ryan, and pretty robust for those brutal northern winters. I am impressed with the apparent workmanship, as well as the excellent look. Way to go!

    On my end, there’s no way I could tackle such a project. So I just buy what I need, or have someone make a coat to my specs. For example, after spending a summer season at McMurdo Station in Antarctica, I just had to buy one of those splendid red parkas that we were issued. I found a U.S. store that sold Canada Goose products, and I scored one before the prices started to soar. They are now around US $800, but mine was just $250. It’s the warmest coat/parka that I’ve ever owned.

    Then I had a lady in Sisters, Oregon do a custom coat for me. I had her pattern it as a duplicate of a TNF Denali fleece jacket, but I wanted it to be the equivalent of 400 wt. fleece with a bombproof GoreTex outer shell. It also needed to be oversized in order to wear thick clothing under it, and also have stretchy cuffs to seal out the cold. She did a great job for $250, but man is it ever a heavy coat at 3 pounds (well, the Canada Goose parka is 4.5 pounds, but it’s far warmer).

    All in all, I think that your coat is every bit as good as either of mine – warmer than my GoreTex ‘Denali clone’, and more bombproof than my Canada Goose parka. Great work on your part, Ryan.

    #3522314
    BCap
    BPL Member

    @bcap

    Seems like a pretty sweet jacket.  Hopefully by next Fall I will feel confident enough in my sewing to try something like this.

    #3522326
    David Thomas
    BPL Member

    @davidinkenai

    Locale: North Woods. Far North.

    Fabulous job on the jacket!

    Sounds like do have similar field work, at times.  As an environmental engineer in Alaska, I hope to schedule tasks like logging soil borings and sampling wells during the spring, summer and fall, but sometimes am out at -10C to -30C.  (-40C I’ve been prepared for on personal trips, but is a stop-work event on the job). I hesitate to suggest this because it seems so sacrilegious, but have batteries gotten good enough to consider electric thermal underwear under such a jacket and whatever insulated pants you use?  I’ve got a lithium battery the size of a *small* paperback book that can jump-start my car.  As much as I like to claim I travel all over Alaska for work (I do), I’m usually stepping out of motor vehicle to do the work (i.e. I could charge a battery before each work day and sometimes at lunch).  Motorcyclists have plug-in suits that run off 12 volts DC.

    That side view of the orange jacket (is that before the shell went on?): I really like how the lower hood comes around the chin.  So many commercial jackets make that part of the hood too tight.  Consider adding a 3-4″ tunnel hood with ruff (and, sorry PETA, but wolverine and beaver make better ruffs than any synthetic) for use in wind and when it’s below -20C.  I’ve seen a few such attachments that “buttoned” on, but instead of button holes, small loops of small-diameter bungie cord gave a place for a largish button (2 cm diameter) to attach.  That leaves the hood still very clean looking when you’re not using the tunnel hood and without Velcro snagging itself, your hair, etc.

    Sounds crazy, but stitching a length of 12-gauge solid copper wire inside the leading edge of a tunnel hood lets you form it to exactly the configuration you want and keeps it stable in high wind.

    I really like the feature of large mesh inside pockets for gloves, etc.  I assume you know the dog-mushing (and toddler) trick of running a cord across your shoulders, down each sleeve and then to each glove/mitten?  It prevents you from losing the gloves while letting you shake them for brief fine work and then slip them right back on.

    I had a jacket custom made with a large compartment across my lower back on the outside.  It goes from side seam to side seam, 15 inches deep from the bottom of the jacket to about the small of my back.  It is accessed through two zippered slits each about 9 inches long, one on the upper left, one on the upper right.  I use it for a dog leash, hat, scarf, face mask, and an inner layer that I may shed or put on again through the day. It functions as a day pack when I sue it, but I can access it without removing the jacket.

    #3522493
    brent driggers
    BPL Member

    @cadyak

    Locale: southwest georgia

    excellent work on the jacket.

    #3580839
    Sarah Pigeon
    BPL Member

    @littlebugshoe

    Hi Ryan,

    I am thinking about making a down jacket. I would like to make my own pattern using a fleece jacket that fits me well. Do you know how to adjust this pattern to account for the extra loft that the down will give? I was thinking about having a loft of about 1 inch. Any help or advice would be greatly appreciated.

    Thank you!

    Sarah

    #3580848
    Jerry Adams
    BPL Member

    @retiredjerry

    Locale: Oregon and Washington

    I didn’t see this originally, nice job!

    If you want a loft of 1 inch, the outside circumference has to be 2 * pi * 1 inch = 6.25 inches bigger

    “I have learned that making your own gear is an iterative process, each version you get closer to what you want your final product to be.”

    That’s my experience too

    “It helped a lot with my recovery though, it was almost a sort of physiotherapy that I could do at home at my own pace.”

    Yeah, if you don’t enjoy the creative process of designing, constructing, using, iterating it probably doesn’t make sense to do MYOG

    #3580856
    Ryan A
    BPL Member

    @rabrams

    Thanks for the Reply Jerry. You are the reason I got a membership to BPL in the first place, I wanted to read your post about your down vest you made. Its pretty cool to see you comment on my post.

    #3580859
    Ryan A
    BPL Member

    @rabrams

    Hi Sarah,

    As Jerry mentioned, you can figure out the width of your jacket by adding 6.25 in to the circumference. The pattern for down jackets seems large but once the jacket is filled with down it becomes quite a bit smaller fitting. Here are some notes I have regarding making your pattern:

    • You will have to adjust the circumference of the fleece pattern and the length
    • Sew a few test baffles and determine how much to stuff each one with using the excel sheets floating around. Doing this allows you to figure out how much each baffle will contract, and therefore how much length you need to add to each baffle to accommodate the contraction. Sewn thru baffles will contract much more than box wall fyi
    • As I mentioned, you will have to adjust the pattern to account for the contraction. Remember this includes the arm hole cutout – I forgot about that and had to make mine larger after
    • Adjust the length and width of the arm pieces and hood also. The arms on my jacket were sewn thru and contracted ~ 1/2″ – 3/4″ when filled
    • I started my pattern by getting the width sorted first and ignoring the length. Once I was happy with the width measurements and how it looked on paper, I traced the pattern using used parchment paper from the grocery store. I cut the parchment paper along each baffle line, then added some space to account for each baffle contraction. If, for example, I estimated each baffle would contract by 1/2 inch, I added 1/2″ between the cut baffle sections and taped them with the 1/2″ space. Once all the baffles were cut and the appropriate space is added, you now have the length prior to stuffing with down. I placed the new baffle line halfway between the cut sections. Its not perfect but its a good starting point.
    • Since you are adding width to your jacket (larger circumference), it will move the shoulder point also
    • When you draft the hood, allow for some more room where the hood attaches to the zipper. On my first attempt the zipper was pulled too close to my chin when it was filled, I ended up adding a small gusset to move the zipper farther away and make it more comfortable
    • I made my body all one piece and it was very hard to sew and manipulate. I would suggest having the back be one piece, and each half of the front be one piece. You will have a seam along the side. If needed you can adjust this seam to take up some of the material if you find it to big

    Since this post I have made a few more jackets and have the pattern just right. Don’t expect to get it perfect the first time. Its hard to get it all right the first time.


    #3580877
    Jerry Adams
    BPL Member

    @retiredjerry

    Locale: Oregon and Washington

    it’s pretty cool when someone reads something I wrote and when they progress from there : )


    #3580893
    Jerry Adams
    BPL Member

    @retiredjerry

    Locale: Oregon and Washington

    I’ve made a couple quilts and vests using this technique:

    Top view of a test piece, a 12 inch square:

    Side view:

    This gives all the advantages of sewn through with all the advantages of box baffles.

    The outside face fabric baffle width is 2 inches.  The inside face is 2 * pi / 2 ~ 3 1/4 inches.  The inside face fabric is also 2 * pi / 4 ~ 1 1/2 inch wider in the other direction on each side.  Asymetric sewn through baffles.

    You can see that there’s a gap where there’s no down, but if you put a jacket outside of that, it will produce a confined air space with insulation almost as good as if it had down.

    Half as many seams to sew.  You don’t have to cut strips for baffles.

    With regular sewn through baffles, the weight of the vest pulls down both sides which tends to pull the baffles closed, reducing the loft.  With regular box baffles the effect is less.  Asymetric sewn through are actually better.  All the weight is carried by the face fabric of the shorter baffles side.  The baffles with down hang off the side and are able to loft better.

    #3581247
    Eric Blumensaadt
    BPL Member

    @danepacker

    Locale: Mojave Desert

    Very nicely done Ryan. It looks good and I’ll bet it’s warm. Nice detail work on the shell. Your patience and ingenuity is enviable but I know you really need this parka for your job. I’ve been in Toronto in winter B/C I lived in Erie, PA and made trips up there with my wife to see her cousin. It can be brutally cold there. I’ve XC skied further north off the 400 near Georgian Bay and one day it was about 5 F. and you either kept moving or you froze.

    Me? I’m not as motivated as you so this winter I bought an Eddie Bauer PEAK XV baffled down expedition parks for $299. on sale from $420. It has a helmet compatible hood that I need to cover my helmet for alpine skiing on bitter cold days.

    However I was not satisfied with the flat interior zipper baffle so I ordered 800 fill DWR treated down from Ripstop by the Roll. Then after seam ripping the 1″ wide top of the baffle I used a kitchen funnel and a 3 foot rod to stuff down into the baffle. It worked so well I’m having another baffle tube sewn the left side of the zipper and will fill it with down. Then I’ll have two baffles, like those on the Patagonia Grade VII and Fitz Roy parkas.

    BTW, I too and “… toying with the idea of sewing a baffle tube around the neck.” at least the back 2/3 circumference.

    Finally, I bought a nice coyote fur ruff and I’ll sew Velcro on it and on the parka hood so I can remove it when I ski. Yeah, I’ll have to hand stitch the hood Velcro strip but I’m good at hand sewing stuff. It just takes patience.


Viewing 13 posts - 1 through 13 (of 13 total)
  • You must be logged in to reply to this topic.
Forum Posting

A Membership is required to post in the forums. Login or become a member to post in the member forums!

Get the Newsletter

Get our free Handbook and Receive our weekly newsletter to see what's new at Backpacking Light!

Gear Research & Discovery Tools


Loading...