Topic
MYOG backpack # 2 – and lessons learned from # 1
Forum Posting
A Membership is required to post in the forums. Login or become a member to post in the member forums!
Home › Forums › Gear Forums › Make Your Own Gear › MYOG backpack # 2 – and lessons learned from # 1
- This topic has 12 replies, 2 voices, and was last updated 4 years, 10 months ago by
 Lester Moore.
-
AuthorPosts
-
Jan 17, 2018 at 7:30 pm #3512919
Please see below.
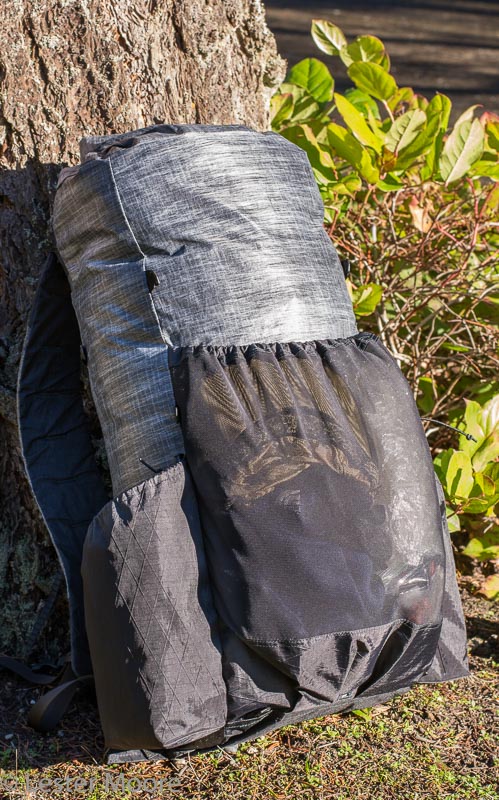
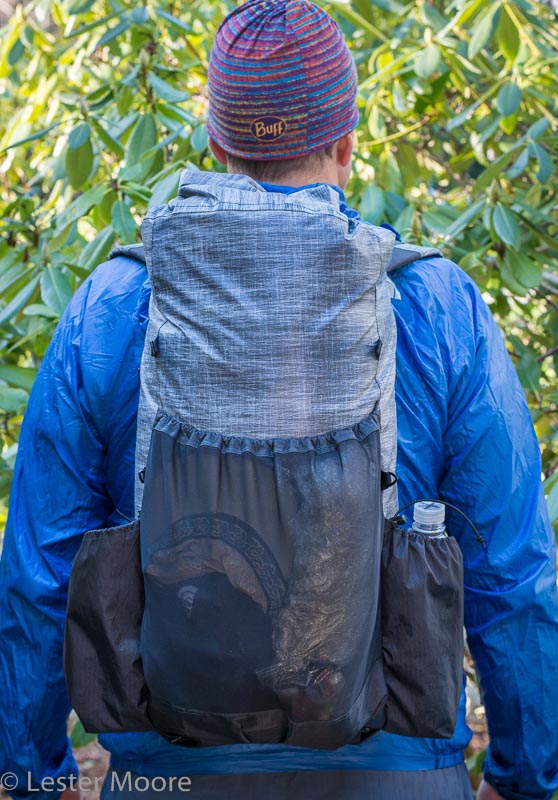
Jan 17, 2018 at 7:40 pm #3512922Backpack # 2 took a different approach than backpack # 1, adding 5 additional ounces for more stoutness and added storage space. Pack # 2 is the same size (22 L) as the first pack, but weighs 8.5 ounces stripped – a workable upper limit for an SUL pack. Pack # 2 also took advantage of some lessons learned after making the first pack (see below).

Design Changes
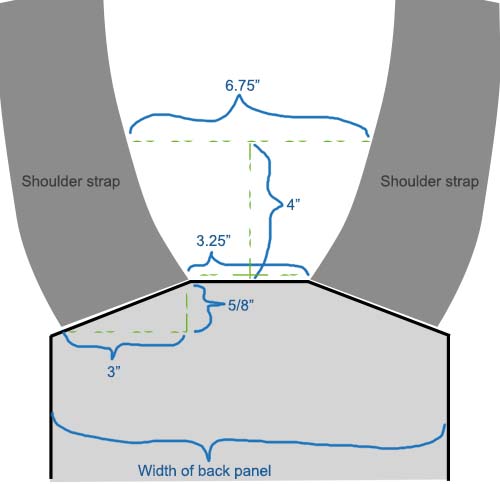
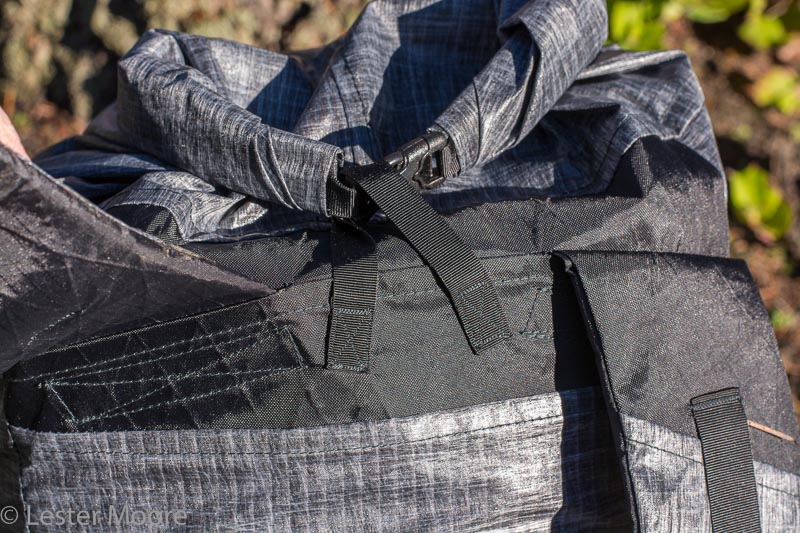
Pack # 2 has simplified panel shapes that were easier to sew (mostly). The back/bottom/front panel was a single right rectangle 10 x 48”, sewed together with different fabrics at different locations. The bottom curve of the side panels and the flat-bottomed side pockets still took extra time to sew. This pack has a front pocket, which added 1.25 ounces to the weight. The height of the pack was increased a few inches to add to the torso length and to add a little space between the shoulder strap seams and the roll-top collar (easier to sew). Several high stress and abrasion area were reinforced with thicker fabric while lighter fabric was used for the main panels.Pack # 1 concentrated all the pull from the top of the shoulder straps toward the outside of the seams attaching the shoulder straps to the back panel. For pack # 2, the angle of the shoulder straps coming off the back panel was adjusted slightly to better distribute force along the entire attachment seams. Specifically, at a distance of 4 inches away from the attachment seams, the inside edges of the shoulder straps were 7 inches apart (see diagram below). This combined with 3.25” between the insides of the shoulder straps at the attachment seams provided a nearly ideal shoulder strap angle coming off the back panel. For the next pack, 6.75 inches should be about perfect.

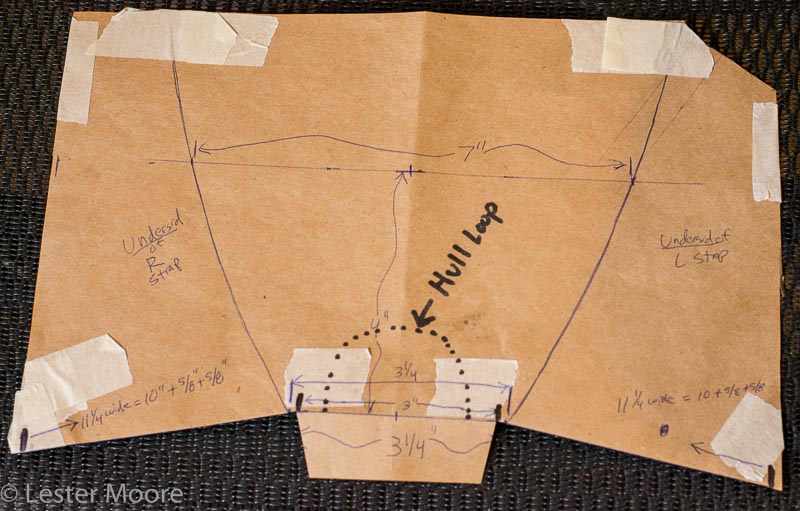
The thickness of the foam in the shoulder straps tended to push the presser foot sideways while sewing the straps to the back panel, making it difficult to maintain proper strap angle and to sew the straps on with a straight line. The straps and back panel were taped to a paper form in the precise orientation prior to sewing, which helped hold the straps and back panel at the correct angles while sewing the attachment seam (image below).

Fabrics
Pack # 1 was 100% 1.1 oz 30D MNT Silnylon 6.6 XL, with no heavier fabric for reinforcement areas. This pack used three different DP X-Pac fabrics: Lite Skin LS-07, VX-07 and VX-21. The LS-07 was used for the main panels, middle front of shoulder straps and the roll-top collar (the majority of the backpack). VX-07 was used for medium wear and moderate stress areas (side pockets, front pocket top and bottom, underside of shoulder straps and bottom 5 inches of both side panels). For high wear and stress areas, VX-21 was used (pack bottom, top and bottom portions of the shoulder straps, the top of the back panel where shoulder straps attach, and the small wings where the shoulder strap webbing attaches to the bottom of the pack). The front pocket mesh is 5 osy Lycra mesh from Quest Outfitters.Sewing
One big improvement for pack # 2 was stitching. This pack used a 2.7 mm stitch length (9 stitches per inch) for most straight stitches. Especially with the Lite Skin fabric, this longer stitch length should minimize the risk of seam perforation and weakening by the thread holes. For the most part, the X-pac fabric was MUCH easier to sew than the 30d MNT silnylon 6.6 XL used for pack # 1. However, tight corners were more challenging to access because of the stiffness of the X-pac fabric. Guttermann Mara 70 thread was used throughout.Instead of pins, masking tape was used to hold multiple layers of fabric in place for sewing. This was faster and worked reasonably well, especially on the tightly curved pack bottom seams.
A Microtex needle was used (size 90/14) for all straight stitches. The extra sharp Microtex tip bit through the X-pac fabrics quite well. However, a LOT more top tension was needed for the machine to sew good stiches with this needle for some reason. For bar tacking or zig zag stiches, the Microtex needle jammed the machine, so a standard 100/16 needle and a more “neutral” top tension were used for these two stitch types.
Most seams were flat felled except for the main panel seams, which were simply double stitched and the edges torched to reduce fraying. We’ll see how the X-pac fraying is over time.
Lessons Learned for the Next Pack (# 3)
- Simplified (flat-bottomed) side panel shapes will be used. Also, the entire bottom panel will be sewn together first, before the other panels are attached to it (for easier sewing).
- Is there a smaller profile presser foot for sewing tight, 3-D inside box corners on stiff fabric? If so, that would make the pack bottom easier to sew.
- The seam closing the roll top collar into a tube will be sewn AFTER most of the collar has already been attached to the main pack. This will ensure no fabric overlap on the collar due to differential fabric speed through the machine while sewing the entire circumference of the collar to the pack.
- A zipper foot may be used while sewing the main backpack panels so that the plastic hardware on the side tie out points does not push the presser foot sideways while sewing, resulting in a wavy seam in the vicinity of the tie out points. Alternatively, a temporary spacer may be used under the other side of the presser food to alleviate sideways presser on the foot while passing tie out point hardware.
- Any sewn channels for shock chord will be made AT LEAST 1/2” wide, so it doesn’t take a half hour to insert 10 inches of chord.
- A different kind of needle will be tried for the Lycra mesh pocket to avoid skipped stitches, or a tough mesh will be used instead.
More Photos


 Jan 17, 2018 at 8:45 pm #3512941
nice, good info
can you have front, sides, back all one piece of fabric? That would avoid some seams.
Jan 17, 2018 at 8:58 pm #3512944can you have front, sides, back all one piece of fabric?
Definitely would be much easier. This would be preferred for a simple pack with no external pockets. The only challenge would be attaching side pockets or a front pocket – the pockets would have to be sewn directly to the panel faces rather than incorporating the pocket’s seam allowance into the main panel seams. Having never seen or used a pack made this way with pockets sewn outside, I’m unsure of the downsides.
Jan 17, 2018 at 9:11 pm #3512947oh, I see your point. and if you sewed the pockets on, it would perforate the main fabric making it weaker and more likely to leak water. Still, an idea to ponder…
I don’t put pockets on my packs. I prefer to put my water bottle inside. Maybe it stays cooler. Make the pack a little bigger. I am in the minority though : )
Jan 17, 2018 at 9:18 pm #3512951can you have front, sides, back all one piece of fabric?
Bottom too: I’ve done that (https://backpackinglight.com/forums/topic/82000/) using John Roan’s pattern: http://www.mountainultralight.com/2011/09/make-your-own-cuben-fiber-backpack.html
You can sew one edge of the side pockets under the mesh back pocket, and then the other edge just gets hemmed and sewn down with the seam running outside the pocket, instead of inside. Looks less professional; also it’s a good idea to reinforce the top corner where the side pocket is sewn on (opposite the mesh pocket)–I didn’t do this and the stress on that stitching and fabric has been noticeable.
Similarly (also outside seam), for the bottom, you could sew a tube of fabric for the pack and then stitch the bottom onto the end of the tube sewing along the outside, with binding tape, a la Hanchor (check out the fourth photo): https://www.hanchor.com/products/Outdoor%20Series/MARL_Hiking_Backpack?locale=en
However, you don’t get the nice contoured back shape Lester got on his packs!
Edit to add a little more detail and to say: By the way, really great job you did on this one! The pack looks great.
Jan 18, 2018 at 1:07 pm #3513053Beautiful pack!
Any sewn channels for shock chord will be made AT LEAST 1/2” wide, so it doesn’t take a half hour to insert 10 inches of chord.
This is hilarious and so true. I have spent way more time on silly little things like this than actually sewing. I’m making a framed pack similar to mine for my father-in-law and last night, I literally sat on the couch and spent an hour inserting foam into straps….
Jan 18, 2018 at 1:39 pm #3513055Pack #2 looks great!
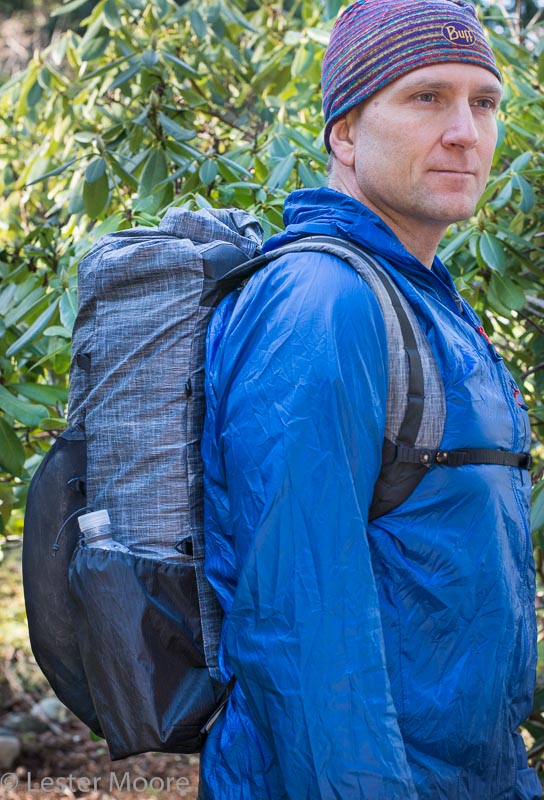
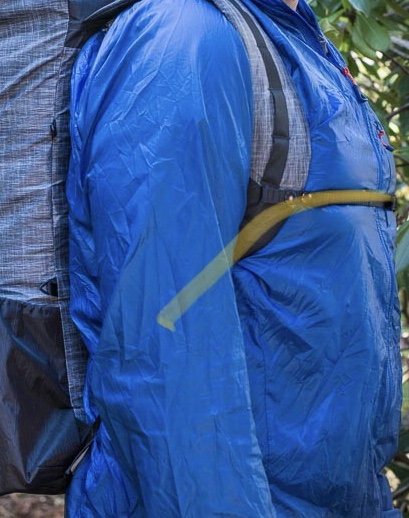
I noticed that you have your sternum strap mounted much lower than most packs will accommodate. It’s so low that it almost forms a continuous line coming off of the webbing that attaches the shoulder strap to the bottom of the pack (I don’t know what to call this!). I’m not sure if this is significant but I suspect this keeps the sternum strap from twisting the shoulder straps. I also wonder if this gives more of a solid harness/vest feel enveloping the rib cage… Any thoughts?
 Jan 18, 2018 at 4:51 pm #3513075
Nice work Lester! Looks great!
Jan 18, 2018 at 5:51 pm #3513083Matt – when wearing a waist belt, I typically wear the sternum strap higher, or not at all for groomed trails. When not using a waist belt, a low sternum strap feels more secure jumping over downed trees and such.
The only caveat is shoulder strap fit. Sometimes the sternum strap has to be positioned to maximize the shoulder straps fit and comfort. For example, on the 2016 GG Gorilla, I wear the sternum strap higher than normal because it helps the shoulder straps to fit better. With an S-curved shoulder strap (like pack # 1 and 2 or the MLD Burn) shoulder strap position does not affect the comfort or fit of the shoulder straps much. YMMV.
Jan 18, 2018 at 6:04 pm #3513085That makes sense. Thanks for your response.
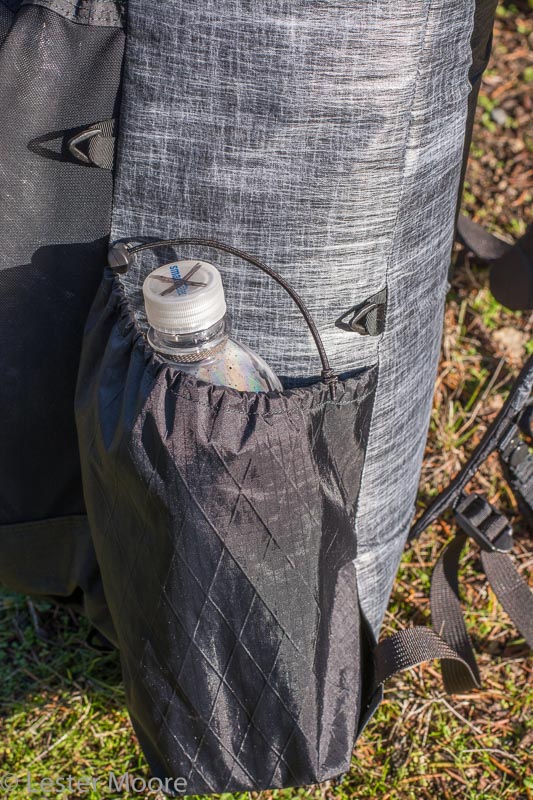
Apr 13, 2020 at 11:36 am #3641192I like your side pockets with the draw on them. Do you have any posts or videos where I can see a little more detail on how they were built?
Apr 13, 2020 at 6:22 pm #3641258The side pockets have gone through a few major revisions since pack # 2. They are now larger and have a much lower front to make bottle access easier while hiking. The current design is based on a lot of personal trial and error and some feedback from users too. There are lots of photos from different angles here:
https://www.olympicul.com/product/talaria-backpack/
-
AuthorPosts
- You must be logged in to reply to this topic.
Forum Posting
A Membership is required to post in the forums. Login or become a member to post in the member forums!
HAPPENING RIGHT NOW (February 11-21, 2025) - Shop Hyperlite Mountain Gear's Biggest Sale of the Year:
Our Community Posts are Moderated
Backpacking Light community posts are moderated and here to foster helpful and positive discussions about lightweight backpacking. Please be mindful of our values and boundaries and review our Community Guidelines prior to posting.
Get the Newsletter
Gear Research & Discovery Tools
- Browse our curated Gear Shop
- See the latest Gear Deals and Sales
- Our Recommendations
- Search for Gear on Sale with the Gear Finder
- Used Gear Swap
- Member Gear Reviews and BPL Gear Review Articles
- Browse by Gear Type or Brand.

