Topic
Making a Stephenson/Jansport Hipwings style Carbon Fiber External pack frame?
Forum Posting
A Membership is required to post in the forums. Login or become a member to post in the member forums!
Home › Forums › Gear Forums › Make Your Own Gear › Making a Stephenson/Jansport Hipwings style Carbon Fiber External pack frame?
- This topic has 18 replies, 6 voices, and was last updated 7 years ago by
 Sam Farrington.
-
AuthorPosts
-
Jan 22, 2018 at 2:38 am #3513619
I have been a member for years but mostly just very much enjoy the great creativity and Body of Knowledge here. Hours spent here are always enjoyable and worthwhile.
I have a fairly large collection of backpacks. One of several areas that my collection focuses on is maintaining the body’s normal center of balance and includes two original Stephenson external frames, 2 or 3 A-16’s, 2 or 3 of every Jansport ‘Hipwing’ style external frames, an Aarn Mountain Magic, an Aarn Natural Balance, several lighter weight Granite Gear (including a Massdrop X Granit Gear Crown X60 due in June 2018) that I am working on making front balance pockets. But that is another project.) . I have not purchased one of the great Carbon Fiber packs as I intend to make my own carbon fiber pack sack once I am able to build my own very light frame.
There are a couple outstanding threads here including “ULTRA-LIGHT EXTERNAL FRAME PACK” and “SUL EXTERNAL FRAME” where a number of members (including Bill Fornshell from South Texas who I really hope is still with us. I have spent hours reading and re-reading the threads that he posted and others responded to, If only I had his mechanical creativity and building skill set.) many years ago that are still accessible. Emails in those threads refer to previous emails that can no longer be accessed.
My goal is to be able to carry 100% of the weight on my pelvis but have the ability to shift the weight to the shoulders now and then. Other goals and my current solutions are below. I apologize for not loading picture(beyond my capabilities but Aarn, Stephenson, A-16 and Jansport pictures can be found here or on Pinterest thru Google.
Please feel very free to disagree and/or provide solutions you believe are better.
Goal 1: A hip belt that will not slip and the ability to carry load in the front but not blocking chest airflow.
I find the Aarn Auto-Form Hipbelt with separate tension for the top and bottom of the hip belt to be the best for me. While the Aarn hip belt (and all other adjustments) take much trial and error to get properly adjusted, once dialed in that hip belt is not going to slip down, at least for me. I also find the Aarn front mounted balance pockets great for center of balance fine tuning and very convenient for immediate access to everything needed on the trail without removing the backpack. With creative packing of the balance pockets and proper adjustment, the chest area airflow is adequate. Creative pack loading, shoulder strap and load lifer adjustments are necessary to minimize backpack to back contact when it gets hot (but then don’t try to run.) Aarn also has a very creative ‘Flow Thru’ strap process which allows a shoulder strap to lengthen when reaching upward while shortening the offsetting shoulder strap. A neat idea but I am not sure how to do that on my external frame.
Goal 2: Body flexibility independent of the frame and that places the weight on the left and right side of the hips. Very light shoulder straps that primarily are only keeping the backpack from falling backwards but that can be used to take carry much weight on the shoulders.
The original Stephenson hip belt works alright for small loads but can slip past the top of the pelvis so the Aarn belt wins the hip belt comparison. The way the Stephenson hip belt attaches to the Stephen Wing arm by a few inches of 1″ pack strap allows the the body to flex different than the external frame (Noiselessly as compared to the Jansport SQUEAK). Stephenson’s shoulder are simply large hole mesh that I find to be very comfortable considering the weight. Stephenson’s beats Jansport as far as suspension attachment to the body at the hips and the shoulders.
Goal 3: ” Very light weight external frame.
The A-16 frame will stand up on the ground by itself but is pretty heavy and requires welding skills that I do not currently have. (Coleman plastic frames also have there benefits but also are heavy and do not focus the weight on the sides of the hips.) Other than that, I think the Stephenson Frame wins best of class except for the weight (slightly over 2 pounds with hip belt and shoulder straps after changing out the 1950s/1960s metal fittings with plastic.)
Finally to the real question. I have a fair bit of experience doing fiberglass work on a sailboat and have plumbed houses with PVC pipe. I also have purchase some carbon fiber tubing of various dimensions and thicknesses to see what it takes to break them. Other than that I am a carbon fiber novice.
Can anyone share any MYOG experience with external frames similar to the Stephenson?
Thanks for all assistance and wisdom.
Hawk.
Jan 22, 2018 at 3:52 am #3513636Here’s a link to one of the mentioned threads. Bill is a legend here deservedly so.
https://backpackinglight.com/forums/topic/59/
Here is the other,
Jan 22, 2018 at 4:10 am #3513640Paul… I make surfboards, carbon fiber ukuleles and about three carbon fiber pack frames. Carbon fiber is easy to work with, just have to use a good epoxy, compress it (vac Bag) and heat treat it after. Any info I can help you with let me know
 Jan 22, 2018 at 6:06 pm #3513718
Ken:
Those are exactly the articles I was talking about. Was Bill able to regain his health?
Les:
Thanks very much for your offer.
It looks like you have already built pretty much what I have in mind. Is there anyway that I can blow up your picture and/or get some additional pictures of the three frames you have made particularly where the shoulder and hip belts connect?
Bill Fornshell’s emails from:
https://backpackinglight.com/forums/topic/59/
Bill’s 06/08/05 3:46PM email shows basically what I want to do in carbon fiber (the blue pack sack is on the frame) except that I was thinking using aluminum like Bill did for the actual wing arms might be easier than carbon fiber.
Bill’s 07/01/05 10:08 AM email has great views of a Stephenson showing the wing arms if you are not familiar with Stephenson.
Just as the Stephenson frame is basically aluminum tubing and brass(not sure) joints/connectors, I was envisioning my MYOG external frame project as trying to almost duplicate the Stephenson Frame with carbon fiber tubes and glued angle connections with glued on carbon fiber gusset supports or nylon angle connections with carbon fiber gussets where necessary. Based upon your “good epoxy, compress it (vac Bag) and heat treat it after” recommendation, I am going to buy a couple carbon fiber how-to-books from Amazon. (can you recommend any specific texts?)
I imagine that using Carbon fiber is basically similar to laying up multiple layers of fiberglass but with the additional steps of vacuum sealing and heating?
Is there a way of building some kind of foam core and then building up the appropriate thickness and number of layers of carbon fiber to achieve the desires shape with sufficient strength?
Are there any particular websites you use to purchase your supplies?
Using Bill’s design with the arrows/ or carbon fiber tubes(but only one on each outward side like the Stephenson) I will still need 2 or 3 horizontal pieces in the top, the bottom and the lower one third that will need to be curved to allow for a Jansport type mesh back support to separate my back from the pack sack. Assuming that my Verticals are 16″ apart (like the Stephenson) could the horizontals be 12″ straight tubing with about 3″ pieces of tubing with say 30 degree angle similar to horizontal offsets in the Alice pack frames or the Tactical Tailor malice Fight Lite external frame?
Possibly as I study the Stephenson further maybe the entire frame except for the Wing Arms should just be laid up with Carbon Fiber with aluminum pivot post firmly embedded in the carbon fiber frame awaiting the aluminum wing arms? So many possibilities.
I think this is going to be quite fun.
Thanks for your assistance.
Hawk
Jan 22, 2018 at 9:55 pm #3513753http://www.kitesandfunthings.com/Departments/Carbon-Tubes/wrapped-carbon-tubes.aspx
Here’s an inexpensive source for wrapped carbon tubing.
Jan 22, 2018 at 10:00 pm #3513755So, I used paulownia wrapped in CF webbing. Last pack (pic) is about 12oz. Yes, you can enlarge it and I can get measurements for you. I’m off to Pilates class now but will post again more info this evening.
Les
Jan 23, 2018 at 2:31 am #3513804Daryl & Daryl:
Thanks a bunch. I went to the KItesandfunthings website and felt like a kid in a candy store. I can’t wait until I actually understand that stuff enough to place an intelligent order. Their sale stuff was so cheap that I really wanted to order a bunch just to play with but my wife just reminded me of the way that I started some of my past projects and I guess that I better hit the books first.
All suggestions gratefully appreciated.
Les,
Paulownia
I pulled up Paulownia images on google. WOW!
Curved horizontals to assure back ventilation space, curved verticals that match Jansport’s large frame, a beefed up frame section to handle the weight leverage that the Stephenson wing arms will put on the frame verticals and feet so that the frame will be self standing would be a piece of cake. The opportunities appear endless.
Now if I can only control myself and only include design needs rather than all of my design wants. I guess the built in lawn chair will need to wait.
I have a wood grade bandsaw,a jig saw, a belt sander and some other wood working tools that I have not used in 35 years (somewhere in my attached 3 car
garageWAREHOUSE.)I am going to check out carbon fiber how-to-books on Amazon and then head to bed.
Thanks very much folks!
Hawk
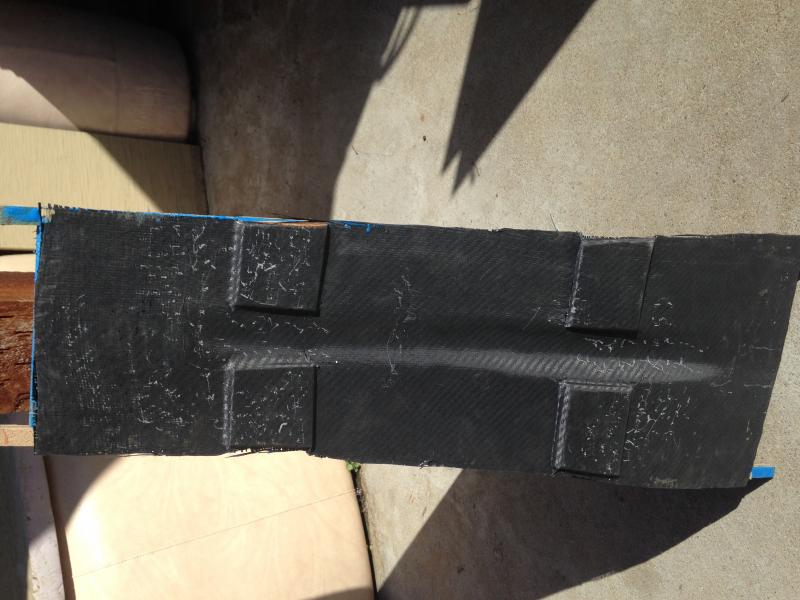
Jan 23, 2018 at 3:05 am #3513810So for the frame i first started making a form that backed the curves of my back. Then cut three pieces of paulownia 3/8″x3/32″x24″ and layered a piece of CF between each and vac bagged them on the mold(form), put in heat box at 140 deg. for 2 hours. Then slipped CF webbing over each, epoxy, heat box…=Frame verticals. Then cut Hip and shoulder support from high density foam, slip CF webbing over and wrap ends around verticals at prescribed distances, secure with electrical tape and into hot box. Hope this helps… Best epoxy I’ve found is Resin Research 2000. It’s strong and flexible
Pictures: Frame one – too heavy, not enough air on my back.
Frame 2 with bottle holders and uke. Frame 3 without bottle holdersFrame 3 with strapsFrame 3 with packJan 23, 2018 at 3:26 am #3513817Also… by any chance you’ll be at the GGG in Feb. I’ll be there with my packs and ukuleles. To take a closer look and talk.
Les
Jan 23, 2018 at 3:39 am #3513824And I’ll bring some Paulownia for you if you like. It’s grown in the south but hard to find elsewhere.
Or let me know and I can send you enough for a pack or two.
Les
Jan 23, 2018 at 6:14 am #3513841Les,
My sleeping pills have already kicked in so some of this might make no sense.
You are one smart dude. “So for the frame i first started making a form that backed the curves of my back. Then cut three pieces of paulownia 3/8″x3/32″x24″ and layered a piece of CF between each”
What did you make the mold(form) out of that was a pattern for your back?
How did you determine the 3/8″ and 3/32″ as the desired size and how did you decide that 3 pieces were sufficient?
I understand that you place a CF piece between each of the 3/8″ X 3/32″ X 24″ Paulownia, How did you determine the thickness of the CF sheet to be placed between the 3 pieces of Paulownia?? I assume that the CF sheet was flexible at this stage?
,”…and vac bagged them on the mold(form), put in heat box at 140 deg. for 2 hours.” “Then slipped CF webbing over each, epoxy, heat box…=Frame verticals.”
Before you bag, do you somehow affix the Paulownia and CF sheet inserts to the mold so nothing moves or does everything sit on top of the mold and gravity works while things heat up? I guess the vacuum bag tightens up and holds everything together in place?
Does the CF webbing and the epoxy go over the vacuum bag?
Are the bags generic or special purpose bags, how do they conform to the wood without excess bag getting in the way and what do you use to cause the vacuum?
Possibly the vacuum bag keeps the epoxy from soaking into the wood thus saving weight?.
What do you have that can hold these size of pieces and maintain the temperature? And how critical is the exact temperature ? I lost my kitchen oven rights trying to cure some paint on some Coleman lanterns.
“Then slipped CF webbing over each, epoxy, heat box…=Frame verticals.”
I imagine that the amount of the epoxy is similar to using fiberglass epoxy; just enough to thoroughly wet the webbing without runoff?
How do you determine the number of layers of webbing.?
After severe Strep Pneumonia about 6 years ago when the admitting ER doctor said that my wife and I had better plan on final details since I might not last the night; two months later I had worked my way up to two hours per day, full incline with a 75 pound Alice pack on my back. I do not remember the speed but the sweat was pouring off of me and I got down to 189. I have not decided on a planned weight capacity for this pack frame but my Tent is 3.25 pounds (Big Agnes s Scout 2 Plus), My 3 season sleep system is also about 3.25 lbs (Big Agnes Mystic SL LONG 15 degree F, folding Thermarest full length pad and a short Klymit 2″ thick blowup pad- I am 68 with tired bones) so I am sitting at about 6.75 lb and comfortable. My Aarn Magic Mountain will come in about 3.25 lbs once I trim off the significant amount of excess strapping.
With the less than 16 oz. on your last frame and a MYOG Carbon Fiber pack sack, I will easily slip in under 10 pounds which is plenty light weight for me. (But I am working on a Duck Patio Door tent that I think will turn out between 1.5 and 2 lbs.)
I ordered a couple Carbon Fiber Fabrication books earlier tonight.
Thanks for your help. Past my bedtime.
Regards,
Hawk
Jan 23, 2018 at 6:45 pm #3513930Les,
I just noticed the water bottles and how they act as protection for the pack bottom if the pack is accidentally dropped. Very Clever.
I am a forensic accountant and I have one or two trials in April, two trials in early March, depositions and mediations in February; so I am home bound for a few months.
What and where is GGG?
Looking at your frame number 3 without bottle holders, I see the top piece that the frame is hanging by the wire. Is there a structural reason that you needed that very top horizontal piece? I am just wondering if the there needs to be a horizontal at the very top of the frame as well as a horizontal where the top of the shoulder straps attach?
As far as the Paulownia, I would like my verticals to be 32-34″ tall just like the Stephenson frame. I see in eBay that I can get 4″ X 20″ X 2mm (2mm is .08″ which is short of the .09375″ thickness for 3/32nds.) I imagine that a 20″ long and a 14″ tall piece can be butted together and sufficiently wrapped and epoxied for sufficient strength. But eBay looks like maybe a month or more shipping time.
What lengths and widths of 3/32nd thickness Paulownia board are you willing to sell?
I ordered :
<div class=”a-section a-spacing-none”>
<h1 id=”title” class=”a-size-large a-spacing-none”><span id=”productTitle” class=”a-size-large”>Composite Materials: Fabrication Handbook #2 (Composite Garage Series)</span> <span class=”a-size-medium a-color-secondary a-text-normal”>Paperback</span> <span class=”a-size-medium a-color-secondary a-text-normal”>– November 15, 2010</span></h1>
</div>
<div id=”byline” class=”a-section a-spacing-micro bylineHidden feature”>by <span class=”author notFaded” data-width=””><span class=”a-declarative” data-action=”a-popover” data-a-popover=”{"closeButtonLabel":"Close Author Dialog Popover","name":"contributor-info-B00J493744","position":"triggerBottom","popoverLabel":"Author Dialog Popover","allowLinkDefault":"true"}”>John Wanberg and<i class=”a-icon a-icon-popover”></i></span></span></div>
<div>
<h1 id=”title” class=”a-size-large a-spacing-none”><span id=”productTitle” class=”a-size-large”>Composite Materials: Fabrication Handbook #3 (Composite Garage Series)</span></h1>
last night from Amazon Prime.Very beautiful ukuleles.
Hawk
</div>
Jan 24, 2018 at 2:47 am #3514050Hawk
I can give a short tutorial on how I Vac Bag, materials I use and where to get them. I do it on the cheep and easy.
But first let me answer your questions from above:
Mold – I use high density EPS or XPS foam (pink or blue foam for home insulation). I had my wife push welding wire against my back to get the curves. Then hotwire/shaved/sanded the foam to my shape. I glassed that . but you can just cover it with stretch plastic to protect it.
Why 3/8×3/32 – ? I don’t know… it seemed like a good size. I have/use 5 oz. twill CF so that is what I used to layer between the paulownia. And, yes, apply epoxy same as polyester resin.
Vertical placement – I first wet out the paulownia/CF , then taped them together and placed on mold where they would/should be and taped them inplace. For small pieces like a pack frame the bag I use is from Harbor Freight. They have vacuum bags for clothing storage. The large one works fine for a frame. The first few times I vacBagged I just used my shop vac. That will only last for so long, I now have a true vac for vac Bagging, eBay for $60. When the verticals come out I sand to final shape and then cover with the CF webbing and again vac bag that. It’s probably a bit over built but light and very strong.
Hot Box – I use 2″ XPS foam and make a box 4’x1 1/2’x1′. It’s ‘glued’ together with Gorilla Glue (expanding PU glue). I use a cheep hair dryer from a thrift store ($2)… it gets the box up to 140 deg.
GGG – Go to Hiking Partners or click this to take you right there, a Gathering in Central California.
https://backpackinglight.com/forums/topic/ggg-2018/
Les
If you want a tutorial on how I make my pack frames let me know… should I start another/new post?
Jan 24, 2018 at 3:22 am #3514056Paul,
PM sent regarding some carbon basics.
I have built quite a few carbon fibre things over the years such as a road bike frame, handlebars, backpacking items, and various other odds and ends.
I much prefer epoxy resin such as west systems to polyester resin. It is more expensive, but much less noxious to work with. Make sure you choose your weave accordingly, each has their own advantage and disadvantage (unidirectional = very strong in only one dimension, bidirectional = great puncture resistance, biaxial = good torsional resistance, 2×2 twill = aesthetically pleasing amongst other things).
Cheers
Jan 24, 2018 at 3:38 pm #3514128Les,
I keep staring at your ” Frame 2 with bottle holders and uke. “. Every stitch, every dimension, every angle and all of the colors are simply perfect. It is like studying art work. In my younger days (i.e.: nearly 50 years ago) I built houses and was great and a flash at the rough framing but was banned from anything that was visible on the final product such as trim, painting, etc. They used to joke that I took “good enough for government” to the extreme. I am really looking forward to this project but think I mighty be pretty embarrassed to post pictures of the final work.
Hot knife to cut the foam never occurred to me as I have never used one. Outstanding! I was thinking how lousy I have been in the past trimming hard foam insulation with a knife and was visualizing a really ragged starting mold.
Covering the mold with stretch plastic, Like saran wrap?
I do not completely follow your “Vertical placement” paragraph but will receive and read the books that are on the way so not to bother you with things that may be obvious once I see the pictures in the books.
Thinking out loud: The Stephenson frame main verticals are straight and that would be the easiest to assemble. Where the Wing Arms mount to the two main verticals is where I see the need for some creative and stout CF structure so that the leverage caused by the Wing Arms does not break the verticals. Wing Arms extend about 8″ horizontally from the main verticals. Assume a 45 pound resupply and water load. Assume I step/stumble off a 10-12″” embankment. How to figure the resulting load on specific points of the verticals and what that will require in CF fabrication to handle twice that?
I think a separate tutorial would be a great idea.
Thanks again for you very creative ideas. You have turn what I envisioned as a huge process into simplified steps. Amazing.
Ryan,
You have touched on the area that I know the least about that will determine the success or failure of the project. How do I determine the forces that each area of the frame might experience and how to the use the correct amount of the proper product to prevent catastrophic failure.
I saw quite a few Alice pack frames fail in the Army leaving us up the creek with no paddle and a big hole in the boat.
Your knowledge of say making a break proof main front bike wheel frame is right on point here.
I really appreciate your recommendation. I have so much to learn.
Thanks much Ryan.
Jan 26, 2018 at 6:07 pm #3514621Les,
I have received and read the CF fabrication books that I ordered from Amazon. I have also watch a number of related ‘YouTube’ videos. Now that I understand what you had to do to make your Uke’s, you must be a true artist just to be able to make the mold.
Unbelievably complicated and precise to end up with such a beautifully finished Uke’s!
Jan 28, 2018 at 4:34 am #3514905Les, Sorry if I missed it. How much does the carbon frame weigh? Thanks.
Jan 30, 2018 at 1:27 am #3515555Sam
The frame is just under 1#. I didn’t write the info down. I just weighed both frames (2 and 3) with packs (32 lt) and their both just under 2 lbs. thats including belt, straps… everything ready to load and go.
Feb 1, 2018 at 6:12 am #3515983Thank you, Les. That is very impressive for such a large frame with top and bottom shelves and the larger diameter tubing. Am guessing that the guitar is carbon also. Was amazed by the excellent tone of some that are offered for sale on the sites like Guitar Gallery with sound clips.
-
AuthorPosts
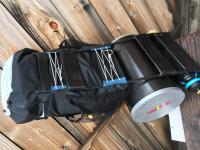
 Frame 2 with bottle holders and uke.
 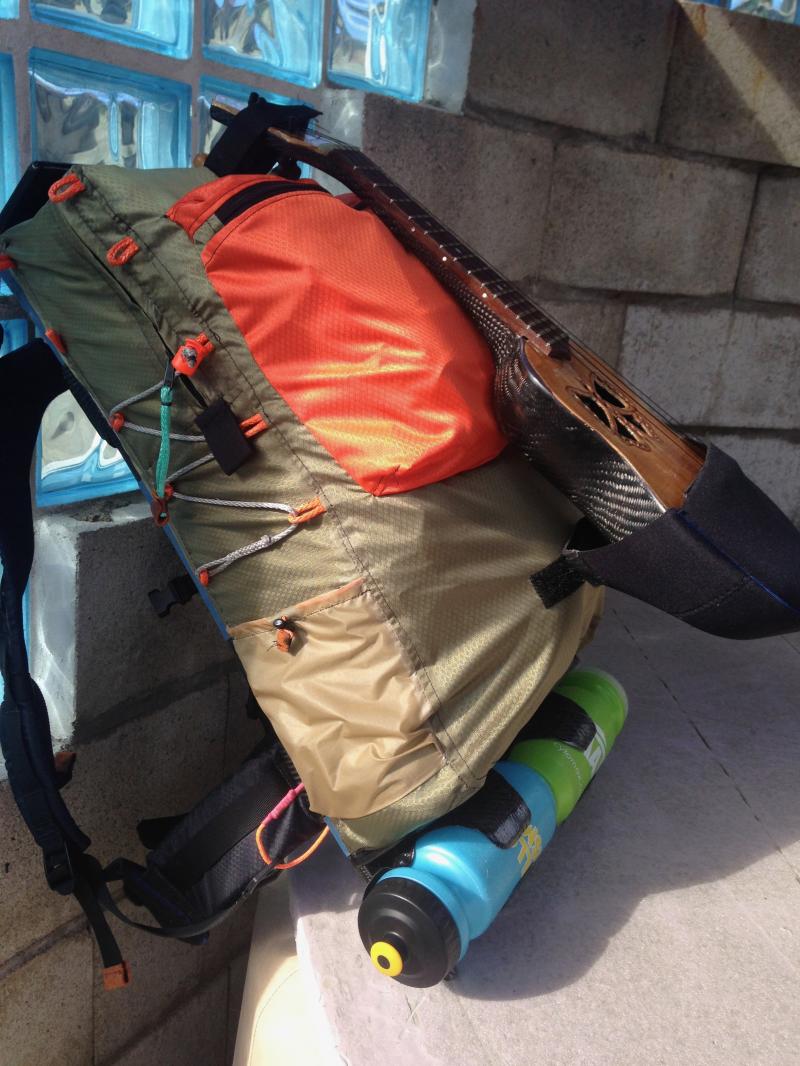 Frame 3 without bottle holders
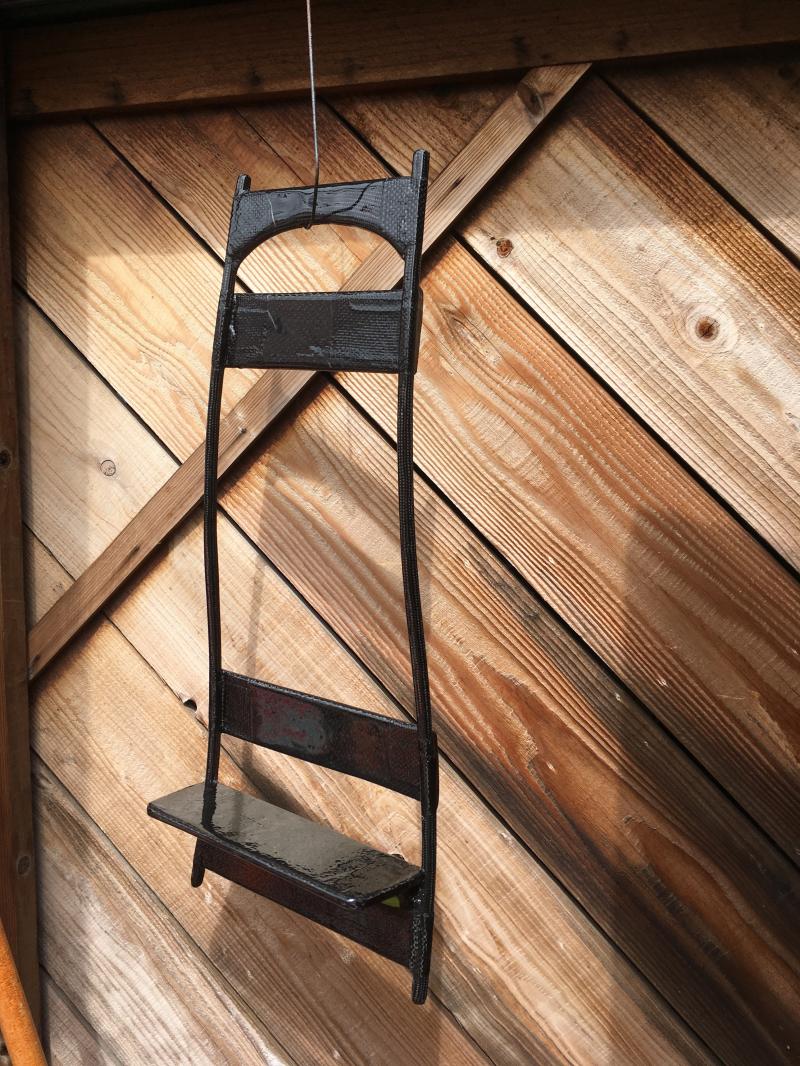 Frame 3 with straps
 Frame 3 with pack
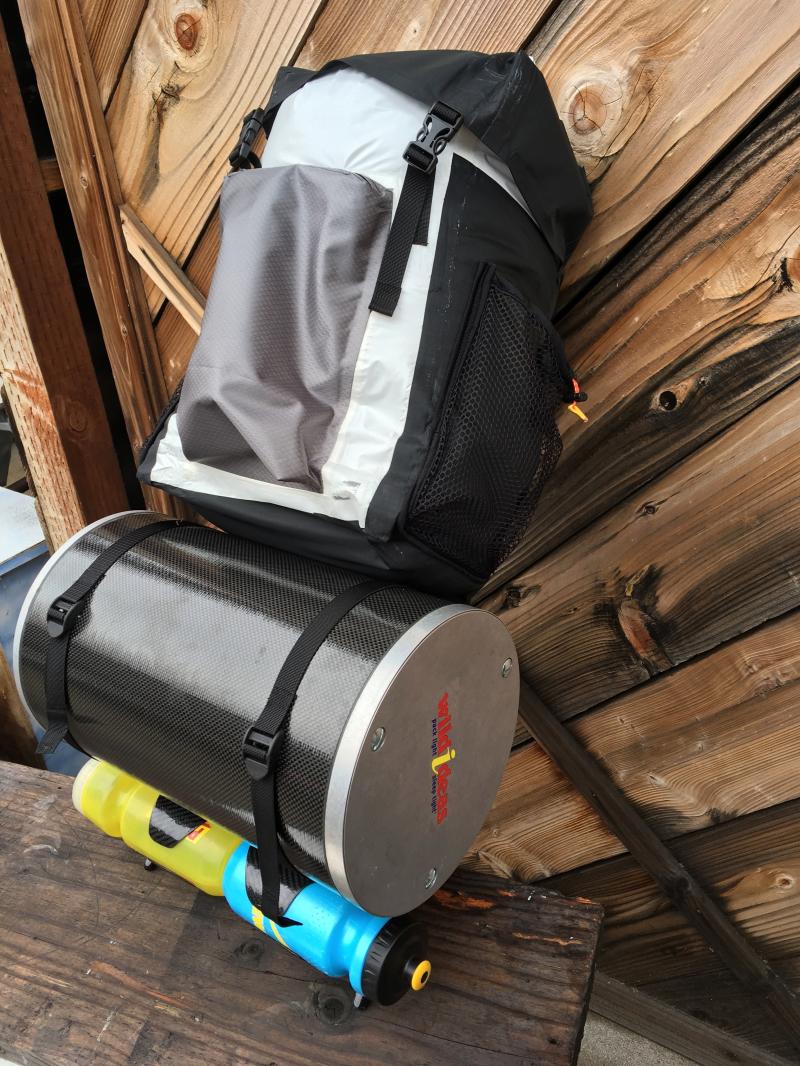
- You must be logged in to reply to this topic.
Forum Posting
A Membership is required to post in the forums. Login or become a member to post in the member forums!
Trail Days Online! 2025 is this week:

Thursday, February 27 through Saturday, March 1 - Registration is Free.
Our Community Posts are Moderated
Backpacking Light community posts are moderated and here to foster helpful and positive discussions about lightweight backpacking. Please be mindful of our values and boundaries and review our Community Guidelines prior to posting.
Get the Newsletter
Gear Research & Discovery Tools
- Browse our curated Gear Shop
- See the latest Gear Deals and Sales
- Our Recommendations
- Search for Gear on Sale with the Gear Finder
- Used Gear Swap
- Member Gear Reviews and BPL Gear Review Articles
- Browse by Gear Type or Brand.
