Topic
Looking for recommendations for nylon adhesive – not sylnylon
Forum Posting
A Membership is required to post in the forums. Login or become a member to post in the member forums!
Home › Forums › Gear Forums › Make Your Own Gear › Looking for recommendations for nylon adhesive – not sylnylon
- This topic has 12 replies, 4 voices, and was last updated 5 years ago by
 Sam Farrington.
-
AuthorPosts
-
Mar 26, 2019 at 9:01 pm #3585626
I am looking for an adhesive to permanently bond the top 4 to 5 inches of the yoke/harness of my backpack to the pack itself – about 24 sq. inches – so the pack rests more fully against my upper back. The pack is a 2014 SMD Fusion 50. Thank you very much. Dan
Mar 26, 2019 at 9:25 pm #3585628Some stitching would probably be more reliable, especially if there’s any degree of stress on that area. If the fabric is coated any glue will probably be bound to fail as it peels off.
Mar 26, 2019 at 10:57 pm #3585646Aaron, thank you for responding. There will be stress to the area in question. I can remove the frame sheet (to which the aluminum stay is attached) from the back panel, which will make sewing that much easier, but there remains a rather stiff piece of plastic that’s in the yoke/harness. I’d need to sew through that as well and I don’t think my sewing machine can get through the plastic without issue. Still, it may be worth a try if there isn’t a magic glue out there. Thanks again. Dan
Mar 26, 2019 at 11:23 pm #3585648I had to look up pictures of the pack in question to visualize it. Rivets straight through the pack and frame sheet come to mind, but I’m not sure if they’d rub against your back, and you’d probably need to seal them from leaks because they’d make more substantial holes than sewing.
Mar 27, 2019 at 3:19 am #3585695I appreciate your rivet suggestion. I just bought a pop rivet gun on Sunday to help my son install a replacement awning on his travel trailer. While the rivets aren’t flush with the fabric, they don’t protrude much at all, are smooth, and, if they don’t work out, they’re easily removed as I found out Sunday. The kit came with washers which will add more reinforcement to the inside when attached. Thanks much. Dan
Mar 27, 2019 at 3:27 am #3585698I think that will load any bond in peel, rather than shear, so any glue will eventually… peel.
Have you explored bending the stays to press that area of the pack closear against your back? Contours in the stays combined with adjustment of the load lifters to pull the stays forward against you should accomplish what it sounds like you’re after.
Mar 27, 2019 at 4:19 pm #3585758Rene, thank you for your comments. I have bent the stays to varying degrees – sort of a backwards letter ‘S’ – before and during trips. When using the pack, I experience considerable pain in and around my C-7, and I don’t overloaded it. It feels like the pack and my shoulders are constantly pulling against each other, which I believe is causing the strain. My goal is to minimize that strain by keeping the pack much closer to my upper back, and reducing the reliance on the load lifters. I hope I haven’t made this too confusing. Dan
Mar 28, 2019 at 4:16 am #3585884Please specify the nature of each material on each side of the proposed bond, and if a fabric, whether the coating in sil or PU. Thanks.
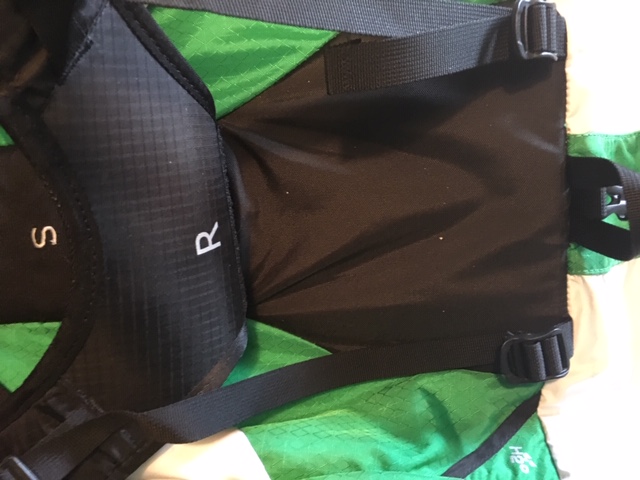
Mar 29, 2019 at 1:10 am #3586020Sam, I believe the two fabrics are 1. ripstop nylon – on the yoke; and 2. non-ripstop nylon on the back of the pack. I emailed SMD around noon to confirm but haven’t heard back. Here is a photo of the two parts of the backpack in question. The ‘R’ is on the yoke and will fold down to the right in the picture flat against the pack. The top of the pack is on the right in the picture. (Disregard the ‘S’). I hope I haven’t been too confusing. I noticed on my iPhone the picture is upside down with the top of the pack on the bottom. Dan
 Mar 30, 2019 at 4:56 am #3586199
Dan,
The picture is very helpful. But even if you solve the adhesion issue, if the pack has a tendency to pull backward, it may do so anyway by the contents of the pack pulling backward away from the portion of the pack below the lift strap buckles.
For most packs, the lift straps would keep the pack from pulling backward. You might send SMD a link to this thread to see if there is some other reason for the problem that can be easily fixed.Another possible issue is the lack of a higher connection between the yoke and pack, allowing the pack to shift left and right on your back, and also making it more difficult to lift the pack and put it on. If the height of the yoke is adjustable, that feature will be lost by joining the yoke firmly to the pack.
For whatever reason, if you want the yoke joined to the pack, you might go to a cobbler or shoe repair shop with a heavy duty sewing machine, and join the pack and yoke with a horizontal line of stitching at your desired point. The stitching would have to be sealed, and it is most probably Seam Grip that would do that, unless you know for sure that one of the fabrics is sil-coated. To find out, put a small dab of Seam Grip on the fabric to see if it holds and won’t peel away from the seam.
There are some great 2-part PU adhesives by Loctite and sold by McMaster-Carr and others, but agree with other posters that none would be likely to keep the yoke from ripping away from the pack during ordinary use, which can be pretty rough.
So agree with the other posters who recommend at physical connection of some kind; and agree with Aaron that a horizontal seam (and/or vertical seams) would provide the most durable connection. A machine that can sew a rubber sole onto a boot would make a lasting connection, but you might want to reinforce the portion of the pack fabric under the seam with a piece of leather or similar synthetic material to keep the yoke from ripping out of the back of the pack. The plastic material you mentioned may do that, assuming the machine will sew through it.
Once you permanently join the yoke and the pack, you won’t be able to change it without damaging the pack, so it must be done right the first time.
Whoever thought packs could get so complicated. Maybe SMD will have a simpler answer.Mar 30, 2019 at 9:16 pm #3586291Considering you’re dealing with 2 separate plastic frame sheets and multiple layers of fabric, I think the rivet and washers idea seems more accessible. To sew it with a machine would take a heavy duty walking foot setup.
Something like this? Maybe add some thin rubber washers in addition to the solid ones as a gasket, and to prevent the (presumably metal) washers from rubbing the fabric.
Another possibility is to do some hand stitching using heavy duty thread and a sewing awl
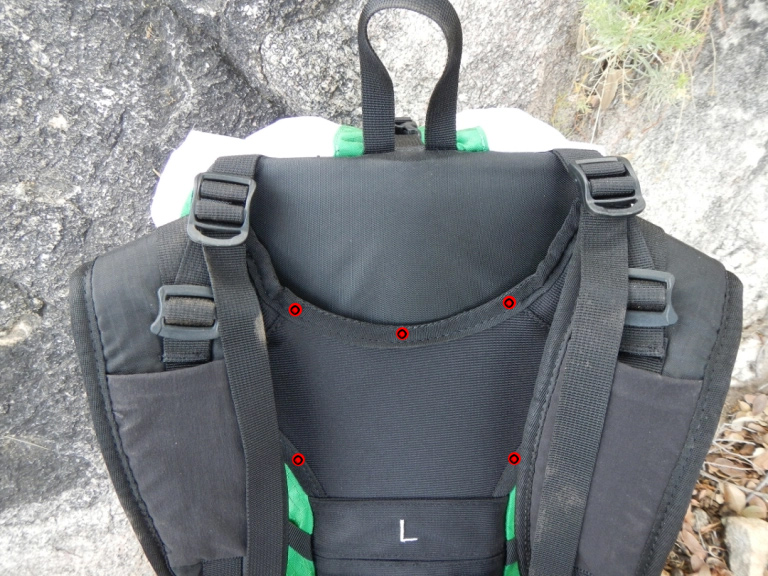
Mar 31, 2019 at 4:04 am #3586324Sam and Aaron, thank you for putting so much time and thought into my proposed ‘simple’ mod project. There is much more to it than I anticipated. I heard back from Eric at SMD, who said he believes both fabrics are nylons – but isn’t 100% sure as one of the fabrics “was not sourced directly”. He also mentioned that SMD’s vest harnesses and newer shoulder harness are compatible with this pack – and I will follow up with him on that – adding one more option to the mix. There isn’t a cobbler in Tehachapi, so the sewing awl may be my MYOG route – perhaps a series of 5 groups of awl stitches each one one-inch in length commensurate to the red dots in the photo. Please note, what ever option I take, I do so knowing that the pack may be relegated to carry-on luggage for all future use.
If I could indulge your interest a little longer, I have a follow up question using Aaron’s above picture as an example (thank you Aaron). The picture shows there is a space or a gap of about 6 or 7 inches between where the shoulder harness is attached to the pack (at the letter L), and where the load lifter straps are secured to the shoulder straps/harness. Lets say there is a total of 25 pounds in the pack, and that 10 of those pounds are <span style=”text-decoration: underline;”>above</span> the L . That would mean those 10 pounds above the ‘L’ are pulling back against my neck and shoulders as I hike, and the load lifters are fighting against those 10 pounds for the duration of the hike – which in my estimation would cause fatigue in my neck and shoulders. Then lets say for the sake of my mod that the harness is sewn fully to the pack up to the points of the three highest red dots (in the photo). And lets say there are 5 pounds in the pack above where the red dots are. Now there are only 5 pounds pulling back against my neck and shoulders, and the load lifters only have to keep those 5 pounds from pulling against my neck and shoulders. Wouldn’t this reduce the stress? If it won’t, then for all practical purposes, my proposed modification will be all for nothing.
Thank you again for your thoughtful input. Dan
Mar 31, 2019 at 7:27 am #3586330Dan,
It sounded like there was a sturdy plastic sheet behind the pack fabric. If it goes all the way to the top of the pack, then a connection that engages the sheet should pull the top of the pack forward. But if the top of the pack is floppy, then don’t see a solution.But not sure that pop rivets will by sturdy enough, and you might need to add washers to hold the yoke in place, and that could result in protuberances rubbing against your back. That is why i suggested sewing, but not the kind of sewing we do in MYOG, even with a heavy duty machine; but rather, the kind used in shoe and boot repair. You might have to call around and do some travelling. Lots of shops on Google.
I sealed an SMD single wall tent for a hiking companion, but she found that it was like a steam room. So bought her a Hubba, fitted it out with carbon poles, and made a sil fly, all of which greatly reduced the weight. Guess I’m suggesting that another brand of pack may ultimately be your answer. I make all my packs, but had lunch with an old friend last week who was singing the praises of his Arc Blast and its several adjustments that provide a perfect fit – virtually no weight on the shoulders he said.
-
AuthorPosts
- You must be logged in to reply to this topic.
Forum Posting
A Membership is required to post in the forums. Login or become a member to post in the member forums!
Our Community Posts are Moderated
Backpacking Light community posts are moderated and here to foster helpful and positive discussions about lightweight backpacking. Please be mindful of our values and boundaries and review our Community Guidelines prior to posting.
Get the Newsletter
Gear Research & Discovery Tools
- Browse our curated Gear Shop
- See the latest Gear Deals and Sales
- Our Recommendations
- Search for Gear on Sale with the Gear Finder
- Used Gear Swap
- Member Gear Reviews and BPL Gear Review Articles
- Browse by Gear Type or Brand.
