Topic

Input on This Tarp/Tent Design


Forum Posting

A Membership is required to post in the forums. Login or become a member to post in the member forums!

Home Forums Gear Forums Make Your Own Gear Input on This Tarp/Tent Design

Viewing 25 posts - 1 through 25 (of 46 total)
  • Author
    Posts
  • #3608174
    Justin G.
    Spectator

    @jusger

    Locale: North Central U.S.A

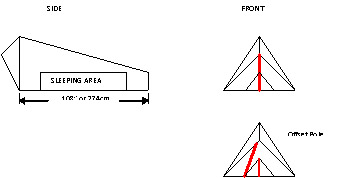
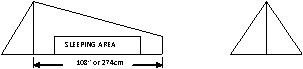
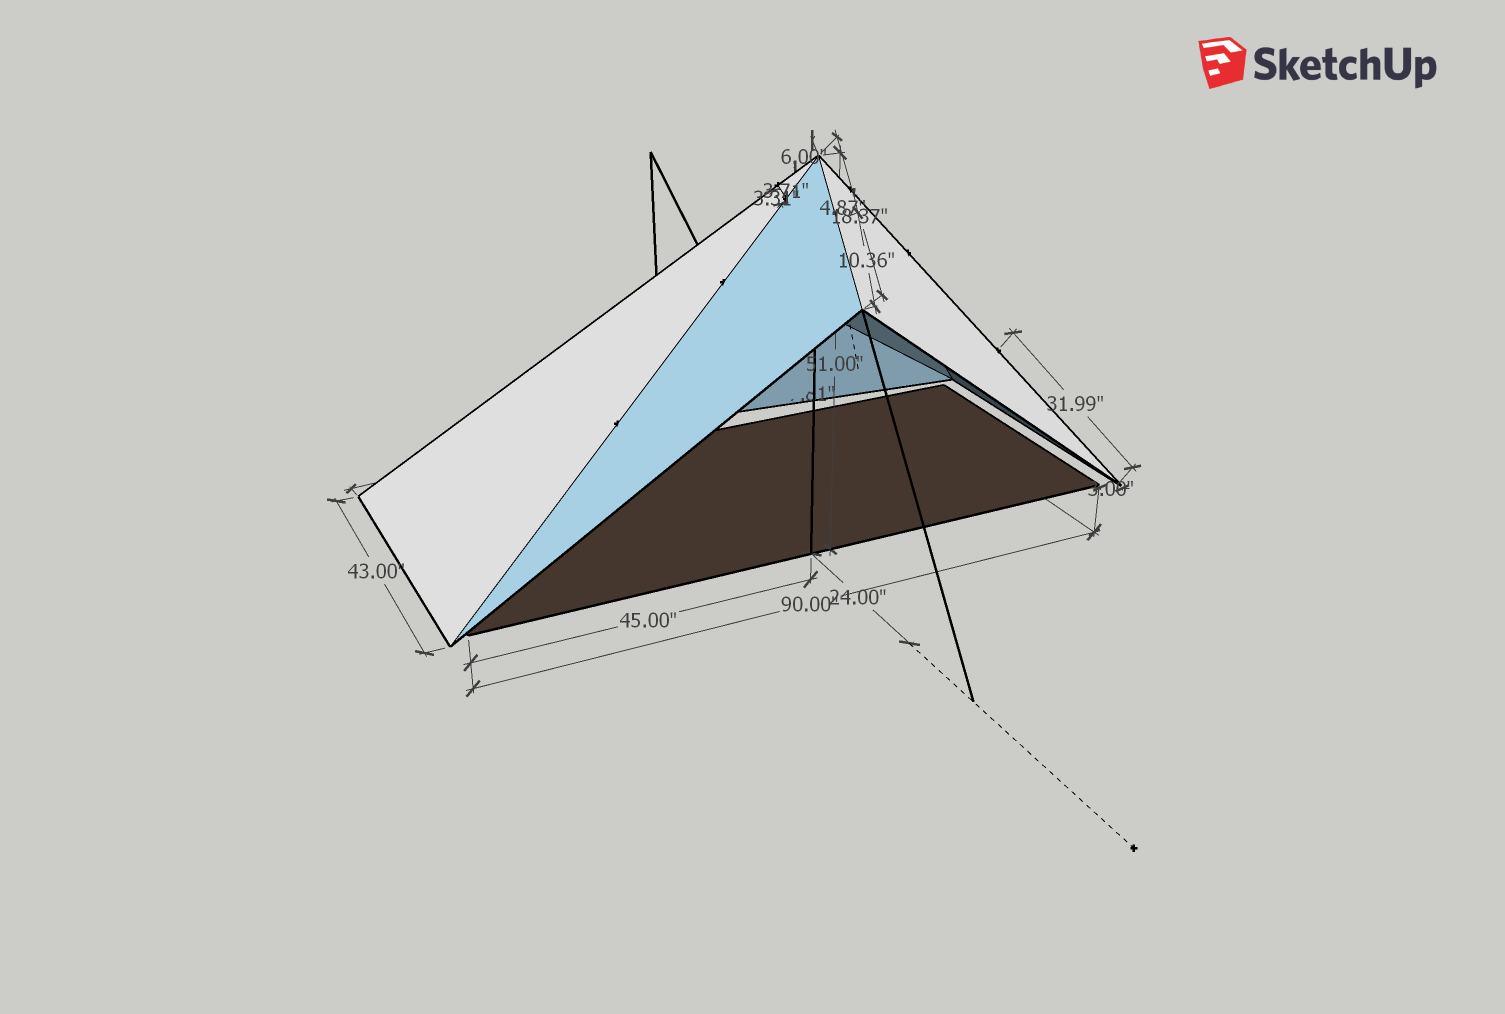
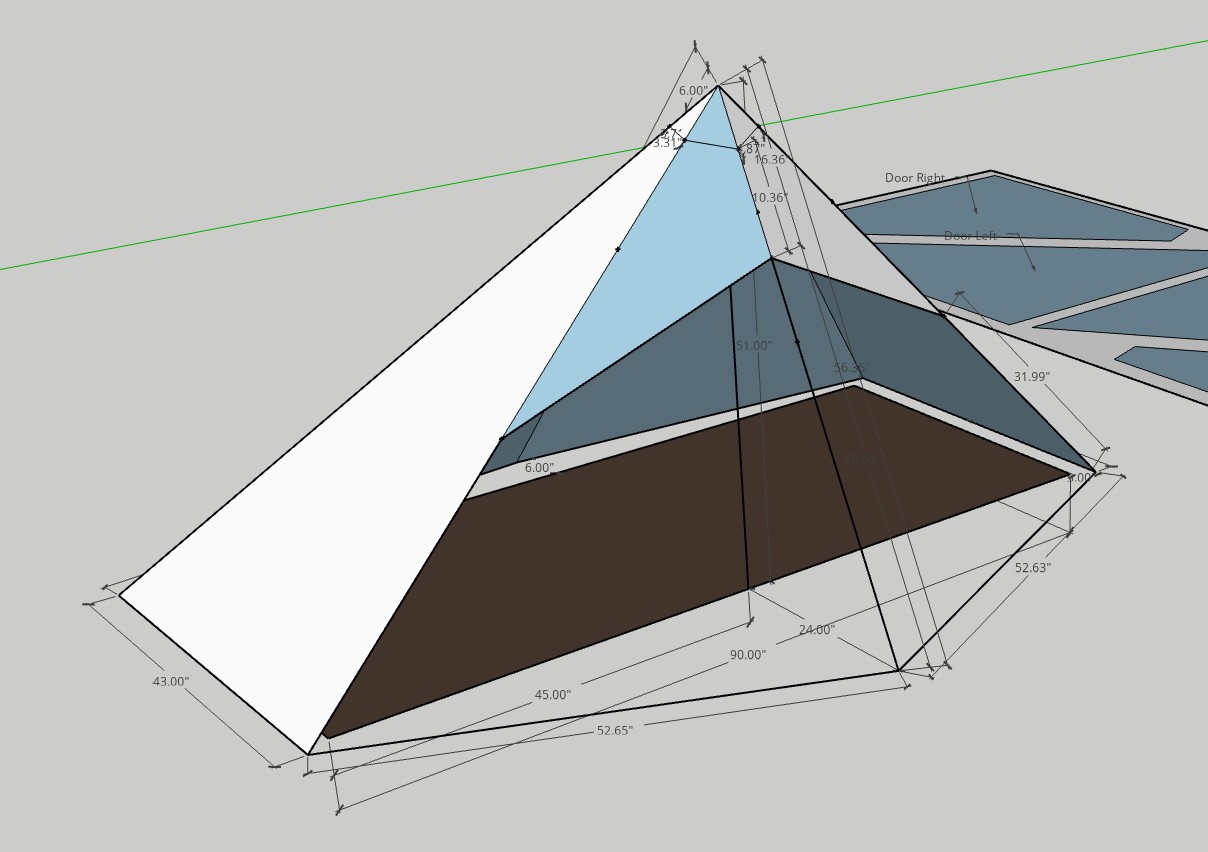
    Here is the sketchup model of the tent.

    I am looking to sew my first Tarp Tent and I’d like to get some input from those who have done this before.

    Reasons for this Design:

    • I have 130 cm trekking poles and usually only hike with 1.
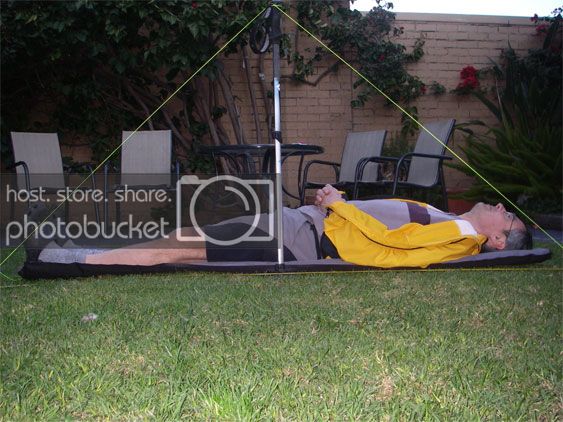
    • I am 6ft tall and I’m worried about how low the ceiling will get so I made it so a space of 40″ x 90″ is livable on the inside.
    • I don’t want to sew a zipper but I do want ‘Doors’ so I was planning on having a front door split down the middle and have it close similar to how the zpacks hexamids door works.
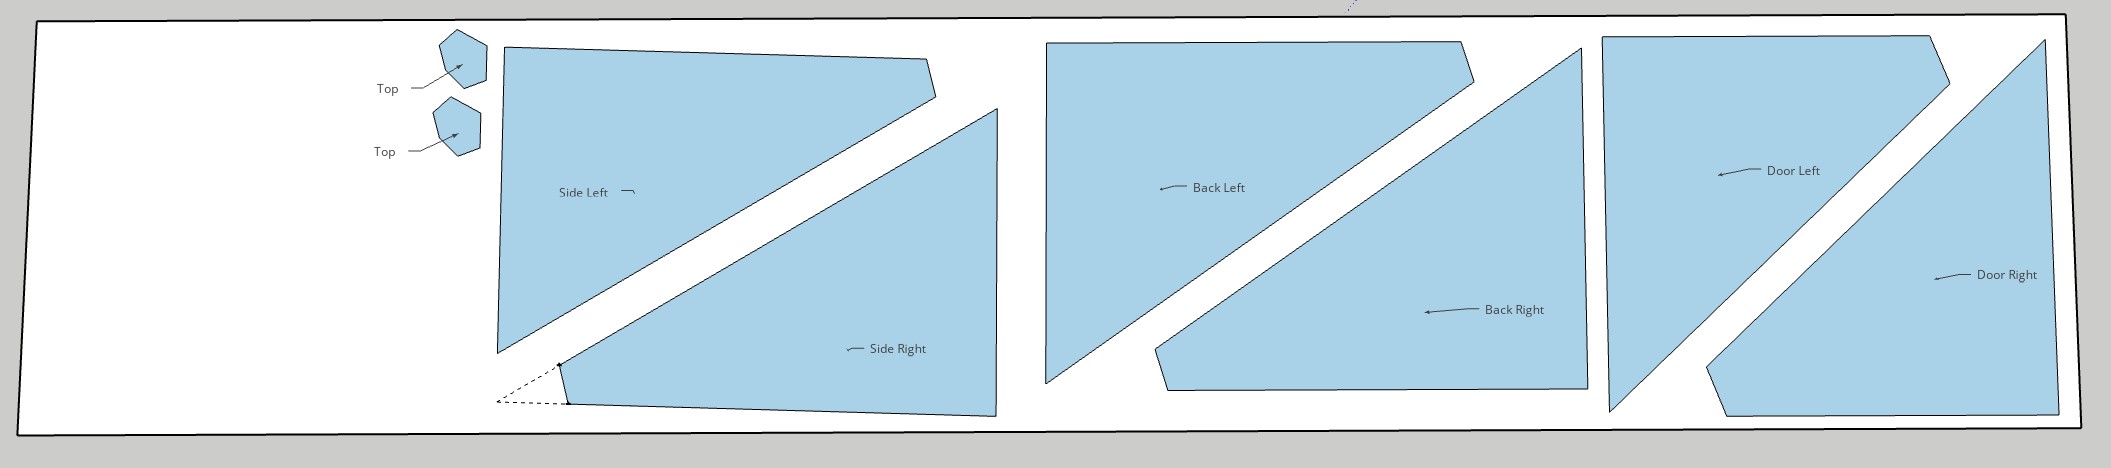
    • I decided too sew a separate top piece of fabric for the top because I’ve read that sewing all panes to one point can get extremely challenging.
    • I am planning on doing cat cuts on the tent but I didn’t model that because that would be a pain in the ass.

    Since this is my first tent I’d like some input for those veterans on if this design could provide any challenging or impossible areas. If this is anything like sewing my apex quilt laying and cutting the fabric will be the hardest part of the process.

    Just for some background I have sewn an apex quilt, 2 zipper bags, 2 dyneema dry bags and a few other items.

    I may go to the local fabric store and buy some cheap cotton and sew a prototype. Would this be a good idea or would the cotton be completely different compared too 1.1 oz sil nylon?

    Thanks!

    #3608181
    Franco Darioli
    Spectator

    @franco

    Locale: Gauche, CU.

    I strongly suggest you make a mock-up using a pole and some string so that you can see how you will fit in.

    Make sure you lay down over your mat and inside your sleeping bag.

    I don’t remember the pole height (around 120cm ) but this mock up was 90″ long. I’m 5’8″ .

    #3608182
    Justin G.
    Spectator

    @jusger

    Locale: North Central U.S.A

    That’s a great suggestion, I hadn’t even thought of doing that. I’ll make sure I do that before continuing and buying fabric.

    #3608188
    Franco Darioli
    Spectator

    @franco

    Locale: Gauche, CU.

    You can just make some marks on a wall , much faster than the lawn version.

    #3608191
    Justin G.
    Spectator

    @jusger

    Locale: North Central U.S.A

    Looking at that picture you added I may have to extend my length some as I’m 6ft. Maybe I’ll look into adding some uprights at the corners also.

    #3608223
    Geoff Caplan
    BPL Member

    @geoffcaplan

    Locale: Lake District, Cumbria

    I have a slow-burning shelter project of my own. I’m going to be using quite expensive fabric and I’m not confident I’ll get everything right first time. Designs by cottage makers generally go though a number of iterations before they settle on a final version.

    So I’m going to build a prototype or two with military surplus parachute nylon I got off eBay. It’s inexpensive @ under USD 1.50 per yard, and is a good, tough ripstop with similar sewing and stretch characteristics to silnylon, and I can actually try the prototypes in strong winds and get a good sense of how the design is performing. So I’ll learn a lot about both the design and the construction process.

    The nylon isn’t proofed, but if the prototype is good enough I’ll dip it in silicone slurry and get a useful backup shelter. Using cotton lining fabric or old sheets simply won’t give me the same level of learning, I feel.

    I mentioned this in another thread recently, but if you’re building that style of mid you’ll find it interesting to check out Colin Ibbotson’s TrampLite shelter, as it contains a number of innovative and well tested design ideas. It’s probably the most refined mid on the market. These days he only makes it in Dyneema, but he’s made effective versions in silnylon in the past.

    http://www.tramplite.com/2018/11/original-tramplite-tarp-discontinued-uk.html

    Here’s another one you might miss, with a nice door design:

    https://tipik-tentes.fr/pioulou

    And an interesting MYOG design that claims better than average ventilation for a mid:

    http://www.trek-lite.com/index.php?threads/sphinxtar-my-myog-mid.2843/

    #3608230
    James Marco
    BPL Member

    @jamesdmarco

    Locale: Finger Lakes

    There are a lot of Problems with a side open mid. None are insurmountable but can leave you feeling unsatisfied with the final result.

    1. While a 130cm pole is fine, you cannot slant it very much to get in/out. Invariably, it requires contortions to do that.
    2. The slant of the roof directly effects the sleeping area. You need around16″ (40cm) clearance for your face and feet. As was mentioned, you need extra length to make the room needed.
    3. Having your face near the surface of the tent leads to a couple problems.
      a. Condensation from breathing will be higher in that area.
      b. Noise from rain will be loud.
    4. The apex is always a pain in the butt to sew. It will be the messiest area on the tent, especially with 6 pieces of fabric.

    While your plan to sew out of cotton is good for prototyping, it will not translate well to sewing sil. Cotton is thicker, less slippery than sil. It will be good practice for sewing in general, though. Geoff’s plan to purchase parachute nylon is likely the best option. You will get a feel for the fabric.

    There are many ways to fix the design so you have more space for your head and feet. The Dirigo uses special triangular panels that let you pull out the tent. ZPacks just pulls out the midpoint. Tarptent uses risers and HMG uses engineered pullouts, etc. (The pullouts work better with a taller stick forcing the guy lines to pull out as opposed to just pulling down. I used this trick on sidewall pullouts on the old “pup” tents back in the late 60’s, early 70’s.)

    I would suggest an elongated mid. This will allow your head and feet more room. And, it simplifies construction (from a 6 panel apex to a four panel apex.)  A backpack stay can serve as the rear pole. Like you, I only use one pole.  I find it easier to simply shift the pole somewhat to one side and crawl in.


    This actually morphs to a shaped tarp. In storm mode, you can close up the rear by staking it down. In warm weather, you can elevate it about 6″ from the ground, giving a lot of ventilation. The front door(s) are simply a triangle across the front. When erected, the angle is allowed to change as needed. Or, simply use a zipper and lock in the doors.


    #3608239
    Geoff Caplan
    BPL Member

    @geoffcaplan

    Locale: Lake District, Cumbria

    I’m with James – I think an A-Frame works better as a solo hiking-pole tent. I like plenty of room above my head and feet, and it’s difficult to do that for a mid with only a 130cm pole. Works better with bug nests. And less intimidating to build, as he says.

    But for some reason we’re in a minority – mids seem to be more popular.

    #3608246
    Jerry Adams
    BPL Member

    @retiredjerry

    Locale: Oregon and Washington

    I’ve made several iterations of something similar, used for years.

    I like the headroom of a mid.  I like that all edges of the mid are on the ground so it withstands wind better.  For only one person you only need half a mid with the other side “beaked” like your design.

    I’m 6’2″.

    I like a peak height of 60″.  Then there’s enough room to sit up comfortably when its raining.

    I like a floor size of 48″ x 108″.  With a mid you lose a foot all the way around because the walls angle up from the ground.  My feet still occasionally touch the wall of the tent.

    Yeah, make prototype with string or cheap material.  Or 3 mil plastic.  Your proposed size is smaller, but that will make it lighter weight.  Maybe plan on a first iteration like Geoff suggested.  Try it on a trip or two to see what size is right.

    Why are you clipping the ends off the 6 panels?  Leave them pointy.  Sew the tent.  Sew on a reinforcement patch over the top.

    Your beak is 24″ wide.  I use 36″ but probably 24″ would be fine.  You need enough angle to provide enough sideways force to keep the peak vertical.  And then there’s enough floor area to put some gear to stay dry.  Unless you have a separate guyline in which case you can make the beak 0″ wide, that is just a sideways panel.  Somebody does that – tarptent?

    I use a catenary curve only on the two long ridges and along the door.  Otherwise it will be floppy.

    I tried #3 zipper but it failed after a while.  #5 zipper works better.  But zipper isn’t really necessary, you don’t sleep directly under it so rain could drip there.

    Membrane silpoly 0.93 oz/yd2 from ripstopbytheroll is pretty good:

    #3608253
    James Marco
    BPL Member

    @jamesdmarco

    Locale: Finger Lakes

    Geoff, yeah, I like an A-frame in the warmer days. Kind of hard to describe the one I use, it’s a cross between an A-frame with extra long beaks, and, a pyramid with two sides longer. You can actually use three triangles for the body and a couple more for the doors/extended beak. Any way, mine comes up to 11 feet long or ~134cm. The overall width tapers from around 9′ to 6′ (274cm x 183cm) depending on how it is set up, it has enough coverage for two, but as a solo shelter, it keeps my gear dry on one side and I sleep on the other. It also lets me put an internal cloths line. for hanging rinsed hiking cloths. Total weight with guy lines and stakes is around 17oz. This is about the same as a cuban mid (Zpacks Solo+) at 23oz if I add a large piece of netting and plastic for the floor…~5oz. As a two person shelter it is about 11oz per person, a good enough weight.

    Anyway, with a single 130cm treking pole (I use an extra long one at ~48″ or 122cm) that is about the best you can do for head room. And, it leaves a rather sharp angle to the ground, as Jerry says, you loose space all the way around (far enough away to prevent any splash back.)Using a Mid/A-Frame hybrid means you have less angle to worry about and lifts the overall living space slightly.


    #3608255
    Justin G.
    Spectator

    @jusger

    Locale: North Central U.S.A

    I really appreciate everyone’s input here. I’m definitely thinking the plan will be to make more room on the inside. I’m also going to make some models with string on both A-Frame and Mid pole designs. I’d like too stay with the mid pole design for the overall hardiness but with the ease of assembly for an A-Frame I might switch to that design. I’m going to draw up a new model when I have time and post that when it’s completed.

    Thanks everyone!

    #3608281
    Aaron
    BPL Member

    @aaron_p

    Locale: California

    I happened to have SketchUp open, so I just threw in my 2 cents.  I think two pole versions of this design tend to work better, especially since you’re already carrying the poles.  You’ll get more usable space and better stability in high winds.  The second pole also helps take up any slack or sag in the silnylon.  I’d probably make the beaks larger too.  It ends up looking like the old Brawny tarpt tent, which was a good design.


    #3608292
    David Thomas
    BPL Member

    @davidinkenai

    Locale: North Woods. Far North.

    Aaron:

    Obviously your tweak gives a lot more volume for very little extra fabric, just adds a second pole.

    Or does it?  Could a long guy line (like out of that 0.244 gram/foot = 6.1 grams for 25 feet, 130-pound Dacron line I love to use) be almost horizontal and eliminate the need for a second pole?  And when wouldn’t a bush or tree be pretty close to tie off to?

    If you’re already carrying two poles, it doesn’t matter.  Unless you break one and then it’s nice to remember you don’t have to have the second one.

    #3608294
    Jerry Adams
    BPL Member

    @retiredjerry

    Locale: Oregon and Washington

    yeah, I do that, just have a side guyline and either stake it to the ground several feet away from tent or tie it to tree or log or whatever

    then, when I sit up on sleeping bag I don’t hit the side of the tent with my head which is bad if there’s condensation on it which happens

    #3608301
    James Marco
    BPL Member

    @jamesdmarco

    Locale: Finger Lakes

    Aaron, the OP doesn’t use two poles.

    “I have 130 cm trekking poles and usually only hike with 1.”

    #3608309
    Aaron
    BPL Member

    @aaron_p

    Locale: California

    I skimmed over that detail  In that case I’d still put a guy line loop there for trees/random sticks or the long guy line David suggested.  You can also add pull outs above the head and foot.  Even with a perfectly shaped pattern silnylon can tend to droop and stretch, especially when wet.  On the bright side that can allow you to eke out a bit more space with strategically placed lines

    #3608312
    Franco Darioli
    Spectator

    @franco

    Locale: Gauche, CU.

    putting a second pole or longer tie out is not going to help much because the floor is still only 90″ long with a 51″ apex.
    The Brawny tent was 120 ” long at the back , tapering to 84″ at the front , 54″ wide and still needed the ends to be pulled out to work.


    #3608313
    Aaron
    BPL Member

    @aaron_p

    Locale: California

    I had the smaller version  http://web.archive.org/web/20060116040258/www.trailquest.net/dlgctaclight.htm, which was closer to 90″ at the back wall.  The pitch was still versatile, and a second pole helped a lot.

    #3608328
    Geoff Caplan
    BPL Member

    @geoffcaplan

    Locale: Lake District, Cumbria

    Justin – don’t reject the A-frame just because you believe it’s less hardy than the mid. If you guy it properly, this really isn’t true. A-frames were used on the first ascent of Everest…

    I’m working on a version of the Kifaru Paratarp/Supertarp design with a better fabric, a more workable size and an integrated vestibule. Note the high-tension at the foot and the 3 side-guys. Reviews say it works well in very high (60mph+) winds and reasonable snow-loads.

    It’s relatively simple to build, and very versatile. You can pitch it high and airy with an open foot for venting and views, clamped down like a limpet in storms, or anything in-between. It offers excellent and protected venting. It only needs 5 stakes in calm weather. It plays well with bug-nests and bivvies. You have lots of space above your head and feet for sleeping, and in most pitches you’ve plenty of space to sit up and change. There’s a pole between the foot of your bag/quilt and the fabric, so you won’t slide down onto the condensation and get your down wet. It will work in a wide range of sizes, depending on your needs.

    You’d have to carry a second pole for the rear, but that needn’t weigh more than 30 or 40 grams.

    There’s no one best solution to a lightweight shelter – it’s all a question of tradeoffs for different preferences and applications. I’m simply suggesting that you don’t reject the idea of an A-frame based on the misapprehension that they can’t be rugged and stormworthy.


    #3608332
    James Marco
    BPL Member

    @jamesdmarco

    Locale: Finger Lakes

    Geoff, Looks like a nice shelter. I had a similar problem with the front beak when I did that. (I have made several shelters like that.) The overall peak needs to be larger, and, the front pole can be moved to the outside in good weather (with a bowline to the peak and, then down to a stake.) The beak can then be pulled out to somewhere on the pole with a second bowline. That keeps the beak tight, by letting you adjust where you set it.  Basically, you keep the lower edge fairly tight. Something like this:

    You get a lot more usable space inside, no poles.  But, it does take a few minutes longer to set up. You really only need one center tie-out about 2/3-3/5 of the way forward and up from the bottom.  Anyway, that will tighten up the beak pretty well.

    I also skip the rear panel and just make the whole tarp a bit longer. Almost no condensation inside…even in a rainstorm. Or, pegged tightly to the ground, to cut down on circulation, it stays fairly warm. It doesn’t do so well with spindrift snow, though.


    #3608360
    Justin G.
    Spectator

    @jusger

    Locale: North Central U.S.A

    After making a few string models and sketchup versions I think it will be best for me to go with an A-Frame tarp or a flat tarp. I’m now starting to lean toward a flat tarp as that will be the easiest to cut and sew from 1.1 oz silnylon. I’m also looking at getting a pole either from quest outfitters or just getting a section of pvc pipe to use as the back pole.

    Thanks again for all the help everyone. I’ll update once I get around to sewing the tarp up. Hopefully I can get it done before snow is on the ground.

    If anyone has any suggestions other then quest outfitters for picking up a second pole let me know!

    #3608367
    Jerry Adams
    BPL Member

    @retiredjerry

    Locale: Oregon and Washington

    A frames are good

    I made several versions that worked fine

    Until I iterated my way to a single pole mid : )

    #3608412
    Geoff Caplan
    BPL Member

    @geoffcaplan

    Locale: Lake District, Cumbria

    James –

    Yes – I like the design of the main body of the Paratarp, but as you say the beak is weak – I’m completely redesigning it so it can be open with good coverage in normal weather, but pegged tight to the ground for full protection in a hoolie.

    I prefer the rear to a MLD Patrol-style flat panel. In anything short of a storm you can leave it open with excellent coverage for views and venting (I’ve fixed the photo – 3rd down shows this).. Pitched like that it’s something like the MLD Grace. But if need be you can get a drum-tight pitch to the ground to keep out high winds and driven rain, snow or dust and still have good clearance for the foot of your bag. I can see why the Patrol is designed like that – the Paratarp wouldn’t work in Dyneema, but for a woven fabric that can stretch a bit this is the approach I like best.

    #3608414
    Geoff Caplan
    BPL Member

    @geoffcaplan

    Locale: Lake District, Cumbria

    Justin –

    I’ve played with flat tarps, and you do get a lot of flexibility. But they’re a pain to rig for bad weather, and very few thru-hikers use them. A shaped tarp is a bit less flexible but a lot less faff to set up, particularly in wind. At the end of a long day, ease of use trumps flexibility in my book.

    But for gentler days and sheltered pitches a flat tarp can be good fun – it depends on your priorities.

    #3608423
    James Marco
    BPL Member

    @jamesdmarco

    Locale: Finger Lakes

    Geoff, Yes, that is exactly what I do, too in good weather. It was basically two panels of Silnylon with the beak(doors) cut from the leftover of the edges. I think it was 6 yd of 1.1oz silnylon. The bag was stitched from the scraps and some 1/2″ nylon webbing was used for loops. But, it rolled up so small, it just fit into my grease pot (protecting the tarp from abrasion in the pack and protecting the pot from getting bent to hell.)

    Justin, I agree with Geoff when he says “At the end of a long day, ease of use trumps flexibility in my book.” After a long day, the ease of setting up a shelter more than compensates for the overall flexibility of pitches. With a single flat end, it becomes rather trivial to set up: stake the narrow end with two stakes. Stick in my hiking staff (single pice that weighs about 4oz) pull out the guyline and then the front stakes, then (finding a stick or using a pack stay) insert the short pole and stake it out. Finally do any extras on the side and pullouts. Most of the time, you can skip those and just spread your ground sheet, pad and sleeping bag. In 15 minutes from getting to camp, you can get in start your stove and cook supper in a rain storm. Warms the place up enough to change cloths while the water is coming to a boil. A hot drink (cocoa) as you finish boiling water for supper, and you are set for the evening.


Viewing 25 posts - 1 through 25 (of 46 total)
  • You must be logged in to reply to this topic.
Forum Posting

A Membership is required to post in the forums. Login or become a member to post in the member forums!

Get the Newsletter

Get our free Handbook and Receive our weekly newsletter to see what's new at Backpacking Light!

Gear Research & Discovery Tools


Loading...