Topic
How to protect stitching on bottom of pack?
Forum Posting
A Membership is required to post in the forums. Login or become a member to post in the member forums!
Home › Forums › Gear Forums › Make Your Own Gear › How to protect stitching on bottom of pack?
- This topic has 23 replies, 11 voices, and was last updated 4 years ago by
 Sam Farrington.
-
AuthorPosts
-
Mar 26, 2020 at 2:00 pm #3637911
I’m starting work on version 2 of my first MYOG pack. The way I designed it there’s a line of stitching on the bottom of the pack.
Not ideal—I’m concerned the thread will wear from putting the pack on the ground standing up. But it’s integral to my design.
My one idea to avoid this is to glue that seam vs sewing it. I’m using 420d Robic from Ripstopbytheroll in this version.
Any ideas on how to protect the bottom stitching? Or glue that would work on Robic nylon?
Mar 26, 2020 at 2:04 pm #3637913I usually pretty heavily Seam Grip all of my pack seams on bottom edges, strap connection points, and high-wear areas, reapplying a layer every season or so.
Mar 26, 2020 at 2:50 pm #3637922same here, seam grip
store the left over tube in the freezer, it will keep for years. Outside of freezer it will keep for months
Mar 26, 2020 at 2:55 pm #3637924Could you do sort of a bathtub bottom design to raise the stitching a bit? I would still apply seam grip.
For disclosure purposes, my DIY skills are limited to stuff sacks…
Mar 26, 2020 at 3:26 pm #3637926If your stitches are on the bottom and you cover with seam grip it’s quite robust. Maybe if you were rock climbing and trying to scrape off, but you’d really have to work at it
Mar 26, 2020 at 9:24 pm #3637972Thanks, everyone for the Seam Grip tip!
I’m putting in a vertical inner divider, so the bottom of it will be inside the pack bottom’s perimeter, therefore it’ll be exposed to the ground (when standing up).
Mar 27, 2020 at 3:57 am #3638008What about sewing the divider to a “false bottom” and then sewing that false bottom inside the pack? Basically just doubling the pack bottom and having the stitching on the inside layer.
Also check out Hanchor pack designs–they sew in a webbing rim around the bottom of their packs that touches the ground and keeps the bottom fabric raised up.
Mar 27, 2020 at 12:48 pm #3638069Would your divider work if you only sewed it to the front/back walls, avoiding the bottom?
Mar 27, 2020 at 9:15 pm #3638160Greg—A second bottom layer might work, but the sewing sequence is already complicated. I’m not sure I could figure that out. :)
The Hanchor bottom rim holds the pack upright nicely, but it seems a bit heavy and unslick to me.
Rene—I’ve thought about leaving the bottom loose. I’d rather not—I want to be able to put small items in one compartment with confidence that they won’t migrate to another.
Mar 28, 2020 at 6:51 am #3638192glue Velcro to the pack bottom, sew a mating strip on the lower end of the divider.
Mar 28, 2020 at 10:26 am #3638228Chris R—Thanks for the idea. I think if I can successfully glue Velcro to the bottom I’ll just glue the divider to the bottom directly. :)
Mar 28, 2020 at 11:57 am #3638242More:
Put a stretch mesh pocket under the bottom of the pack; this will protect a bottom seam.
Instead of trying to make a second bottom layer inside the pack, do it outside: sew in the divider with a bottom seam, and then add a burly second layer to the outside of the pack. (Granted, the rest of the assembly may rule this out.)
Use two narrow, waterproof pack liners, one for each side; don’t sew the bottom seam.
If you glue it, remember to sew a flap on to the bottom edge so you have a T shape to glue – this will avoid peeling the bond. Pending material, tape may also be an option.
Mar 28, 2020 at 10:47 pm #3638395Rene—Thanks for the ideas. The bottom pocket thing doesn’t appeal to me: the bottom gets the most wear, so I want a durable material there, it would get dirty and maybe even muddy, and I don’t feel the need for that kind of pocket use. HYOP(ocket)
I’m going to try gluing a couple of pieces of scrap material, let it set up, and then try pulling it apart. I’m thinking of using Gorilla Glue (made of polyethylene like the Robic inner coating).
Mar 29, 2020 at 4:04 am #3638409Gorilla Glue is not polyethylene; it is polyurethane.
Cheers
Mar 29, 2020 at 12:13 pm #3638478Roger—Oh, my mistake. I meant to say Gorilla Glue is polyurethane—which sounds like a good choice since the Robic nylon has a PU inner coating.
Mar 29, 2020 at 3:18 pm #3638527Very good adhesive, PU.
Cheers
Mar 30, 2020 at 11:44 pm #3638837I sew on the pack bottom panel with all the stitching on the inside. Like on the inside of kid’s doll. Two lines of stitching with a tough thread, but the seam allowance and thread are exposed inside. Don’t use basting tape inside, but do seal with PU as suggested, and sew a 2-3 oz and very water and abrasion proof nylon onto the seam allowance on the inside. Use 6 oz diamond ripstop on the outside, and something like RBTR’s 2-3 oz hex nylon for the inner layer. These are heavy fabrics, but for just a pack bottom don’t add much weight, and make the pack bottom pretty impregnable.
Sometimes the inner bottom is just sewn to the seam allowance on the inside and sealed. A neater way is to leave the rear side of the pack that touches the wearer’s back open until last. Sew the inner bottom to the outer with the seam allowances sewn together inside the space between the inner and outer pack bottoms. To do this, the rear side of the pack bottoms must be left unsewn until last, and the bottom layers later top stitched to the back panel of the pack. The top stitched seam on the bottom can include whatever you want to use to connect the pack to a frame, or other stiffening device. Am working on one now, and will post with attention to bottom seams when finished.
Mar 31, 2020 at 11:45 pm #3639033I’m putting in a vertical inner divider, so the bottom of it will be inside the pack bottom’s perimeter, therefore it’ll be exposed to the ground (when standing up).
Does the vertical divider have to be sewn on the bottom? Can it just be sewn in the front and rear panel of the pack body?
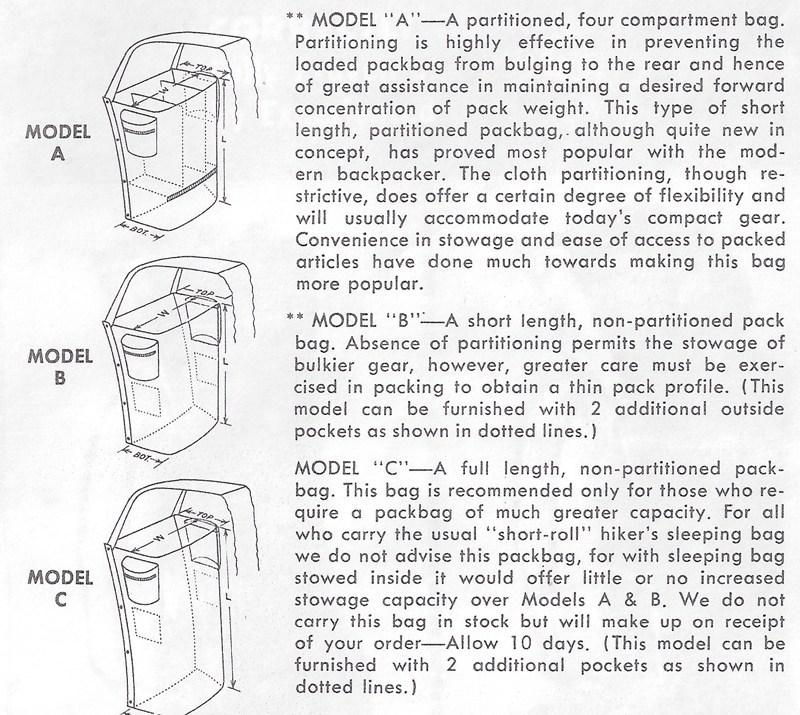
Here’s another option … look at the Kelty Model A below. If you can do something like this, I can take detailed pictures of the construction
 Apr 1, 2020 at 11:30 am #3639124
Nick: https://backpackinglight.com/forums/topic/how-to-protect-stitching-on-bottom-of-pack/#post-3638160
“I’ve thought about leaving the bottom loose. I’d rather not—I want to be able to put small items in one compartment with confidence that they won’t migrate to another.”
Apr 1, 2020 at 3:10 pm #3639167put small items in one compartment
My external frame pack has only one compartment, by choice. I solved the small items problem by putting them all in one multi-coloured silnylon stuff sack and keeping that near the top. Works fine.Cheers
Apr 3, 2020 at 5:34 pm #3639530Extra rows of stitches and sealant over them on the outside. By the time that wears out, you will have figured out things you want in a new pack project anyway
Apr 3, 2020 at 9:42 pm #3639565I find the best way to protect the stitching on the bottom of the pack is to not have any exposed. I make the bag itself, with stitching everywhere, then I make a cup-shaped outer cover of stronger material with bread-tin folds up the sides which is sewn to the full bag around the top perimeter. That also protects the weaker bag fabric from being dragged over rocks etc. Made many packs that way.
Cheers
Apr 4, 2020 at 12:56 am #3639582Roger—That’s a clever solution. I’ve seen it used on separate bathtub floors to use with tarps, but not on packs.
Apr 5, 2020 at 8:17 pm #3639928“… then I make a cup-shaped outer cover of stronger material with bread-tin folds up the sides which is sewn to the full bag around the top perimeter. ”
Agree, a super solution. Avoid all the manipulations of the pack inside out, and outside in, while sewing.
-
AuthorPosts
- You must be logged in to reply to this topic.
Forum Posting
A Membership is required to post in the forums. Login or become a member to post in the member forums!
Our Community Posts are Moderated
Backpacking Light community posts are moderated and here to foster helpful and positive discussions about lightweight backpacking. Please be mindful of our values and boundaries and review our Community Guidelines prior to posting.
Get the Newsletter
Gear Research & Discovery Tools
- Browse our curated Gear Shop
- See the latest Gear Deals and Sales
- Our Recommendations
- Search for Gear on Sale with the Gear Finder
- Used Gear Swap
- Member Gear Reviews and BPL Gear Review Articles
- Browse by Gear Type or Brand.
