Topic

eyelet or no eyelet

Viewing 14 posts - 1 through 14 (of 14 total)
Paul E BPL Member
PostedSep 23, 2019 at 10:05 pm

Hi.

For about 6 months I have been struggling with whether to add an eyelet ( to put sharp tip of walking pole into) to ridge of a myog a frame I am about to make OR to simply add a strap or simply rely on the pole self locating.

I have used the latter before and it deformed the silnylon. I like the positive fit of an eyelet but realise this creates a weak point even if reinforced with webbing.

Have tried silnylon in it’s own. Reinforced with cordura and also tried reinforced with grosgrain between the cordura and silnylon. The latter was strongest unsurprisingly.

How do you advise to secure a walking pole as a support in an a frame. ( not looking to have pole outside of shelter)

Many thanks

Paul

PostedSep 23, 2019 at 11:39 pm

If it’s in the door way, a short loop of grosgrain works if you have a basket on your pole.  I’m not sure what your design is given your ‘not outside’ comment.  If it’s inside the peak of a beak or vestibule, re-enforce w/ just about anything and put the handle end up.

Some more info on your design might give better answers.

PostedSep 24, 2019 at 1:52 pm

In similar situations I’ve used the pole handle-end up.  Padded handle is much easier on the fabric than the pointy metal end.

Paul E BPL Member
PostedSep 24, 2019 at 2:07 pm

Thanks so much for the comments so far. I have previously made a tent which accommodated walking poles handle up and it deformed the silnylon and lead to loss of tension on some local panels of fabric. I concede that there was likely insufficient reinforcement of the loading points in that instance.

In particular I would love to hear reasoned arguments for or against each option:

1. handle up self located
2. point up located in eyelet affixed through multiple layers of reinforcement

I see 1. as being ‘stronger’ but with many potential downsides as to how load is distributed leading to stretch of fabric. 2. more secure, with more tension on the ridge line ( using guy tie out attached to the same grosgrain holding eyelet) but increased loading immediately around the eyelet.

Would love to hear arguments in either direction with your experiences and thoughts from having perhaps done either or both.

I see the eyelet being better in terms of the pitch quality/experience and stability but not having an eyelet better perhaps in terms of lower chance of fabric failure albeit with perhaps less stability.

I have made 3 super quick mockups (using small pieces of fabric) and found that a. eyelet into silnylon only, tore out with little effort b. eyelet into silnylon with backing of cordura affixed with stitching, didn’t tear but did start to stretch the hole when worked vigorously c. eyelet into sandwich of silnylon plus grosgrain plus cordora affixed with stitching, held fast under significant load. How these things would fair in the field in full builds and under wind loading is beyond my experience at this point.

Thanks in advance

Paul

PostedSep 24, 2019 at 5:26 pm

Take a close look at commercial products of similar design. MLD’s Grace tarp page has a relevant close up.

Again, any sort of rendering or image of your intended design will help get you better input.


Paul E BPL Member
PostedSep 24, 2019 at 7:56 pm

My request for input doesnt really rely or depend on the design. However, I did put in the first post that it is an A frame and that the poles are to be located inside. Hope that makes sense.

Paul.

Brook / MtGL BPL Member
PostedSep 25, 2019 at 2:33 am

poles inside –> eyelet seems the only way for the metal tip. In terms of design, perhaps not a neat solution.


PostedSep 26, 2019 at 6:09 am

A-frames have the pole in the entrance. You haven’t indicated use of a beak, door or vestibule, so “inside” could mean as little as one inch deference in location from outside. If inside is as problematic as it seems, maybe move the pole one inch?

Here’s MLD’s solution:


David Thomas BPL Member
PostedSep 26, 2019 at 7:13 pm

My Black Diamond Megamid (which I love and is fabulous in the wind) has a grommet secured not to the tent body fabric but to additional fabric and straps such that the pole tip doesn’t press against the tent fabric itself.  For a small A-frame in non-hurricane-force winds, I’d think that could be a grommet in light grosgrain tape.

PostedSep 26, 2019 at 7:48 pm

Paul,

Is this a-frame a tarp or a tent??

Paul E BPL Member
PostedSep 26, 2019 at 9:27 pm

Thank you everyone for your comments so far. @davidinkenai I haven’t seen or thought of that solution before. I think that may well be a solution that ticks all the boxes. I will make a quick mockup to see how it behaves. Sounds like it is the best of both worlds although potentially a bit heavier. I will see by what kind of amount. I will happily take a slight hike in weight for durability on such an important part of the tent.


@autox
In this instance a tent, but would be using the same solution across a number of tarps/tents. I like to use common solutions across different builds where possible as it means I get better at them and it speeds up the work and allows me to reuse/recycle things.

Kind Regards
Paul

PostedSep 26, 2019 at 10:27 pm

That clarifies things.

First, go grip down, tip up.  The floor of your tent will fare better w/ the larger, rounded surface of the pole handle pressing it in to the dirt than the sharp edges of the small metal bit.

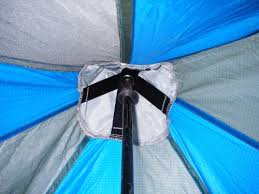
Presumably, you’re putting a pole at either end of the ridge line, and both ends of the tent are closed with a vertical wall.  This creates a point at each end where 3 felled seams meet, joining 3 panels (2 sides of the roof, plus the vertical wall).  Reinforce the corners of all 3 panels w/ a small triangle of the same material the panel is made off – this way both layers stretch the same and share the load equally.

You can break the task of connecting the pole tip to the tent in to three separate concerns: transfer the load from pole to tent; secure the position of the pole relative to the tent; protect the tent from the pole tip.

Three felled seams joining doubled panels creates all the strength we need for the first concern; this part is pretty obvious.  So we need means to keep the pole where the 3 seams converge, and make sure the tip doesn’t cut any of the fabric threads we’re placing under tension.

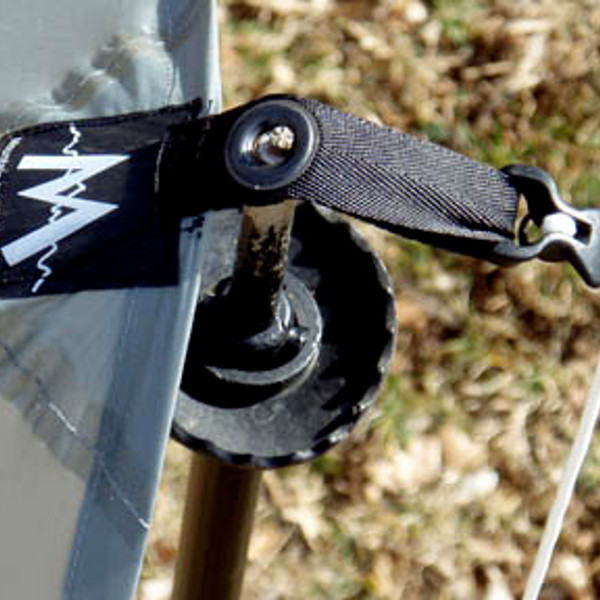
Consider a strip of webbing.  Fold it in half and sew the edges together on each side – now you’ve got a tube with a closed end you can slip the tip of your pole in to.  Since you folded the webbing, there’s no seam at the end for the pole tip to slice through under load.  Better still, put a short, second layer of webbing where the crease is and fold so this is on the inside – that become a bit of padding for the sharp tip.  Since the pad is too short to connect to anything else, it won’t get any tension placed on it, so much less likely to get cut through by the pole tip.  This covers the third concern of protecting the tent from the sharp tip.

Place the closed end of this little tube where the 3 tent seams meet.  Sew the edges of the webbing (where you’ve already put a line of stitches) to the vertical end wall of the tent.  This locates the tube to transfer load where we want it.  You’ll be sewing through the doubled layer of the tent, and the load here is low – just stabilizing.  A more secure implementation would have you sew the center of the long, outer webbing strip to the point of contact with the felled tent seams before doing anything else.  And this addresses the remaining concern of locating the pole relative to the tent.

No metal grommets, no punched holes, no heavy fabric.  Just 6″ – 8″ of webbing for each pole.

I haven’t used this on a tent as described, but I have used folded grosgrain pole pockets successfully on a tarp and a frame pack, both with carbon poles, although not a lot of use on either.


Paul E BPL Member
PostedSep 26, 2019 at 11:12 pm

That was really useful thanks. Another solution I hadn’t considered.  I will get the sewing machine out this weekend and trial run all of the pole retaining ideas mentioned  :)

PostedSep 27, 2019 at 12:59 am

Another thought:

Do something similar to position the grip end of the pole at the floor, but with a 30d or 70d instead of webbing. Then attach both end pockets to each other with cord. Tension the cord by adjusting the pole length, or cord tensioner. Now you don’t need to sew to the end wall to stabilize the length of the tube, just stitch the center of it where you want to apply the load.

Let us know how it goes!

Viewing 14 posts - 1 through 14 (of 14 total)
Loading...