Topic
DIY Nansen choofer clone
Forum Posting
A Membership is required to post in the forums. Login or become a member to post in the member forums!
Home › Forums › Gear Forums › Make Your Own Gear › DIY Nansen choofer clone
- This topic has 73 replies, 8 voices, and was last updated 5 years, 8 months ago by
 Anonymous.
-
AuthorPosts
-
Jun 13, 2018 at 11:26 am #3541887
When you find a skirted pot of your liking, place it on top of the exhaust of this water boiling stove of Turkish design. The Stove is available on ebay. The Samovar:

Use your XGK-EX inside the bottom of the boiler where you see them burning twigs.
Modify, Modify and then Modify some more
 Jun 13, 2018 at 7:15 pm #3541946
@ Edward John
The first post said “A clone of the Scott stove…”
(Commander) Scott?
Would one of the old Sigg tourist cook pot kits work paired with the SVEA 123 stove?
SVEA of course was a clone of the Primus (The First) burner that Nansen, Amundsen and others used for polar exploration.
Jun 13, 2018 at 11:56 pm #3541989Yes the ill-fated Scott of Antarctic infamy
Scotts stove system was different to Nansens and probably not as efficient but also probably a lot easier to DIY. Scott used a stacking pot array with a single pass heat flow and a full coverage windscreen, Nansen used an annular snow melting pot, a double pass heat flow. As for using a SVEA? While I like the small stove I would say it is far too small to melt snow for a party of 4 persons, which is probably the safe minimum party size in the low Arctic.
I guess either system/ both systems work well enough and you would need to be cautious and careful with both
Jun 14, 2018 at 1:44 am #3542021Jun 14, 2018 at 1:53 am #3542023Have you considered pasteurizing water, 180 degrees, instead of boiling to conserve fuel?
Have you considered using a 6 quart pressure cooker? That would cook a lot of beans with very little fuel. After breakfast, place beans in cooker to pre-soak until dinner time.
What is the most used food item you plan to cook?
Jun 14, 2018 at 2:00 am #3542024I’ve wondered about that photo. In it they seem to be using the inner lid as the stove base and they are not using the shrouding outer windshield. I suspect an early publicity photo for a major sponsor due to prominent display of the large tin in the foreground. What date do you think? Who are they? Where taken?
Jun 14, 2018 at 5:14 am #3542041No details on that photo.
It’s in this article :
https://mashable.com/2017/01/29/terra-nova-expedition/#9aJf6M3Ijmqd
(loads of great photos there…)
Jun 14, 2018 at 5:41 am #3542044Quite a few of the photos look posed, but what do you expect?
Cheers
Jun 14, 2018 at 11:27 pm #3542122It was fun surfin the web today, learned alot
Omnia Oven
Weight: 1 lb. 2 oz / 0.5 kg
Material: Aluminum baking pot and lid with a treated steel base plate
Designed to bake on any type of burner. Not for use on an Induction Plate!
Gas Stove
Alcohol Stove
Electric Stove
Electric Hotplatehttps://seadogboatingsolutions.com/omnia-stove-top-oven.html
————————————————————————————————-
Make your own pot skirt:
http://www.instructables.com/id/DIY-Super-Pot-for-Rocket-Stoves/
EcoZoom Pot Skirt – Power Ring
CHRISTCHURCH, NEW ZEALAND: THE CANTERBURY MUSEUM
https://divertingjourneys.wordpress.com/2016/07/27/christchurch-new-zealand-the-canterbury-museum/
—————————————————————————————-
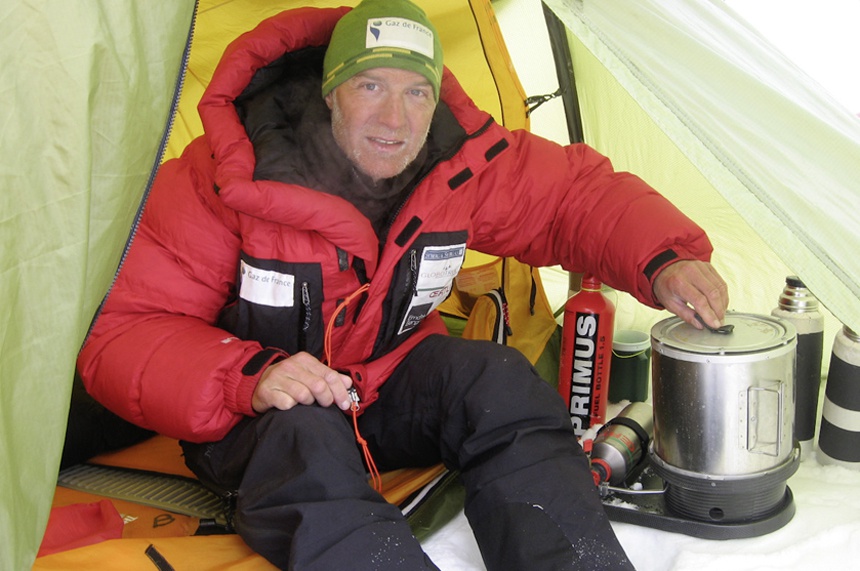
http://www.lastgreatmarch.com/
Double wall cook pot for Arctic trek
Guys name Sebastian. Photo of him with pot. Contact him, ask where he got the pot.
For Sebastian Copeland Adventures:
http://www.sebastiancopelandadventures.com
——————————————————————————————-These numbers could be further improved if we combine the fireless cooker with the pressure cooker. If we use a pressure cooker to bring food to a boil and then put the pressure cooker into a fireless cooker, we can cook at 40%-90% efficiency, depending on the cooking stove used. This compares to a maximum of 23% for our western cooking stoves, and 40% — or at most 50% — for improved biomass stoves.
In its simplest form, the fireless cooker is a wooden, metal or plastic container filled with straw, old clothes, styrofoam, paper or any other insulation material. It can even be a cooking pot wrapped into a sleeping bag. Usually 5 to 10 cm of insulation is applied on all sides, the upper layer often in the form of an easy-to-handle, scaled-down mattress or pillow. A more cost-effective technique to lower energy use is hardly imaginable.
Sebastian Copeland with his double wall cook pot:
Jun 15, 2018 at 4:13 am #3542158Nice work Dan.
Has this one been discussed already ? :
https://www.thomasulrich.com/en/polar-shop/stove.html
Sorry, I have noticed that the Sebastian Copeland kit and the one in my link are the same.
Jun 15, 2018 at 4:21 am #3542159Referenced in posting #1. Interesting but NOT light.
Cheers
Jun 15, 2018 at 11:04 am #3542169Roger, make one lighter and more fuel efficient :-)
Franco, nice find, the photos at that site are very informing…thank you!
Moondog can use all this info to build a unit for four people. He’s got the time before he ventures off on his trek.
He ventured, he gained ;-)Note: looks like all of Ulrich’s food was prepackaged and re-hydrated in a thermos. No cooking involved. I would use Mountain House meals :-) gotta love all that salt that makes it taste soooo good :-)
Jun 15, 2018 at 12:22 pm #3542171The Ulrich pot is 3 litres and it seems he travels solo. Thermos makes good sense and that or a LW haybox makes a facsimile of real food more likely. I have thought about sacrificing a TOAKS 170mm wide pot to use as the skirt. Much more robust than Ti foil, even a short skirt of 95mm would aid heat transfer I think. Is there a slightly larger Ti pot around with straight walls? But not the Evernew 5 litre, that is a little large
Jun 15, 2018 at 12:43 pm #3542173The discontinued REI 4 litre Ti pot was about the right size so maybe I’ll get lucky
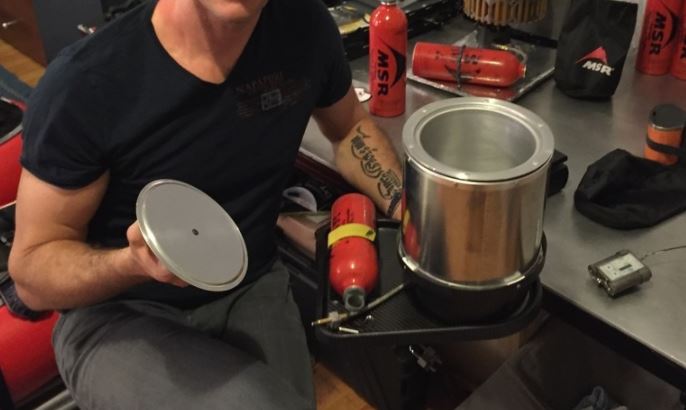
May 23, 2019 at 12:44 am #3594159Got my 2 milk pots in the mail today, started working on the 2 litre( the one on the right.) Has 1/2″ holes.
On the left is a 1.5 litre.
Will cut hole in bottom tomorrow.
May 25, 2019 at 10:35 pm #3594626May 26, 2019 at 1:48 am #3594656Dan, what are the final weights of the modified milk pots? Are they Al or stainless? If you don’t mind, would you share where you found the 2l one. Unfortunately, many places won’t ship to Canada but I’m in no rush… Plenty of time to keep searching…
They look great! Impressive work as per your usual with anything pot and stove related. I for one highly value your contributions!
Thanks
May 26, 2019 at 2:45 am #3594663Thank you, I’ll share all that info with you in a PM tomorrow.
May 26, 2019 at 4:02 am #3594676 AnonymousInactive
Interesting stuff, very curious how it turns out.
May 26, 2019 at 4:04 am #3594677AnonymousInactiveAccidental double post
May 26, 2019 at 4:42 am #3594679AnonymousInactiveWouldn’t a separate, super insulated container ultimately be more efficient and lighter? Just heat up the water near boiling and quickly pour into the super insulated container?
Awhile back, I was working on such a design that is very lightweight, using a combination of balsa wood and food grade silicone primarily for the container part, and then goose down + IR reflector (and EVA foam bottom) for the insulation.
The silicone coating would cover the inside of the balsa container and come up over the lip and down some. The rest of the balsa container would be reinforced with a combo of epoxy and thin EVA foam (so it could take rough handling. Then it would be wrapped in a fabric cozy made out of a combo of WP fabric (inside) and breathable fabric (outside) with goose down in same (and as mentioned an IR reflecting material as well).
I unfortunately had to put the project on hold, because I ran into some issues with cutting the balsa (stuff’s a pita), and need to invest in a good jig saw and special blades for same to complete the project, and money is almost always tight around here. Up until recently, time was tight too, as for the last 5 years or so until very recently, I’ve been working both full and part time jobs concurrently (and one of my semi recent full time jobs, sometimes required 60 hours).
But I’m down to two part time jobs and have more time and energy that I’ve had in awhile.
Anyways, one could easily beat the weight to insulation ratio of a typical SS thermos using such a combo of materials.
I’ve also though of using two epoxy/composite reinforced bamboo containers and pulling at least a partial vacuum in between them (and maybe also putting aeorgel in between them), but I don’t know if I trust even food grade epoxy long term with boiling water. You might be able to use silicone in the inside of the inner container, and just reinforce the rest with epoxy/composite.
Anyways, with a combination of composites and systems approach, you can definitely get some rather light weight, strong, durable, and very highly insulating containers for high efficiency cooking. My biggest hurdle in designing things, is almost always lack of extra spending money.
May 26, 2019 at 8:11 am #3594691If you want a ‘super-insulated’ pot, you can do better than balsa wood. Here are some thermal conductivities to consider, in ascending order:
Vacuum 0
Radon gas 0.0033
Propane 0.015
Urethane foam 0.021
Air (dry) 0.026
Cotton wool 0.029
Styrofoam 0.033
Down 0.034
Balsa wood 0.048
Paper (dry) 0.05Could we store our propane in the walls? Not as good as Radon, but possibly safer.
Cheers
PS:” now try lining all the values up with this font -HA!May 26, 2019 at 3:09 pm #3594725AnonymousInactiveUmm, not sure what you are getting at, but the Balsa is not for the primary insulation though it is fairly insulative. It’s primary use is to hold the container shape . I picked balsa for the container though, because it is very light weight and fairly insulative in and of itself. Kind of a two bird, one stone solution. Also a renewable material.
As previously outlined, the serious part of the insulation would come from goose down+IR reflector+EVA foam. You could have as thick of a “cozy”/koozie as you want to have.
I also previously discussed possibly using a combination of partial vacuum in combo with aerogel particles as insulation. It would have to rather partial in my case, because I don’t have the equipment to pull a stronger vacuum currently.
Sometimes it seems like some people don’t actually read my posts before commenting on them. Are they just too long for this increasingly fast food minded/instant gratification society we’re living in?
May 26, 2019 at 7:00 pm #3594770Interesting ideas Justin. In this photo you can see the Thermos containers that they use to transfer their melted snow water to once it’s heated.
May 26, 2019 at 11:04 pm #3594818AnonymousInactiveThanks Dan. Yep, I can see those thermos containers. I hypothesize that with the right design and materials, one could easily get much more usable volume at less weight but similar insulation capacity of those SS thermos type containers, even though vacuum is more efficient than any other insulation. The big problem with those SS thermos’s besides the weight of the primary material, are the much less insulated tops.
I may share a pic of the stopped balsa container project later.
-
AuthorPosts


 He ventured, he gained ;-)


- You must be logged in to reply to this topic.
Forum Posting
A Membership is required to post in the forums. Login or become a member to post in the member forums!

Our Community Posts are Moderated
Backpacking Light community posts are moderated and here to foster helpful and positive discussions about lightweight backpacking. Please be mindful of our values and boundaries and review our Community Guidelines prior to posting.
Get the Newsletter
Gear Research & Discovery Tools
- Browse our curated Gear Shop
- See the latest Gear Deals and Sales
- Our Recommendations
- Search for Gear on Sale with the Gear Finder
- Used Gear Swap
- Member Gear Reviews and BPL Gear Review Articles
- Browse by Gear Type or Brand.
