Topic

Designing My First DCF Tent


Forum Posting

A Membership is required to post in the forums. Login or become a member to post in the member forums!

Home Forums Gear Forums Make Your Own Gear Designing My First DCF Tent

Viewing 25 posts - 1 through 25 (of 35 total)
  • Author
    Posts
  • #3694424
    David Gardner
    BPL Member

    @gearmaker

    Locale: Northern California

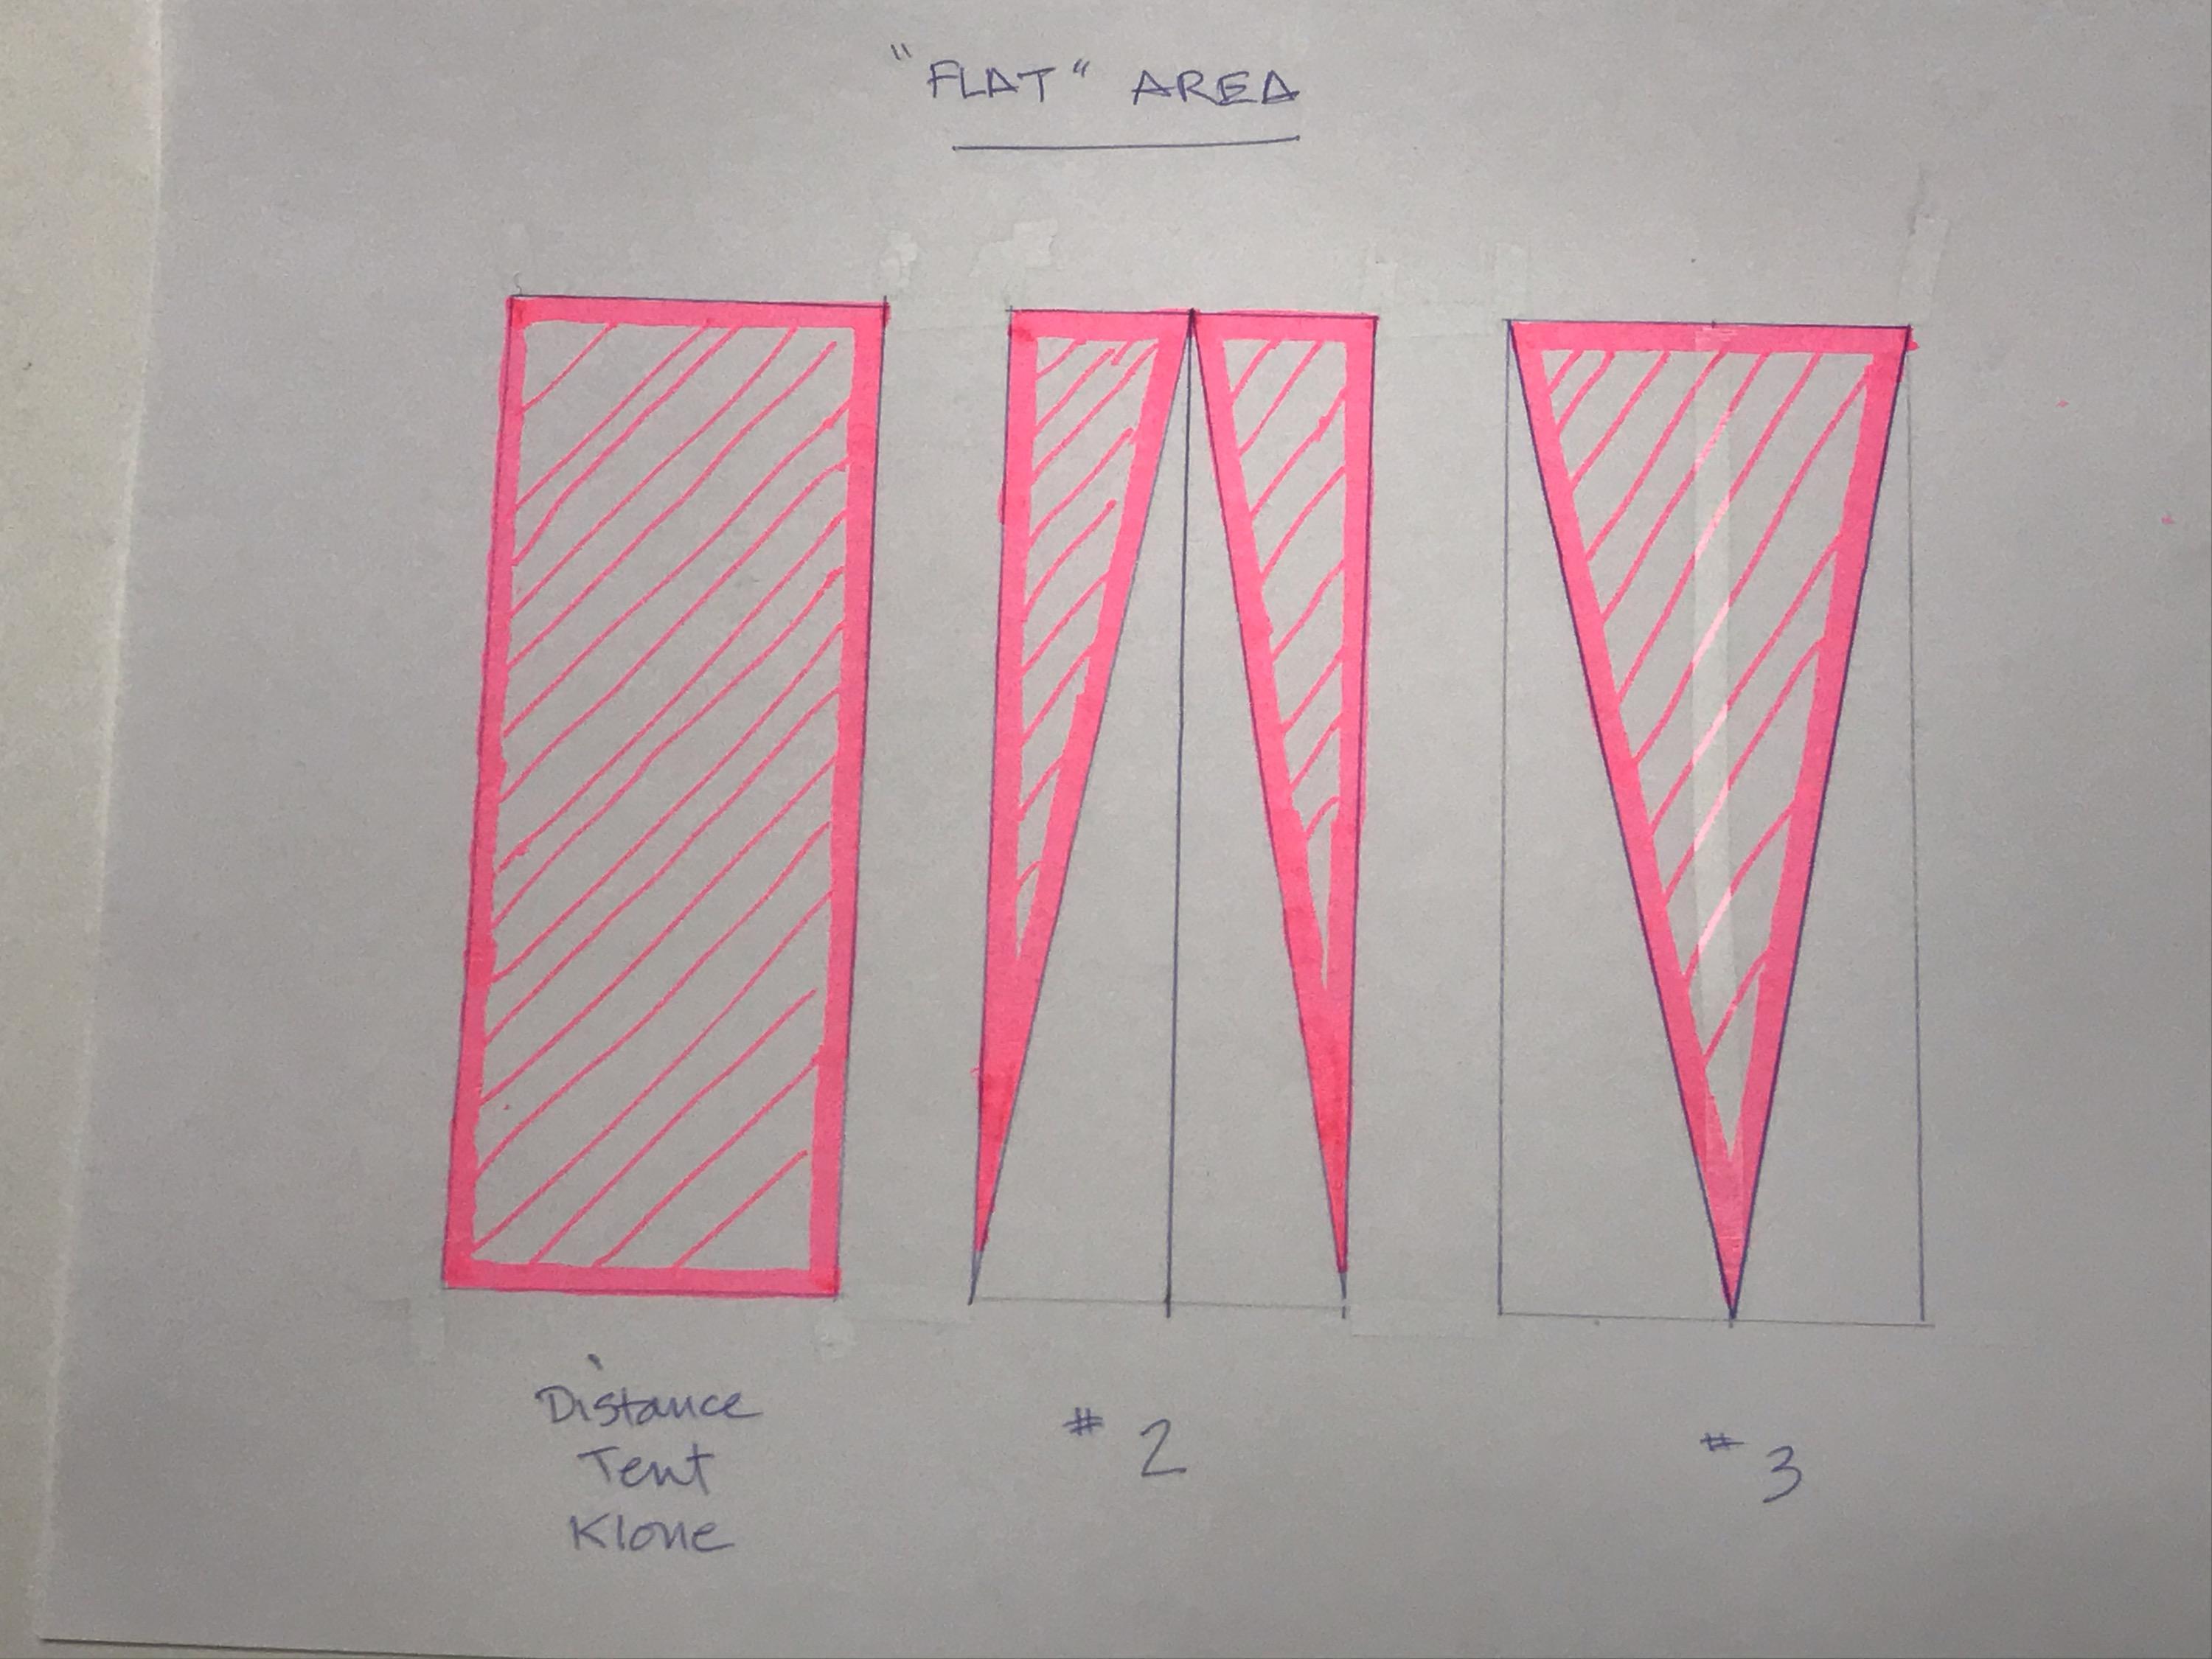
    Making a lot of my own DCF gear for the Sierra High Route this summer to get my carried weight as low as possible so I can attempt the entire route without resupply. I was initially inspired by a post here on BPL about the Black Diamond Distance Tent. Did some sketches and corresponded with Tim Evans (cubenmaker.com) to get his input.

    My basic concept is what I call “skin & bones” in which the “bones” are 1mm Dyneema cord (rated to 275 lbs.) that run along all of the panel corners and act as internal guy outs running in straight lines from stakes to trekking poles, so that the cords carry the forces instead of the 0.31 DCF that I’ll be using. I would like this to be a 4-season tent, so it needs all the bracing and design help it can get. The cords and DCF are put under slight tension and then bonded together with PSA, as are all the seams. No sewing here!

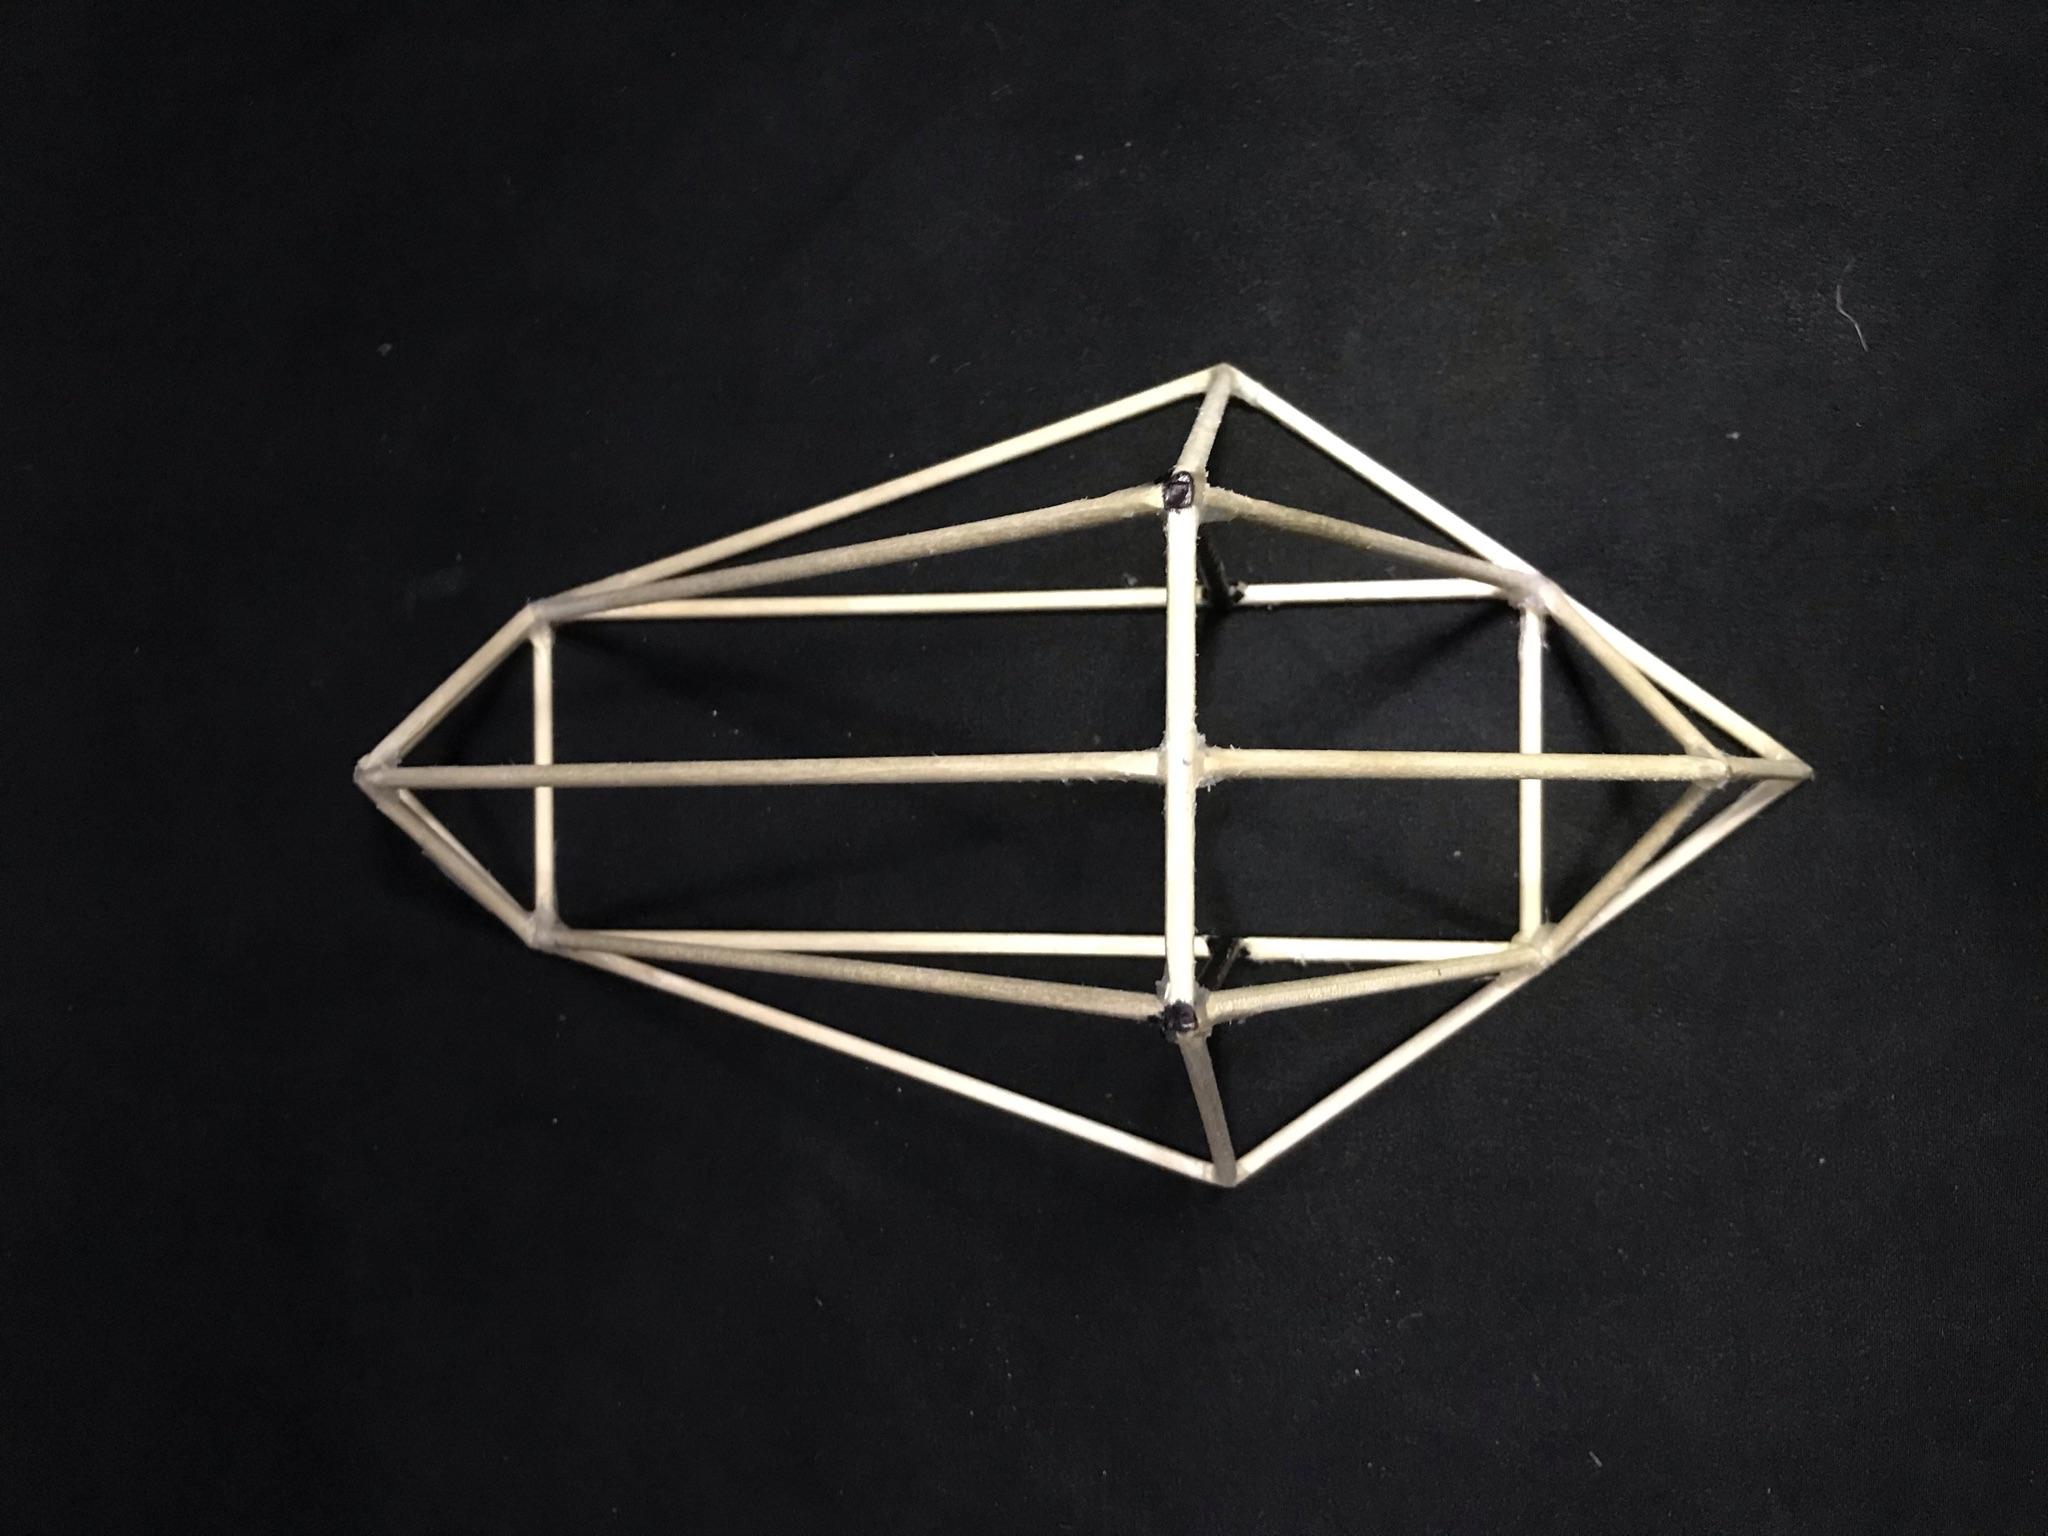
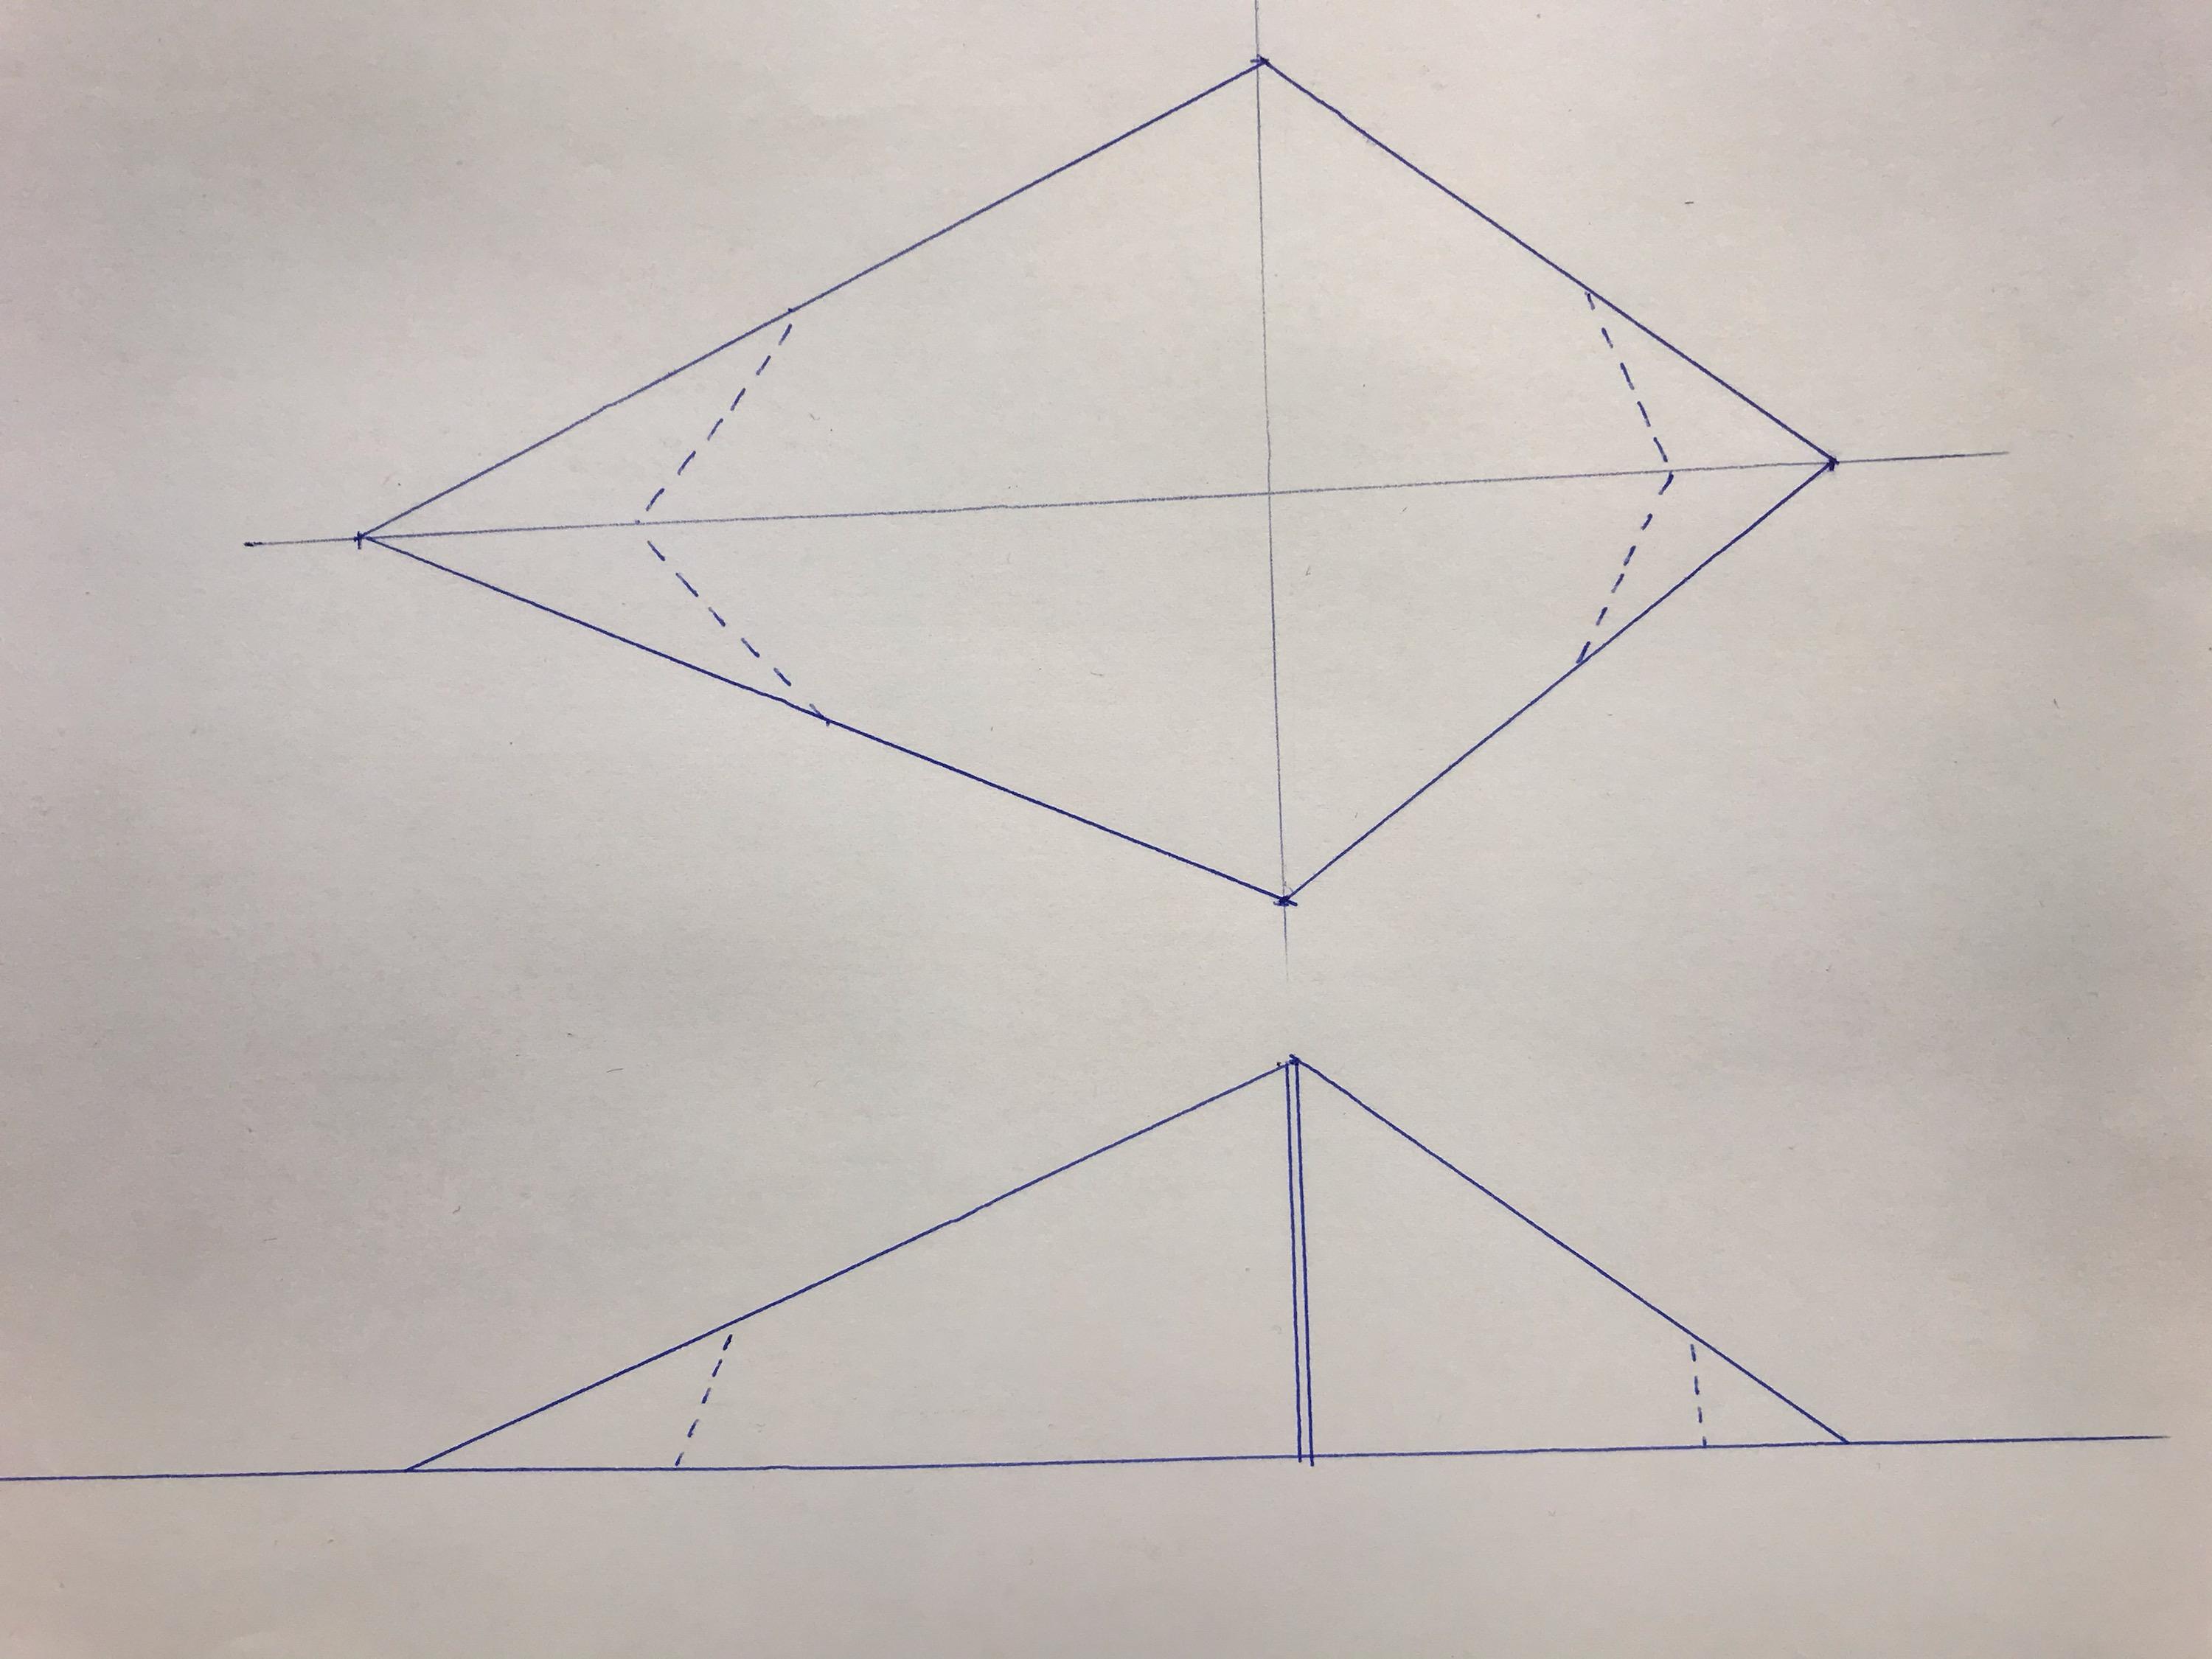
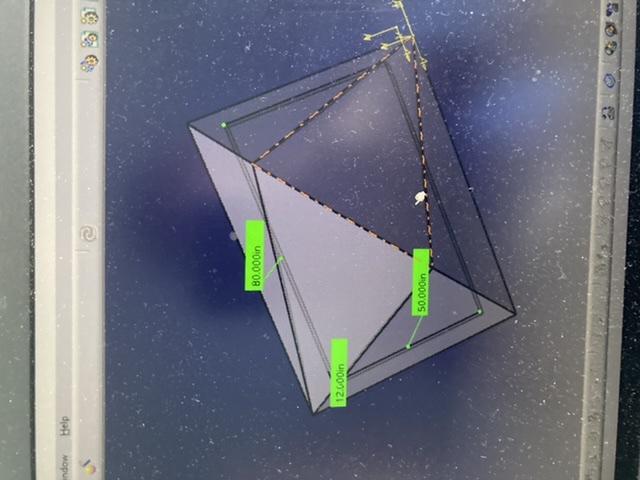
    I’m an analog, old-school guy. I can do AutoCAD, but I prefer actual drawings and models. First I made a small paper model, then a full size string mockup and crawled inside:

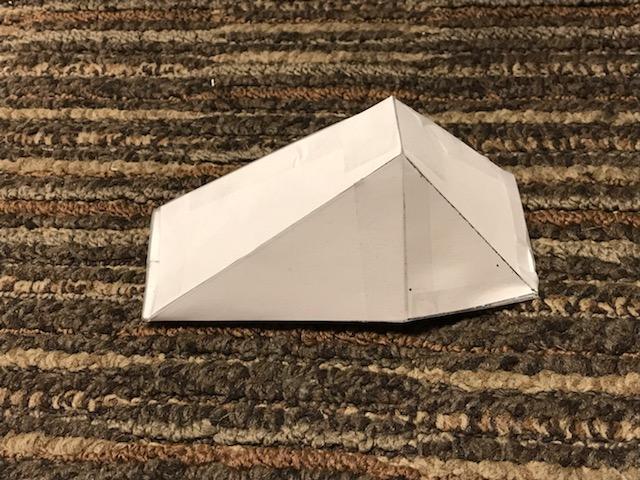
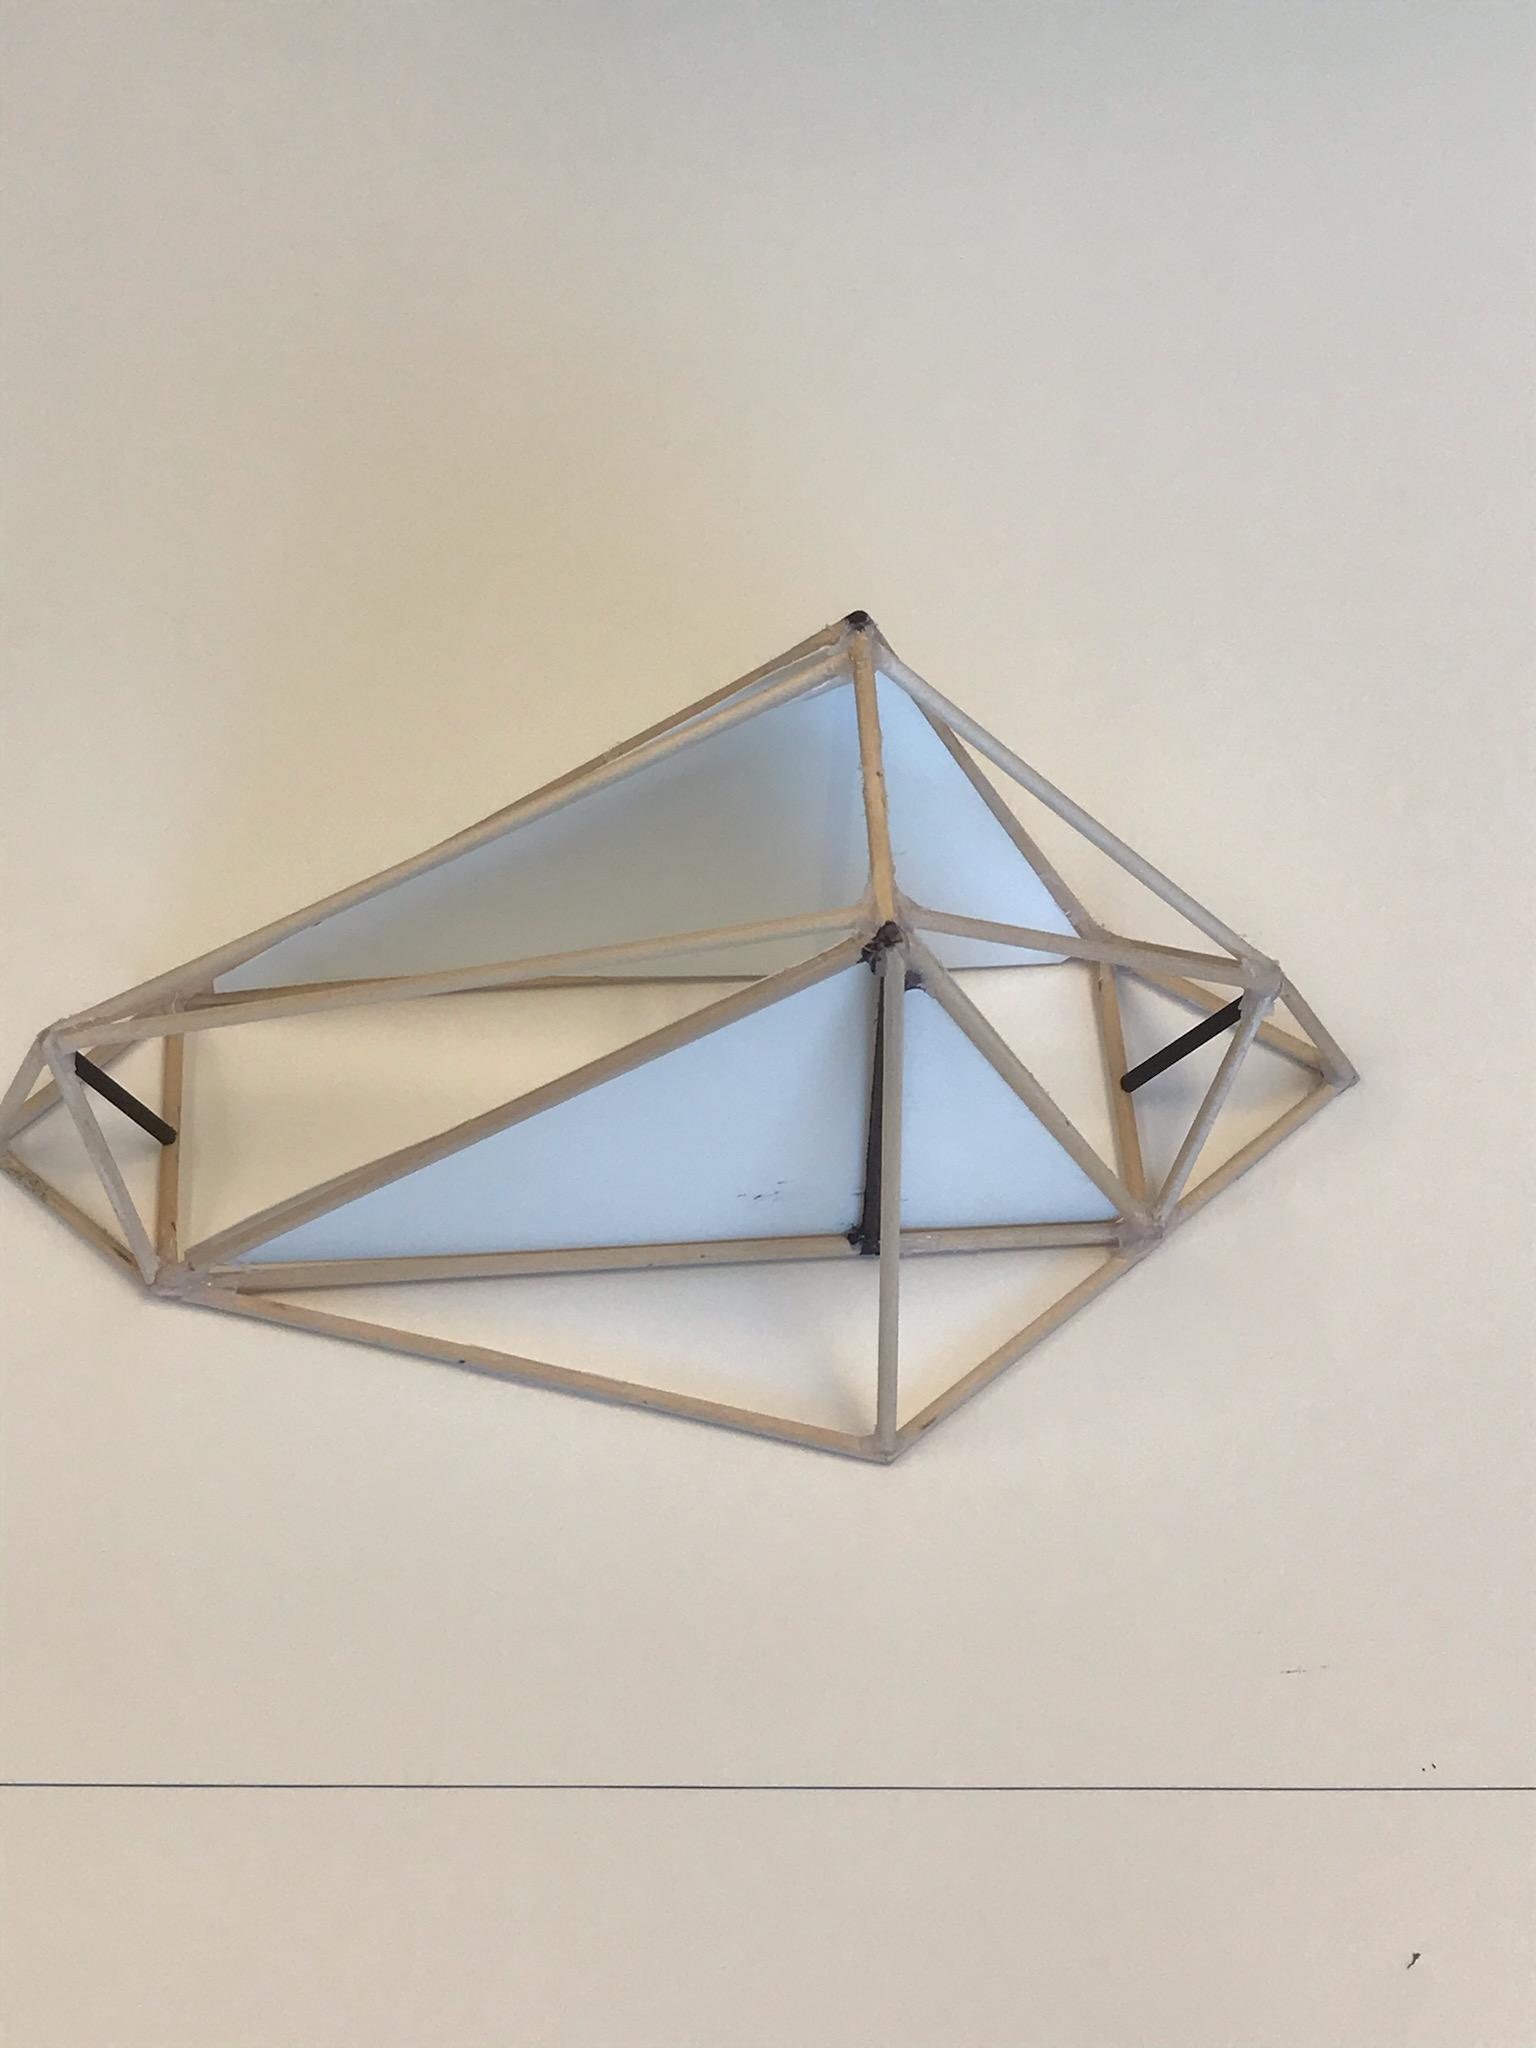
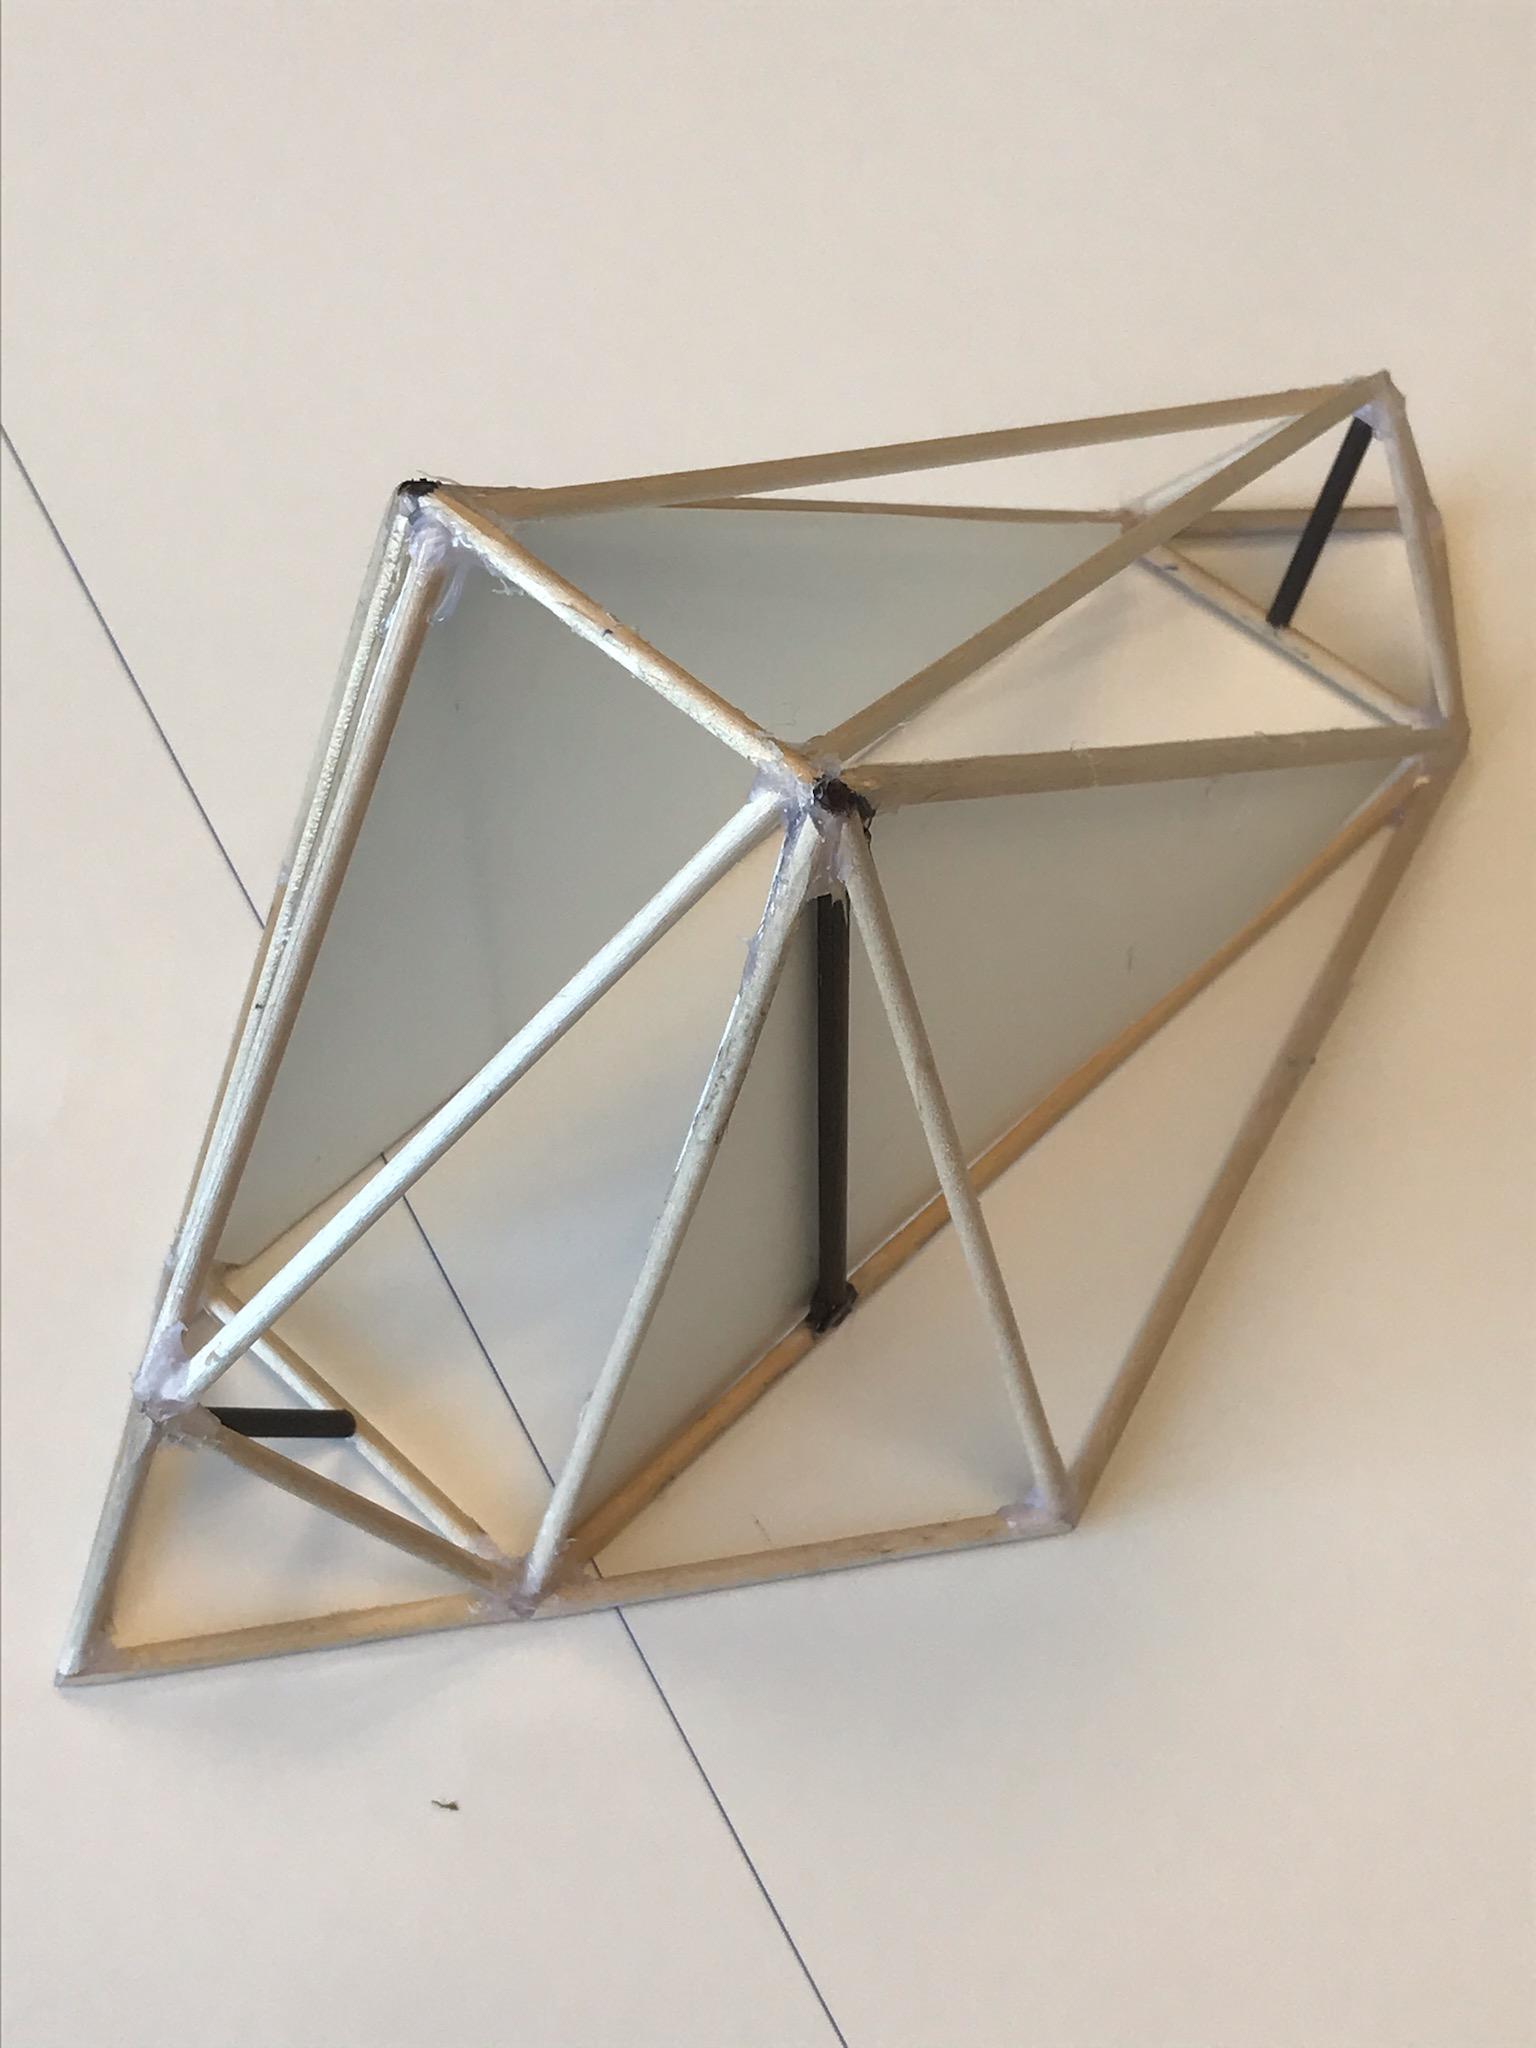
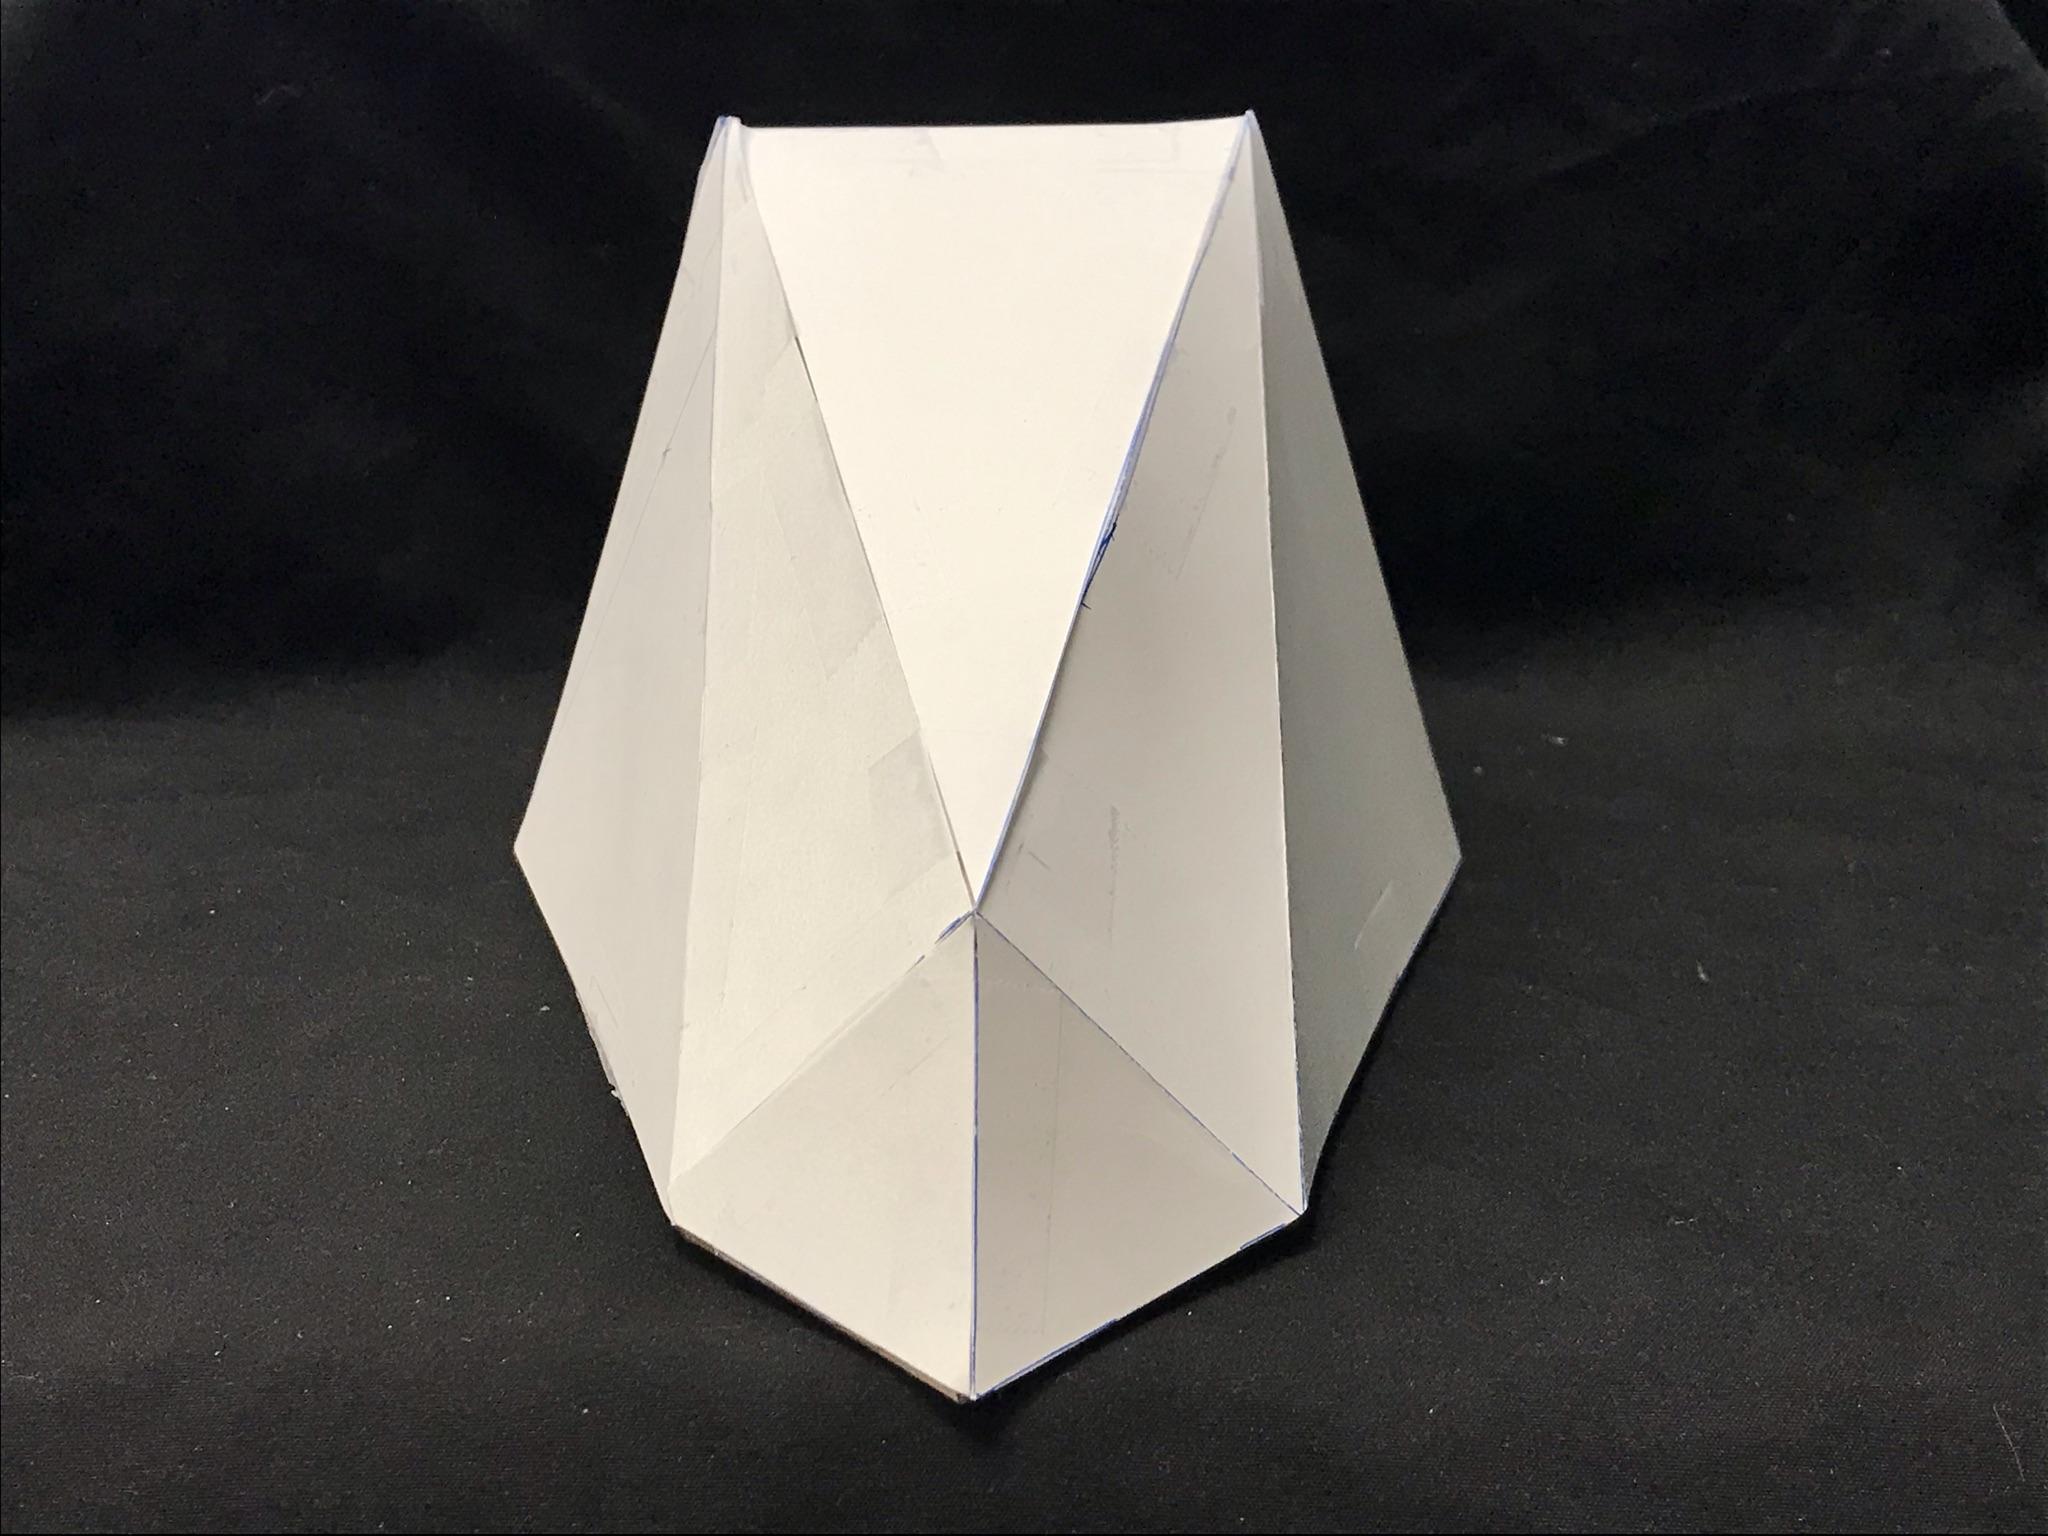
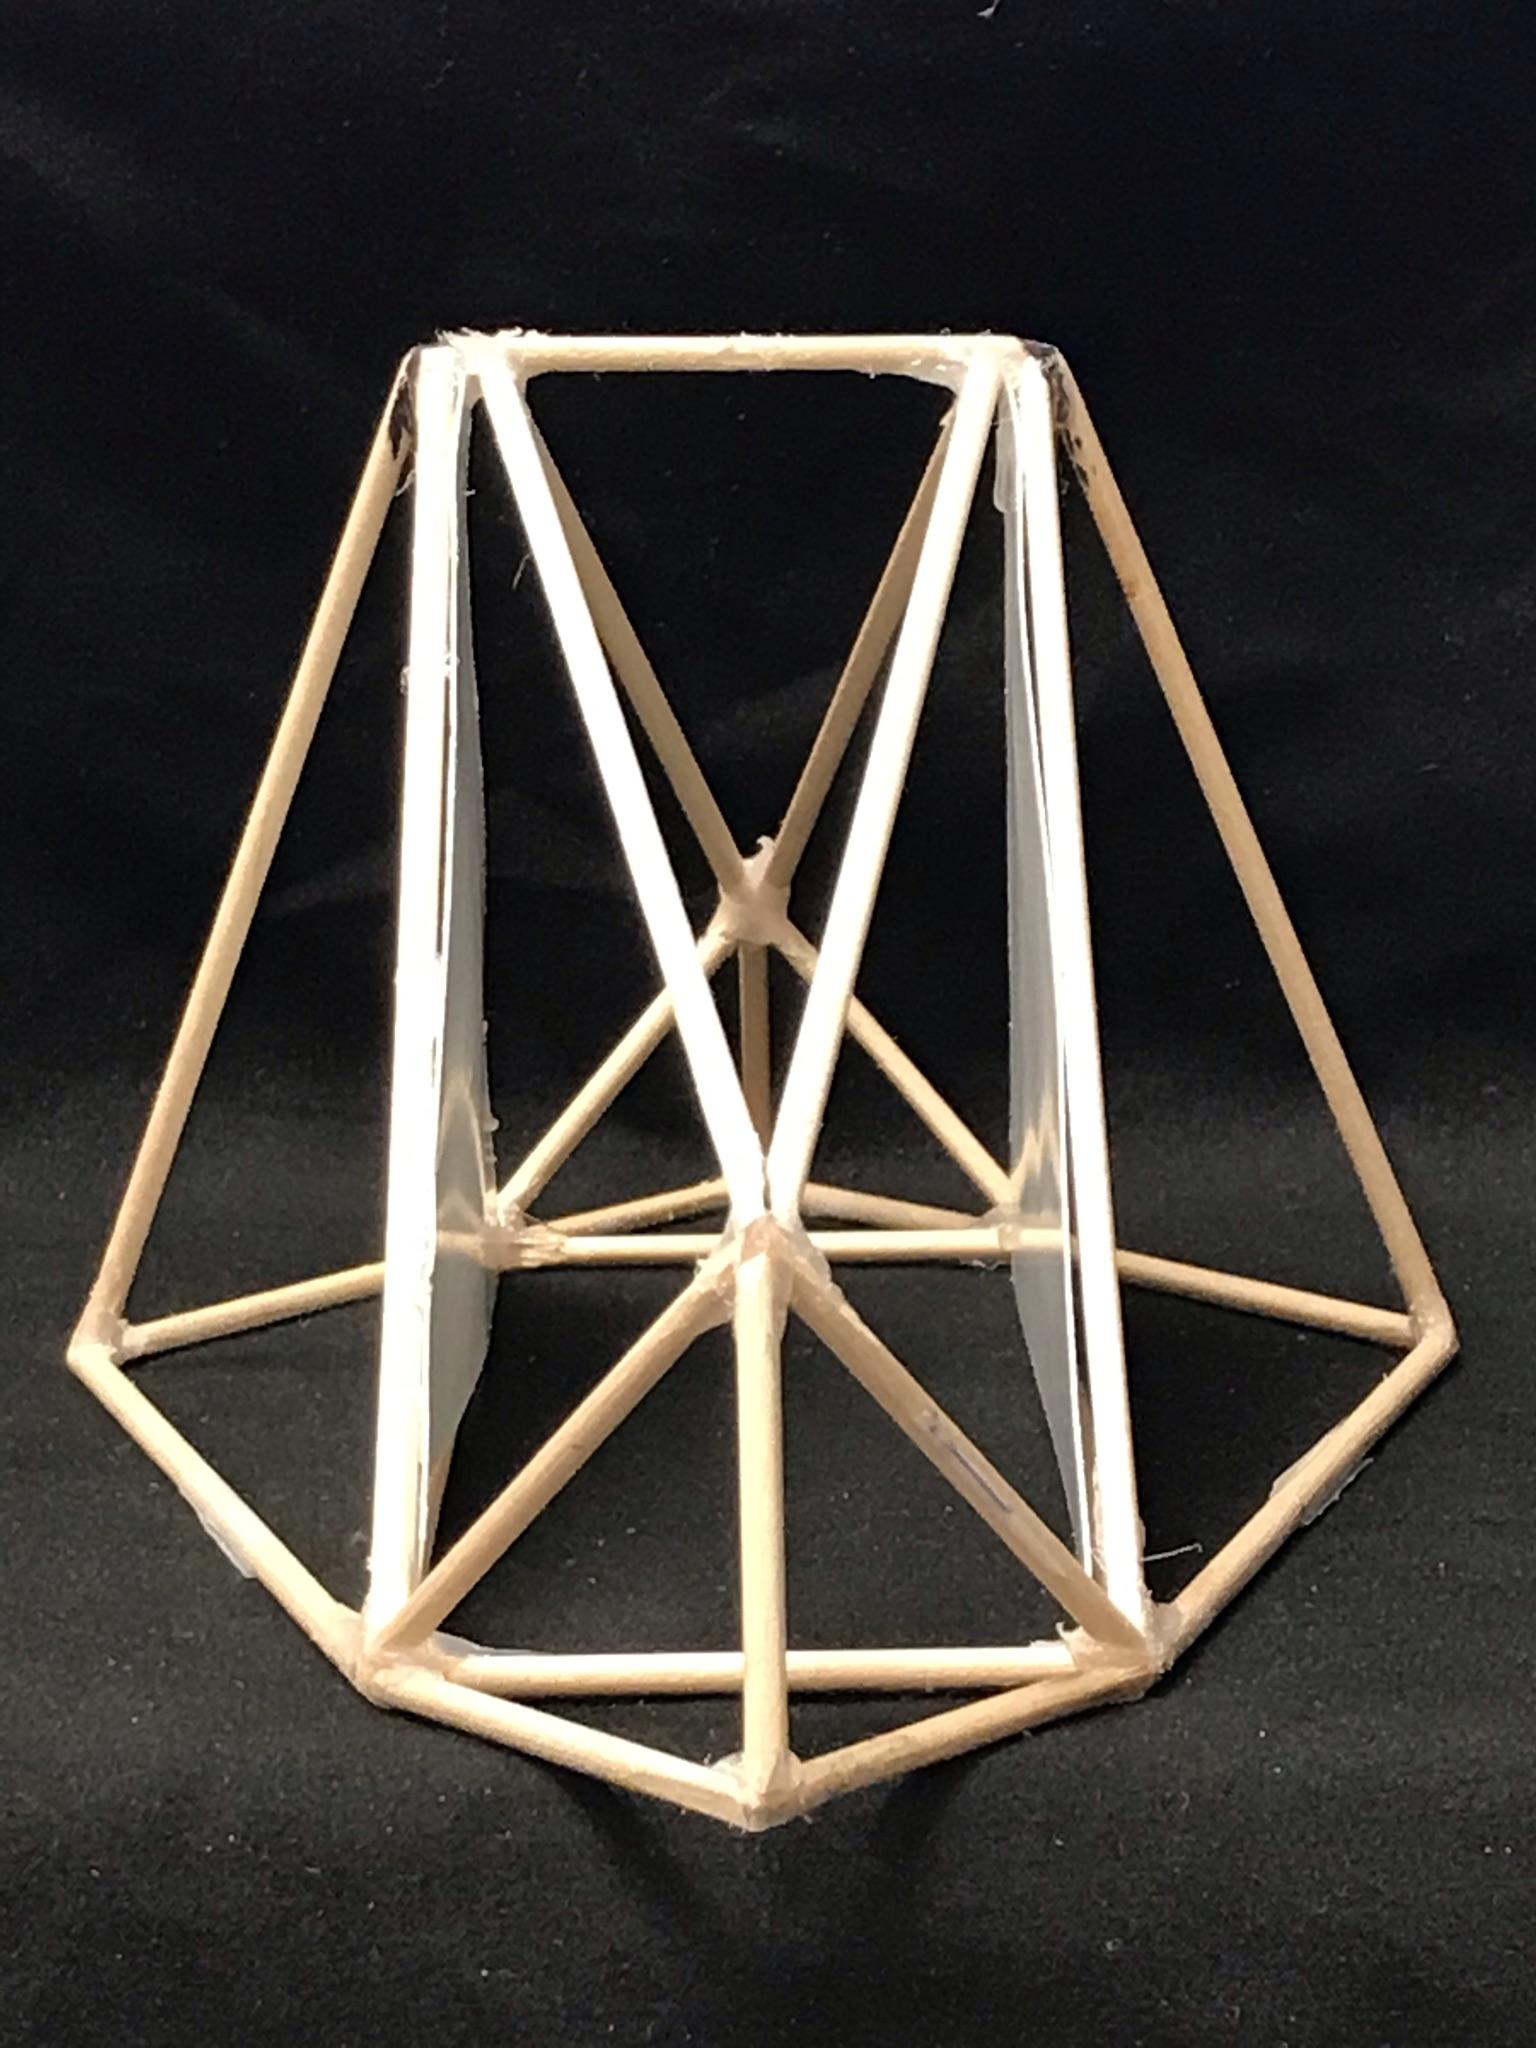
    The trapezoids at floor level at the head and foot will be mesh “low cold air in” vents. Similar to my Gatewood Cape I decided there wasn’t enough head or foot room, so I noodled around and came up with a variation with peaked gables. The “eyebrows” are covers for the peak vents. The light colored sticks represent the bone cords, the two black ones are the trekking poles:

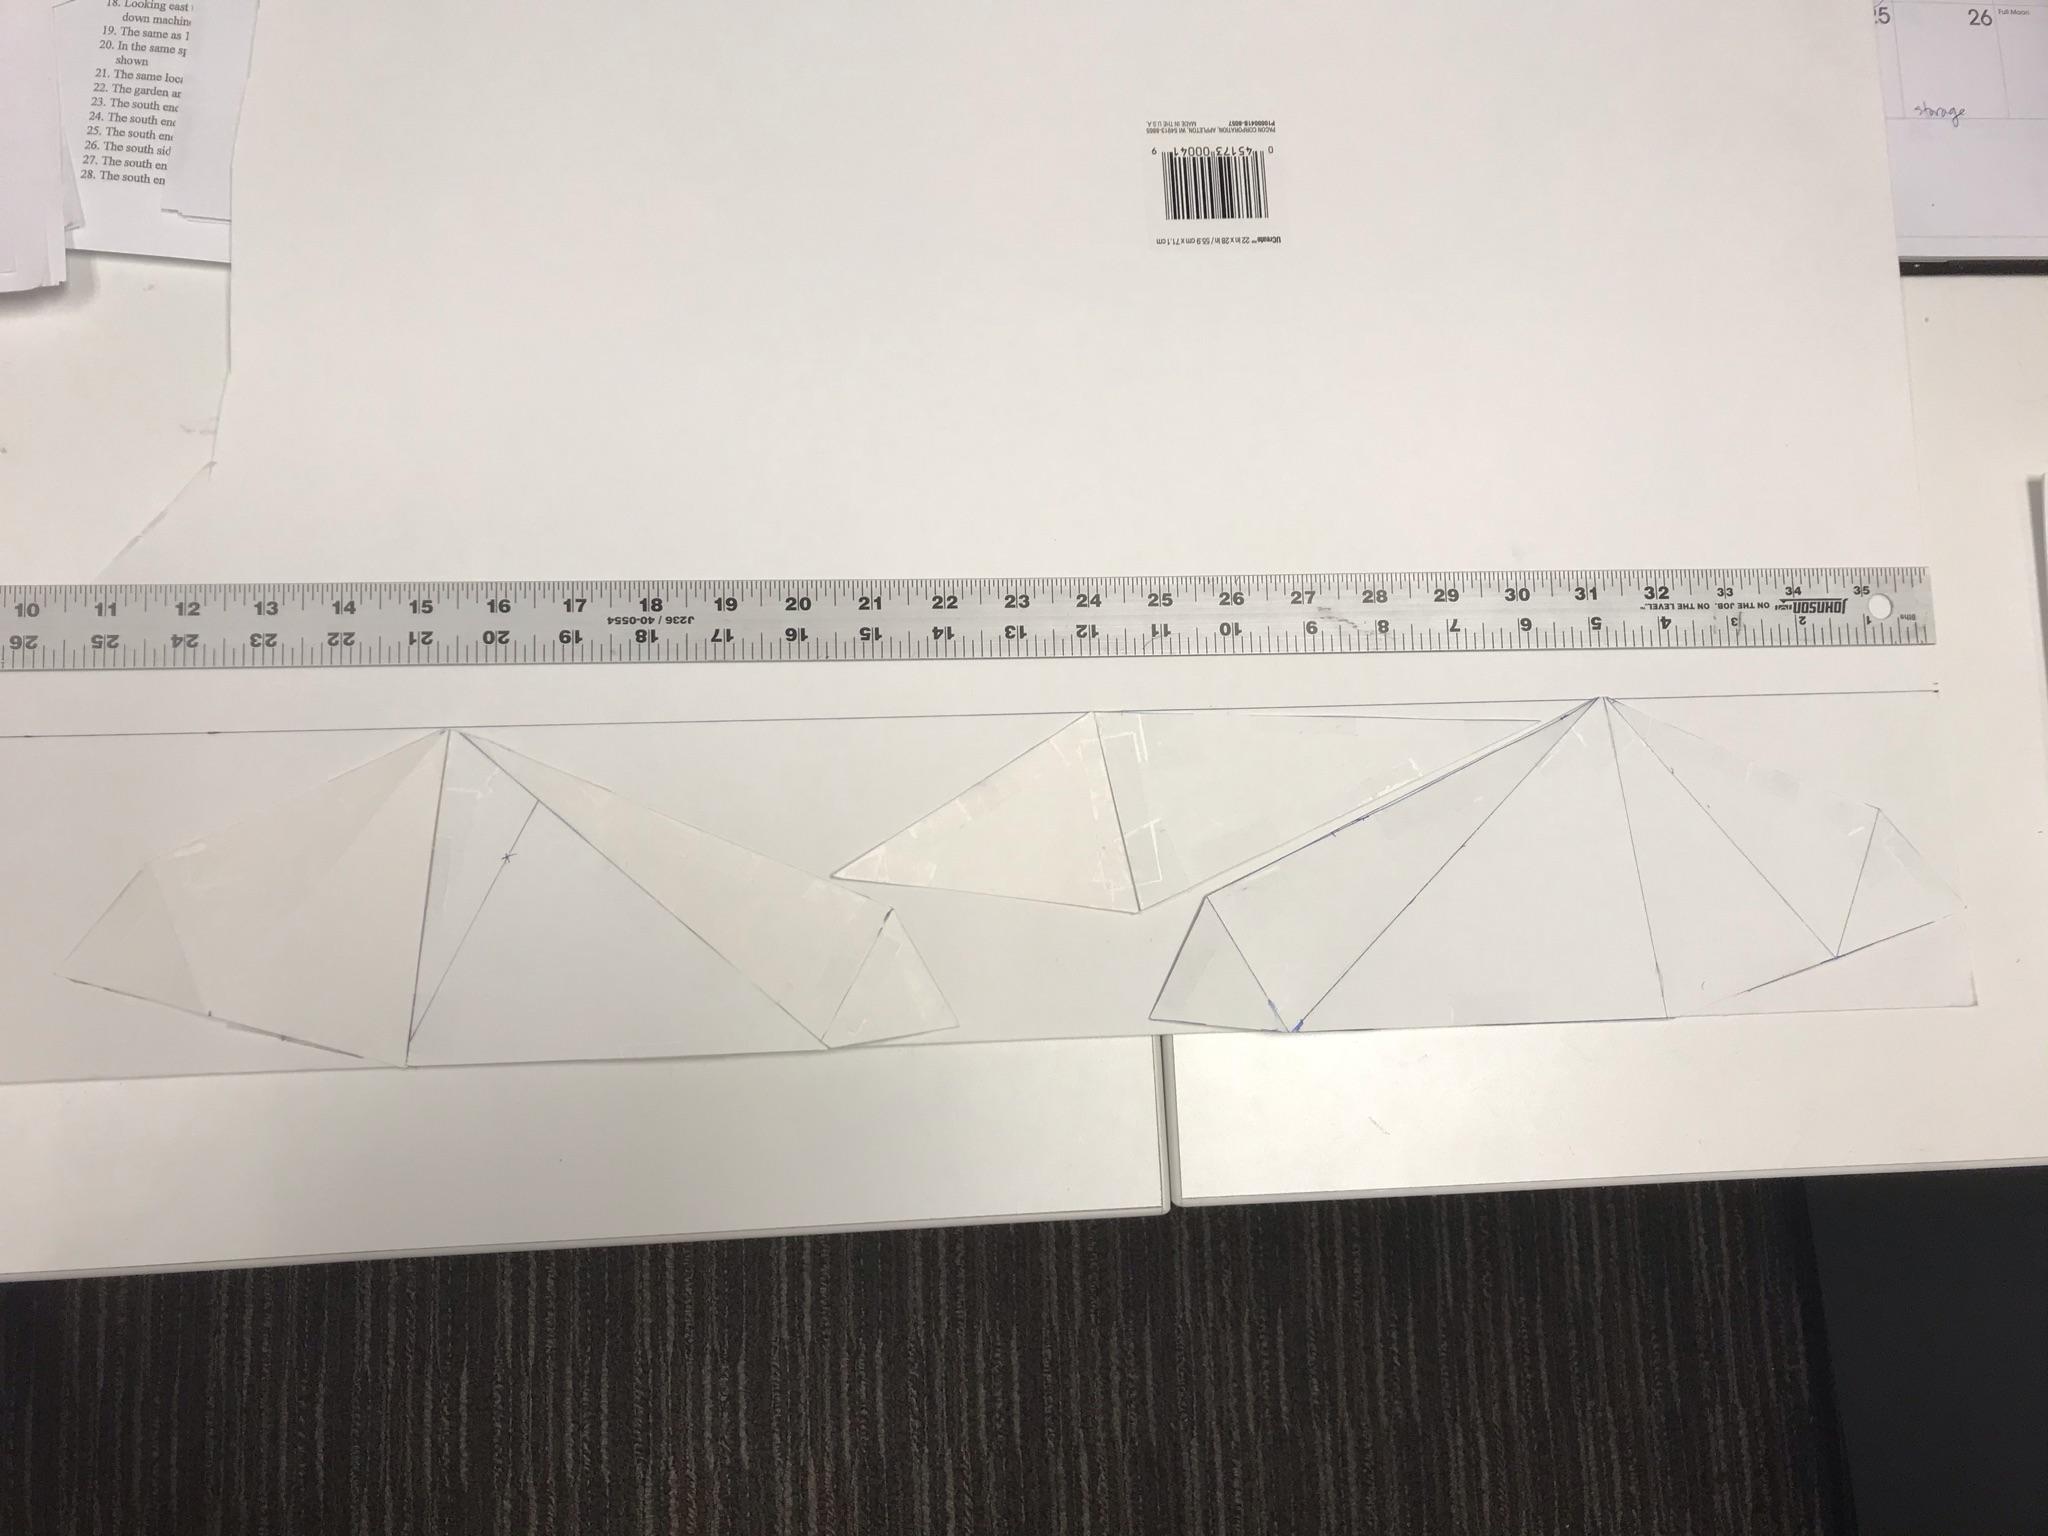
    Wicked complicated to make, and wasn’t convinced that it was aerodynamic enough, so came up with a third variant. It has two fewer panels than the other design, more interior space, and is much more aerodynamic:
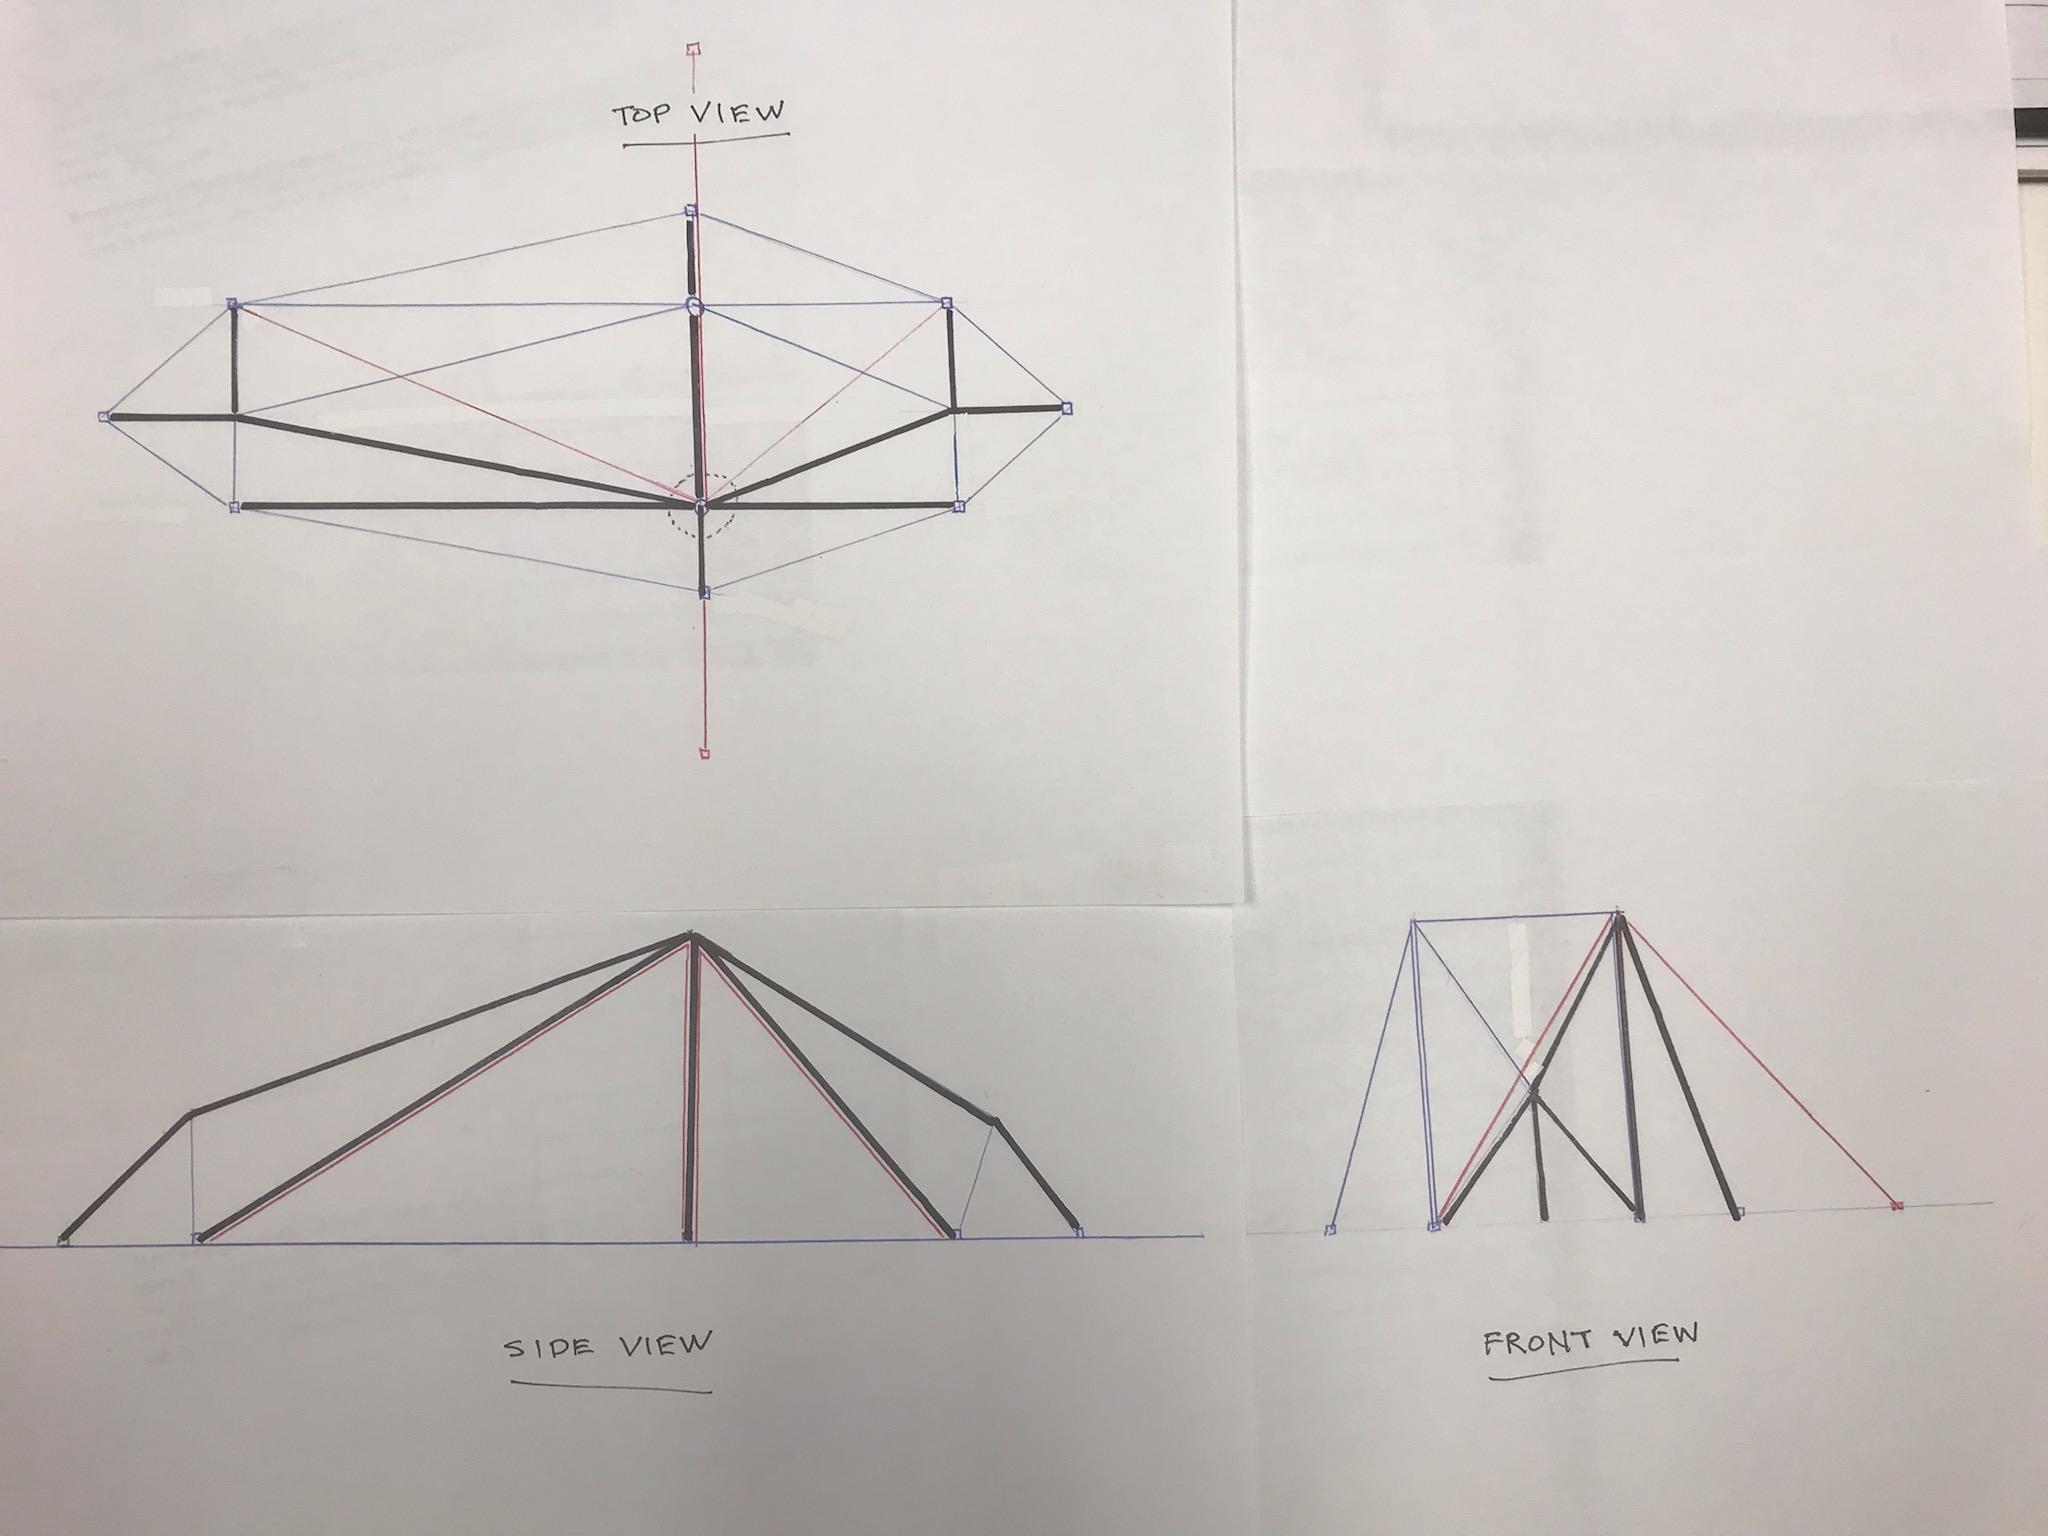
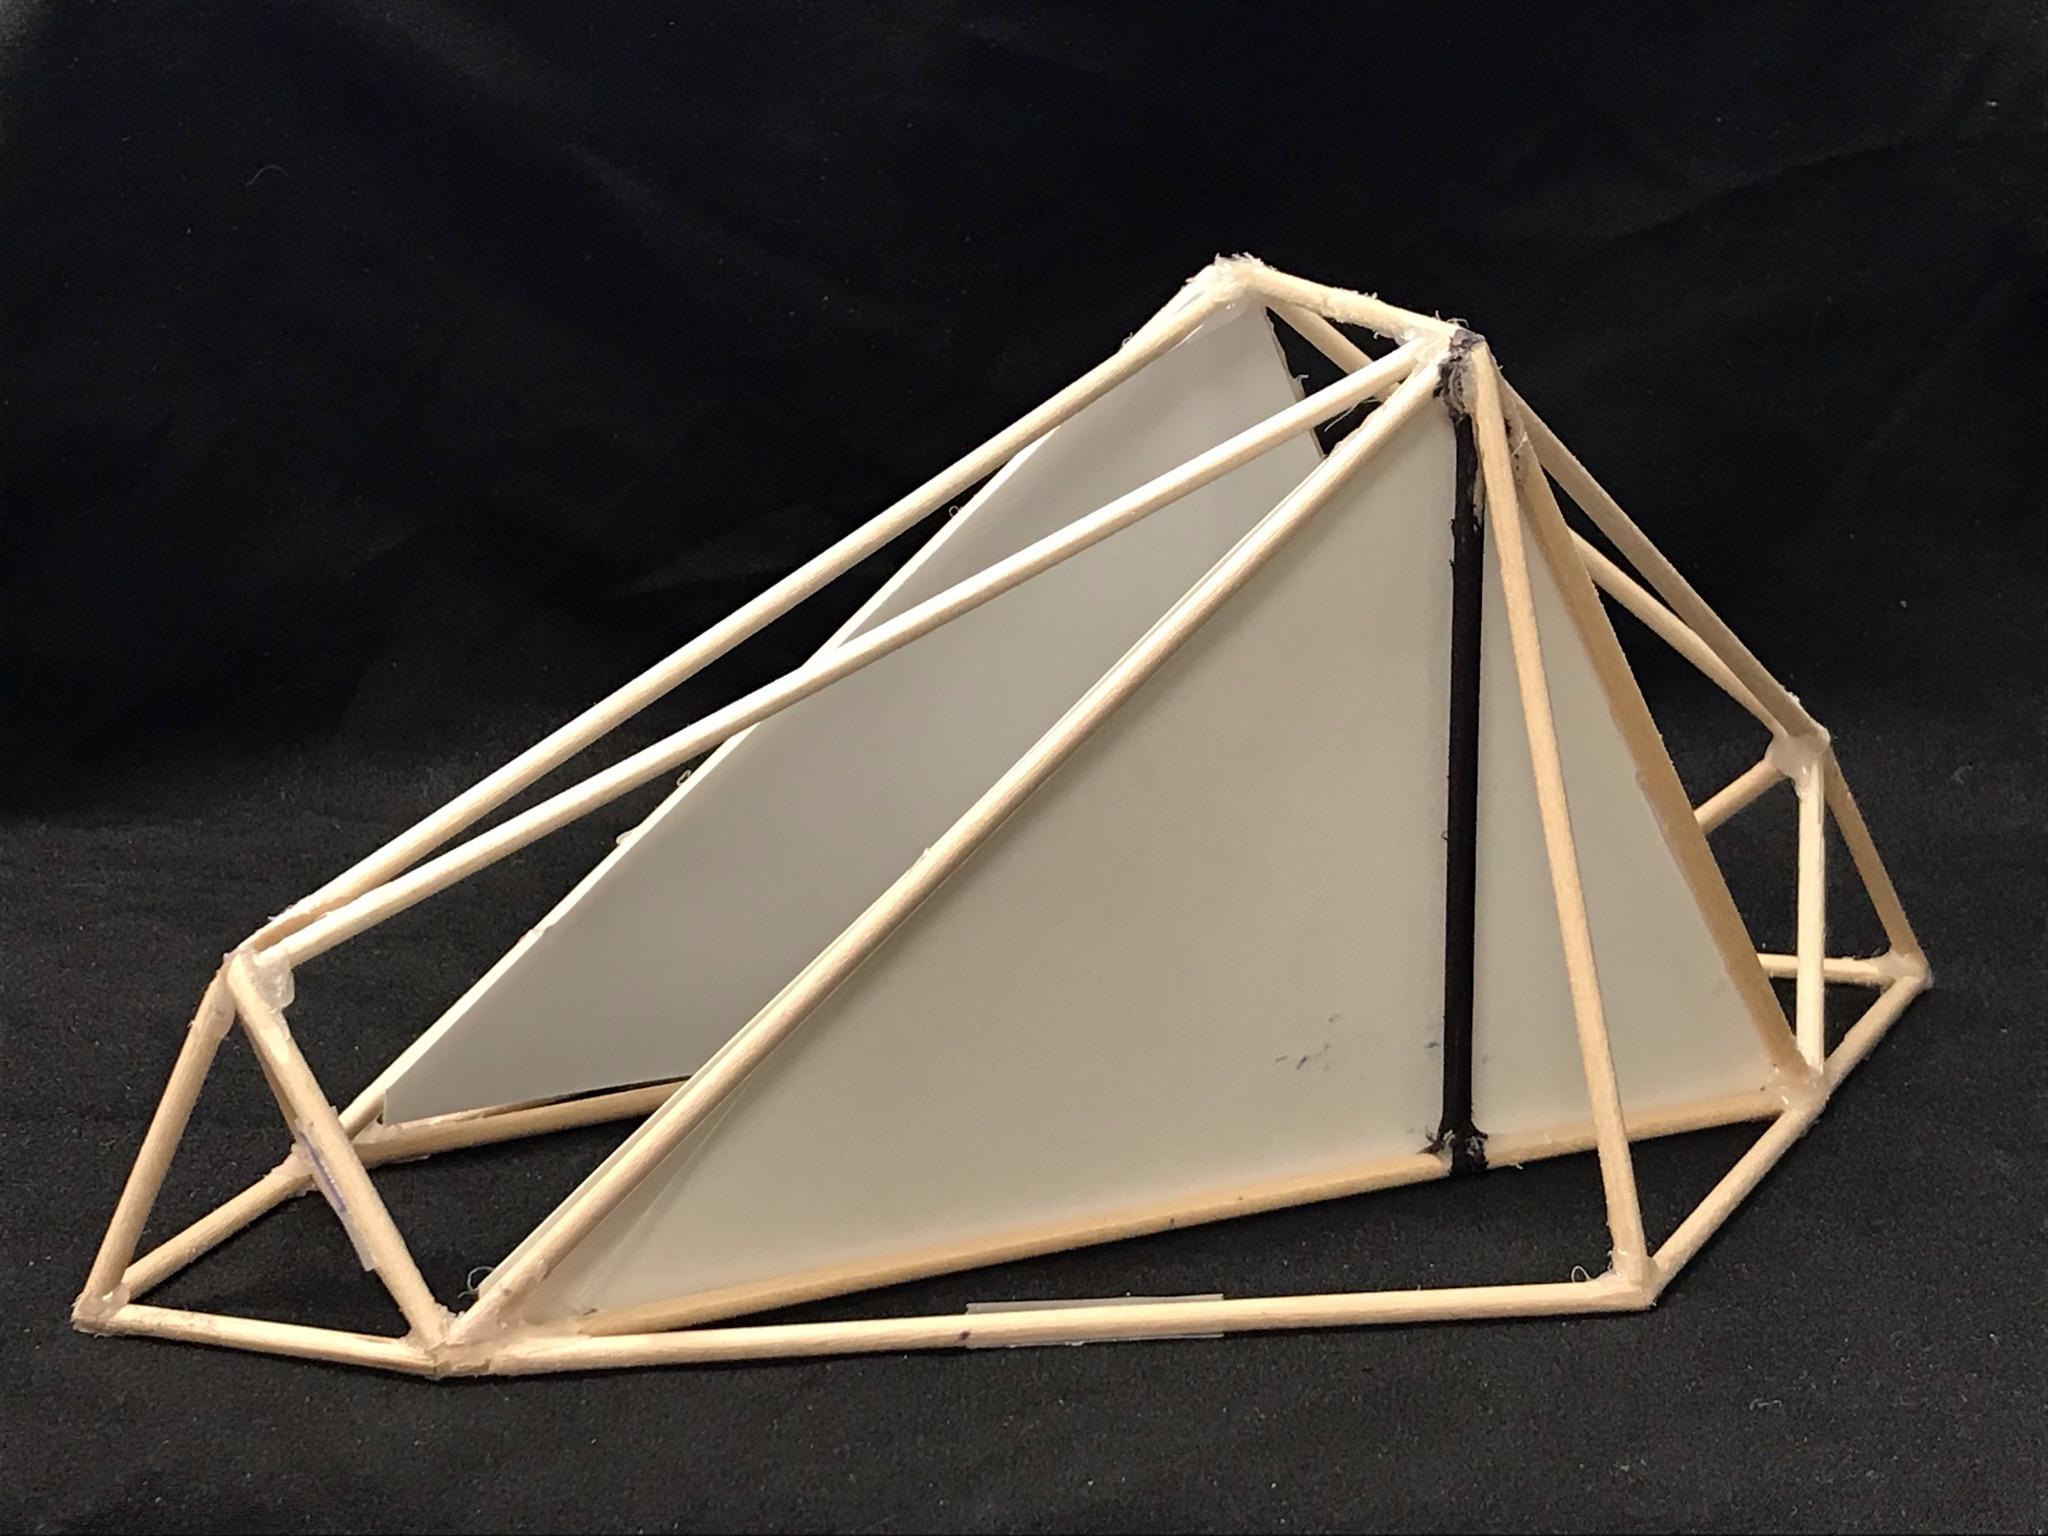
On this model I included the interior panels, which will also be DCF, with double doors of both DCF and mesh. The idea here is to reduce the interior volume that must be warmed up in order to get good convection ventilation in still air. Only the interior portion will have a floor. In this version the trapezoidal head and foot vents are now triangular. The vents also have DCF panels that can be opened and closed to different positions depending on conditions. Tweaking this third design a bit for more floor space and greater strength, but otherwise it’s pretty close.

    I’m shooting for a total finished weight of 8 ounces or less. Ordered the Dyneema cords and the DCF and PSA tape. 11 yards of material at almost $40/yd. $440 just for the fabric! You can bet I’ll be doing a lot of practice with scraps before I start in on the real thing.

    #3694426
    Michael B
    BPL Member

    @mikebergy

    That’s a lot of money for materials. How are you planning to support the “mid-panel” peaks at the head and foot end? Just planning to pull tight with guy line? If so, you are looking at minimum of 10 stakes to pitch, correct? It does look awesome, but it also looks like you are going to waste a lot of material. Call me cheap. but if I do a DCF tent ever, I’m going to look to utilize minimum 90% of the material I buy. Looking forward to see your progress. Silnylon is like 6$/yd, so go with that first to see if the design works the way you want it to.

    #3694441
    David Gardner
    BPL Member

    @gearmaker

    Locale: Northern California

    I looked at two designs, one with straight cords only and no tubes, the other with two 18″ CF tubes. The long straight cord version doesn’t need the tubes, but would be a minimum of 11.5′ from head stake to foot stake. A large footprint that needs a lot of ground. It also uses more DCF and won’t be nearly as strong. It could be pitched with only four stakes: head, foot, and at the widest point on the sides:

    The dashed lines represent the profile and footprint with the tubes for comparison. But I want a small footprint and great strength so I’m leaning towards the tubes. They weigh  24.4 gm each. I’ll use 8 stakes, 10 if I need to use side tie outs to the trekking poles for high winds. I have some Ti shepherd’s hooks that weigh 8.4 gm each, so two CF tubes 48.8 gm + either 4 (33.6 gm) or 6 (50.4 gm) more stakes than the no-tube version, so 82.4 gm or 99.2 more grams than the no-tube version, minus whatever the longer cords weigh and minus .031 oz for the extra yard of DCF.

    So total weight for the tent:

    DCF (11 yds. x .031 oz/yd = 3.41 oz/96.6 gm) + Stakes (10 x 8.4 gm = 84 gm)                         = 180.6 gm/6.37 oz.

    + 8′ of #1 plastic coiled zipper (Anyone have any idea what it weighs? I’ve scoured the Internet but can’t find anything.)

    + (10) 6″ long x 1/2″ nylon web stake loops

    + 100′ 1mm Dyneema cord (21 gm/.74 oz)

    #3694455
    Michael B
    BPL Member

    @mikebergy

    #1 zipper? #3 is already smaller than I’ve cared for with the shelters I’ve made. I’ve never even seen #1. 8ft of #3 will cost you 1 oz, and IMO is approaching the “stupid light” category. It doesn’t pull as smooth as #5, which would cost you 2oz for 8ft.

    regarding the DCF, are you using 11 sq yd, or 11 linear yd? I may have misread your first post.

    #3694469
    Claiborne B
    BPL Member

    @cbrown2019

    I’m really digging your design and markup. Reminds me of the SMD Skyscape or the Lightheart Gear Firefly. I always wanted to build a modified version with a pole supported footbox out of DCF.. maybe someday. I’m a little concerned about it being a 4 Season design. Might have some issues if in heavy snow. Also my frustration with ultralight zippers for tents keeps me in a #5. Good luck with it, looking forward to watching the progress.

    #3694470
    David Gardner
    BPL Member

    @gearmaker

    Locale: Northern California

    I’m using what Dyneema calls a yard, 36″ linear inches of 50″ wide material.

    Thanks for the zipper input. There is actually #0 zipper too, typically used for doll clothing. Probably not robust enough for this application, ya think?  I never really considered zipper type or size much before. I remember from years ago that Stephenson’s Warmlite tents used #2 zippers, but I see they switched to #3 awhile ago.

    I can’t even find #1, much less #0, zippers after about an hour of fruitless internet searches. I was concerned with weight and strength, I didn’t know about the smoothness factor. Were your zippers coiled or toothed?

    I want to get some samples and test for separation/pull apart strength. I think Stephenson originally said he chose #2 because that is the size used for men’s flies, an area of high separation/pull apart strength. (Don’t go there!) I wonder how strong the #1 and #2 are. I’m going to put at least #2, maybe #3, zippers down the ridgeline outside at the widest point and I want them to be very strong since they will be carrying a lot of loads. I don’t see big loads on the inside panels so maybe I can get away with something very light there.

    Given the weight, I’m going with zipperless vent closures, such as flaps with pull cords. I don’t see a good way to use velcro right next to no-see-um mesh.

    #3694472
    Claiborne B
    BPL Member

    @cbrown2019

    I’ve used YKK Uretek Coil Zippers for most of my projects that need waterproofing, usually a #3 for clothing, zippered bags, and bug bivys; a #5 my myog pyramid tents. 

    #3694476
    David Gardner
    BPL Member

    @gearmaker

    Locale: Northern California

    Hmmm…If I have two full doors on both sides it would be about 24 LF, so 3 x 1.0 oz/8′ = 3 oz

    One set of doors for 1.5 oz is looking better. Cheaper and easier too. Just have to remember to pitch it with the doors on the uphill side of the icy alpine perches.

    I think that gets the weight up to 8.5 oz. Still need to add in the web stake loops and  1mm Dyneema cord. And all the PSA tape at the seams. Damn, might hit 10 oz.

    Ah, my CF tubes are the Fibraplex 18″ pieces aluminum ferrules for the long crossing poles in a BD FirstLight tent, which are major structural elements. I can cut that in half from 50 gm to 25 gm or less with smaller tubes, which gets me back to 9 oz territory.

    Attached are some sketches of my thinking on the 4-season and snow issues.  The first shows that either of the two peaked variations cuts the “flat” area by 50% when compared to the BDDT Klone, and that both have the same amount a flat area but in different areas. Also the roof of the DBDT Klone supported by two Dyneema cords only at the edges, whereas both of the variations have four cords with the two additional cords in the center.

    #2 has the further advantage that the flat areas are adjacent to the supporting trekking poles, and flat areas are supported by four Dyneema cord bones, but the disadvantage is that the peak center cord “bone” attaches to the cord spanning between the tops of the two trekking poles. #3 has more of the flat area in the center but is supported by poles at all three corners. I decided on #3 because of its aerodynamic advantages, incrementally lesser weight, and ease of construction.

    The next sketch has dark lines showing the load paths of the cords bracing the top of one of the trekking poles, which is one of the keys to rigidity and stability for high winds and snow. All the dark lines run from stakes more or less directly to the pole top. The red lines are more 1mm Dyneema cords that I can add with mini ‘biners to tie in more of the existing stakes and to the two additional stakes when rigging for the worst possible conditions. I know the cords crossing the center of the occupied space look claustrophobic, but in variation #4 I have splayed the tips of the trekking poles farther apart and the tops a bit closer together, which raises the crossing point to about 2/3 of the way from floor to peak. I don’t know, if 9 cords don’t hold I’m not sure a 10th would make much difference.

    So at least 6 cords to each trekking pole, 10 when rigged for the worst conditions.

    #3694480
    Matthew / BPL
    Moderator

    @matthewkphx

    This is a superficial comment as I haven’t considered this design as deeply as you have, David. Please read it with that disclaimer.

    Considering that many of the UL cottage manufacturers chose #5 zippers because of durability problems they used #3 zippers and that you want this shelter to last more than one trip, I think you should aim for a zipperless design. It makes more sense to me to eliminate the zipper rather than use a flimsy one. Perhaps the weight of the zipper could be invested in other reinforcements resulting in a more durable/stable final result.

    I’m looking forward to seeing what you create. Thanks for documenting and sharing your process.

    #3694484
    David Gardner
    BPL Member

    @gearmaker

    Locale: Northern California

    Hey Matthew, no worries. All well-intentioned comments welcomed and appreciated. It’s one of many reasons I post here – to get information and ideas and experiences from the community.

    I did not know that many UL makers have gone to #5. So it probably makes sense to go to #5 for just one 4′ vertical side door zipper at 1 oz because I want the canopy to be robust. On the inner, I think I’ve got to have zippers for the mesh door if it’s really going to be effective against mosquitos. If there’s no stress across the fabric and the zippers are straight, might I be able to get away with #3 or even #2?

    I’ve got to get some and see what size they really are, how smooth. I can’t believe I can’t find anything on rated strength of zippers of different types and materials. Amazon, here I come…

    #3694487
    Michael B
    BPL Member

    @mikebergy

    #3 on mesh has worked just fine for me. It isn’t as smooth operating as I said, but it is a trade, since I wanted a longer zipper on the net but didn’t want to add the weight of the #5.

    #3694497
    Brett A
    BPL Member

    @bulldogd

    I would lean towards Matthew’s solution for the doors.  I have both the SMD Skyscape and DCF Deschutes and the #3 on the Deschutes is by far the weakest link in it’s construction.  I suppose much of that is inherent to the design.  Once the tarp is tensioned, the zipper is under considerable stress.  A #5 would have been more appropriate were it to have a zipper at all.  I’ve considered removing the zipper and adding a “wing” to each door that would overlap one another, much like the Hexamid arrangement.  #3’s would probably be fine for the inner mesh.  The Skyscape’s door zippers (#5’s) aren’t as stressed and your design is similar so you may be fine.  Personally though, I’ve become skeptical of #3’s under any sort of stress holding up long-term.

    It does seem like a sin to add #5’s to 0.31 oz DCF  :)

    Cool concept!

    #3694509
    David Gardner
    BPL Member

    @gearmaker

    Locale: Northern California

    Thanks Brett. I’ll take a look at those. I have a Gatewood Cape with the same issue with basically the same tent. My experience with the Gatewood’s low foot and head clearance when lying down was a deal breaker, and the gables are intended to address that issue. Another reason for the Dyneema cord “bones” is to carry the loads so the zippers don’t. It would be great if that lets the smaller and lighter zippers would work.

    And bummer…I was just checking out RBTR and it looks like the lightest weight DCF is . . . sob . . .  0.34, not 0.31.

    #3694516
    Brett A
    BPL Member

    @bulldogd

    “And bummer…I was just checking out RBTR and it looks like the lightest weight DCF is . . . sob . . .  0.34, not 0.31.”

    Doh!!!  You’re right.  The cord “bones” concept is interesting.  What was your inspiration?

    #3694539
    Michael B
    BPL Member

    @mikebergy

    Also, have you checked to see how all your parts are going to be laid out on your DCF yardage? I am not sure how sensitive composite fabric is to orientation, but the cut layout in my design experience is as crucial as the actual tent design if you don’t want to end up buying and wasting a lot of material and $$$.

    My X-mid/HR design I’ve been working on, and fabric layout.


    With your dyneema cord structure, how are you going to alleviate the stress on the main zipper?


    #3694547
    David Gardner
    BPL Member

    @gearmaker

    Locale: Northern California

    Brett: The term comes from John Britten, one of my heroes. A brilliant lone Kiwi designer who built a motorcycle from scratch in his garage in 1992 that came within one lap of winning the Daytona 500 when a $5 electrical component (one of the few things on the motorcycle that he didn’t build himself) failed. He was an early implementer of carbon fiber and developed a building technique that he called skin and bones. The bike was monocoque – no separate frame – and he bolted spools on various hard points of the engine and suspension, then wound CF cord under tension around the hard points and epoxied in place. The wound cords were the bones. Once the bones cured he wrapped them in sheets of CF, the skin, and epoxied it all together.

    The concept comes from…experience as a civil, structural and mechanical engineering technician? It’s sort of like building a skyscraper. There is an underlying structure that is built first and supports everything. Then some kind of “skin” (exterior surfaces) is put over it. It lets you carry the loads exactly where you want to, to the “hard point” stakes and trekking poles.

    Michael: I have laid out scaled individual panels on a 50″ wide strip of DCF, but would really like to know if orientation matters. That could take if from very little waste to a huge cost increase. Frustratingly similar to my experience trying to information on the weight and strength of zippers, I can’t find anything exactly on point that states whether orientation matters. Plenty of information from the manufacturer about criss-crossing layers of highly oriented strands, but nothing that talks about how to orient a pattern on the fabric.

    #3694549
    Michael B
    BPL Member

    @mikebergy

    I had assumed DCF fabric parts would want to be oriented in the direction of principle stresses, similar to normal fabrics. Aren’t the fibers layered at 90 degrees, or are there other directions the laminates go? I also assume there is minimal stretch on the bias with DCF but that it is probably poor practice to orient the pieces such that the fibers are not in line with the stresses. I imagine there is some advice to be gained from emailing DSM or RBTR about it.

    #3694553
    Michael B
    BPL Member

    @mikebergy

    Also, rather than using dyneema cord for your bones, maybe consider grosgrain, as it may be easier to sew into the design. I assume you are sewing this all together? Or are you going no-sew route? I recommend the grosgrain (1/4” maybe) since it is not a huge weight penalty over dyneema cordage, will definitely meet your structural requirements, and as previously said, will be easier to incorporate into the tent. And cheaper, but if you are already in it almost 500$ for the DCF, what’s another 25-30$ for cordage?

    #3694556
    David Gardner
    BPL Member

    @gearmaker

    Locale: Northern California

    Oh no, no sewing! Nothing but bonding with Pressure-Sensitive Adhesive tape. It’s the preferred method. No holes to leak, seal, start tears, etc. And the bonding is stronger. The Dyneema cord will be adhered to the fabric with PSA tape at overlapping seams between panels, and where there is no seam by laying down the tape, then the cord, and then a strip of DCF fabric the same width as the tape to bond it in place.

    #3694647
    David Gardner
    BPL Member

    @gearmaker

    Locale: Northern California

    I don’t know were I came up with that 25 gram figure for an 18″ Fibraplex CF pole. Just weighed one and it’s actually 9.6 grams. Cool. Just “saved” an ounce.

    #3694843
    Sam Farrington
    BPL Member

    @scfhome

    Locale: Chocorua NH, USA

    It’s nice to see someone designing a 2 -Trekking Pole tent with a longer ridge pole.

    “In this version the trapezoidal head and foot vents are now triangular.”  Glad you said that, because was desperately looking for trapezoids in the later pix.

    Am also wondering about possible grain direction on DCF.  If only Henry Shires would give us a few tips, assuming that there is any grain direction.  What made me wonder is Diane’s recent comment in her OP that it was much more difficult for her to cut DCF diagonal to what would be the grain were it a woven fabric.

    “Oh no, no sewing!”  So am wondering how you plan to affix the zipper tape to the DCF.  If you do decide on zips, please note that the YKK water resistant ones are not only heavier, but take more oomph to pull with both hands.  Think they are called Uretek, or something like that.

    Warmlite still sells YKK #3 zips that are not waterproof, but weigh, without pulls, about .12 oz per running foot, compared to less durable #3 zips sold by Quest and others that are .1 oz per running foot.  The waterproof zips are heavier, due to the coating runnng all along the tape.  I prefer the Warmlite for  outer doors because they slide easier and are stronger, not to mention decades of performance in use.   For interior doors, the Quest are fine.  For interior and exterior, keeping zip length at a minimum saves significant weight.  Also, I think avoiding curved zip lines is a good deterrent to zip failure.  So agree that one straight line for a zip is best wherever possible.

    Not sure what Fibraplex sells for a ridge pole, but would recommend looking also at the slightly heavier Easton carbon poles sold by Quest.

    Looking at your design, wondered if a couple of carbon poles might be able to hold each of the low peaks at the ends better than stakes.  The poles would be short, forming triangles, and go into sleeves on each side of the lower peaks.  But if there were no floor, there would have to be a line to hold the base of the triangle constant.  Quest’s light Easton poles would do for these.  They run around .223 oz per running foot, not counting a couple of bent Ti elbows made from stakes, and if needed, ferrules.  They come in 18″ lengths, are priced reasonably, and are from a manufacturer with much experience with carbon shafts. .

    Just some thoughts that might be helpful.

    #3694868
    William Chilton
    BPL Member

    @williamc3

    Locale: Antakya

    Does PSA tape bond well to Dyneema cord? I don’t know that it doesn’t, but with DCF, the tape bonds to the mylar/PET outer film rather than the dyneema fibres.

    #3694934
    David Gardner
    BPL Member

    @gearmaker

    Locale: Northern California

    Sam: My sketches and models may not have been sufficiently clear. There is no “ridge pole” per se. The only poles are the two trekking poles, and two short CF tubes at the head and foot which were not shown previously, only described. I have now added them. The trekking poles and two short CF poles are black. All of the light colored lines represent corners/panel edges, at which locations the Dyneema cords will run. Better said, the light colored sticks are only cords, not poles. Here are hopefully a couple of better pictures:

    I have ordered 5mm diameter CF tubes for head and foot.

    Regarding “grain” in the DCF, I have come up with a cutting pattern that requires less than 9 yards of material and requires only two bonded seams for the entire shell:

    I’m hoping/thinking that grain won’t be an issue for the most part because the DCF will be continuous instead of cut and bonded. Hoping because it would sure make it easier to make!

    Thanks for the zipper tips. I didn’t know Warmlite sold zippers.

    William: I have no idea if the PSA tape bonds well to Dyneema cord. It’s one of the things I’ll be testing. But I’m not really relying on the tape to bond to the Dyneema much. Mostly relying on the cord being tightly trapped in a bond between tape and DCF:

    Not sure I need a second strip of tape at the seams, so I’ll test that too.

    #3695008
    Sam Farrington
    BPL Member

    @scfhome

    Locale: Chocorua NH, USA

    David,

    The second photo in your OP had what looked like a pole between the tops of the two trekking poles.  Thank you for clarifying, but have you considered a ridge pole, somewhat like the ones between the tops of the trekking poles in Lightheart Gear Tents and others, but only longer.  The carbon tubing for such a ridge pole could be less than half an ounce, plus one ferrule between two sections, two end tips, a bit of shock cord, and fixtures to join the ridge pole ends to the tops (or bottoms) of the trekking poles.  I’d be interested in knowing your thinking about that.

    Henry Shires seems to have mastered making a taut canopy out of an inelastic material.  I’m sure that took a lot of doing, because I’ve seen a lot of DCF canopies that were anything but taut; not wrinkling and sagging like nylon can, but not taut either.   From what I’ve seen, some catenary type of cut may be needed to keep even a DCF canopy taut; because the basic reason for such a cut is gravity slightly caving fabric surfaces, especially those that are closer to horizontal than vertical.

    You may find that a frame of some kind is needed to keep your canopy taut.  As suggested, it would involve three wickets; a trapezoidal one using the trekking poles plus a ridge pole, and two outwardly canted triangular ones ones at each end.  A good example of the end wickets would be Henry’s “pitchlock” arrangements, but other designs have been used, some as simple as an awning at each end that protects the venting underneath, but also pulls the fabric tent walls uniformly very tight.   Basically, it is similar to a TarpTent Moment design, only a wicket shape rather than a hoop is used to support the two taller peaks.  For some reason, some European designers, like Vaude and Terra Nova, use an approach more like yours to tension the canopy at both ends.  Possibly to save weight.  But you might want to look at their Moment-shaped tents for some ideas.  My bet is that the need for less pegs with such a framework can more than make up for its weight.

    Warmlite’s zips are YKK, just a cut above those from Quest et al.

    #3695048
    William Chilton
    BPL Member

    @williamc3

    Locale: Antakya

    I have no idea if the PSA tape bonds well to Dyneema cord. It’s one of the things I’ll be testing. But I’m not really relying on the tape to bond to the Dyneema much. Mostly relying on the cord being tightly trapped in a bond between tape and DCF.

    I was wondering if the tape doesn’t stick to the Dyneema cord then the cord will slip between the layers of tape an so won’t hold the DCF panels as taut as you might want them to.

Viewing 25 posts - 1 through 25 (of 35 total)
  • You must be logged in to reply to this topic.
Forum Posting

A Membership is required to post in the forums. Login or become a member to post in the member forums!

Get the Newsletter

Get our free Handbook and Receive our weekly newsletter to see what's new at Backpacking Light!

Gear Research & Discovery Tools


Loading...