Started this discussion in the Trek Lite forum – maybe someone here might be interested to create a geodesic UL tent.
I’m still in the fjells, so apologies for (very) late replies.
_____
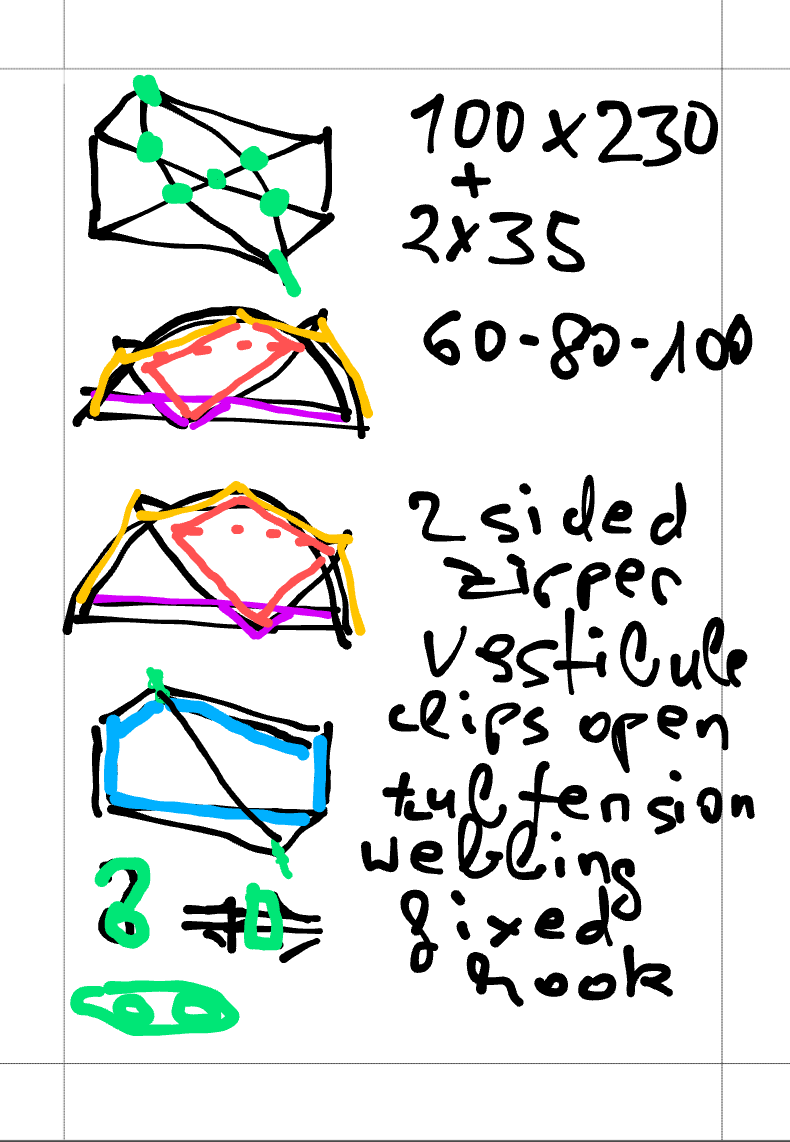 I’ve tried to combine my old Pathfinder with an X-Dome for a long time. With another heavy storm rattling and flapping the X-Dome tonight and keeping me awake, I found one possible solution with the pole crossing pattern of my much bigger Wechsel Conqueror.
Take the lightweight materials (carbon, SilPoly, waterproof zipper, magnets) and the asymmetrical design of the X-Dome and apply them to the crossing pole pattern of the Conqueror:
Start with a simple cross 100×230.
Slip the ends of the cross poles through 40 sleeves for upward stability.
Fix the end into grommet with ladderlock.
Add two curved sides for crosspoints and strength. Make them each stand out 35 at the sides for inner space / vestibule.
Make the curved sides asymmetrical, starting 1/3 lower left and ending 2/3 higher right on the other side.
Symmetrical would be easier and stronger but: small door and wasted vestibule space. Asymmetrical raises one corner for better access / storage and minimizes waste on the lower side.
Fix the 5 crosspoints with a clip that is glued to the under pole segment and hooks in the upper crossing pole. Stabilizes not just the poles but also prevents the fly clips from slipping down the poles (better tension).
All double clips are fitted with 5 webbing and ladderlock towards fly and 10 rope loop for guy line. The ladderlock allows tensioning the fly, the guyline loop holds the pole frame in place, not pulls at the fly, but still in the strongest connection point to the fly.
Fix the curved pole ends with a double grommet with ladderlock at the bottom. The pole ends push against each other inside the grommet further stabilizing themselves, the sides of the door, and the tent floor.
Add a webbing seam with ladderlock from one double grommet to the other underneath the tent floor. Further tensions the poles and the tent floor.
Add two waterproof zippers as door between the curved poles starting at the pointy bottom. Zippers open from bottom for entry but has option to additionally open from top as window.
Zippers open rainproof up to lower left and higher right curved pole. Not rainproof because over inner tent, zippers can go all the way to top of the fly when dry for easier entry or skygazers.
Add a clip to the low point of the bottom fly triangle underneath the higher curve (or both if wanted) to unclip the triangle below the higher curve when zipper open. Further opens up vestibule space to store gear. For panorama view both lower triangles could be unclipped (both zippers open) to completely open the side of the tent.
Put same door setup on both sides of the tent to open both sides (windward, view, ventilation).
Add zippered triangles to extend door as rain porch (two needed, one each side of the door).
Fly clips at all crosspoints plus highest curve of side poles to pull out head room. 60 low curve 80 high curve 100 top cross.
Add one more clip on the middle crossed poles below high curve and above low curve to pull tight the corners of the tent.
Add one clip each along the 2×2 door zippers so fly does not sag when door open.
All fly clips 5 webbing with ladderlock integrated into the pole clips above.
Fly pitches 15+ (even 20?) high above ground for ventilation and keeping zippers out of the mud. Door also has pointy bottom flap triangle, zipper only starts at 15+ against mud.
To close gap add flaps at the bottom that close with magnets at the bottom end around the poles when down, and fold up inside holding with second farther inside magnet half.
Tent tub can be 5 max as no spatter (flaps) and tensioned at all 6 corners (no flopping down). Also nice view all around the tent when lying down and nature comes calling.
Add inside tent with one side vestibule (straight), the other side only zipper into full corner for non-rain exit.
If 35 deep vestibule is not enough for your preference, move inner tent further inside on the high curve side (more vestibule but narrower foot inside). However my idea is to keep most of the gear and boots inside (I’ve already walked a whole day on a wet snail in my boots thinking I broke a blister I did not have). Vestibule I only use for dripping wet gear – rest goes inside.
Ground floor goes all the way into vestibule, only 5 tent tub follows inner tent. Vestibule still wet from rain and gear but not muddy, thus easier to dry gear and use clean vestibule.
Cons I’ve decided to accept:
More weight (1.3-1.5kg? current geodesic all beyond +2kg) for more strength, tension, less windy, rain spatter, flapping noise, but same space (guessed, not calculated) and snow worthy (true 4 season).
Weaker and more complex (fly cut) asymmetrical side poles for larger door and less vestibule waste. Also raises one side headroom, 60-80 instead of 70-70.
Less pole tension with carbon but also less weight than alu. Unless that changes and alu gets lighter. Titanium poles anyone?
Double-Wall for different inner tents (size, form, mesh, solid, breathable). If only for me I’d go with Single and just net for doors and flaps – plenty ventilation and sleep system takes care of warmth.
Two-zipper door (left and right of door) but still one-handed opening possible (one after the other). Putting the door on the curved side did not work for me (wider but lower, vertical entrance instead of side entrance).
Narrow double pole point at door could be stepped on (break poles?) but I find I need wider space for my ass and shoulders (sitting down backwards into the inner tent) than my 41 boots on the ground.
If anyone wants to build such a tent (myog or commercial) I claim no copyrights for any of the ideas – would just be happy to see a non-claustrophobic geodesic tent under 3kg : )
Plus I’d be the first customer : D
and apologies for the finger drawing …
_____
For me geodesic strength is not about better securing my X-Dome – think I’ve done on that all I can and it did survive last night’s 76km/h (this time full frontal winds and heavy rains, no ridge or bushes to break the force of the storm), so I’m quite happy with that.
The strength advantages of geodesic for me are:
– it is fully usable up to high 50ies km/h winds without any stakes or guylines or trekking poles
– it is fully tensioned all around without any noisy flapping fly or inner parts (why I spent another sleepless night thinking up new designs)
– it is storm worthy beyond 100km/h when ‘standard’ staked and guylined (no extras)
Of course that comes with a price of higher weight or smaller space, so above design was sort of ‘take the best from both worlds and see if you can make it fit’
Hope someone finds a way – would be nice to see a geodesic 1+ UL tent in the future : )
_____
Not necessarily – the fly and inner would be roundabout the same material as X-Dome (400g + 300g), twice the amount of poles (+350g?), double the zippers and clips (100g to 250g?) – that’s 1.3kg before having Dan fine-tuning material use, shaving off grams : D
The second door and the special flaps or additional door triangles for rain porch I’d take as personal comfort and winter penalty and we’re at ~1.6kg for a full geodesic 1+ … less for single-wall with the flaps reducing need for two short inner walls and all the clipping and webbing to put it in place.
My design might be a compromise though, but since I’m not designer and myog-challenged, that’s to be expected : D