Topic

Cat curve Questions


Forum Posting

A Membership is required to post in the forums. Login or become a member to post in the member forums!

Home Forums Gear Forums Make Your Own Gear Cat curve Questions

Viewing 20 posts - 1 through 20 (of 20 total)
  • Author
    Posts
  • #3572170
    Lance
    Spectator

    @geaulite-2

    Hey everyone,

    I just have a quick question before I attempt my cat curve on the ridge line of my tent. I’m planning on using one of the spreadsheets and just plotting the points directly onto the fabric. I’m thinking about doing either a 2in or 3in curve. Is that too little for a ridge line that is 8′ 10″ long?

    My main question: If the head end of the tent is 48 inches high and the foot end is 42 inches high, would I need to take this into account when doing the curve or does it not matter? Would I just plot the points as if both ends are the same height? 

    #3572198
    Jerry Adams
    BPL Member

    @retiredjerry

    Locale: Oregon and Washington

    I have done that on a similar tent but it was a while ago so I forget specifics.  2 or 3 inches treating the two ends the same makes sense.

    If you do too much cat curve you lose headroom inside.  Too little and it flaps.

    I assume you’re doing a flat felled seam on the ridge.  You could just do the first row of stitches, then make it a flat felled seam for a few inches on both ends.  Make the rest of the tent.  Set it up.  See what amount of cat curve you need – just pinch out the amount that seems right and measure it to see what you need, like 2 or 3 inches.  Then use the spread sheet to measure the sideways distance for every 2 or 3 inches.  Finish the flat felled seam.

    If you make the tent with a flat felled seam and some cat curve deflection (or none – just a straight seam) and you find there’s not enough cat curve, I’ve gone back and added more cat curve.  Measure from the spreadsheet.  Sew the first row of stitches of the new flat felled seam.  I use 1/2 inch of fabric for my flat felled seam.  Where the fabric is more than 1/2 inch (the original flat felled seam) I cut it off, then finish the flat felled seam.

    I don’t know if any of that makes sense, probably better to just use 2 or 3 inches and call it good.

    #3572202
    Lance
    Spectator

    @geaulite-2

    Thanks Jerry! I’m just going to try 2 inches I think since I’m wanting some headroom and see what happpens.

    #3572219
    Brook / MtGL
    BPL Member

    @brookqwr

    I thought theoretically the curves should be different between a string hanging to 48/42 pods and the other hanging to 48/48, but the difference should be little that can be ignored.

    Someone also mentioned before an arc can be used that make things easier instead of a real CAT line. There are so many points that contributes to the overall tautness of a pitch.

    #3572267
    R
    Spectator

    @autox

    In theory, there’s a difference. In practice, for a tarp, it doesn’t really matter. A suspension bridge, yes; tarp, not so much.

    If you feel like it, you could play around with the software to get a curve the same height on both ends, but with the length you want between the uneven heights. Basically, cut one end short to get the lower height.

    I think 2″ – 3″ depth is about right.

    You might also see what there is to be seen here:

    site://backpackinglight.com catenary


    #3572322
    Jerry Adams
    BPL Member

    @retiredjerry

    Locale: Oregon and Washington

    2 inches sounds good, it is possible to go back and redo it with more cat deflection if it’s too flappy.

    I think Rene is correct, theoretically there’s a difference but not important for a tarp.  Fabric stretches.  You should try to be smooth though, if going along the curve, it deviates at one spot, you’ll notice that.

    Before I used Roger’s spreadsheet, I used a string that I suspended but there were places along the curve that were out of wack and when pitched, it was a little uneven.  Mostly cosmetic.

    #3572493
    Sam Farrington
    BPL Member

    @scfhome

    Locale: Chocorua NH, USA

    Thanks – Glad your brought this up as there has not been a thread for a while.
    Someone once posted that a dome tent pole or flexible tube could be marked and bent to the same length as the seam (with the desired deflection), secured with cord connecting the tube ends, and the parabolic line traced from the flexed tube onto the fabric, would work without having to use a spreadsheet. An ordinary parabola has a tighter radius or bend near the center of the arch, while a circle has a constant radius. Haven’t tried this yet, but intend to.

    Also, have noted the cat cuts on market tents that run more vertical than horizontal, like seams on the sides of a mid, appear to have more of a cat cut near the top (often a peak on the tent) than down near the bottom. Someone said just use the spread sheet, even though the seam was not at or close to horizontal. Not sure that solves the problem, especially when trying for a taut tent canopy. A hoop flexed to a parabola longer than the seam might duplicate the store tents, but I’ve no idea how to go about it.

    The cat cuts appear to compensate for two things: The greater bias or diagonal stretch on a woven fabric, and gravity. On an unwoven Cuben or DCF fabric there is no bias stretch, but have noted that a horizontally suspended sheet of cuben will sink at its center no matter how tightly the corners are pulled out. So I’m missing something, but intuition says that due to gravity, the cat cut deflection on the more horizontal panel would have to be greater than on one that is more vertical.

    Have been reading cat cut threads on MYOG for years, but am still navigating these mysteries. The math folks seem to have a lot of formulas, but they are often beyond me. If anyone can explain how to duplicate the cat cuts on the store tents, would much appreciate it. (Unless I’m just imagining the variations and any parabola the length of the seam will do) Thanks.

    #3572538
    Brook / MtGL
    BPL Member

    @brookqwr

    The CAT still  remains mysterious for years? I agreed. :-)

    CAT cut is science. It depends on the fabric type, the layout direction of fabric pieces, and the overall tent/shelter structure. For example, the situation for the side lines of a mid is definately different than the ridge of an A-frame tarp.

    Also, if several CATs could be applied in one construction, they are impacting each other, meaning more cut in one cat line could allow less cut in another.

    Cat is also art. Some cottage owners just like to cut in that way that you can even identify the brand by merely observing the curve. And, I think less cat cut for the same taut pitch could be achieved with more setup experience. Last but not least, more wind requires more cat cut. So overall, it’s the tent maker’s decision.

    #3572545
    Jerry Adams
    BPL Member

    @retiredjerry

    Locale: Oregon and Washington

    edges along the grain of fabric don’t need cat curve, edges along bias do need cat curve

    probably exceptions to all rules : )

    #3572616
    Ben H.
    BPL Member

    @bzhayes

    Locale: No. Alabama

    I agree with the above comments that it probably won’t matter….but if you go to the wiki article on catenary curves (https://en.wikipedia.org/wiki/Catenary) you will see an image of what the curve should look like:

    You can see the minima is shifted towards the lower support.  If getting the curve exactly right appeals to you, I could help you get the actual curve.  Let me know.  It would take a bit of finagling but I enjoy helping people with their DIY projects.


    #3572665
    Sam Farrington
    BPL Member

    @scfhome

    Locale: Chocorua NH, USA

    Sounds like math will not produce the cat cuts for my vestibules, but thanks, Ben, for the the Wiki link, and ” The catenary and parabola equations are respectively, y = cosh(x) and y =x2″. At least it does seem that a parabola and a catenary are close enough for working with nylon, what with its elasticity.

    Looking at market tents, it appears that the grains of the fabric usually run either vertical or horizontal, like on a ridge or bottom edge of a vestibule, and that the latter still require some cat cut on the bottom to keep a taut edge. For an arch-shaped panel, like on a simple dome tent, the grain appears to run along the base of the arch. Curved panels appear the follow this approach, no matter how they are situated on a tent.

    One possible approach for vestibules would be to build a more complex frame on which to lay and define the shapes of any fabric panels that will need a cat cut at any seam. Up till now, I’ve just laid the fabric over the main frame, tailored it taut with pins, drawn the vestibule seam lines on the panels, and left it at that. But that approach has a lot of trial and error.

    Might try to use soft wooden slats (if that terms is still tolerable), and lay them on the main frame from the peak to the floor along the vestibule seam lines, tailor and pin the vestibule seams until taut over the slats, and draw the seam lines at the edges of the slats. If the slats are just a little flexible, the result might be a more taut vestibule. Since the tent fabric will be very thin, slightly thicker fabrics would be needed for the tailoring, and cutting the forms for the panels, but that is no problem with all the old silnylon lying around.

    #3572669
    Paul McLaughlin
    BPL Member

    @paul-1

    Well, way back in the stone age – er, I mean the 1970`s – I sewed a few tents and did my catenary cuts with siple arcs, no fancy math or fancy layout. Works just fine. Given the fact that either way it is a pretty slight curve, and the stretch in the fabric, and the imprecision involved in both cutting and sewing, no surprise that close is good enough. I once checked a curve generated by a cat curve spreadsheet against an arc an found no deviation greater than about an eight of an inch or so, using a curve in both cases that deviated something like 2″ from the straight line over 7 feet – an amount I have found to be about right, though it varies depending on the strech of the fabric. So I would just use an arc – assuming you have room to swing that big of a radius.

    And I am of the opinion that the need for cat cut is regardless of fabric grain, but seams on the bias may need more than seams with the grain in the same fabric. Some fabrics have a greater difference in strecth from the grain to the bias, so it requires some experimentation to get it right.

    #3572781
    Sam Farrington
    BPL Member

    @scfhome

    Locale: Chocorua NH, USA

    Paul,
    You are a far better tailor than I. There have been problems getting the arch right to assure a taut pitch. One early attempt was a failure altogether, as the front peak to ground entry beaks could not be set so the zipper joining them would produce a taut vestibule when closed. This was a pretty common use of a cat cut, where the front beaks are joined with a zip to provide a protected entry when closed, and was memorialized on Dan Durston’s thread about his mod of an REI tent fly.  A picture of an earlier mod of a Eureka Crescent may help to show what I’m talking about. Although the beaks did not come all the way to the ground on that one, making it necessary to run a guyline to the ground. However, the failed later attempt to get the cut right, despite umpteen attempts at pinning and repinning, deterred me from simple ‘two beaks to the ground’ vestibules:

    Note that some cat cuts had to be made on the bottom hems of the beaks as well to insure a taut vestibule (of sorts).

    Later, I tried to cat cut the rear net inner of another mod, which turned out OK, but had to plant a tiny carbon fiber tube a few inches long at the bottom of the cat cut to make the inner taut – no zips as there was no rear entry on the tent. This photo may show the result, or read the whole thread to get a fuller picture of what was done:
    https://backpackinglight.com/forums/topic/81307

    This actually turned out OK, because the severe cat cut left more space between the inner net and the fly (not pictured, but see the thread), where space is generally a good thing.

    With such challenges, the latest design does not attempt to put a zip in a cat cut seam. Instead the zip is straight, on a flat surface, and the cat cuts will be on either side of the door panel, as in this model pictured (without cat cuts) on a recent post:

    This was about as simple as could be envisioned for a cat cut tending toward vertical, not at all like a ridge seam that tends toward horizontal.  At this point, I’m inclined to just use some old small tubing cut to the length of the seam and flexed to a slight parabola with a piece of cord as described earlier on this thread to around a 2-3″ deflection. The arc will be traced onto the panels just inside the straight seam line, and I’ll see what happens when it’s pinned up. If it comes out OK, the cat cut will be transferred to the actual tent fabric panels. You know, looking at the first photo of a Tarp Tent Strato Li currently on the BPL home page, I think cat cuts for taut canopies can be something of a challenge to even the far more experienced, but should quickly add that the TT Moment I bought when they first came out was as taut as could be imagined.  Maybe it was the pitch in the tent shown on the home page.

    #3572882
    Paul McLaughlin
    BPL Member

    @paul-1

    Sam, I doubt i am a better tailor than you. The situation you describe is rather more complex than just a simple catenary curve on an otherwise straight seam. I should backtrack and clarify. If what you are sewing is theoretically a simple geometric shape, with all planar faces, so that all vertices where two faces meet are theoretical straight lines, then simple arcs work fine in place of more complex curves for the purposes of a catenary cut.

    What you are dealing with is far from that, as some of the edges of your pieces are curves even in theory while others are theoretically straight lines. Thus you step into the dark and nebulous realm of patterning a curved tensile structure and leave behind the sunny simple world of the a-frame and pyramid. Since I know nothing of the math involved in analyzing such shapes, i would rely on what I learned in high school drafting and good old trial and error.

    The only fully curvrd tent that i have sewn was a 3-pole dome. I set up the poles, anchored at the bottom to the desried floor layout, and lasd together at the top as desired. I ran tape all along the lenght of the poles and marked them every two or three inches. Then i measured  from pole to pole at the marks, starting atthebottom and working upward. A lot of laboriuos layout got those measurements transferred to muslin for a mockup test, and so on from there. You may be able to utilize something of that method if that is different from how you have gone about it thus far. Patterning of this nature is very tricky, and the factors that you need to take into account are not obvious, and every fabric behaves differently just to make it harder.

    It might also be useful to use a reference line, up the center of your panel, as a way to deal with asymmetry in your shape, since measurements from point a on one side to point b on the other do not tell the whole story if the piece is asymmetrical – and yours are.

    Good luck!

    #3573078
    Sam Farrington
    BPL Member

    @scfhome

    Locale: Chocorua NH, USA

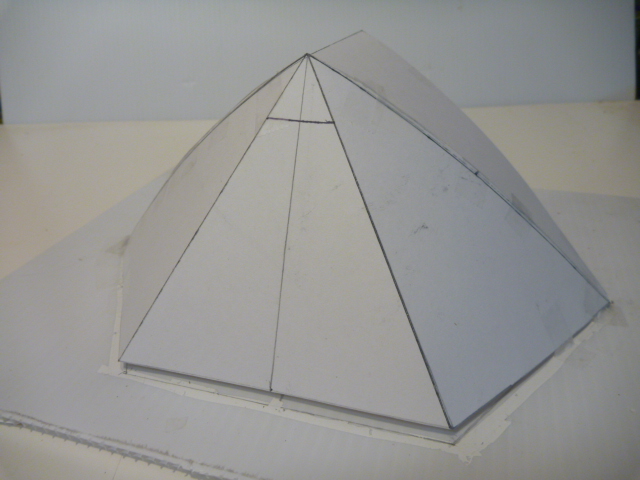
    Thank you, Paul. Your comments are helpful, and provide more insight.  From these forums, I think a frame can be constructed to define the shape of many curved fabric panels on a tent that are not catenary curves.  The issue I’m working on now involves a direct line between two points, like the ridge of a tarp, but in this case running closer to vertical, being a line from the peak of a tent to a stake point on a vestibule.  This was shown in an image of a model in my previous post on this thread, but I’ll repost it here so readers can more conveniently scroll between the photo and the text of this post:

    Even though fabric panels for much of the model would have curved edges, they are not catenary curves, and can be defined by building the frame on which fabric can be tailored, pinned and marked.  However, the vestibule seams on each side of the door panel in the model are suspended between two points, and are unsupported, running from the peak down to a stake point at the base of the triangle that is the door panel.  So a catenary cut is needed for a taut canopy. Due to the many pin holes created by tailoring, I think it is better to tailor, pin and mark the panels from left over 30D silnylon, and once sure they will yield taut vestibules on the construction frame, trim them to pattern pieces for the actual tent fabric.

    A couple ways to create the catenary lines and mark them on the 30D fabric would involve using old SMC 26″ tent pole sections for MYOG.  The length of each seam line would be doubled, and a double length of sectioned tubing flexed to a about a 2″ deflection at center, secured with cord using curtain hanging pins and a slip knot, then adjusted so the maximum deflection on each half of the pole is about 1″.  This will create a parabolic shape, curved more at the center of the arc than toward the ends.  Either half of the flexed pole could then be used to trace and mark the catenary lines inside the straight lines on 30D fabric panels, initially for a one inch maximum deflection on each side of the seam.  The center of the flexed pole would be placed at the peak end of the line to assure that the curve of the catenary cut is greater at the higher end of the seam toward the peak.  If that doesn’t work, a second approach would be to just flex a pole that is slightly over the length of the straight seam line to produce a symmetrical catenary arc for each seam.  Either way, the panels would then be pinned up to the frame and the floor using the catenary cut lines as a guide.   If the result is a taut vestibule, the seam allowance would be trimmed off the 30D panels, and they would be used as pattern pieces to create new panels, without pin holes, on lighter 15D sil/PU nylon for the actual sewn construction.

    The above could wind up being, “laborious,” as you stated, but on reflection, would produce catenary vestibule seams that would be simpler to create without marking and connecting numerous points for the seamlines, which would number four, two on each vestibule.   I’d be interested to know if readers think this is a feasible approach.

    #3573101
    Paul McLaughlin
    BPL Member

    @paul-1

    I’d be inclined toward your second approach.

    #3573169
    Sam Farrington
    BPL Member

    @scfhome

    Locale: Chocorua NH, USA

    Thanks, Paul.  Will post results when I get into it.

    #3573244
    Ben H.
    BPL Member

    @bzhayes

    Locale: No. Alabama

    Ok, I know everyone is in agreement this isn’t necessary but this kept picking at my brain and I’m annoyed to admit I couldn’t get a closed form solution to the catenary curve with unequal pole height.  I solved it numerically and uploaded the solution here:

    https://docs.google.com/spreadsheets/d/1hmdB3TquXqKOzo-HX6Pj3GMtzn773xHNagZ_rhUefJY/edit?usp=sharing

    It is only for the problem presented in the OP: 106 inch ridgeline that goes up in the air 6 inches for a maximum deflection of 2 or 3 inches.  Numerically the solution was very unstable (too many exponents) but I think I got a the solution to an accurate enough answer.  I know its a big waste of time, but if someone wants a different set of numbers run, let me know.

    #3573411
    Lance
    Spectator

    @geaulite-2

    Nice work Ben! Sorry to have caused you all the extra work.

    #3573421
    Jerry Adams
    BPL Member

    @retiredjerry

    Locale: Oregon and Washington

    Interesting thread, thanks

    Yeah, big difference between pyramid/A frame tent and one of these dome tents.  Those are too complicated.  I wonder how the professionals do it.

    I’ve used a string that was pulled down by gravity, against a rigid piece like cardboard, and then marked on the cardboard where the curve is.  Then cut out and use that as a pattern.

Viewing 20 posts - 1 through 20 (of 20 total)
  • You must be logged in to reply to this topic.
Forum Posting

A Membership is required to post in the forums. Login or become a member to post in the member forums!

Get the Newsletter

Get our free Handbook and Receive our weekly newsletter to see what's new at Backpacking Light!

Gear Research & Discovery Tools


Loading...