Topic

Box foot tarp


Forum Posting

A Membership is required to post in the forums. Login or become a member to post in the member forums!

Home Forums Gear Forums Make Your Own Gear Box foot tarp

Viewing 9 posts - 1 through 9 (of 9 total)
  • Author
    Posts
  • #3429327
    R
    Spectator

    @autox

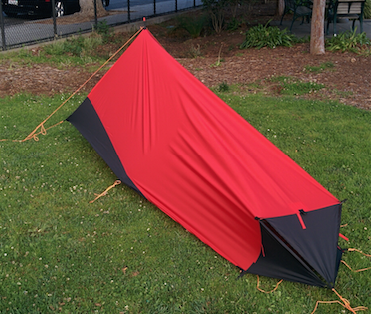
    I came up w/ a new (I think?) way to protect the foot end of a tarp.

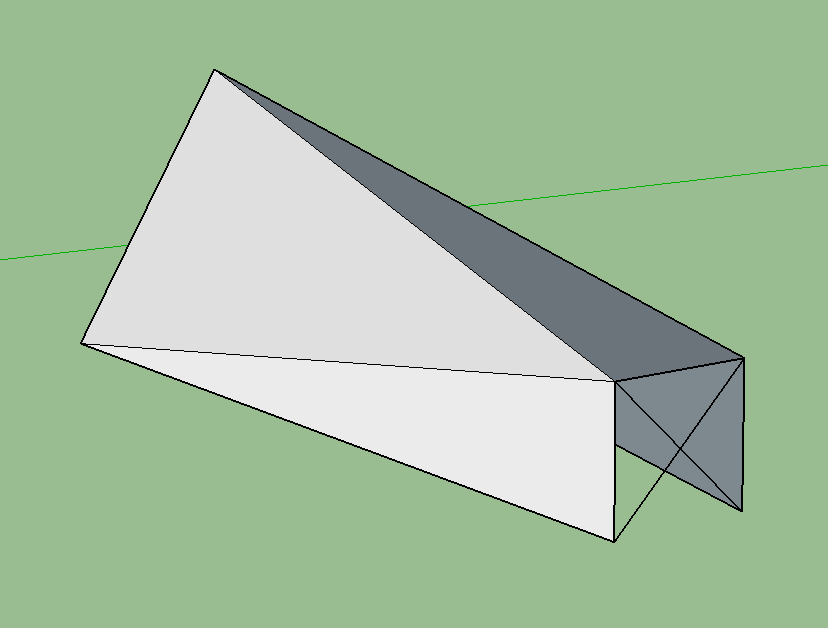
    There are two 30″ poles in an X configuration in the foot.  The black end of the tarp is actually 3 separate triangular panels.  This does leave small gaps for weather to get through, but it also means the panels can be rolled up leaving you with a flat tarp rather than a shaped tarp.

    Since the poles are in an X, you can’t get your feet past them, but there’s not much room past them anyway – the panels slope around 45d. But with out the panels, you wouldn’t want to be that close to the foot.  So not only does this help keep your feet dry, it also helps keep your head dry.

    The box is around 18″ square – adequate for my size 12 feet plus a NeoAir with room to spare.  Excluding the panels, the tarp is 9′ long, 7′ wide at the head, and only 4′ wide at the foot. A square is much closer to a circle than an A-frame, so it takes less fabric to wrap around you.  And this only requires a single stake at the end.  Since it frees your other trekking pole, you could use them in an A frame at the head and only require 2 stakes, total.

    I was not expecting the sides of the foot box to bow inward like that.  This could be due to bias stretch in the triangular panel – the roof doesn’t do that.  As the creases indicate, tension isn’t ideal, and it creates a flat-ish roof at the foot, which is no good for snow. I suppose you could skew the X to create a more trapezoidal box w/ a narrower roof if snow loading is a concern. Velcro flaps could be added to seal the panel edges to each other.

    Hard to see in this photo the apex of the foot panels is 6″ off the ground to improve air flow, and there are 3″ sleeves for the bottom end of the poles, lifting the side panels off the ground, again for ventilation.  So far I’ve only spent one night under it with ridiculously mild conditions, so not much to report on there.

    As for weight, I used tubular carbon kite spars for the poles which came in at 1.5oz with ferrules, and the foot panels add about 1/3 sq. yd. I made this from some scrap 2.4osy ripstop and the total less cord/stakes is an even pound.  Using Rockywoods’ 0.7osy would drop ~8oz.

    Questions and comments welcome.

    #3429371
    Matthew / BPL
    Moderator

    @matthewkphx

    I read that three times and looked carefully at the photo but I totally don’t get it. Can you post more photos, perhaps including a shot from inside?

    #3429448
    Jordo _99
    BPL Member

    @jordo_99

    Locale: Nebraska

    Rene,

    This is a pretty interesting idea and I have a few suggestions that may help with the issues you mentioned:

    1. Change the X poles to a single arch pole…my math shows you’re using (2) 25″ poles to make that X and an arch pole would be 54″ — so weight should be a wash and you end up with a stronger support. A pole sleeve would be ideal, but could easily be done with just a few loops to hold it in place and a grommet at each end for the pole tips to slip into. I’d imagine that this would also give your tent a more uniform pitch as well. — The SD Tentsegrity has a pole that does exactly what I’m talking about: https://www.rei.com/media/product/879904
    2. Change the top/middle triangle at the footbox to a rectangle…the two corners of the rectangle can wrap around the bottom of the triangles and connect to each other, providing better coverage (rather than having two very small slit-like openings) from rain. Can still guy out the rectangle from the middle of the side, where the tip of a triangle would be.

    Anyway, that’s just my thoughts. Very cool idea you’ve got there.

    #3429505
    R
    Spectator

    @autox

    Matthew,

    Easiest for me is to whip up a sketch, this evening.  In the mean time – if you were inside it looking towards the foot, you’d see two straight poles in an X shape.  Their tips are attached where the red and black meet, holding out the corners.  And to be clear, where ever I mention black panels, I’m talking about the foot, not the bits out on the sides near the head.

    Jordo,

    Thanks for the feed back.  Always helpful to see things through fresh eyes.

    I think I was mentally working w/ straight carbon poles the whole time, and hadn’t considered a hoop.  I’m familiar w/ the Tensegrity – it’s a 2 person so has a wider arc than I’d need.  If I want to use tubular poles, I’d have to go with pre-bent aluminum, or elbows.  All of this is heavier than what I have now.  However, I could make a hoop with bowed flat carbon spars, like what ZPacks uses for their frames.  That could be weight competitive.

    A mod I might try to improve the current tarp is to put a tension strap across the bottom of the foot.  Right now the only thing pulling the bottom ends of the poles together is the tension along the bottom edge of the tarp.  Connecting them to each other with an adjustable strap would put a lot more tension around the box, straighten out the sides, and possibly flatten out all those creases.  Only downside there besides a few grams for the strap is increasing the compressive load on the poles.

    I see what you’re getting at w/ your second suggestion.  I could also skip the triangular panels entirely and move the loops from their tips to the foot-edge of the original tarp, then move the poles towards the head.  The triangles would form under tension when pitched and the slack between them would form gutters.  This would move my head closer to the front, but if that’s a concern I could make the tarp longer.

    Cheers!

    #3429513
    Monte Masterson
    BPL Member

    @septimius

    Locale: Southern Indiana

    I like what you’re trying to do. I’d forget the X and the triangular material that extends to the foot end tie out. You can’t get your feet into it anyway, so it’s just wasted space. The X is of course what’s causing it to suck in on the sides. Instead maybe just go with a flat face on the square foot and sew a sleeve to insert a horizontal .246″ diameter carbon pole on top. An 18″ section weighs .5 oz. Then take another 20″ pole and attach it vertically next to the horizontal pole (In the middle) by sewing a simple pocket for the top of the pole to fit into to form a T. Tie it all out with a line and stake and I think you’d get a much more taught pitch without the sides sucking in. And you’d only be using 38″ of carbon pole (1.1 oz). Being only 18″ wide I don’t think it would teeter side to side. You’d just have to stake out the foot corners properly to get it balanced.

    Transitioning from square at foot to triangle at head might take a lot of experimenting with mock up Tyvek to get it just right. I like the fact that you’re thinking in a novel and revolutionary way instead of just reinventing the wheel like so many designers do nowadays.

    #3429538
    R
    Spectator

    @autox

    Hey Monte,

    Your suggestions sound like they’d work, but I’d lose 2 features with them.  The flat face at the foot would make it a shaped tarp; what I have opens up in to a flat tarp, which has more flexible pitching options.  I’m often camping in rocky soil, so I’d like to stick w/ a single stake at the foot, rather than needing corner stakes.

    To transition from a square end to a triangular end, fold a W length wise on a sheet of paper (draw a W and then crease the lines).  The 2 bottom points of the W should be at even intervals on one end of the paper.  The 3 top points should be in the corners and middle at the other end.  Make a tunnel out of it and you’ll have a box at one end and an A frame at the other w/ a triangular roof and faceted sides composed of 2 more triangles, each.  Putting seams or tape in the tarp where the creases are on the paper might improve the pitch at the expense of a bit more weight and effort.

    Thanks for the feed back!

    #3429803
    R
    Spectator

    @autox

    Matthew,  sketch as promised.  Pardon the delay.

    Rear panels omitted, showing poles in X arrangement.

    #3429811
    Franco Darioli
    Spectator

    @franco

    Locale: Gauche, CU.

    Rene,

    Luxe Outdoor used the X end support with the X Rocket (hence the name…)

    The previous version (the Rocket) had just one strut (A frame style) with the X the footbox gave the sides a bit more width.


    #3429876
    R
    Spectator

    @autox

    Interesting.

    They use it to support the roof and provide a box-section at the foot, but they didn’t take the poles out to the lower corners – they still need corner stakes.  I think they leave the poles in the tent when packed, so maybe the length to reach the corners was their concern.

    Thanks for the link.

Viewing 9 posts - 1 through 9 (of 9 total)
  • You must be logged in to reply to this topic.
Forum Posting

A Membership is required to post in the forums. Login or become a member to post in the member forums!

Get the Newsletter

Get our free Handbook and Receive our weekly newsletter to see what's new at Backpacking Light!

Gear Research & Discovery Tools


Loading...